ansible1.7版本
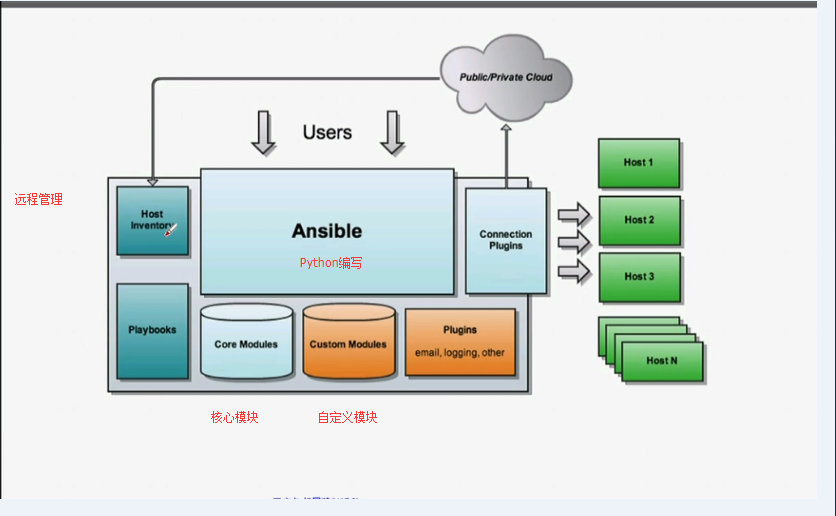
ansible核心组件
ansible core
host iventory
core modules
custom modules
playbook(yaml,jinjia2)
connect plugin
ansible的特性:
基于Python语言实现,由paramiko,PyYAML和jinjia2三个关键模块
部署简单,agentless
默认使用ssh协议
(1) 基于秘钥认证方式
(2)在inventory文件中配置账号密码
主从模式:
master:ansible,ssh client
slave:ssh server
支持自定义模块:支持各种编程语言
支持Playbook
基于“模块”完成各种“任务”
yum list all *ansible*
yum info ansible
yum install ansible -y
rpm -ql ansible
安装依赖于epel源
配置文件:/etc/ansible/ansible.cfg
invertory:/etc/ansible/hosts
ls /etc/ansible
ansible.cfg hosts roles
ansible.cfg 是 Ansible 工具的配置文件;
hosts 用来配置被管理的机器;
roles 是一个目录,playbook 将使用它
1、Ansible 管理机与被管理机做秘钥认证
ssh-keygen # 生成秘钥
ssh-copy-id -i /root/.ssh/id_rsa.pub "-p 22 root@ip地址" # 将公钥写入被管理机
ssh root@ip地址 'ntpdate 另一个ip地址' #同步时间和另一个服务器时间相同。
2、hosts 文件添加被管理机
vim /etc/ansible/hosts
[Client]
192.168.163.2
192.168.163.3
[webservers]
192.168.163.2
[dbservers]
192.168.163.3
如何查看模块帮助;
man ansible-doc
ansible-doc -l 查看ansible支持的所有的模块。
ansible-doc -s MODULE_NAME 查看某些模块如何使用的。
ansible-doc -s yum 查看yum如何使用
ansible-doc -s command
ansible命令应用基础:
语法:ansible <host-pattern> [-f forks] [-m module_name] [-a args]
host-pattern:对哪些主机生效。
-f forks:一批处理多少主机,启动的并发线程数。
-m module_name:要使用的模块。
-a args:模块特有的参数。
一.常见模块:
ansible-doc -s MODULE_NAME

1) command:命令模块,默认模块,用于远程执行命令
ansible all -a 'data'
ansible 192.168.133.2 -m command -a 'data'    #出现success表示成功。
192.168.12.129 | SUCCESS |rc=0 >>
TUE JUN 23 16:56:41 CST 2018

ansible webservers -m command -a 'data'
ansible all -m command -a 'data'
ansible 192.168.133.2 -m command -a 'tail -2 /etc/passwd'

2)

cron:
    state:
        present:安装
        absent:移除

ansible-doc -s cron:查看如何使用参数,该参数-a后面添加(minute,job,name皆为参数的内容。)
比如在webservers集群中写个定时计划任务:每隔10分钟输出hello

ansible webservers -m cron -a 'minute="*/10" job="/bin/echo hello" name="test cron job"'
ansible webservers -a 'crontab -l'  查看同步任务列表
ansible webservers -m cron -a 'minute="*/10" job="/bin/echo hello" name="test cron job" state=absent'
移除同步任务。默认没有state是安装。

3)user
name=:指明创建用户的名字。
ansible-doc -s user
ansible all -m user -a 'name="user"'
ansible all -m user -a 'name="user" state=absent'

4)group
ansible-doc -s group
ansible webservers -m group -a 'name=mysql gid=306 system=yes'
ansible webservers -m user -a 'name=mysql uid=306 system=yes group=mysql'

5)copy
src=:定义本地源文件路径
dest=:定义远程目标文件路径
content:取代src=,表示直接用此处生成的信息生成为目标文件的内容。
ansible all -m copy -a 'src=/etc/fstab dest=/tmp/fstab.ansible ower=root mode=640'
ansible all -m copy -a 'connect="Hello Ansible
Hi Mageedu" dest=/tmp/test.ansible'
是转译。

6)file:设定文件属性
path=:指定文件路径,可以使用name或dest来替换

创建文件符号链接:
    src=:指明源文件
    path=:指明符号链接文件路径

ansible all -m file -a 'ower=mysql group=mysql mode=644 path=/tmp/fstab.ansible'
创建文件链接:
ansible all -m file -a 'path=/tmp/fstab.link src=/tmp/fastab.ansible state=link'

7)ping:测试主机是否能连接。
ansible -a 'ping'

8)service:指定运行状态
enabled=:是否开机自动启动,取值为true或者false
name=:服务名称
state=:状态,取值为started,stopped,restarted

ansible-doc -s service
ansible webservers -a 'service httpd status'
ansible webservers -a 'chkconfig --list httpd'
ansible webservers -m service -a 'enabled=true name=httpd state=started'

9)shell:在远程主机上运行命令
        尤其是用到管道等功能的复杂命令时候。
ansible all -m user -a 'name=user1'
ansible all -m command -a 'echo passwd |passwd --stdin user1'
在远程主机上查看发现密码没改变,是因为他默认可能认为是本机的命令
ansible all -m shell -a 'echo passwd |passwd --stdin user1'

10)script:本地脚本命令复制到远程并且运行之。该shell脚本只支持相对路径
cat test.sh
#!/bin/bash
echo "hello ansible" > /tmp/script.ansible
useradd user2
cp -r /tmp/test.sh ./ 该shell脚本只支持相对路径
vim /tmp/test.sh
chmod +x /tmp/test.sh
ansible all -m script -a 'test.sh'

11)yum:安装程序包
name=:指明要安装的程序包,可以带上版本号
state=:present,lastest表示安装,absent表示卸载
ansible all -m yum -a 'name=zsh'
ansible all -m yum -a 'name=zsh state=absent'

12)setup:收集远程主机的facts
    每个被管理的节点在接受并运行管理命令之前,会将自己的主机相关信息,如操作系统,ip地址等报告给远程的ansible主机。
ansible 192.168.133.4 -m setup
nginx配置文件中有个work_processes=物理核心数(processor_core * processor_count)-1或者-2

13)get_url 模块(实现在远程主机下载指定 URL 到本地,支持 sha256sum 文件校验)
ansible Client -m get_utl -a "url=http://www.baidu.com dest=/tmp/index.html mode=0440 force=yes"

14) stat 模块(获取远程文件状态信息,atime/ctime/mtime/md5/uid/gid 等信息)
ansible Client -m stat -a "path=/etc/syctl.conf"

15) mount 模块(远程主机分区挂载)
ansible Client -m mount -a "name=/mnt/data src=/dev/sd0 fstype=ext4 opts=ro state=present"

综合
ansible-doc -s 模块名

command
    -a 'COMMAND'
user
    -a 'name= state={present|absent}' system= uid= '
group
    -a 'name= gid= state= system='
cron
    -a 'name= minute= hour= day= mounth= weekday= job= user= state='
copy
    -a 'dest= src= mode= owner= group= '
file
    -a 'path= mode= owner= group= state={directory|link|present|absent} src='
ping
    无参数
yum
    -a 'name= state={present|lastest|absent}'
service
    -a 'name- state={started|stopped|restarted} enabled='
shell
    -a 'COMMAND'
script
    -a '/path/to/script'
setup

Monitor ansible_ssh_port=12378
ansible_ssh_host=192.168.1.200 # 定义别名
# ansible_ssh_host 连接目标主机的地址
# ansible_ssh_port 连接目标主机的端口,默认 22 时无需指定
# ansible_ssh_user 连接目标主机默认用户
# ansible_ssh_pass 连接目标主机默认用户密码
# ansible_ssh_connection 目标主机连接类型,可以是 local 、ssh 或 paramiko
# ansible_ssh_private_key_file 连接目标主机的 ssh 私钥
# ansible_*_interpreter 指定采用非 Python 的其他脚本语言,如 Ruby 、Perl 或其他类似 ansible_python_interpreter 解释器

# 主机名支持正则描述
[webservers]
www[01:50].example.com
[dbservers]
db-[a:f].example.com
二.ansible之playbook
1)YAML介绍
http://www.yaml.org
2)yaml语法
ansible中使用的yaml基础元素:
变量
Inventory
条件测试
迭代
3)playbook的组成结构
Inventory
Modules
Ad Hoc Commands
Playbooks
Task:任务,即调用模块完成的某操作
Variables:变量
Templates:模板
Handlers:处理器,由某事件触发执行的操作
Roles:角色
4)基本结构
- host:webservers
remote_user:
tasks:
- task1
modulename: module
- task2
- host: dbservers
如果命令或脚本的退出码不为0,可以使用如下方式替换:
tasks:
- name: run this command and ignore the result
shell: /usr/bin/somecommand | /bin/true
或者使用ignore_error来忽略错误信息
tasks:
- name: run this command and ignore the result
shell: /usr/bin/somecommand
ignore_error: True
简单示例01:
编写一个nginx.yml,执行命令ansible-playbook nginx.yml
- host: webservers
remote_user: root
tasks:
- name: create nginx group
group: name=nginx system=yes gid=208
- name: create nginx user
user: name=nginx uid=208 group=nginx system=yes
- hosts: deservers
remote_user: root
tasks:
- name: copy file to dbservers
copy: src=/etc/inittab dest=/tmp/inittab.ansible
handlers
简单实例02:
在远程主机上安装appach。编写appach.yml,命令执行ansible-playbook appach.yml
需要在本机的/root/conf/httpd.conf 拷贝到远程主机并覆盖,所有该主机应该配置好文件
- host: webservers
remote_user: root
tasks:
- name: install httpd packages
yum: name-httpd state=lastest
- name: install configuration file for httpd
copy: src=/root/conf/httpd.conf dest=/etc/httpd/conf/httpd.conf
- name: start httpd service
service: enabled=true name=httpd state=started
如果在该配置文件改变的情况下(比如更改配置文件监听端口80),远程服务器httpd启动后,
再次执行该命令(ansible-playbook appach.yml)虽然task会发生变化,但是实际情况下并没有发生变化。
此时,会用到handlers。重新编写文件appach.yml
- host: webservers
remote_user: root
tasks:
- name: install httpd packages
yum: name=httpd state=lastest
- name: install configuration file for httpd
copy: src=/root/conf/httpd.conf dest=/etc/httpd/conf/httpd.conf
notify:
- restart httpd
- name: start httpd service
service: enabled=true name=httpd state=started
handlers:
- name: restart httpd
service: name=httpd state=restarted
引入变量:
vars:在后面添加变量名,然后再引入变量,必须加{{}},用变量名替换。
简单示例:
- host: webservers
remote_user: root
vars:
- package: httpd
tasks:
- name: install httpd packages
yum: name={{ package }} state=lastest
- name: install configuration file for httpd
copy: src=/root/conf/httpd.conf dest=/etc/httpd/conf/httpd.conf
notify:
- restart httpd
- name: start httpd service
service: enabled=true name={{ package }} state=started
handlers:
- name: restart httpd
service: name=httpd state=restarted
将每台主机的ip地址(ansible_all_ipv4_addresses)发送到远程主机的/tmp/var.ansible文档中
查找变量名(ansible_all_ipv4_addresses用命令:ansible 192.168.133.4 -m setup )
vi test.yml
- hosts: webservers
remote_user: root
tasks:
- name: copy file
copy: content="{{ ansible_all_ipv4_addresses }}" dest=/tmp/vars.ansible
也可以用主机传导一些变量。用组变量或者inventory变量
vi /etc/ansible/hosts
[webservers]
192.168.133.2 testvar="1.100"
192.168.133.3 testvar="2.100"
vi test.yml
- hosts: webservers
remote_user: root
tasks:
- name: copy file
copy: content="{{ ansible_all_ipv4_addresses }}, {{ testwar }}" dest=/tmp/vars.ansible
可以在192.168.133.2上查看cat /tmp/vars.ansible
inventory参数
vi /etc/ansible/hosts
[webservers]
192.168.133.2 ansible_ssh_user=root ansible_ssh_pass=123456
192.168.133.3 testvar="2.100
即便是我们没有做关于秘钥的认证,我们也会自动使用账户和密码来登录该主机
条件测试:
when:
简单示例:
- hosts: all
remote_user: root
vars:
- username: user10
tasks:
- name: create {{ username }} user
user: name={{ username }}
when: ansible_fqdn == "www.test.com"
迭代:
当有需要重复性执行的任务时,可以用迭代机制,使用格式为将需要迭代的内容定义为item变量引用
并通过with_items语句来指明迭代的元素列表即可
示例:
- name: add several users
user: name={{ item }} state=present groups=wheel
with_items:
- testuser1
- testuser2
上面的语句功能等同于下面的语句:
- name: add several users1
user: name=testuser1 state=present groups=wheel
- name: add several users2
user: name=testuser2 state=present groups=wheel
事实上with_items可以使用元素还可为hashes,例如:
- name: add several users
user: name={{ item.name }} state=present groups={{ item.groups }}
with_items:
- { name: 'testuser1', group: 'wheel' }
- { name: 'testuser2', group: 'root' }
:重复同类task时使用
调用:item
定义循环列表:with_items
- apache
- php
- mysql-server
注意:with_item中的列表值可以是字典,但引用时用item.KEY
- {name: apache, conf: confiles/httpd.conf}
- {name: php, conf: confiles/php.ini}
- {name: mysql, conf: confiles/my.cnf}
template:模板
比如两台远程服务器要监听的端口不同,maxclients不同,而且主机名不同
可以调用模板。j2代表模板。
示例:
cd /root/ && mkdir templates && cp conf/httpd.conf templates/
mv templates/httpd.conf template/httpd.conf.j2
vim httpd.conf.j2
Listen {{ http_port}}
MaxClients {{ maxClients}}
ServerName {{ ansbible_fqdn }}
vi /etc/ansible/hosts
[webservers]
192.168.133.2 http_port=80 maxClients=100
192.168.133.3 http_port=8080 maxClients=200
vi apache.yml
- host: webservers
remote_user: root
vars:
- package: httpd
tasks:
- name: install httpd packages
yum: name={{ package }} state=lastest
- name: install configuration file for httpd
template: src=/root/templates/httpd.conf.j2 dest=/etc/httpd/conf/httpd.conf
notify:
- restart httpd
- name: start httpd service
service: enabled=true name={{ package }} state=started
handlers:
- name: restart httpd
service: name=httpd state=restarted
ansible-playbook apache.yml
tags:
多次运行playbook时,其中某些task不需要运行,只需运行某个task,可以单独标记该task.
在playbook可以为某个或某些任务定义为一个标签,在执行playbook时,通过ansible-playbook命令使用--
tags选项能实现仅运行指定的tasks而非所有的。
vi apache.yml
- host: webservers
remote_user: root
vars:
- package: httpd
tasks:
- name: install httpd packages
yum: name={{ package }} state=lastest
- name: install configuration file for httpd
template: src=/root/templates/httpd.conf.j2 dest=/etc/httpd/conf/httpd.conf
tags:
- conf
notify:
- restart httpd
- name: start httpd service
service: enabled=true name={{ package }} state=started
handlers:
- name: restart httpd
service: name=httpd state=restarted
ansible-playbook apache.yml --tags="conf"
roles:
(1) 目录名同角色名
(2) 目录结构有固定格式
fiels:静态文件
template:模板文件
tasks:至少有一个main.yml 文件,定义各handlers
vars:至少有一个main.yml文件,定义变量。
meta:定义依赖关系等信息。
(3) site.yml定义playbook,额外也可以有其他的yml文件。
mkdir -pv ansible_playbooks/roles/{webservers,deservers}/{tasks,files,template,meta,handlers,vars}
tree ansible_playbooks/
cd ansbible_playbooks/roles/
cp /etc/httpd/conf/httpd.conf files/
vim tasks/main.yml
- name: install httpd package
yum: name=httpd
- name: install configuration file
copy: src=httpd.conf dest=/etc/httpd/conf/httpd.conf
tags:
- conf
notify:
- restart httpd
- name: start httpd
service: name=httpd state=started
vim handlers/main.yml
- name: restart httpd
service: name=httpd state=restarted
cd ansbible_playbooks
vim site.yml
- hosts: webservers
remote_user: root
roles:
- webservers
ansible-playbook site.yml
更为直观的看法:
vim site.yml
- hosts: 192.168.133.2
remote_user: root
roles:
- webservers
- hosts: 192.168.133.3
remote_user: root
roles:
- deservers
- hosts: 192.168.133.4
remote_user: root
roles:
- webservers
- dbservers