什么是WebSocket?
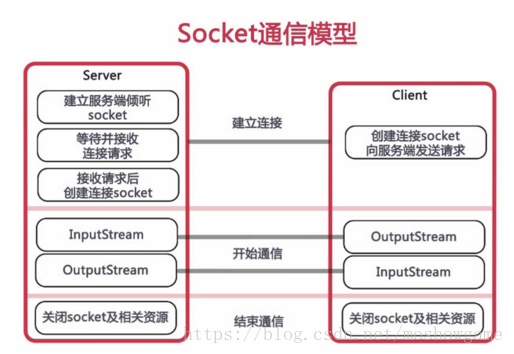
WebSocket协议是基于TCP的一种新的网络协议。它实现了浏览器与服务器全双工(full-duplex)通信——允许服务器主动发送信息给客户端。
为什么需要 WebSocket?
初次接触 WebSocket 的人,都会问同样的问题:我们已经有了 HTTP 协议,为什么还需要另一个协议?它能带来什么好处?
答案很简单,因为 HTTP 协议有一个缺陷:通信只能由客户端发起,HTTP 协议做不到服务器主动向客户端推送信息。

举例来说,我们想要查询当前的排队情况,只能是页面轮询向服务器发出请求,服务器返回查询结果。轮询的效率低,非常浪费资源(因为必须不停连接,或者 HTTP 连接始终打开)。因此WebSocket 就是这样发明的。
话不多说,马上进入干货时刻。
maven依赖
SpringBoot2.0对WebSocket的支持简直太棒了,直接就有包可以引入
<dependency>
<groupId>org.springframework.boot</groupId>
<artifactId>spring-boot-starter-websocket</artifactId>
</dependency>
WebSocketConfig
启用WebSocket的支持也是很简单,几句代码搞定
 1 import org.springframework.context.annotation.Bean;
 2 import org.springframework.context.annotation.Configuration;
 3 import org.springframework.web.socket.server.standard.ServerEndpointExporter;
 4
 5 /**
 6  * 开启WebSocket支持
 7  * @author zhengkai
 8  */
 9 @Configuration
10 public class WebSocketConfig {
11
12     @Bean
13     public ServerEndpointExporter serverEndpointExporter() {
14         return new ServerEndpointExporter();
15     }
16
17 }
WebSocketServer
因为WebSocket是类似客户端服务端的形式(采用ws协议),那么这里的WebSocketServer其实就相当于一个ws协议的Controller
直接@ServerEndpoint("/websocket")@Component启用即可,然后在里面实现@OnOpen,@onClose,@onMessage等方法
  1 import java.io.IOException;
  2 import java.util.concurrent.CopyOnWriteArraySet;
  3
  4 import javax.websocket.OnClose;
  5 import javax.websocket.OnError;
  6 import javax.websocket.OnMessage;
  7 import javax.websocket.OnOpen;
  8 import javax.websocket.Session;
  9 import javax.websocket.server.ServerEndpoint;
 10 import org.springframework.stereotype.Component;
 11 import cn.hutool.log.Log;
 12 import cn.hutool.log.LogFactory;
 13 import lombok.extern.slf4j.Slf4j;
 14
 15
 16 @ServerEndpoint("/websocket/{sid}")
 17 @Component
 18 public class WebSocketServer {
 19
 20     static Log log=LogFactory.get(WebSocketServer.class);
 21     //静态变量,用来记录当前在线连接数。应该把它设计成线程安全的。
 22     private static int onlineCount = 0;
 23     //concurrent包的线程安全Set,用来存放每个客户端对应的MyWebSocket对象。
 24     private static CopyOnWriteArraySet<WebSocketServer> webSocketSet = new CopyOnWriteArraySet<WebSocketServer>();
 25
 26     //与某个客户端的连接会话,需要通过它来给客户端发送数据
 27     private Session session;
 28
 29     //接收sid
 30     private String sid="";
 31     /**
 32      * 连接建立成功调用的方法*/
 33     @OnOpen
 34     public void onOpen(Session session,@PathParam("sid") String sid) {
 35         this.session = session;
 36         webSocketSet.add(this);     //加入set中
 37         addOnlineCount();           //在线数加1
 38         log.info("有新窗口开始监听:"+sid+",当前在线人数为" + getOnlineCount());
 39         this.sid=sid;
 40         try {
 41              sendMessage("连接成功");
 42         } catch (IOException e) {
 43             log.error("websocket IO异常");
 44         }
 45     }
 46
 47     /**
 48      * 连接关闭调用的方法
 49      */
 50     @OnClose
 51     public void onClose() {
 52         webSocketSet.remove(this);  //从set中删除
 53         subOnlineCount();           //在线数减1
 54         log.info("有一连接关闭!当前在线人数为" + getOnlineCount());
 55     }
 56
 57     /**
 58      * 收到客户端消息后调用的方法
 59      *
 60      * @param message 客户端发送过来的消息*/
 61     @OnMessage
 62     public void onMessage(String message, Session session) {
 63         log.info("收到来自窗口"+sid+"的信息:"+message);
 64         //群发消息
 65         for (WebSocketServer item : webSocketSet) {
 66             try {
 67                 item.sendMessage(message);
 68             } catch (IOException e) {
 69                 e.printStackTrace();
 70             }
 71         }
 72     }
 73
 74     /**
 75      *
 76      * @param session
 77      * @param error
 78      */
 79     @OnError
 80     public void onError(Session session, Throwable error) {
 81         log.error("发生错误");
 82         error.printStackTrace();
 83     }
 84     /**
 85      * 实现服务器主动推送
 86      */
 87     public void sendMessage(String message) throws IOException {
 88         this.session.getBasicRemote().sendText(message);
 89     }
 90
 91
 92     /**
 93      * 群发自定义消息
 94      * */
 95     public static void sendInfo(String message,@PathParam("sid") String sid) throws IOException {
 96         log.info("推送消息到窗口"+sid+",推送内容:"+message);
 97         for (WebSocketServer item : webSocketSet) {
 98             try {
 99                 //这里可以设定只推送给这个sid的,为null则全部推送
100                 if(sid==null) {
101                     item.sendMessage(message);
102                 }else if(item.sid.equals(sid)){
103                     item.sendMessage(message);
104                 }
105             } catch (IOException e) {
106                 continue;
107             }
108         }
109     }
110
111     public static synchronized int getOnlineCount() {
112         return onlineCount;
113     }
114
115     public static synchronized void addOnlineCount() {
116         WebSocketServer.onlineCount++;
117     }
118
119     public static synchronized void subOnlineCount() {
120         WebSocketServer.onlineCount--;
121     }
122 }
消息推送
至于推送新信息,可以再自己的Controller写个方法调用WebSocketServer.sendInfo();即可
@Controller
@RequestMapping("/checkcenter")
public class CheckCenterController {

    //页面请求
    @GetMapping("/socket/{cid}")
    public ModelAndView socket(@PathVariable String cid) {
        ModelAndView mav=new ModelAndView("/socket");
        mav.addObject("cid", cid);
        return mav;
    }
    //推送数据接口
    @ResponseBody
    @RequestMapping("/socket/push/{cid}")
    public ApiReturnObject pushToWeb(@PathVariable String cid,String message) {
        try {
            WebSocketServer.sendInfo(message,cid);
        } catch (IOException e) {
            e.printStackTrace();
            return ApiReturnUtil.error(cid+"#"+e.getMessage());
        }
        return ApiReturnUtil.success(cid);
    }
}
页面发起socket请求
然后在页面用js代码调用socket,当然,太古老的浏览器是不行的,一般新的浏览器或者谷歌浏览器是没问题的。还有一点,记得协议是ws的哦,如果像我这样封装了一些basePath的路径类,可以replace(“http”,“ws”)来替换协议
<script>
    var socket;
    if(typeof(WebSocket) == "undefined") {
        console.log("您的浏览器不支持WebSocket");
    }else{
        console.log("您的浏览器支持WebSocket");
            //实现化WebSocket对象,指定要连接的服务器地址与端口  建立连接
            //等同于socket = new WebSocket("ws://localhost:8083/checkcentersys/websocket/20");
            socket = new WebSocket("${basePath}websocket/${cid}".replace("http","ws"));
            //打开事件
            socket.onopen = function() {
                console.log("Socket 已打开");
                //socket.send("这是来自客户端的消息" + location.href + new Date());
            };
            //获得消息事件
            socket.onmessage = function(msg) {
                console.log(msg.data);
                //发现消息进入    开始处理前端触发逻辑
            };
            //关闭事件
            socket.onclose = function() {
                console.log("Socket已关闭");
            };
            //发生了错误事件
            socket.onerror = function() {
                alert("Socket发生了错误");
                //此时可以尝试刷新页面
            }
            //离开页面时,关闭socket
            //jquery1.8中已经被废弃,3.0中已经移除
            // $(window).unload(function(){
            //     socket.close();
            //});
    }
    </script>
运行效果
v1.1的效果,刚刚修复了日志,并且支持指定监听某个端口,代码已经全部更新,现在是这样的效果
打开两个页面:
http://localhost:8083/checkcentersys/checkcenter/socket/20
http://localhost:8083/checkcentersys/checkcenter/socket/22
向前端推送数据:
http://localhost:8083/checkcentersys/checkcenter/socket/push/20?message=cccccccccc
http://localhost:8083/checkcentersys/checkcenter/socket/push/22?message=xxxxx123xxxx
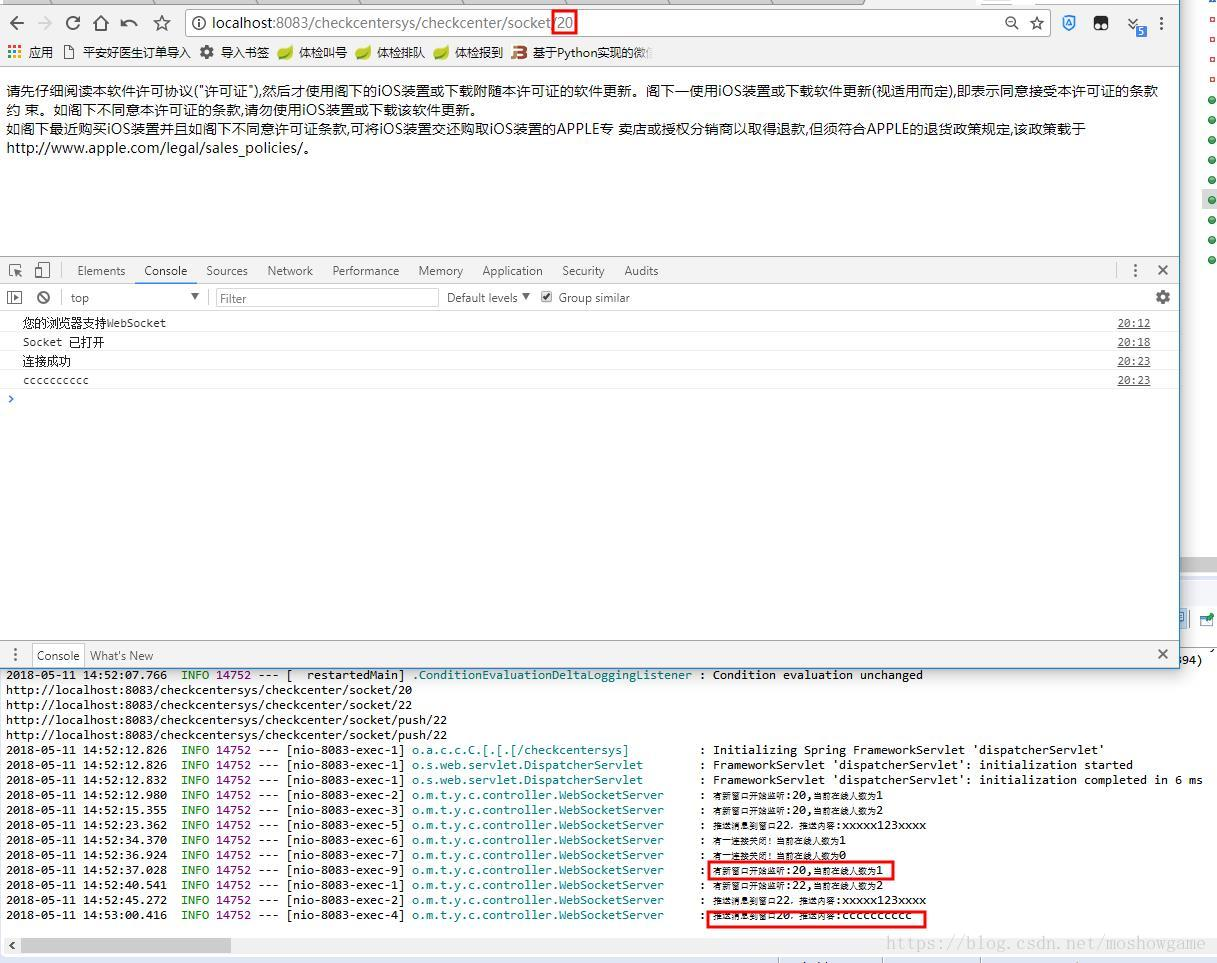
先打开页面,指定cid,启用socket接收,然后再另一个页面调用刚才Controller封装的推送信息的方法到这个cid的socket,即可向前端推送消息。
后续
针对简单IM的业务场景,进行了一些优化,可以看后续的文章SpringBoot2+WebSocket之聊天应用实战(优化版本)
主要变动是CopyOnWriteArraySet改为ConcurrentHashMap,保证多线程安全同时方便利用map.get(userId)进行推送到指定端口。
相比之前的Set,Set遍历是费事且麻烦的事情,而Map的get是简单便捷的,当WebSocket数量大的时候,这个小小的消耗就会聚少成多,影响体验,所以需要优化。
Websocker注入Bean问题
关于这个问题,可以看最新发表的这篇文章,在参考和研究了网上一些攻略后,项目已经通过该方法注入成功,大家可以参考。
关于controller调用controller/service调用service/util调用service/websocket中autowired的解决方法
netty-websocket-spring-boot-starter
Springboot2构建基于Netty的高性能Websocket服务器(netty-websocket-spring-boot-starter)
只需要换个starter即可实现高性能websocket,赶紧使用吧
Springboot2+Netty+Websocket
Springboot2+Netty实现Websocket,使用官方的netty-all的包,比原生的websocket更加稳定更加高性能,同等配置情况下可以handle更多的连接。
代码样式全部已经更正,另外也感谢大家的阅读和评论,一起进步,谢谢!~~
serverEndpointExporter错误
org.springframework.beans.factory.BeanCreationException: Error creating bean with name ‘serverEndpointExporter’ defined in class path resource [com/xxx/WebSocketConfig.class]: Invocation of init method failed; nested exception is java.lang.IllegalStateException: javax.websocket.server.ServerContainer not available
如果tomcat部署一直报这个错,请移除 WebSocketConfig 中@Bean ServerEndpointExporter 的注入 。
ServerEndpointExporter 是由Spring官方提供的标准实现,用于扫描ServerEndpointConfig配置类和@ServerEndpoint注解实例。使用规则也很简单:
如果使用默认的嵌入式容器 比如Tomcat 则必须手工在上下文提供ServerEndpointExporter。
如果使用外部容器部署war包,则不需要提供提供ServerEndpointExporter,因为此时SpringBoot默认将扫描服务端的行为交给外部容器处理,所以线上部署的时候要把WebSocketConfig中这段注入bean的代码注掉。
文章转自: https://blog.csdn.net/moshowgame/article/details/80275084
其他参考:
1. https://blog.csdn.net/weixin_38111957/article/details/86352677
2. https://blog.csdn.net/qq_35387940/article/details/93483678
3. https://blog.csdn.net/qq_34409255/article/details/81010075