(1)安装ceph-radosgw (安装集群时,已经安装过了,所以略过)
yum -y install ceph-radosgw
(2)部署
ceph-deploy rgw create c720181 c720182 c720183
(3)配置80端口(仅做参考,因为在生产环境会在rgw前面部署负载均衡,所以一般不会在这配置)
vim /etc/ceph/ceph.conf
……
[client.rgw.c720181]
rgw frontentds = "civetweb port=80"
sudo systemctl restart ceph-radosgw@rgw.c720181.service
(4)创建池
wget https://raw.githubusercontent.com/aishangwei/ceph-demo/master/ceph-deploy/rgw/pool
wget https://raw.githubusercontent.com/aishangwei/ceph-demo/master/ceph-deploy/rgw/create_pool.sh
[ceph-admin@c720181 my-cluster]$ cat pool
.rgw
.rgw.root
.rgw.control
.rgw.gc
.rgw.buckets
.rgw.buckets.index
.rgw.buckets.extra
.log
.intent-log
.usage
.users
.users.email
.users.swift
.users.uid
[ceph-admin@c720181 my-cluster]$ cat pool |wc -l
14
[ceph-admin@c720181 my-cluster]$ cat create_pool.sh
#!/bin/bash
PG_NUM=30
PGP_NUM=30
SIZE=3
for i in `cat ./pool`
do
ceph osd pool create $i $PG_NUM
ceph osd pool set $i size $SIZE
done
for i in `cat ./pool`
do
ceph osd pool set $i pgp_num $PGP_NUM
done
[ceph-admin@c720181 my-cluster]$ chmod +x create_pool.sh
[ceph-admin@c720181 my-cluster]$ ./create_pool.sh
pool '.rgw' created
set pool 6 size to 3
pool '.rgw.root' already exists
set pool 2 size to 3
pool '.rgw.control' created
set pool 7 size to 3
pool '.rgw.gc' created
set pool 8 size to 3
Error ERANGE: pg_num 30 size 3 would mean 840 total pgs, which exceeds max 750 (mon_max_pg_per_osd 250 * num_in_osds 3)
Error ENOENT: unrecognized pool '.rgw.buckets'
Error ERANGE: pg_num 30 size 3 would mean 840 total pgs, which exceeds max 750 (mon_max_pg_per_osd 250 * num_in_osds 3)
Error ENOENT: unrecognized pool '.rgw.buckets.index'
Error ERANGE: pg_num 30 size 3 would mean 840 total pgs, which exceeds max 750 (mon_max_pg_per_osd 250 * num_in_osds 3)
Error ENOENT: unrecognized pool '.rgw.buckets.extra'
Error ERANGE: pg_num 30 size 3 would mean 840 total pgs, which exceeds max 750 (mon_max_pg_per_osd 250 * num_in_osds 3)
Error ENOENT: unrecognized pool '.log'
Error ERANGE: pg_num 30 size 3 would mean 840 total pgs, which exceeds max 750 (mon_max_pg_per_osd 250 * num_in_osds 3)
Error ENOENT: unrecognized pool '.intent-log'
Error ERANGE: pg_num 30 size 3 would mean 840 total pgs, which exceeds max 750 (mon_max_pg_per_osd 250 * num_in_osds 3)
Error ENOENT: unrecognized pool '.usage'
Error ERANGE: pg_num 30 size 3 would mean 840 total pgs, which exceeds max 750 (mon_max_pg_per_osd 250 * num_in_osds 3)
Error ENOENT: unrecognized pool '.users'
Error ERANGE: pg_num 30 size 3 would mean 840 total pgs, which exceeds max 750 (mon_max_pg_per_osd 250 * num_in_osds 3)
Error ENOENT: unrecognized pool '.users.email'
Error ERANGE: pg_num 30 size 3 would mean 840 total pgs, which exceeds max 750 (mon_max_pg_per_osd 250 * num_in_osds 3)
Error ENOENT: unrecognized pool '.users.swift'
Error ERANGE: pg_num 30 size 3 would mean 840 total pgs, which exceeds max 750 (mon_max_pg_per_osd 250 * num_in_osds 3)
Error ENOENT: unrecognized pool '.users.uid'
set pool 6 pgp_num to 30
Error EINVAL: specified pgp_num 30 > pg_num 8
set pool 7 pgp_num to 30
set pool 8 pgp_num to 30
Error ENOENT: unrecognized pool '.rgw.buckets'
Error ENOENT: unrecognized pool '.rgw.buckets.index'
Error ENOENT: unrecognized pool '.rgw.buckets.extra'
Error ENOENT: unrecognized pool '.log'
Error ENOENT: unrecognized pool '.intent-log'
Error ENOENT: unrecognized pool '.usage'
Error ENOENT: unrecognized pool '.users'
Error ENOENT: unrecognized pool '.users.email'
Error ENOENT: unrecognized pool '.users.swift'
Error ENOENT: unrecognized pool '.users.uid'
报错原因:每个osd最多只支持250个pg,之前创建了一个rbd池,pg总数是128。平均分配到3个osd,那已经占了43个。现在又新建了14个池,每个池占30个pg.总共需要420个pg,平均分到3个osd,每个osd占140.(这样计算也不对)
Error ERANGE: pg_num 30 size 3 would mean 840 total pgs, which exceeds max 750 (mon_max_pg_per_osd 250 * num_in_osds 3)
处理办法:删除之前的池,然后修改脚本把pg数目设置小一点,再创建对象池。

这是由于没有配置mon节点的 mon_allow_pool_delete 字段所致,解决办法就是到mon节点进行相应的设置。
解决方案:
注:1-3步的操作必须在mon节点上执行
===================在管理端192.168.20.181操作===========================
打开mon节点的配置文件:
[root@c720181 ~]# vi /etc/ceph/ceph.conf
在配置文件中添加如下内容:
[mon]
mon allow pool delete = true
重启ceph-mon服务:
[root@c720181 ~]# systemctl restart ceph-mon.target
执行删除pool命令:
[root@c720181 ~]# ceph osd pool delete rbd rbd –yes-i-really-really-mean-it
pool ‘ecpool’ removed
[ceph-admin@c720181 my-cluster]$ vim delete_pool.sh
#!/bin/bash
PG_NUM=30
PGP_NUM=30
SIZE=3
for i in `cat ./pool`
do
ceph osd pool delete $i $i --yes-i-really-really-mean-it
[ceph-admin@c720181 my-cluster]$ ./delete_pool.sh
pool '.rgw' removed
pool '.rgw.root' removed
pool '.rgw.control' removed
pool '.rgw.gc' removed
pool '.rgw.buckets' does not exist
pool '.rgw.buckets.index' does not exist
pool '.rgw.buckets.extra' does not exist
pool '.log' does not exist
pool '.intent-log' does not exist
pool '.usage' does not exist
pool '.users' does not exist
pool '.users.email' does not exist
pool '.users.swift' does not exist
pool '.users.uid' does not exist
================================================
[ceph-admin@c720181 my-cluster]$ ceph osd pool create rbd 20
pool 'rbd' created
[ceph-admin@c720181 my-cluster]$ vim create_pool.sh
#!/bin/bash
PG_NUM=8
PGP_NUM=8
SIZE=3
for i in `cat ./pool`
do
ceph osd pool create $i $PG_NUM
ceph osd pool set $i size $SIZE
done
for i in `cat ./pool`
do
ceph osd pool set $i pgp_num $PGP_NUM
done
[ceph-admin@c720181 my-cluster]$ ./create_pool.sh
pool '.rgw' created
set pool 20 size to 3
pool '.rgw.root' created
set pool 21 size to 3
pool '.rgw.control' created
set pool 22 size to 3
pool '.rgw.gc' created
set pool 23 size to 3
pool '.rgw.buckets' created
set pool 24 size to 3
pool '.rgw.buckets.index' created
set pool 25 size to 3
pool '.rgw.buckets.extra' created
set pool 26 size to 3
pool '.log' created
set pool 27 size to 3
pool '.intent-log' created
set pool 28 size to 3
pool '.usage' created
set pool 29 size to 3
pool '.users' created
set pool 30 size to 3
pool '.users.email' created
set pool 31 size to 3
pool '.users.swift' created
set pool 32 size to 3
pool '.users.uid' created
set pool 33 size to 3
set pool 20 pgp_num to 8
set pool 21 pgp_num to 8
set pool 22 pgp_num to 8
set pool 23 pgp_num to 8
set pool 24 pgp_num to 8
set pool 25 pgp_num to 8
set pool 26 pgp_num to 8
set pool 27 pgp_num to 8
set pool 28 pgp_num to 8
set pool 29 pgp_num to 8
set pool 30 pgp_num to 8
set pool 31 pgp_num to 8
set pool 32 pgp_num to 8
set pool 33 pgp_num to 8
(5)测试是否能够访问ceph集群
[ceph-admin@c720181 my-cluster]$ ceph -s -k /var/lib/ceph/radosgw/ceph-rgw.c720181/keying --name client.rgw.c720181
2019-08-18 21:19:22.908292 7f3bd2d43700 -1 auth: unable to find a keyring on /var/lib/ceph/radosgw/ceph-rgw.c720181/keying: (13) Permission denied
2019-08-18 21:19:22.908414 7f3bd2d43700 0 librados: client.rgw.c720181 initialization error (13) Permission denied
[errno 13] error connecting to the cluster
提示没有权限,可以通过下面的方式先拷贝到当前目录,然后再测试访问:
[ceph-admin@c720181 my-cluster]$ sudo ls -l /var/lib/ceph/
total 0
drwxr-x--- 2 ceph ceph 6 Apr 11 21:15 bootstrap-mds
drwxr-x--- 2 ceph ceph 26 Aug 18 16:00 bootstrap-mgr
drwxr-x--- 2 ceph ceph 26 Aug 18 15:56 bootstrap-osd
drwxr-x--- 2 ceph ceph 6 Apr 11 21:15 bootstrap-rbd
drwxr-x--- 2 ceph ceph 26 Aug 18 19:54 bootstrap-rgw
drwxr-x--- 2 ceph ceph 6 Apr 11 21:15 mds
drwxr-x--- 3 ceph ceph 26 Aug 18 16:00 mgr
drwxr-x--- 3 ceph ceph 26 Aug 18 15:39 mon
drwxr-x--- 3 ceph ceph 20 Aug 18 15:56 osd
drwxr-xr-x 3 root root 30 Aug 18 19:54 radosgw
drwxr-x--- 2 ceph ceph 6 Aug 18 15:39 tmp
[ceph-admin@c720181 my-cluster]$ sudo cp /var/lib/ceph/radosgw/ceph-rgw.c720181/keyring ./
[ceph-admin@c720181 my-cluster]$ ceph -s -k keyring --name client.rgw.c720181
cluster:
id: a4088ae8-c818-40d6-ab40-8f40c5bedeee
health: HEALTH_OK
services:
mon: 3 daemons, quorum c720181,c720182,c720183
mgr: c720181(active), standbys: c720183, c720182
osd: 3 osds: 3 up, 3 in
rgw: 3 daemons active
data:
pools: 18 pools, 156 pgs
objects: 183 objects, 0B
usage: 3.06GiB used, 56.9GiB / 60.0GiB avail
pgs: 156 active+clean
io:
client: 70.1KiB/s rd, 0B/s wr, 70op/s rd, 46op/s wr
=====================================================================================
使用S3 API访问Ceph对象存储
===================在管理端192.168.20.181操作===========================
(1)创建radosgw用户
[ceph-admin@c720181 my-cluster]$ radosgw-admin user create --uid=radosgw --display-name="Radosgw"
注意:请把access_key secret_key保存下来,如果没记住可使用命令查看:
radosgw-admin user info --uid=radosgw --display-name="Radosgw"
{
"user_id": "radosgw",
"display_name": "Radosgw",
"email": "",
"suspended": 0,
"max_buckets": 1000,
"auid": 0,
"subusers": [],
"keys": [
{
"user": "radosgw",
"access_key": "XBKOS3SHEB0KZ86U8QN6",
"secret_key": "kK9Rq7o1Wm8oBe02I35uqt3yIB0YOQOb4xHCVBnV"
}
],
"swift_keys": [],
"caps": [],
"op_mask": "read, write, delete",
"default_placement": "",
"placement_tags": [],
"bucket_quota": {
"enabled": false,
"check_on_raw": false,
"max_size": -1,
"max_size_kb": 0,
"max_objects": -1
},
"user_quota": {
"enabled": false,
"check_on_raw": false,
"max_size": -1,
"max_size_kb": 0,
"max_objects": -1
},
"temp_url_keys": [],
"type": "rgw"
}
===================在客户端192.168.20.184操作===========================
(2)安装s3cmd客户端
yum install -y s3cmd
安装完成之后,将会自动在家目录下生成配置文件.s3cfg
[root@c720184 ~]# s3cmd --configure
Enter new values or accept defaults in brackets with Enter.
Refer to user manual for detailed description of all options.
Access key and Secret key are your identifiers for Amazon S3. Leave them empty for using the env variables.
Access Key: XBKOS3SHEB0KZ86U8QN6
Secret Key: kK9Rq7o1Wm8oBe02I35uqt3yIB0YOQOb4xHCVBnV
Default Region [US]: ZH
Use "s3.amazonaws.com" for S3 Endpoint and not modify it to the target Amazon S3.
S3 Endpoint [s3.amazonaws.com]:
Use "%(bucket)s.s3.amazonaws.com" to the target Amazon S3. "%(bucket)s" and "%(location)s" vars can be used
if the target S3 system supports dns based buckets.
DNS-style bucket+hostname:port template for accessing a bucket [%(bucket)s.s3.amazonaws.com]:
Encryption password is used to protect your files from reading
by unauthorized persons while in transfer to S3
Encryption password:
Path to GPG program [/usr/bin/gpg]:
When using secure HTTPS protocol all communication with Amazon S3
servers is protected from 3rd party eavesdropping. This method is
slower than plain HTTP, and can only be proxied with Python 2.7 or newer
Use HTTPS protocol [Yes]: no
On some networks all internet access must go through a HTTP proxy.
Try setting it here if you can't connect to S3 directly
HTTP Proxy server name:
New settings:
Access Key: XBKOS3SHEB0KZ86U8QN6
Secret Key: kK9Rq7o1Wm8oBe02I35uqt3yIB0YOQOb4xHCVBnV
Default Region: ZH
S3 Endpoint: s3.amazonaws.com
DNS-style bucket+hostname:port template for accessing a bucket: %(bucket)s.s3.amazonaws.com
Encryption password:
Path to GPG program: /usr/bin/gpg
Use HTTPS protocol: False
HTTP Proxy server name:
HTTP Proxy server port: 0
Test access with supplied credentials? [Y/n] n
Save settings? [y/N] y
Configuration saved to '/root/.s3cfg'
(3)编辑.s3cfg文件,修改host_base和host_bucket
vim .s3cfg
修改如下两行:
……
host_base = s3.amazonaws.com 改成host_base = c720183.kevin.cn:7480 #必须要有域名
host_bucket = %(bucket)s.s3.amazonaws.com 改成host_bucket = %(bucket). c720183.kevin.cn:7480 #必须要有域名
……
vim /etc/hosts #添加如下行:
172.22.69.65 c720183.kevin.cn
(4)创建桶并放入文件
[root@c720184 ~]# s3cmd mb s3://first-bucket #创建一个桶
ERROR: [Errno -2] Name or service not known
ERROR: Connection Error: Error resolving a server hostname.
Please check the servers address specified in 'host_base', 'host_bucket', 'cloudfront_host', 'website_endpoint'
解决办法:
vim.s3cfg
bucket_location = ZH 把 ZH改成US
[root@client ~]# s3cmd mb s3://first-bucket
ERROR: S3 error: 400 (InvalidLocationConstraint): The specified location-constraint is not valid
解决办法:
vim.s3cfg
bucket_location = ZH 把 ZH改成US
[root@client ~]# s3cmd mb s3://first-bucket
ERROR: S3 error: 416 (InvalidRange)
解决办法:
将其他对象存储后台驻留程序(OSD)添加到群集或将“mon_max_pg_per_osd”的默认值增加到300以上。
修改配置文件(管理节点操作):
[ceph-admin@c720181 my-cluster]$ vim ceph.conf
[mon]
mon allow pool delete = true
mon_max_pg_per_osd = 300
[ceph-admin@c720181 my-cluster]$ ceph-deploy --overwrite-conf config push c720181 c720182 c720183
重启mon服务(集群mon节点都要操作):
systemctl restart ceph-mon.target
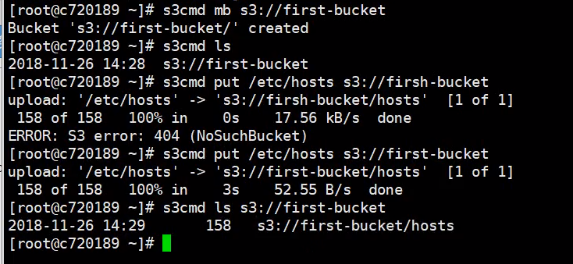
[root@c720184 ~]# s3cmd mb s3://first-bucket #创建一个桶
Bucket 's3://first-bucket/' created
[root@c720184 ~]# s3cmd put /etc/hosts s3://first-bucket #把文件放入桶中
[root@c720184 ~]# s3cmd ls s3://first-bucket #查看桶里面的文件
正常情况应该是下面的截图:
's3: //first-bucket/hosts ' 158 of 158 100% in 3s 52.55 B/S done [root@c720189 s3cmd Is s3://first-bucket 2018-11-26 14:29 [root@c720189 158 53 : / / first -bucket/hosts " v:shapes="图片_x0020_19">
===============================================================================================
使用Swift API访问对象存储
(1)创建swift api自用户
radosgw-admin subuser create --uid=radosgw --subuser=radosgw:swift --access=full --display-name="radosgw-sub" #display-name 可选 --access=full 必选,否则报错
删除用户:
radosgw-admin subuser rm --uid=radosgw --subuser=radosgw:swift
[ceph-admin@c720181 my-cluster]$ radosgw-admin subuser create --uid=radosgw --subuser=radosgw:swift --access=full --display-name="radosgw-sub"
注意:请把secret_key保存下来,如果没记住可使用命令查看:
{
"user_id": "radosgw",
"display_name": "Radosgw",
"email": "",
"suspended": 0,
"max_buckets": 1000,
"auid": 0,
"subusers": [
{
"id": "radosgw:swift",
"permissions": "<none>"
}
],
"keys": [
{
"user": "radosgw",
"access_key": "XBKOS3SHEB0KZ86U8QN6",
"secret_key": "kK9Rq7o1Wm8oBe02I35uqt3yIB0YOQOb4xHCVBnV"
}
],
"swift_keys": [
{
"user": "radosgw:swift",
"secret_key": "HHTS1whkPd46EM7CLOCRD7Mm3ATHN7nwBpqg8Iys"
}
],
"caps": [],
"op_mask": "read, write, delete",
"default_placement": "",
"placement_tags": [],
"bucket_quota": {
"enabled": false,
"check_on_raw": false,
"max_size": -1,
"max_size_kb": 0,
"max_objects": -1
},
"user_quota": {
"enabled": false,
"check_on_raw": false,
"max_size": -1,
"max_size_kb": 0,
"max_objects": -1
},
"temp_url_keys": [],
"type": "rgw"
}
(2)安装swift客户端
[root@c720184 ~]# yum install -y python-pip
[root@c720184 ~]# pip install --upgrade python-swiftclient
查看
[root@c720184 ~]# swift -A http://c720181.kevin.cn:7480/auth/1.0/ -U radosgw:swift -K HHTS1whkPd46EM7CLOCRD7Mm3ATHN7nwBpqg8Iys list #查看桶
Auth GET failed: http://c720181.kevin.cn:7480/auth/1.0/ 403 Forbidden [first 60 chars of response] {"Code":"AccessDenied","RequestId":"tx000000000000000000002-
Failed Transaction ID: tx000000000000000000002-005d595d78-1080-default
报错原因:
a.对象存储需要用到域名,所以在配置集群主机名之前需要配置好主机名和域名。
b.没有触发该用户写入数据库,可以多试试几遍,或者再添加一个其他用户试试。
解决办法:
vim /etc/hosts #添加如下行
172.22.69.63 c720181.kevin.cn
[root@c720184 ~]# swift -A http://c720181.kevin.cn:7480/auth/1.0/ -U radosgw:swift -K HHTS1whkPd46EM7CLOCRD7Mm3ATHN7nwBpqg8Iys post second-bucket #创建一个桶
[root@c720184 ~]# swift -A http://c720181,kevin.cn:7480/auth/1.0/ -U radosgw:swift -K HHTS1whkPd46EM7CLOCRD7Mm3ATHN7nwBpqg8Iys list #查看桶
正常情况的话如下图所示:
