需求:
系统需要做下单、退款、撤销的回归测试,有下单页面,所以就想到用selenium做WEB UI 自动化
项目目录结构:
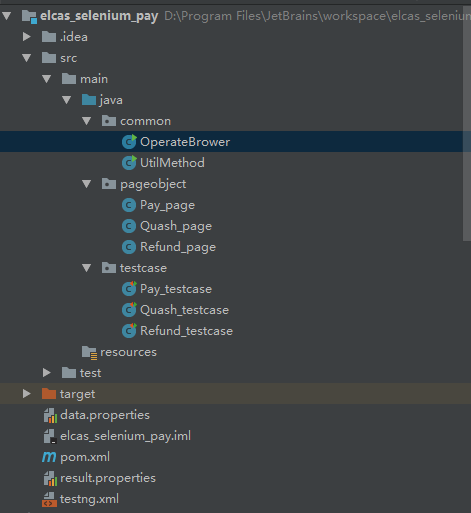
common包上放通用的工具类方法和浏览器操作方法
pageobject包放封装好的页面对象,里面包含页面所有可操作的元素和方法
testcase包放测试用例脚本
data.properties放需要传入的测试数据
result.properties放测试执行后的结果
pom.xml为maven项目的配置文件,解决项目包的依赖问题
testng.xml为testNG框架的配置文件,控制用例的执行
下面开始介绍项目实施过程
1.第一步,新建maven项目,pom.xml文件内容如下
<?xml version="1.0" encoding="UTF-8"?>
<project xmlns="http://maven.apache.org/POM/4.0.0"
         xmlns:xsi="http://www.w3.org/2001/XMLSchema-instance"
         xsi:schemaLocation="http://maven.apache.org/POM/4.0.0 http://maven.apache.org/xsd/maven-4.0.0.xsd">
    <modelVersion>4.0.0</modelVersion>

    <groupId>elcas</groupId>
    <artifactId>elcas_selenium_pay</artifactId>
    <version>1.0-SNAPSHOT</version>

    <build>
    <plugins>
    <plugin>
        <groupId>org.apache.maven.plugins</groupId>
        <artifactId>maven-compiler-plugin</artifactId>
        <version>3.6.1</version>
        <configuration>
            <source>1.8</source>
            <target>1.8</target>
        </configuration>
    </plugin>
    </plugins>
    </build>
    <dependencies>
    <dependency>
        <groupId>org.seleniumhq.selenium</groupId>
        <artifactId>selenium-java</artifactId>
        <version>2.53.1</version>
    </dependency>
    <dependency>
        <groupId>log4j</groupId>
        <artifactId>log4j</artifactId>
        <version>1.2.17</version>
    </dependency>
        <dependency>
            <groupId>org.testng</groupId>
            <artifactId>testng</artifactId>
            <version>6.11</version>
            <!--<scope>compile</scope>-->
        </dependency>
        <!--<dependency>-->
            <!--<groupId>org.seleniumhq.selenium</groupId>-->
            <!--<artifactId>selenium-server</artifactId>-->
            <!--<version>2.53.1</version>-->
        <!--</dependency>-->
    </dependencies>

</project>
2.第二步,编写操作浏览器的方法,和可能用到的工具类方法
 1 package common;
 2
 3 import org.openqa.selenium.WebDriver;
 4 import org.openqa.selenium.firefox.FirefoxBinary;
 5 import org.openqa.selenium.firefox.FirefoxDriver;
 6
 7 import java.io.File;
 8 import java.io.IOException;
 9
10 public class OperateBrower {
11     static WebDriver driver;
12 public static WebDriver OpenFireFox() throws IOException {
13     File firefoxFile=new File("D:\Program Files (x86)\Mozilla Firefox\24.0\firefox.exe");
14     FirefoxBinary binary=new FirefoxBinary(firefoxFile);
15     driver =new FirefoxDriver(binary,null);
16     return driver;
17 }
18 public static void OpenURL(String url) throws InterruptedException {
19     driver.get(url);
20     driver.manage().window().maximize();
21 //    Thread.sleep(2000);
22 }
23 public static void CloseBrower(){
24     driver.close();
25 }
26
27 public static void main(String[] args) throws Exception {
28 //    File directory = new File("");// 参数为空
29 //    String courseFile = directory.getCanonicalPath();
30 //    System.out.println(courseFile);
31     OperateBrower.OpenFireFox();
32     OperateBrower.OpenURL("https://www.baidu.com");
33     OperateBrower.CloseBrower();
34
35 }
36 }
 1 package common;
 2
 3 import java.io.*;
 4 import java.text.SimpleDateFormat;
 5 import java.util.Date;
 6 import java.util.Properties;
 7
 8 public class UtilMethod {
 9     public static String getData(String key){
10         Properties pro=new Properties();
11         try {
12            InputStream inputfile= new FileInputStream("data.properties");
13             pro.load(new InputStreamReader(inputfile,"utf-8"));
14
15         } catch (IOException e) {
16             e.printStackTrace();
17         }
18         return pro.getProperty(key);
19     }
20     public static void setData(String key,String value,String comments){
21         Properties pro=new Properties();
22         try {
23             FileOutputStream outputfile= new FileOutputStream("result.properties",true);
24             pro.setProperty(key,value);
25             pro.store(new OutputStreamWriter(outputfile,"utf-8"),comments);
26
27         } catch (IOException e) {
28             e.printStackTrace();
29         }
30     }
31     public static String getCurrentDate(){
32         SimpleDateFormat df = new SimpleDateFormat("yyyy-MM-dd HH:mm:ss");//设置日期格式
33 //        System.out.println(df.format(new Date()));// new Date()为获取当前系统时间
34         return  df.format(new Date());
35     }
36     public static void main(String[] args){
37 //        System.out.println(getData("URL"));
38         setData("中文","22","test");
39         setData("121","孩子","test");
40 //        getCurrentDate();
41     }
42 }
读取和写入properties文件时,一开始中文乱码,需要加上相关的把编码类型变成utf-8的语句
3.第三步,创建pageobject对象,通过pagefactory中的@FindBy注解和PageFactory.initElements(driver, this);初始化页面控件元素对象,举个例子
package pageobject;

import org.openqa.selenium.WebDriver;
import org.openqa.selenium.WebElement;
import org.openqa.selenium.support.FindBy;
import org.openqa.selenium.support.PageFactory;
import org.openqa.selenium.support.ui.ExpectedConditions;
import org.openqa.selenium.support.ui.WebDriverWait;

public class Pay_page {
    WebDriver driver;
    WebDriverWait wait;
    @FindBy(xpath = "/html/body/div/ul/li[2]/a")
    WebElement tab;
    @FindBy(id="goods")
    WebElement goodsName;
    @FindBy(id="sysmerchantno")
    WebElement merchantNo;
    @FindBy(id="amount")
    WebElement amount;
    @FindBy(id="cardNO")
    WebElement cardNo;
    @FindBy(id="pwd")
    WebElement password;
    @FindBy(id="pay")
    WebElement payButton;
    @FindBy(xpath = "/html/body/div/div[2]/div[7]/div[1]")
    WebElement result;
    @FindBy(xpath = "/html/body/div/div[2]/div[7]/div[2]")
    WebElement orderNo;

    public Pay_page(WebDriver driver) {
        this.driver = driver;
        PageFactory.initElements(driver, this);
    }
    public void clickTab(){
        tab.click();
    }
public void inputGoods(String goodsname){
        goodsName.clear();
        goodsName.sendKeys(goodsname);
}
    public void inputMerchantNo(String merchantno){
        merchantNo.clear();
        merchantNo.sendKeys(merchantno);
    }
    public void inputAmount(String amountStr){
        amount.clear();
        amount.sendKeys(amountStr);
    }
    public void inputCardNo(String cardno){
        cardNo.clear();
        cardNo.sendKeys(cardno);
    }
    public void inputPassword(String pwd){
        password.clear();
        password.sendKeys(pwd);
    }
    public void clickPay(){
        payButton.click();
    }
    public String getResult(){
        wait=new WebDriverWait(driver,10);
        wait.until(ExpectedConditions.visibilityOf(result));
       return result.getText();
    }
    public String getOrderNo(){
        wait.until(ExpectedConditions.visibilityOf(orderNo));
        String str=orderNo.getText();
        String [] a=str.split(":") ;
        return a[1];
    }
    public void pay(String goods,String merchant,String amount,String cardno,String pwd) throws  Exception{
    clickTab();
    inputGoods(goods);
    inputMerchantNo(merchant);
    inputAmount(amount);
    inputCardNo(cardno);
    inputPassword(pwd);
    clickPay();
    Thread.sleep(2000);
    System.out.println("支付结果是:"+getResult()+"
订单号是:"+getOrderNo());

    }
}
第四步,编写测试用例脚本
 1 package testcase;
 2
 3 import common.OperateBrower;
 4 import common.UtilMethod;
 5 import org.openqa.selenium.WebDriver;
 6 import org.testng.Assert;
 7 import org.testng.annotations.AfterClass;
 8 import org.testng.annotations.BeforeClass;
 9 import org.testng.annotations.Test;
10 import pageobject.Pay_page;
11
12
13 public class Pay_testcase {
14     WebDriver driver;
15     Pay_page payPage;
16     @BeforeClass
17     public void setUp() throws Exception {
18         driver=OperateBrower.OpenFireFox();
19         OperateBrower.OpenURL(UtilMethod.getData("URL"));
20     }
21     @AfterClass
22     public void tearDown(){
23         OperateBrower.CloseBrower();
24     }
25     @Test
26     public void testPay()throws Exception{
27         payPage=new Pay_page(driver);
28 //        payPage.clickTab();
29 //        Thread.sleep(2000);
30         System.out.println("支付用例执行开始");
31         payPage.pay(UtilMethod.getData("GOODS"),UtilMethod.getData("MERCHANT"),UtilMethod.getData("AMOUNT"),UtilMethod.getData("CARD"),UtilMethod.getData("PASSWORD"));
32         UtilMethod.setData("支付结果",payPage.getResult()+" "+payPage.getOrderNo(),"result");
33 //        UtilMethod.setData(+timestamp,payPage.getOrderNo());
34 //        Thread.sleep(2000);
35         Assert.assertEquals(payPage.getResult(),"支付成功");
36         System.out.println("支付用例执行结束");
37         System.out.println();
38     }
39 }
第五步,准备好测试数据,建好存储结果的文件,使用testng.xml运行测试
testng.xml文件
 1 <?xml version="1.0" encoding="UTF-8"?>
 2 <!DOCTYPE suite SYSTEM "http://testng.org/testng-1.0.dtd">
 3 <suite name="regression">
 4     <test name="all_regression">
 5         <packages><package name="testcase"></package></packages>
 6     </test>
 7     <test name="part_regression">
 8         <classes>
 9             <!--<class name="testcase.Pay_testcase"></class>-->
10             <!--<class name="testcase.Refund_testcase">-->
11                 <!--<methods>-->
12                     <!--<include name="testRefund"></include>-->
13                 <!--</methods>-->
14             <!--</class>-->
15             <!--<class name="testcase.Quash_testcase"></class>-->
16         </classes>
17     </test>
18 </suite>
data.properties文件
1 URL=https://手动打码/
2 AMOUNT=1
3 GOODS=test
4 MERCHANT=123
5 CARD=6255555555555555
6 PASSWORD=123456
result.properties文件
#Thu May 03 15:45:08 CST 2018
支付结果=支付成功 02000435490503154454
希望同行们更够给出改进建议,欢迎交流讨论