创建DOM元素
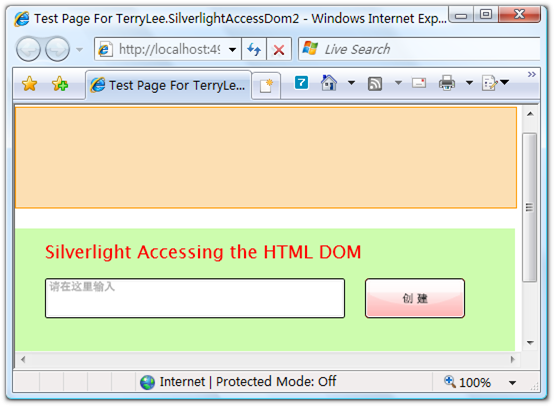
首先我们来看如何创建一个新的DOM元素,最终的效果如下,当我们在文本框中输入文字后,单击创建,将在上面的区域中创建一个li元素。
先来定义一下HTML页面,甚至Silverlight插件的高度。
 阅读
阅读  编辑
编辑  运行 复制
运行 复制  保存
保存<div id="parentdiv"> <ul id="list"> </ul> </div> <div style="height:200px;"> <asp:Silverlight ID="Xaml1" runat="server" Source="~/ClientBin/TerryLee.SilverlightAccessDom2.xap" Version="2.0" Width="100%" Height="200px" /> </div>
并且为上面的div定义一个简单的样式,以示与Silverlight区分
 复制 保存
复制 保存#parentdiv
{
background:#FCDFB3;
border:solid 1px #FF9900;
500px;
height:100px;
margin-bottom:20px;
}
在Silverlight中进行界面布局,XAML如下:
 复制 保存
复制 保存<Canvas Background="#CDFCAE"> <TextBlock Text="Silverlight Accessing the HTML DOM" Foreground="Red" Canvas.Top="10" Canvas.Left="30" FontSize="18"> </TextBlock> <WatermarkedTextBox x:Name="input" Watermark="请在这里输入" Height="40" Width="300" Canvas.Left="30" Canvas.Top="50"> </WatermarkedTextBox> <Button x:Name="createButton" Background="Red" Height="40" Width="100" Content="创 建" Canvas.Top="50" Canvas.Left="350" Click="createButton_Click"> </Button> </Canvas>
编写创建按钮的代码,首先获取到要往里面添加元素的父元素,即我们定义的ul:
 复制 保存
复制 保存HtmlElement parent = HtmlPage.Document.GetElementById("list");
创建一个新的元素li,并设置属性
复制 保存HtmlElement child = HtmlPage.Document.CreateElement("li");
child.SetAttribute("innerText", this.input.Text);
添加新元素到parent中
复制 保存parent.AppendChild(child);
完整的代码如下:
复制 保存private void createButton_Click(object sender, RoutedEventArgs e)
{
HtmlElement parent = HtmlPage.Document.GetElementById("list");
HtmlElement child = HtmlPage.Document.CreateElement("li");
child.SetAttribute("innerText", this.input.Text);
parent.AppendChild(child);
}
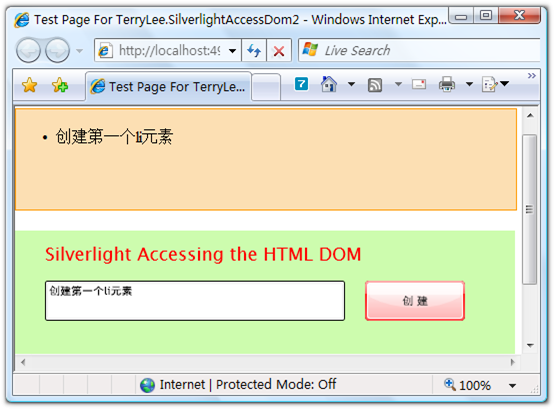
运行后创建第一个元素
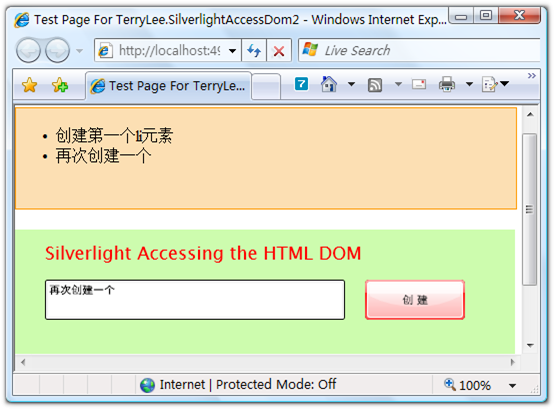
再次创建一个
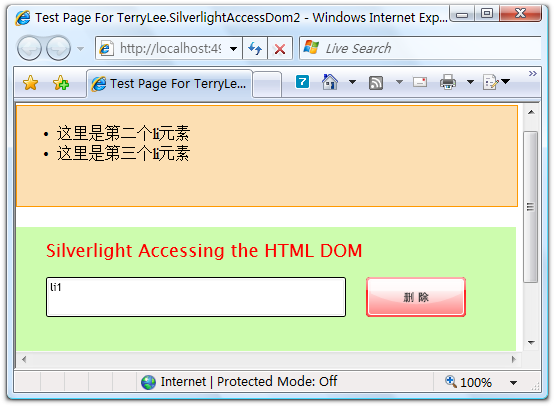
移除DOM元素
既然可以创建元素,对应的也可以删除元素,我们在页面上放上几个<li>元素,然后输入id进行删除。代码如下:
复制 保存private void deleteButton_Click(object sender, RoutedEventArgs e)
{
HtmlElement parent = HtmlPage.Document.GetElementById("list");
HtmlElement child = HtmlPage.Document.GetElementById(this.input.Text);
parent.RemoveChild(child);
}
运行后界面上有三个<li>
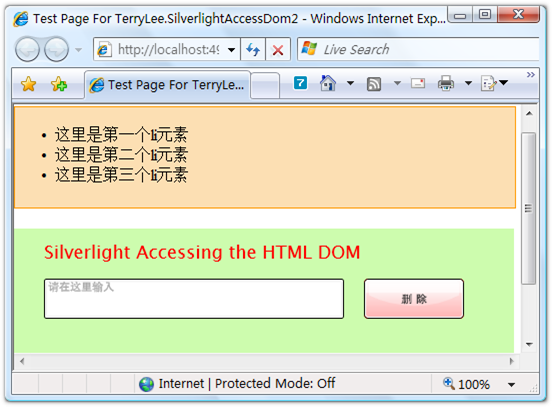
删除其中一个
为DOM注册事件
除了添加和移除DOM元素外,我们还可以为DOM元素附加事件,在下面的例子中我们将通过Silverlight动态创建一个DOM元素<a>,并未它注册单击事件,单击时修改Silverlight中的矩形背景色。先准备相关的HTML。
阅读 编辑 运行 复制 保存<div id="parent"> </div> <div style="height:200px;"> <asp:Silverlight ID="Xaml1" runat="server" Source="~/ClientBin/TerryLee.SilverlightAccessingDom3.xap" Version="2.0" Width="100%" Height="200px" /> </div>
并且定义两个样式,其中newstyle我们将在Silverlight中为新添加的a元素使用。
复制 保存#parent
{
background:#FCDFB3;
border:solid 1px #FF9900;
500px;
height:100px;
margin-bottom:20px;
}
.newstyle
{
background:#0099FF;
border:solid 1px #0000FF;
}
做一个简单的界面,放置一个按钮和矩形:
复制 保存<Canvas Background="#CDFCAE"> <TextBlock Text="Silverlight Accessing the HTML DOM" Foreground="Red" Canvas.Top="10" Canvas.Left="30" FontSize="18"> </TextBlock> <Rectangle x:Name="result" Height="40" Width="300" Fill="Red" Canvas.Left="30" Canvas.Top="50" RadiusX="5" RadiusY="5"> </Rectangle> <Button x:Name="addButton" Background="Red" Height="40" Width="100" Content="添 加" Canvas.Top="50" Canvas.Left="350" Click="addButton_Click"> </Button> </Canvas>
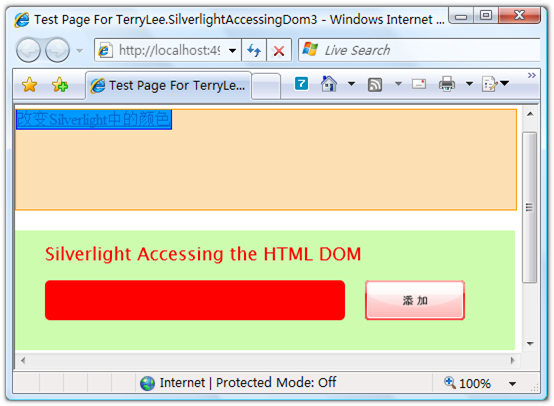
添加DOM元素,创建一个a元素,并为它设置属性,其中用CssClass来定义它的样式:
复制 保存HtmlElement parent = HtmlPage.Document.GetElementById("parent");
HtmlElement button = HtmlPage.Document.CreateElement("a");
button.SetAttribute("innerText", "改变Silverlight中的颜色");
button.SetAttribute("href", "#");
button.CssClass = "newstyle";
parent.AppendChild(button);
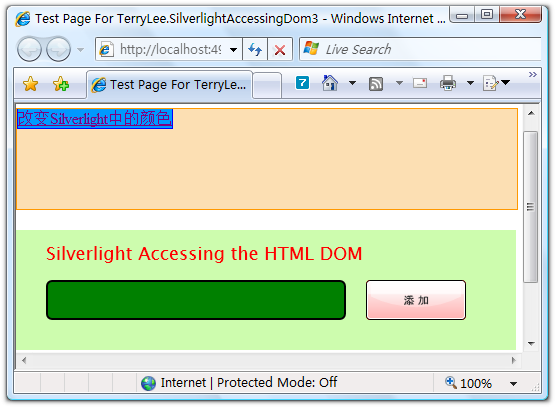
为a元素附加onclick事件,HtmlElement提供了AttachEvent方法用来附加事件,使用泛型的EventHandler,在a元素单单击时我们改变Silverlight中的矩形填充色和边框。
复制 保存button.AttachEvent("onclick", new EventHandler<HtmlEventArgs>(button_Click));
复制 保存void button_Click(object sender, HtmlEventArgs e)
{
result.Stroke = new SolidColorBrush(Colors.Black);
result.Fill = new SolidColorBrush(Colors.Green);
result.StrokeThickness = 2;
}
完整的代码如下:
复制 保存private void addButton_Click(object sender, RoutedEventArgs e)
{
HtmlElement parent = HtmlPage.Document.GetElementById("parent");
HtmlElement button = HtmlPage.Document.CreateElement("a");
button.SetAttribute("innerText", "改变Silverlight中的颜色");
button.SetAttribute("href", "#");
button.CssClass = "newstyle";
parent.AppendChild(button);
button.AttachEvent("onclick", new EventHandler<HtmlEventArgs>(button_Click));
}
void button_Click(object sender, HtmlEventArgs e)
{
result.Stroke = new SolidColorBrush(Colors.Black);
result.Fill = new SolidColorBrush(Colors.Green);
result.StrokeThickness = 2;
}
运行一下看看效果如何,起始界面
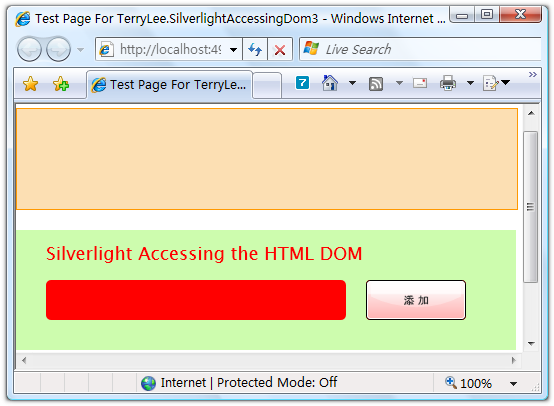
添加新元素a
单击改变矩形的背景颜色
HtmlElement也提供了DetachEvent方法,可以取消注册事件。
结束语
本文简单介绍了如何在Silverlight中添加和移除DOM元素,以及为DOM元素添加、取消事件处理程序。