一,控件基本
1,在ICONFONT之中创建图表项目:
https://www.iconfont.cn/manage/index?manage_type=myprojects&projectId=1810335
2,下载 字体文件,并且查看index : 发现每个图表的代码:
3,将字体访日项目中的某个文件夹内:
根目录为./ 可以使用以下两种方式进行字体访问:
FontFamily="./Fonts/#iconfont" FontFamily="pack://application:,,,/Fonts/#IconFont" //其中:pack://application:,,, 表示根目录. 或者使用资源的方式: <Grid.Resources> <ResourceDictionary> <ResourceDictionary.MergedDictionaries> <!-- 引入字体 --> <ResourceDictionary> <FontFamily x:Key="iconfont">./Fonts/#iconfont</FontFamily> </ResourceDictionary> </ResourceDictionary.MergedDictionaries> </ResourceDictionary> </Grid.Resources> 然后在代码中引用资源 <TextBlock Grid.Row="1" FontFamily="{StaticResource iconfont}" FontSize="30" Text=''></TextBlock>
5,属性继承:
FontFamily:继承给子元素
在Control类中: Foreground 继承,Background不继承
在UIElement之中:AllowDrop,IsEnable,IsVisible 继承
在FrameworkElement中:CultureInfo,FlowDirection 继承
6,设置备用字体 : FontFamily="f1,f2,f3”
7,获取系统字体:lstFont是一个标准listbox
foreach(var family in Fonts.SystemFontFamilies)
            {
                lstFont.Items.Add(family);
            }
8:光标,通过设定Cusor 属性来设定光标形状.
- 通过 Mouse.Override来大面积更改光标
- 通过ForceCusor=True ,父元素可以强制子元素光标.(必须其属性不为NULL).
- 如何加载自定义光标,注意下载完光标之后,貌似要安装一下,然后才能使用.且
- 光标的地址是绝对值.
- 光标相对值作为资源文档的方式:
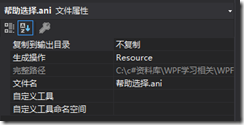
Cursor cursor = new Cursor(@"C:c#资料库WPF学习相关WPF变成宝典WPF编程宝典源码(第四版)Pro WPF 4.5 in C#Chapter06ControlsCusors帮助选择.ani");
二,内容控件:
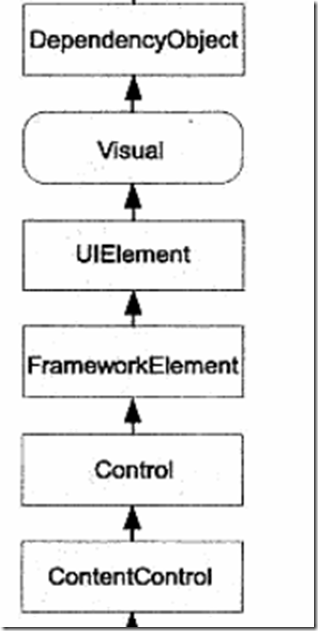
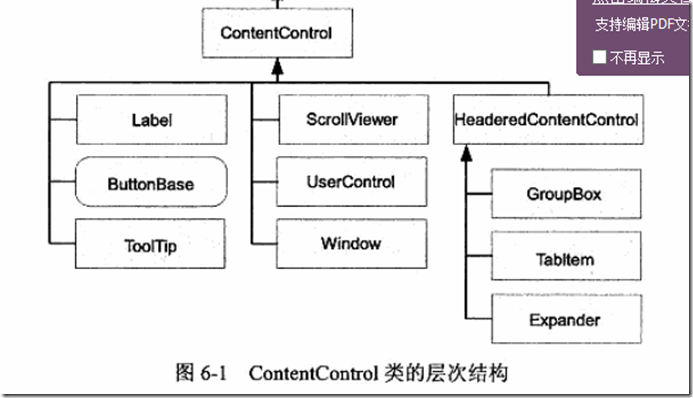
1,ControlContent内容控件在WPF中的类的层次关系.
常用内容控件:标签,按钮,滚动条视窗,用户控件,window. 带头内容控件.
3,ContentControl类的常用属性:
ContentControl.Content属性支持任何对象.大致分为两类:
未继承自UIElement类对象,则调用其ToString方法获取文本.
继承自UIElement对象,则调用其OnRender()方法在内容控件内部显示.
4,ContentTemplate:内容模板的使用.
先看使用方法:首先建立DataTemplate资源:
<DataTemplate x:Key="template1">
  <TextBlock Text="{Binding}" FontSize="12" FontWeight="Bold" TextWrapping="Wrap"></TextBlock>
</DataTemplate>
//建立一个换行的数据模板.
<ContentControl Name="contCtrl" ContentTemplate="{StaticResource template1}"
    Content="This is the content of the content control."/>
//然后使用它.
数据模板的概念:DataTemplate对象(ContentTemplate,ItemTemplate...)
1, 数据源绑定相关姿势:https://blog.csdn.net/yangwenxue1989/article/details/81624240
RelativeSource-----Self
<Window x:Class="RelativeSource.MainWindow"

        xmlns="http://schemas.microsoft.com/winfx/2006/xaml/presentation"

        xmlns:x="http://schemas.microsoft.com/winfx/2006/xaml"

        Title="MainWindow" Height="350" Width="525">

    <Grid>

        <StackPanel>

            <TextBox Height="30" Width="60" Name="Box1" Text="{Binding RelativeSource={RelativeSource Mode=self},Path=Name }"/>

        </StackPanel>

    </Grid>

</Window>
public MainWindow()

{

    InitializeComponent();

    System.Windows.Data.RelativeSource rs = new System.Windows.Data.RelativeSource();

    rs.Mode = RelativeSourceMode.Self;

    Binding binding = new Binding("Name") { RelativeSource = rs };

    this.Box1.SetBinding(TextBox.TextProperty, binding);

}
//创建一个RelativeSource对象,表明如何进行相对绑定.然后创建一个绑定对象,并将其与自身名称绑定.
2,----------父级容器绑定
<Window x:Class="RelativeSource.MainWindow"

        xmlns="http://schemas.microsoft.com/winfx/2006/xaml/presentation"

        xmlns:x="http://schemas.microsoft.com/winfx/2006/xaml"

        Title="MainWindow" Height="350" Width="525">

    <Grid Name="G1">

        <Grid Name="G2">

            <StackPanel Name="S1">

                <TextBox Height="30" Width="60" Name="Box1" Text="{Binding RelativeSource={RelativeSource Mode=FindAncestor, AncestorType={x:Type Grid}, AncestorLevel=2},Path=Name }"/>

            </StackPanel>

        </Grid>

    </Grid>

</Window>
表明要绑定的方式是绑定父级容器的某个属性.其中 AncestorLevel设定偏移量.AncestorType设定父容器的类型.
3,使用关联模板属性
<Window.Resources>

    <Style TargetType="{x:Type Button}">

        <Setter Property="Background" Value="Green"/>

            <Setter Property="Template">

                <Setter.Value>

                <ControlTemplate TargetType="{x:Type Button}">

                    <Grid>

                        <Ellipse>

                            <Ellipse.Fill>

                                <SolidColorBrush Color="{Binding Path=Background.Color,RelativeSource={RelativeSource TemplatedParent}}"/>

                            </Ellipse.Fill>

                        </Ellipse>

                    </Grid>

                </ControlTemplate>

            </Setter.Value>

        </Setter>

    </Style>

</Window.Resources>
三 标签
标签具有Target属性.可以通过按快捷键使绑定的控件获得焦点.通过下划线标识 ,按 Alt+C可以切换到TextBox.
 <Label Grid.Row="0" Target="{Binding ElementName=C1}" Content="_C1" HorizontalAlignment="Center"/>
            <TextBox Grid.Row="1"  x:Name="C1" Margin="3" Background="#581111"/>
四 按钮
1,按钮继承自 ButtonBase类 可以通过ClickMode属性来设定Click事件引发的时机.
2,IsCancel属性 当True时候,在当前窗口任何位置按下Esc会触发该按钮.且关闭当前窗口...
3,IsDefault属性 当为True的时候,在当前窗口任何位置按下Enter会触发该按钮.
4,其他按钮 ToggleButton控件 单击一次更改一次行为. RepeatButton在按下的时候会不断触发Click事件.
CheckBox继承自 ToggleButton,并且其添加了IsChecked属性.
RadioButton 添加了GroupName属性 单选按钮通常由其容器进行分组,但是可以使用GroupName进行覆盖该行为.
五 ToolTip
 <StackPanel Margin="5" ToolTip="StackPanel tooltip">
    <Button ToolTip="This is my tooltip" ToolTipService.InitialShowDelay="5000">I have a tooltip</Button>
    <Button ToolTipService.InitialShowDelay="0" ToolTipService.BetweenShowDelay="5000">
      <Button.ToolTip>
        <ToolTip Background="#60AA4030" Foreground="White"
                 HasDropShadow="False" >
        <StackPanel>
          <TextBlock Margin="3" >Image and text</TextBlock>
          <Image Source="happyface.jpg" Stretch="None" />
          <TextBlock Margin="3" >Image and text</TextBlock>
        </StackPanel>
        </ToolTip>
        </Button.ToolTip>
      <Button.Content>I have a fancy tooltip</Button.Content>

    </Button>
    <Button ToolTip="This is my tooltip"  ToolTipService.Placement="Bottom">Placement test</Button>
    <Button Padding="50">Does Nothing</Button>
    <TextBox TextWrapping="Wrap" MinLines="2" AutoWordSelection="True"></TextBox>

  </StackPanel>
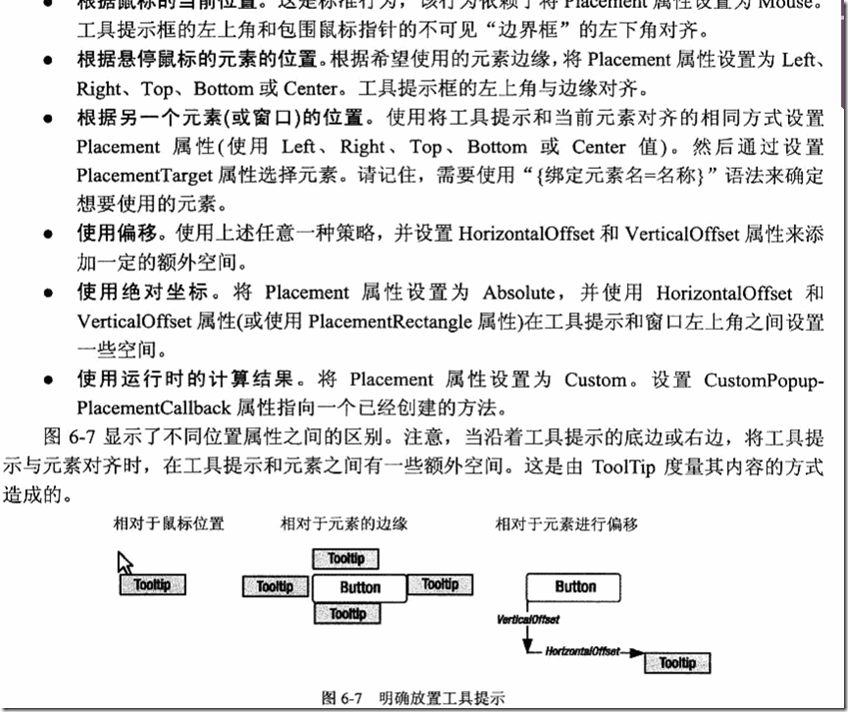
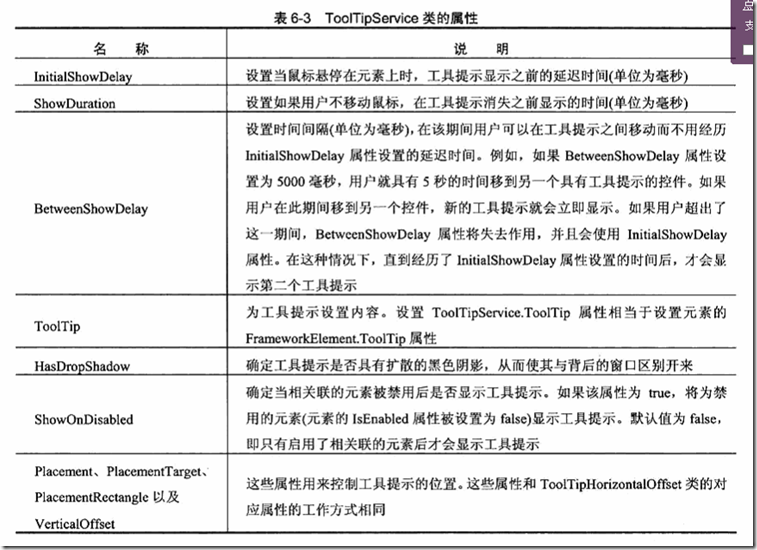
2使用ToopTipService 来扩展 ToolTip的功能:
六 PopUp---弹出窗口:
<TextBlock TextWrapping="Wrap">You can use a Popup to provide a link for
      a specific <Run TextDecorations="Underline"
        MouseEnter="run_MouseEnter"
                      >term</Run> of interest.</TextBlock>
      <Popup Name="popLink" StaysOpen="False" Placement="Mouse" MaxWidth="200"
             PopupAnimation="Slide" AllowsTransparency = "True">
        <Border BorderBrush="Beige" BorderThickness="2" Background="White">
          <TextBlock Margin="10"  TextWrapping="Wrap" >
            For more information, see
            <Hyperlink NavigateUri="http://en.wikipedia.org/wiki/Term" Click="lnk_Click">Wikipedia</Hyperlink>


          </TextBlock>
        </Border>
      </Popup>
1,PopUp的内容继承在Child之中
2,PopUp显示使用IsOpen来控制,使用StayOpen来提示是否一致显示.
3,PopUp支持动画效果:
- PopupAnimation=Slide--划入,Fade,Scroll
七 其他控件---ScrollView和TableControl
一,ScrollView:用于设定滚动条
二,支持代码滚动
三,支持自定义滚动:对象实现接口:IScrollInfo.并且将CanContentScroll设为True.
 private void LineUp(object sender, RoutedEventArgs e)
        {
            scroller.LineUp();
        }
        private void LineDown(object sender, RoutedEventArgs e)
        {
            scroller.LineDown();
        }
        private void PageUp(object sender, RoutedEventArgs e)
        {
            scroller.PageUp();
        }
        private void PageDown(object sender, RoutedEventArgs e)
        {
            scroller.PageDown();
        }
八, TableControl
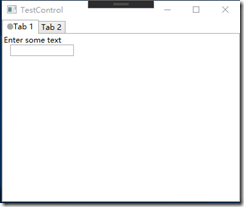
<TabControl>
  <TabItem>
    <TabItem.Header>
      <StackPanel Orientation="Horizontal">
        <Ellipse Width="10" Height="10" Fill="DarkGray"/>
        <TextBlock>Tab 1</TextBlock>
      </StackPanel>
    </TabItem.Header>
    <StackPanel>
      <TextBlock>Enter some text</TextBlock>
      <TextBox Name="textBox1" Width="50"/>
    </StackPanel>
  </TabItem>
  <TabItem Header="Tab 2">
    <!--Bind TextBlock.Text to the TextBox on the first
    TabItem.-->
    <TextBlock Text="{Binding ElementName=textBox1, Path=Text}"/>
  </TabItem>
</TabControl>
1,TabItem是可以进行内容填充成更复杂图形的.
2,TabItem进行页面的配置.
九 HeaderContentControl---Expander控件
1,其Header对象 可以像Content一样进行配置
2,其ExpandDirection可以配置方向
3, 可以使用Expanded 和 Collapsed事件,在展示和隐藏前进行事件通知.
十 TextBox RichTextBox 和PasswordBox 的区别
1,使用MinLines和MaxLines设定文本框的高度
2,通过设定VerticalScrollBarVisibility 来控制显示内容
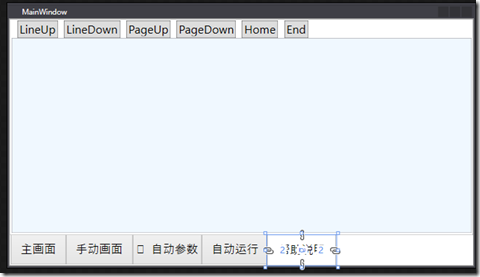
3,通过LineUp() PageUp() LineDown() PageDown() 来控制翻页.ScrollToHome(),ScrollToEnd() 和ScrollToLine()来操作显示窗口.
4,在代码中使用Begin Change()和EndChange()进行更改.
5,使用UnDo进行文本撤销功能.
 <Grid>
                    <Grid.RowDefinitions>
                        <RowDefinition Height="30"></RowDefinition>
                        <RowDefinition></RowDefinition>
                    </Grid.RowDefinitions>
                    <StackPanel Grid.Row="0" Orientation="Horizontal">
                        <StackPanel.Resources>
                            <Style TargetType="Button">
                                <Setter Property="Margin" Value="10 0 0 0" ></Setter>
                                <Setter Property="Padding" Value="3"/>

                            </Style>
                        </StackPanel.Resources>
                        <Button x:Name="btLineUp" Click="btLineUp_Click">LineUp</Button>
                        <Button x:Name="btLineDown" Click="btLineDown_Click">LineDown</Button>
                        <Button x:Name="btPageUp" Click="btPageUp_Click">PageUp</Button>
                        <Button x:Name="btPageDown" Click="btPageDown_Click">PageDown</Button>
                        <Button x:Name="btHome" Click="btHome_Click">Home</Button>
                        <Button x:Name="btEnd" Click="btEnd_Click">End</Button>
                    </StackPanel>
                    <TextBox x:Name="txtBox" TextWrapping="Wrap" Grid.Row="1" Background="AliceBlue">

                    </TextBox>
                </Grid>
进行TextBox的控制.
PasswordBox: 略.
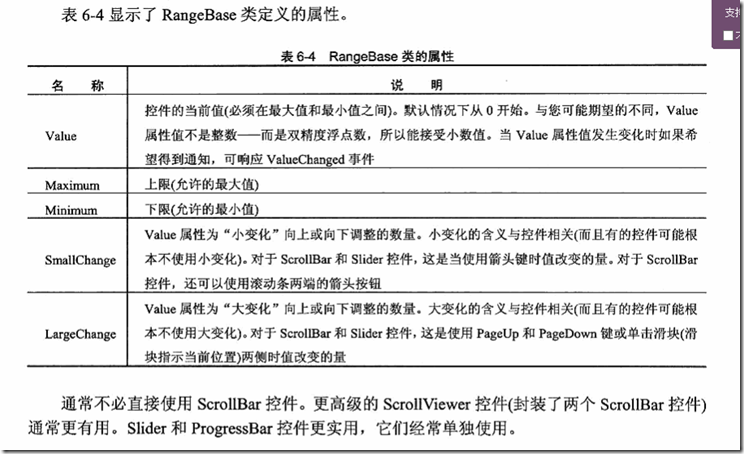
十一,基于范围的控件 RangeBase
ProcessBar: IsIndeterminate 属性=true 类似的循环效果.
十二 日期控件
Calendar 和 DataPicker 控件
<StackPanel Orientation="Horizontal">

  <!-- Create a Calendar that displays 1/10/2009
             through 4/18/2009. -->
  <Calendar Margin="20"
            SelectedDate="2/15/2009"
            DisplayDate="3/15/2009"
            DisplayDateStart="1/10/2009"
            DisplayDateEnd="4/18/2009"/>

  <!-- Create a Calendar that displays dates through
       Januarary 31, 2009 and has dates that are not selectable. -->
  <Calendar Margin="20" SelectionMode="MultipleRange"
            IsTodayHighlighted="false"
            DisplayDate="1/1/2009"
            DisplayDateEnd="1/31/2009"
            xmlns:sys="clr-namespace:System;assembly=mscorlib">

    <Calendar.BlackoutDates>
      <CalendarDateRange Start="1/2/2009" End="1/4/2009"/>
      <CalendarDateRange Start="1/9/2009" End="1/9/2009"/>
      <CalendarDateRange Start="1/16/2009" End="1/16/2009"/>
      <CalendarDateRange Start="1/23/2009" End="1/25/2009"/>
      <CalendarDateRange Start="1/30/2009" End="1/30/2009"/>
    </Calendar.BlackoutDates>

    <Calendar.SelectedDates>
      <sys:DateTime>1/5/2009</sys:DateTime>
      <sys:DateTime>1/12/2009</sys:DateTime>
      <sys:DateTime>1/14/2009</sys:DateTime>
      <sys:DateTime>1/13/2009</sys:DateTime>
      <sys:DateTime>1/15/2009</sys:DateTime>
      <sys:DateTime>1/27/2009</sys:DateTime>
      <sys:DateTime>4/2/2009</sys:DateTime>
    </Calendar.SelectedDates>
  </Calendar>

</StackPanel>
重要属性:
- DisplayDateStart,DisplayDateEnd---显示日期起始结束
- BlackoutDates ---被禁用的不能选择的日期---可调用AddDatesInPast()禁止选择过去的日期
- SelectedDate:选择的日期,SelectedDates---当SelectionMode允许选择多个日期时激活
- DisplayDate:日历视图最初显示的日期
- FirstDayOfWeek,显示星期几作为默认的左手侧第一个位置.欧美是星期天,中国是星期一.
- IsTodayHighlighted 今天是否高亮显示
- SlectionMode:用户选择日期的模式
- IsDropDownOpen:是否显示下拉的日历视图:仅DatePicker控件中
- SelectedDateFormat :显示显示日期方式.
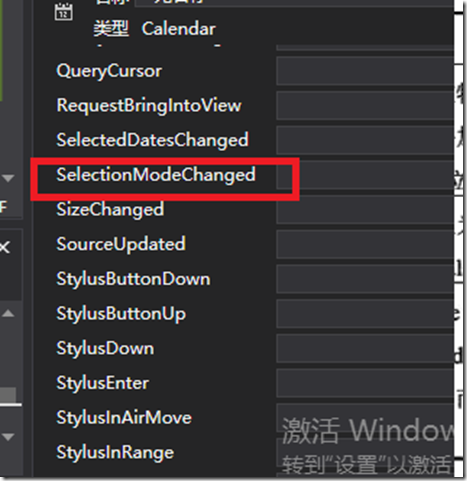
- 重要的事件
SelectedDateChanged: 选择日期变更
DisplayDateChanged:当界面变化时发生
DatePicker:
ClalenderOpened和ClaenderClosed:打开下拉日历和关闭下拉日历的时候
DateValidationError:输入日期错误通知.

