ActiveMQ介绍
MQ是消息中间件,是一种在分布式系统中应用程序借以传递消息的媒介,常用的有ActiveMQ,RabbitMQ,kafka。ActiveMQ是Apache下的开源项目,完全支持JMS1.1和J2EE1.4规范的JMS Provider实现。
特点:
1、支持多种语言编写客户端
2、对spring的支持,很容易和spring整合
3、支持多种传输协议:TCP,SSL,NIO,UDP等
4、支持AJAX
消息形式:
1、点对点(queue)
2、一对多(topic)
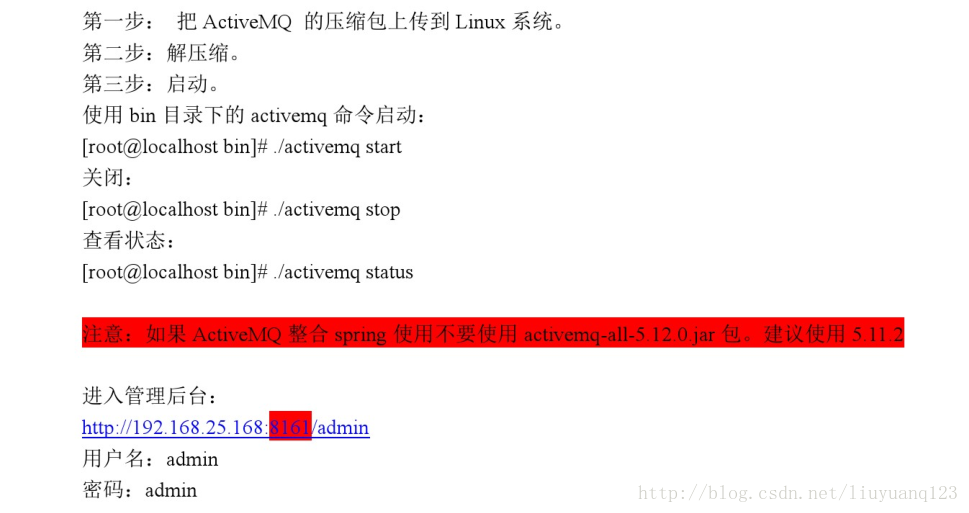
ActiveMQ安装
我这里提供一个安装好的虚拟机:http://download.csdn.net/download/liuyuanq123/10217892
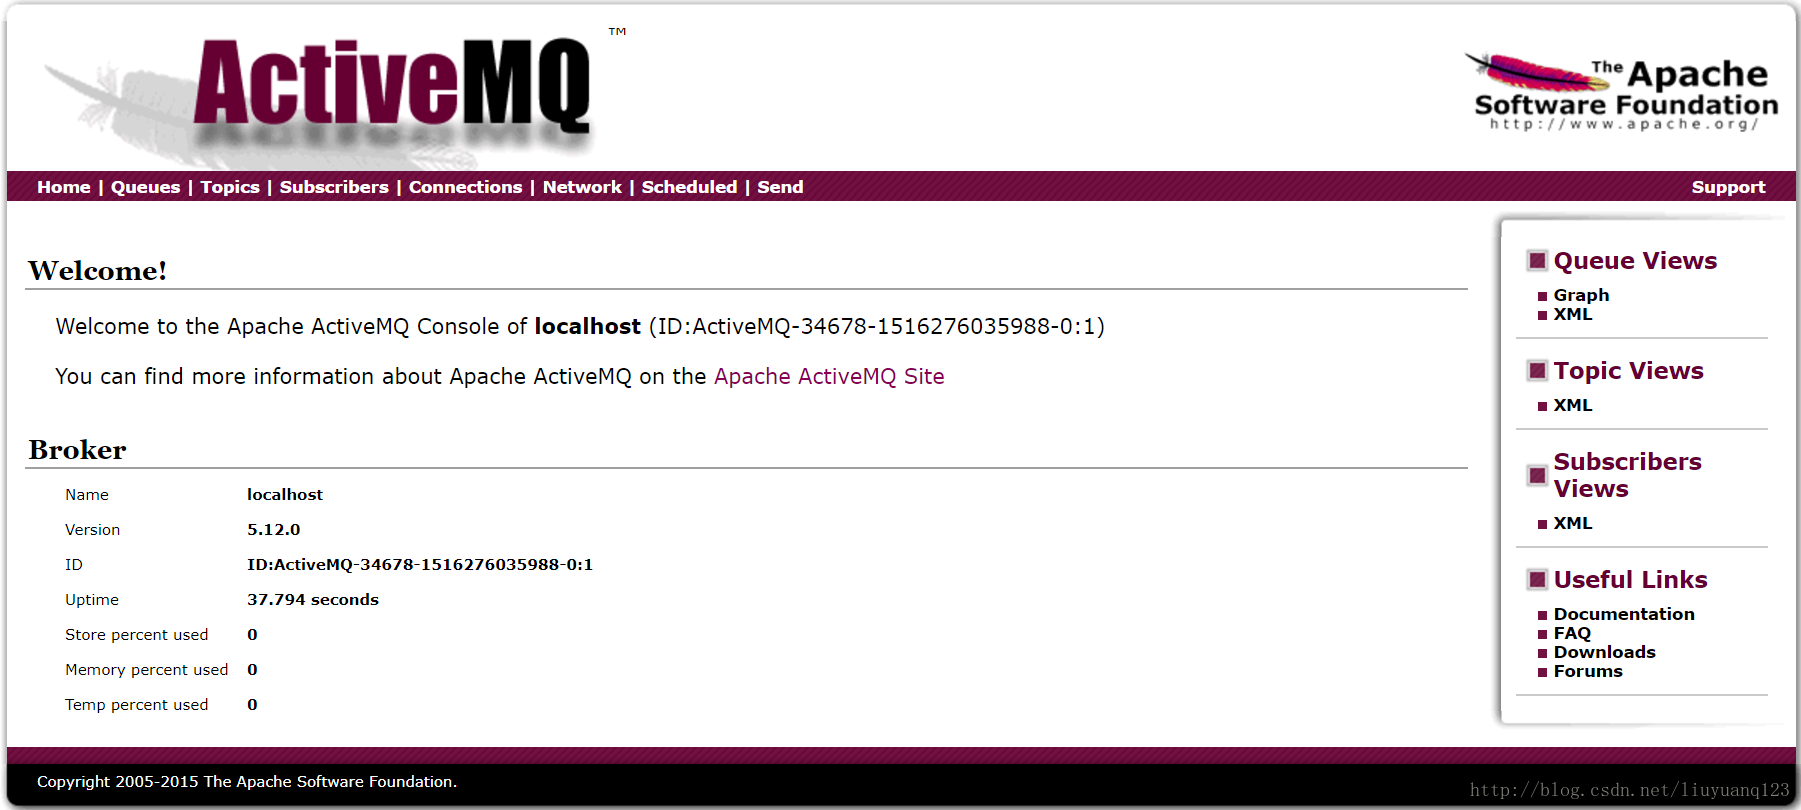
服务器运行后,我们可以直接访问到activeMQ的界面:
然后点击queues可以看到现在没有一条消息:

ActiveMQ测试
编写一个测试类对ActiveMQ进行测试,首先得向pom文件中添加ActiveMQ相关的jar包:
     <dependency>
         <groupId>org.apache.activemq</groupId>
         <artifactId>activemq-all</artifactId>
    </dependency>
queue的发送代码如下:

    public void testMQProducerQueue() throws Exception{
        //1、创建工厂连接对象,需要制定ip和端口号
        ConnectionFactory connectionFactory = new ActiveMQConnectionFactory("tcp://192.168.156.44:61616");
        //2、使用连接工厂创建一个连接对象
        Connection connection = connectionFactory.createConnection();
        //3、开启连接
        connection.start();
        //4、使用连接对象创建会话(session)对象
        Session session = connection.createSession(false, Session.AUTO_ACKNOWLEDGE);
        //5、使用会话对象创建目标对象,包含queue和topic(一对一和一对多)
        Queue queue = session.createQueue("test-queue");
        //6、使用会话对象创建生产者对象
        MessageProducer producer = session.createProducer(queue);
        //7、使用会话对象创建一个消息对象
        TextMessage textMessage = session.createTextMessage("hello!test-queue");
        //8、发送消息
        producer.send(textMessage);
        //9、关闭资源
        producer.close();
        session.close();
        connection.close();
    }
接收代码:
  public void TestMQConsumerQueue() throws Exception{
        //1、创建工厂连接对象,需要制定ip和端口号
        ConnectionFactory connectionFactory = new ActiveMQConnectionFactory("tcp://192.168.156.44:61616");
        //2、使用连接工厂创建一个连接对象
        Connection connection = connectionFactory.createConnection();
        //3、开启连接
        connection.start();
        //4、使用连接对象创建会话(session)对象
        Session session = connection.createSession(false, Session.AUTO_ACKNOWLEDGE);
        //5、使用会话对象创建目标对象,包含queue和topic(一对一和一对多)
        Queue queue = session.createQueue("test-queue");
        //6、使用会话对象创建生产者对象
        MessageConsumer consumer = session.createConsumer(queue);
        //7、向consumer对象中设置一个messageListener对象,用来接收消息
        consumer.setMessageListener(new MessageListener() {

            @Override
            public void onMessage(Message message) {
                // TODO Auto-generated method stub
                if(message instanceof TextMessage){
                    TextMessage textMessage = (TextMessage)message;
                    try {
                        System.out.println(textMessage.getText());
                    } catch (JMSException e) {
                        // TODO Auto-generated catch block
                        e.printStackTrace();
                    }
                }
            }
        });
        //8、程序等待接收用户消息
        System.in.read();
        //9、关闭资源
        consumer.close();
        session.close();
        connection.close();
    }
然后当我们运行queue发送的时候可以看到队列里已经有一条消息了,但没有发送出去:
然后在运行queue 的接收端,可以看到消息已经发出了:
接着对topic进行测试,发送代码如下:


public void TestTopicProducer() throws Exception{
        //1、创建工厂连接对象,需要制定ip和端口号
        ConnectionFactory connectionFactory = new ActiveMQConnectionFactory("tcp://192.168.156.44:61616");
        //2、使用连接工厂创建一个连接对象
        Connection connection = connectionFactory.createConnection();
        //3、开启连接
        connection.start();
        //4、使用连接对象创建会话(session)对象
        Session session = connection.createSession(false, Session.AUTO_ACKNOWLEDGE);
        //5、使用会话对象创建目标对象,包含queue和topic(一对一和一对多)
        Topic topic = session.createTopic("test-topic");
        //6、使用会话对象创建生产者对象
        MessageProducer producer = session.createProducer(topic);
        //7、使用会话对象创建一个消息对象
        TextMessage textMessage = session.createTextMessage("hello!test-topic");
        //8、发送消息
        producer.send(textMessage);
        //9、关闭资源
        producer.close();
        session.close();
        connection.close();
    }
接收代码:
    public void TestTopicConsumer() throws Exception{
        //1、创建工厂连接对象,需要制定ip和端口号
        ConnectionFactory connectionFactory = new ActiveMQConnectionFactory("tcp://192.168.156.44:61616");
        //2、使用连接工厂创建一个连接对象
        Connection connection = connectionFactory.createConnection();
        //3、开启连接
        connection.start();
        //4、使用连接对象创建会话(session)对象
        Session session = connection.createSession(false, Session.AUTO_ACKNOWLEDGE);
        //5、使用会话对象创建目标对象,包含queue和topic(一对一和一对多)
        Topic topic = session.createTopic("test-topic");
        //6、使用会话对象创建生产者对象
        MessageConsumer consumer = session.createConsumer(topic);
        //7、向consumer对象中设置一个messageListener对象,用来接收消息
        consumer.setMessageListener(new MessageListener() {

            @Override
            public void onMessage(Message message) {
                // TODO Auto-generated method stub
                if(message instanceof TextMessage){
                    TextMessage textMessage = (TextMessage)message;
                    try {
                        System.out.println(textMessage.getText());
                    } catch (JMSException e) {
                        // TODO Auto-generated catch block
                        e.printStackTrace();
                    }
                }
            }
        });
        //8、程序等待接收用户消息
        System.in.read();
        //9、关闭资源
        consumer.close();
        session.close();
        connection.close();
    }
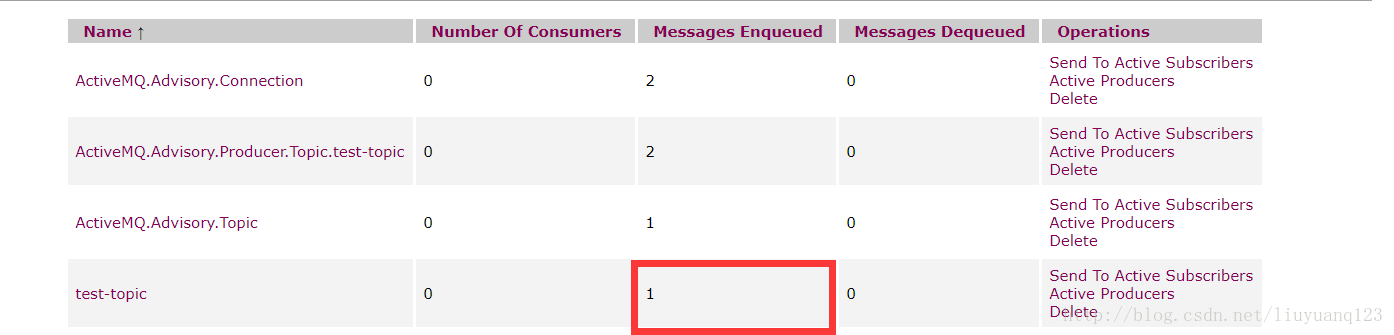
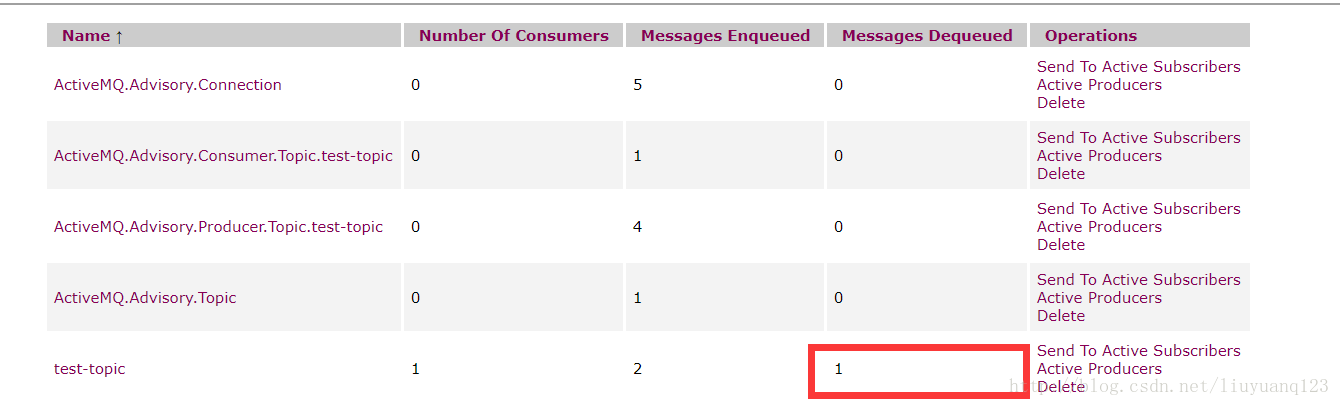
然后运行topic发送:
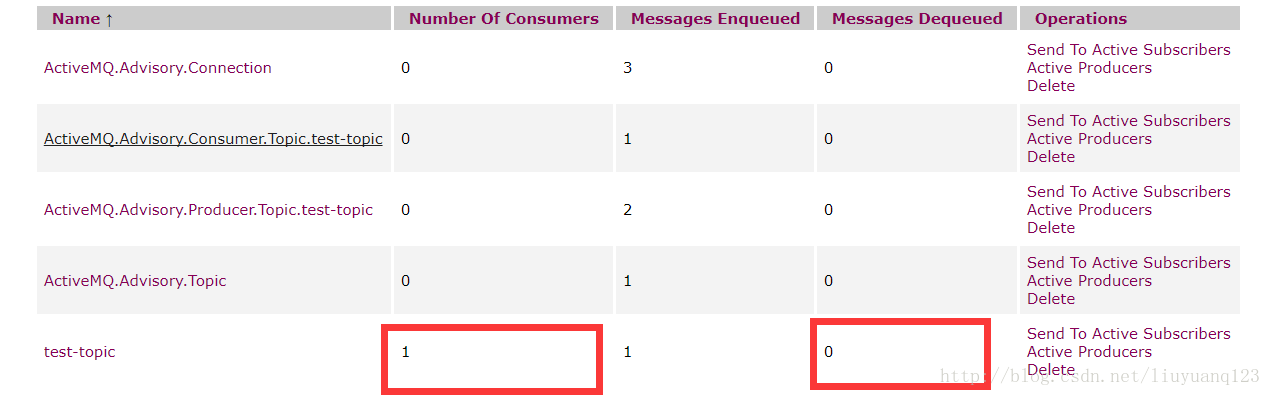
可以看到消息已经发送出去。再运行topic接收:
可以看到有了一个消费者,但是没有接收的消息,这是因为正常情况下我们的topic消息不会再服务器持久化,所以要先打开消费者,再打开生产者,这个时候我们再运行生产者发送一条消息看到消息已经接收到了:

ActiveMQ整合spring及项目中运用
activeMQ与spring看一整合到一起使用,除了添加ActiveMQ相关的jar包外,还需要添加spring的jar包:
    <dependency>
        <groupId>org.springframework</groupId>
        <artifactId>spring-context</artifactId>
    </dependency>
然后编写applicationContext-activemq.xml文件,
代码如下:
<?xml version="1.0" encoding="UTF-8"?>
<beans xmlns="http://www.springframework.org/schema/beans"
    xmlns:context="http://www.springframework.org/schema/context" xmlns:p="http://www.springframework.org/schema/p"
    xmlns:aop="http://www.springframework.org/schema/aop" xmlns:tx="http://www.springframework.org/schema/tx"
    xmlns:dubbo="http://code.alibabatech.com/schema/dubbo"
    xmlns:xsi="http://www.w3.org/2001/XMLSchema-instance"
    xsi:schemaLocation="http://www.springframework.org/schema/beans http://www.springframework.org/schema/beans/spring-beans-4.2.xsd
    http://www.springframework.org/schema/context http://www.springframework.org/schema/context/spring-context-4.2.xsd
    http://www.springframework.org/schema/aop http://www.springframework.org/schema/aop/spring-aop-4.2.xsd http://www.springframework.org/schema/tx http://www.springframework.org/schema/tx/spring-tx-4.2.xsd
    http://code.alibabatech.com/schema/dubbo http://code.alibabatech.com/schema/dubbo/dubbo.xsd
    http://www.springframework.org/schema/util http://www.springframework.org/schema/util/spring-util-4.2.xsd">

    <!-- 配置能够产生connection的connectionfactory,由JMS对应的服务厂商提供 -->
    <bean id="tagertConnectionFactory" class="org.apache.activemq.ActiveMQConnectionFactory">
        <constructor-arg name="brokerURL" value="tcp://192.168.156.44:61616"/>
    </bean>
    <!-- 配置spring管理真正connectionfactory的connectionfactory,相当于spring对connectionfactory的一层封装 -->
    <bean id="connectionFactory" class="org.springframework.jms.connection.SingleConnectionFactory">
        <property name="targetConnectionFactory" ref="tagertConnectionFactory"/>
    </bean>
    <!-- 配置生产者 -->
    <!-- Spring使用JMS工具类,可以用来发送和接收消息 -->
    <bean id="jmsTemplate" class="org.springframework.jms.core.JmsTemplate">
        <!-- 这里是配置的spring用来管理connectionfactory的connectionfactory -->
        <property name="connectionFactory" ref="connectionFactory"/>
    </bean>
    <!-- 配置destination -->
    <!-- 队列目的地 -->
    <bean id="queueDestination" class="org.apache.activemq.command.ActiveMQQueue">
        <constructor-arg value="spring-queue"/>
    </bean>
    <!-- 话题目的地 -->
    <bean id="itemAddTopic" class="org.apache.activemq.command.ActiveMQTopic">
        <constructor-arg value="item-add-topic"/>
    </bean>
</beans>
然后在我们淘淘商城中,商品添加到数据库的时候,对应也要添加数据到我们的solr索引中,所以生产者应该在插入数据后创建:
当然,在xml文件中配置好的jmstemplate和destination也要注入进来:
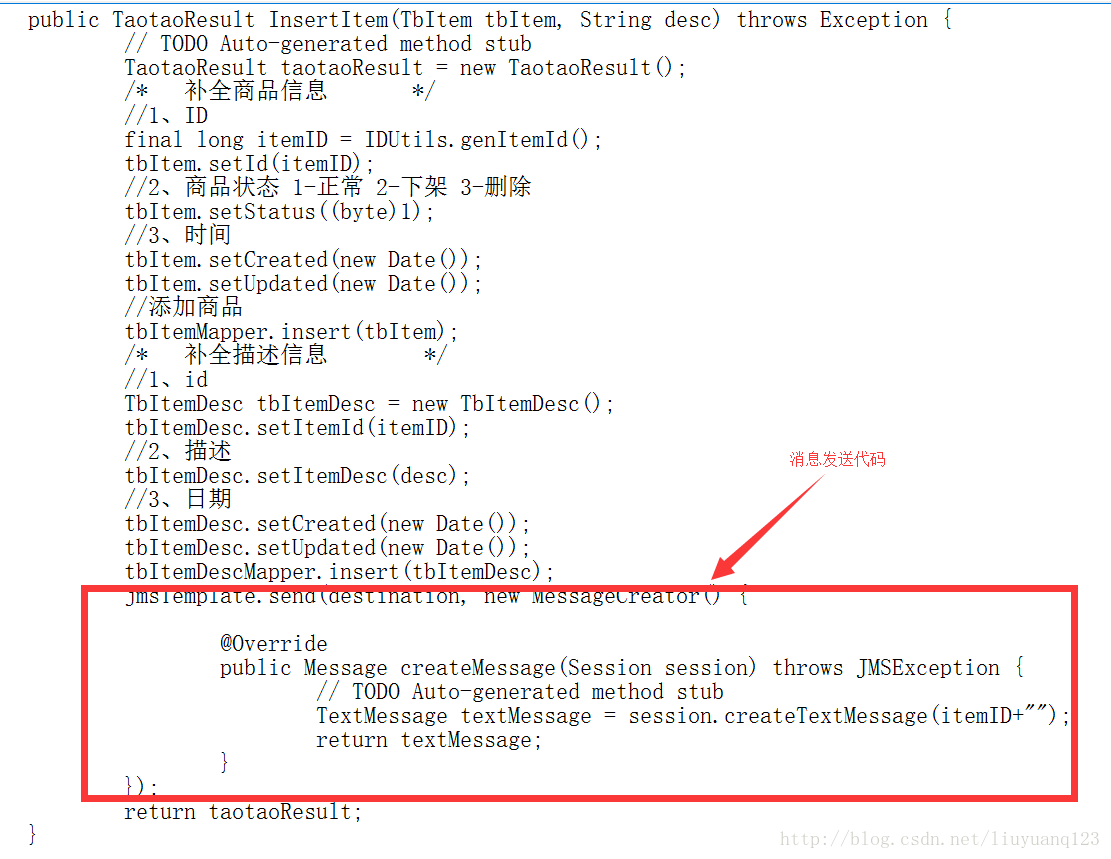
    @Autowired
    private JmsTemplate jmsTemplate;
    @Resource(name="itemAddTopic")
    private Destination destination;
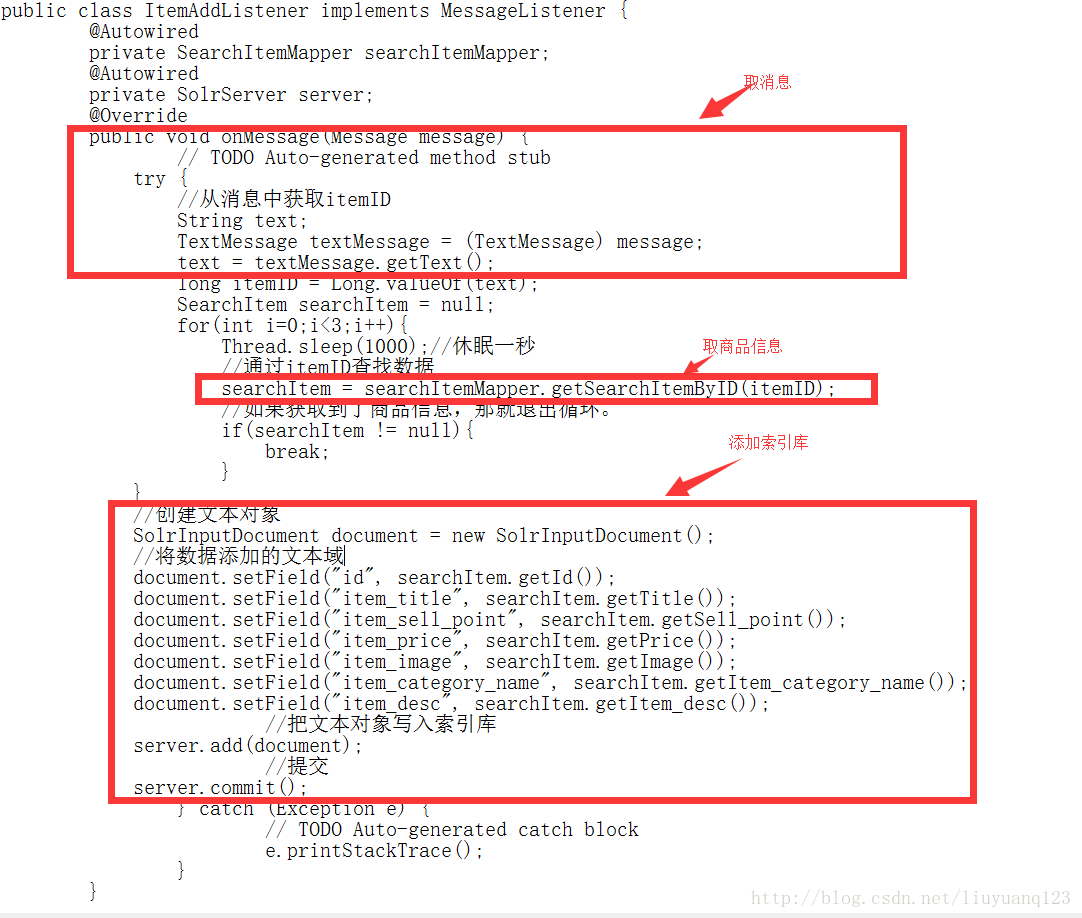
然后消费者应该写在我们的搜索工程中,首先添加spring和activeMQ的jar包,然后配置xml文件,再编写一个监听器,当接收到消息时,就讲数据存入索引库,xml文件代码如下:
<?xml version="1.0" encoding="UTF-8"?>
<beans xmlns="http://www.springframework.org/schema/beans"
    xmlns:context="http://www.springframework.org/schema/context" xmlns:p="http://www.springframework.org/schema/p"
    xmlns:aop="http://www.springframework.org/schema/aop" xmlns:tx="http://www.springframework.org/schema/tx"
    xmlns:dubbo="http://code.alibabatech.com/schema/dubbo"
    xmlns:xsi="http://www.w3.org/2001/XMLSchema-instance"
    xsi:schemaLocation="http://www.springframework.org/schema/beans http://www.springframework.org/schema/beans/spring-beans-4.2.xsd
    http://www.springframework.org/schema/context http://www.springframework.org/schema/context/spring-context-4.2.xsd
    http://www.springframework.org/schema/aop http://www.springframework.org/schema/aop/spring-aop-4.2.xsd http://www.springframework.org/schema/tx http://www.springframework.org/schema/tx/spring-tx-4.2.xsd
    http://code.alibabatech.com/schema/dubbo http://code.alibabatech.com/schema/dubbo/dubbo.xsd
    http://www.springframework.org/schema/util http://www.springframework.org/schema/util/spring-util-4.2.xsd">

    <!-- 配置能够产生connection的connectionfactory,由JMS对应的服务厂商提供 -->
    <bean id="tagertConnectionFactory" class="org.apache.activemq.ActiveMQConnectionFactory">
        <constructor-arg name="brokerURL" value="tcp://192.168.156.44:61616"/>
    </bean>
    <!-- 配置spring管理真正connectionfactory的connectionfactory,相当于spring对connectionfactory的一层封装 -->
    <bean id="connectionFactory" class="org.springframework.jms.connection.SingleConnectionFactory">
        <property name="targetConnectionFactory" ref="tagertConnectionFactory"/>
    </bean>
    <!-- 配置destination -->
    <!-- 队列目的地 -->
    <bean id="queueDestination" class="org.apache.activemq.command.ActiveMQQueue">
        <constructor-arg value="spring-queue"/>
    </bean>
    <!-- 话题目的地 -->
    <bean id="itemAddTopic" class="org.apache.activemq.command.ActiveMQTopic">
        <constructor-arg value="item-add-topic"/>
    </bean>
    <!-- 配置监听器 -->
    <bean id="myListener" class="com.taotao.search.listener.MyListener"/>
    <bean id="itemAddListener" class="com.taotao.search.listener.ItemAddListener"/>
    <!-- 系统监听器 -->
<!--    <bean class="org.springframework.jms.listener.DefaultMessageListenerContainer">
        <property name="connectionFactory" ref="connectionFactory"/>
        <property name="destination" ref="queueDestination"/>
        <property name="messageListener" ref="myListener"/>
    </bean> -->
    <bean class="org.springframework.jms.listener.DefaultMessageListenerContainer">
        <property name="connectionFactory" ref="connectionFactory"/>
        <property name="destination" ref="itemAddTopic"/>
        <property name="messageListener" ref="itemAddListener"/>
    </bean>
</beans>
接收消息代码:
最后同时打开测试即可。
转载地址:https://blog.csdn.net/liuyuanq123/article/details/79109218