现在已经知道如何创建和执行自己的程序,但如何更加清晰合理的展示自己的代码呢,我们不可能将成千上万的代码写到一个文件里,这里我们需要用到模块。
一般python程序都可以作为模块被调用,也都可以调用其他的模块。模块是程序,模块有三个来源,第一种是内置模块,第二种是第三方模块,第三种是自定义模块。
导入模块
调用方式一般用import package.module来导入模块。或者通过from package.module import function的方式调用模块中的函数,也可以通过from package import module从包里导入模块,如下图两个程序的位置
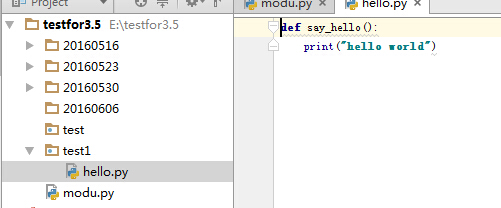
用modu.py调用方式如下:
import test1.hello
test1.hello.say_hello()

from test1 import hello
hello.say_hello()

from test1.hello import say_hello
say_hello()
#执行结果均为:hello world
下面介绍几种常用的内置模块、第三方模块的调用及自定义模块的使用
常用的内置模块
sys模块
sys模块让你能够访问一些与python解释器息息相关的变量和函数,比较常见的如下表
| 函数、变量 | 功能 |
| argv | 命令行参数,包括脚本名称 |
| exit([arg]) | 退出当前程序,可选参数为指定的返回信息 |
| modules | 映射模块名字到载入模块的字典 |
| path | 查找模块所在目录的目录名列表 |
| stdout | 输出流——一个类文件对象 |
| stdin | 输入流——一个类文件对象 |
| stderr | 错误流——类文件对象 |
argv
可以获取程序名称、路径等信息,具体应用场景,我觉着应该函数映射什么的用的比较多。
如E: esthello.py下代码为:
import sys
print("hello.py",sys.argv[0])
for i in range(1,len(sys.argv)):
print("args ",i,sys.argv[i])
执行结果为:
C:UsersAdministrator>python3 C:UsersAdministratorDesktophello.py hello
hello.py C:UsersAdministratorDesktophello.py
args hello 1
exit([arg])
直接退出程序,并打印结果。修改hello.py为如下代码:
import sys
exit(exit("".join(("exit ",*sys.argv))))
执行结果为:
C:Usersadmin>python E:	esthello.py
exit E:	esthello.py
modules
查看映射模块名字到载入模块的字典。


import sys
for i in sys.modules:
    print (i,sys.modules[i])
#执行结果为:
_warnings <module '_warnings' (built-in)>
encodings.mbcs <module 'encodings.mbcs' from 'C:\Users\admin\AppData\Local\Programs\Python\Python35-32\lib\encodings\mbcs.py'>
os.path <module 'ntpath' from 'C:\Users\admin\AppData\Local\Programs\Python\Python35-32\lib\ntpath.py'>
_thread <module '_thread' (built-in)>
encodings <module 'encodings' from 'C:\Users\admin\AppData\Local\Programs\Python\Python35-32\lib\encodings\__init__.py'>
_stat <module '_stat' (built-in)>
_codecs <module '_codecs' (built-in)>
_io <module 'io' (built-in)>
_locale <module '_locale' (built-in)>
_codecs_cn <module '_codecs_cn' (built-in)>
_signal <module '_signal' (built-in)>
encodings.latin_1 <module 'encodings.latin_1' from 'C:\Users\admin\AppData\Local\Programs\Python\Python35-32\lib\encodings\latin_1.py'>
_weakref <module '_weakref' (built-in)>
_collections_abc <module '_collections_abc' from 'C:\Users\admin\AppData\Local\Programs\Python\Python35-32\lib\_collections_abc.py'>
sys <module 'sys' (built-in)>
sysconfig <module 'sysconfig' from 'C:\Users\admin\AppData\Local\Programs\Python\Python35-32\lib\sysconfig.py'>
__main__ <module '__main__' from 'E:\testfor3.5\test\modu.py'>
winreg <module 'winreg' (built-in)>
site <module 'site' from 'C:\Users\admin\AppData\Local\Programs\Python\Python35-32\lib\site.py'>
builtins <module 'builtins' (built-in)>
stat <module 'stat' from 'C:\Users\admin\AppData\Local\Programs\Python\Python35-32\lib\stat.py'>
ntpath <module 'ntpath' from 'C:\Users\admin\AppData\Local\Programs\Python\Python35-32\lib\ntpath.py'>
encodings.gbk <module 'encodings.gbk' from 'C:\Users\admin\AppData\Local\Programs\Python\Python35-32\lib\encodings\gbk.py'>
encodings.aliases <module 'encodings.aliases' from 'C:\Users\admin\AppData\Local\Programs\Python\Python35-32\lib\encodings\aliases.py'>
codecs <module 'codecs' from 'C:\Users\admin\AppData\Local\Programs\Python\Python35-32\lib\codecs.py'>
_sitebuiltins <module '_sitebuiltins' from 'C:\Users\admin\AppData\Local\Programs\Python\Python35-32\lib\_sitebuiltins.py'>
_multibytecodec <module '_multibytecodec' (built-in)>
io <module 'io' from 'C:\Users\admin\AppData\Local\Programs\Python\Python35-32\lib\io.py'>
_bootlocale <module '_bootlocale' from 'C:\Users\admin\AppData\Local\Programs\Python\Python35-32\lib\_bootlocale.py'>
_weakrefset <module '_weakrefset' from 'C:\Users\admin\AppData\Local\Programs\Python\Python35-32\lib\_weakrefset.py'>
nt <module 'nt' (built-in)>
marshal <module 'marshal' (built-in)>
zipimport <module 'zipimport' (built-in)>
os <module 'os' from 'C:\Users\admin\AppData\Local\Programs\Python\Python35-32\lib\os.py'>
genericpath <module 'genericpath' from 'C:\Users\admin\AppData\Local\Programs\Python\Python35-32\lib\genericpath.py'>
encodings.utf_8 <module 'encodings.utf_8' from 'C:\Users\admin\AppData\Local\Programs\Python\Python35-32\lib\encodings\utf_8.py'>
_frozen_importlib_external <module '_frozen_importlib_external' (frozen)>
abc <module 'abc' from 'C:\Users\admin\AppData\Local\Programs\Python\Python35-32\lib\abc.py'>
_imp <module '_imp' (built-in)>
errno <module 'errno' (built-in)>
_frozen_importlib <module '_frozen_importlib' (frozen)>
path
该变量会罗列出所有可导入的模块的目录,所以当添加自定义模块是,需要将模块路径添加至path,值为list,
>>>import sys
>>>print(sys.path)
['C:\Users\admin\AppData\Local\Programs\Python\Python35-32\python35.zip', 'C:\Users\admin\AppData\Local\Programs\Python\Python35-32\DLLs', 'C:\Users\admin\AppData\Local\Programs\Python\Python35-32\lib', 'C:\Users\admin\AppData\Local\Programs\Python\Python35-32', 'C:\Users\admin\AppData\Local\Programs\Python\Python35-32\lib\site-packages']
stdin
stdin
stdout
sdtderr
os
os模块提供了很多操作系统服务的功能,包括系统、磁盘、CPU、内存、文件操作等等。
通过查看help可以得到一些简明的说明。下面罗列一些之前最近接触过的和感觉一些比较重要的。
os.sep取代操作系统中特定的路径分隔符,如windows中的"\"
os.name获取你当前所使用的操作系统,nt表示windows,posix为linux
os.getcwd()获取当前工作目录,即你当前项目所在路径,此处在移植平台环境时会用到
os.listdir(path)返回指定路径下所有的文件和目录名称
os.remove(path)删除一个文件
os.rename(name1,name2)重命名name1文件为name2
os.makedir(dir)创建一个目录
os.removedirs(disr)删除目录
os.system(command)执行shell命令
os.linesep取代操作系统中换行符,如windows中的" "
>>> os.name
'nt'
>>> c = "".join(("E:",os.sep,"test"))
>>> c
'E:\test'
>>> os.name
'nt'
>>> os.getcwd()
'C:\Users\Administrator'
>>> os.listdir("G:\")
['$RECYCLE.BIN', 'BaiduYunDownload', 'CentOS-7.0-1406-x86_64-DVD.iso', 'CentOS7.
1', 'class.test', 'python', 'tmp.txt', '视频']
>>> os.remove("G:\tmp.txt")
>>> os.listdir("G:\")
['$RECYCLE.BIN', 'BaiduYunDownload', 'CentOS-7.0-1406-x86_64-DVD.iso', 'CentOS7.
1', 'class.test', 'python', '视频']
>>> os.mkdir("G:\test")
>>> os.listdir("G:\")
['$RECYCLE.BIN', 'BaiduYunDownload', 'CentOS-7.0-1406-x86_64-DVD.iso', 'CentOS7.
1', 'class.test', 'python', 'test', '视频']
>>> os.rename("G:\test","G:\test2")
>>> os.listdir("G:\")
['$RECYCLE.BIN', 'BaiduYunDownload', 'CentOS-7.0-1406-x86_64-DVD.iso', 'CentOS7.
1', 'class.test', 'python', 'test2', '视频']
>>> os.removedirs("G:\test2")
>>> os.listdir("G:\")
['$RECYCLE.BIN', 'BaiduYunDownload', 'CentOS-7.0-1406-x86_64-DVD.iso', 'CentOS7.
1', 'class.test', 'python', '视频']
>>> a = "".join(("第一行",os.linesep,"第二行"))
>>> a
'第一行
第二行'
>>> print(a)
第一行
第二行
datetime和time
如其名所示,两个都是python控制时间的模块。
首先了解一下日期格式的转意符对应关系:
转义符对应意义如下
%a 本地简化星期名称
%A 本地完整星期名称
%b 本地简化的月份名称
%B 本地完整的月份名称
%c 本地相应的日期表示和时间表示
%d 月内中的一天(0-31)
%H 24小时制小时数(0-23)
%I 12小时制小时数(01-12)
%j 年内的一天(001-366)
%m 月份(01-12)
%M 分钟数(00=59)
%p 本地A.M.或P.M.的等价符
%S 秒(00-59)
%U 一年中的星期数(00-53)星期天为星期的开始
%w 星期(0-6),星期天为星期的开始
%W 一年中的星期数(00-53)星期一为星期的开始
%x 本地相应的日期表示
%X 本地相应的时间表示
%y 两位数的年份表示(00-99)
%Y 四位数的年份表示(000-9999)
%Z 当前时区的名称
%% %号本身
>>> import time
>>> import datetime
>>> print(time.time())#时间戳
1465221786.87
>>> print(time.mktime(time.localtime()))
1465221816.0
>>> time.gmtime()#可加时间戳参数
time.struct_time(tm_year=2016, tm_mon=6, tm_mday=6, tm_hour=14, tm_min=3, tm_sec
=49, tm_wday=0, tm_yday=158, tm_isdst=0)
>>> time.localtime()#可加时间戳参数,获取当前时间
time.struct_time(tm_year=2016, tm_mon=6, tm_mday=6, tm_hour=22, tm_min=3, tm_sec
=57, tm_wday=0, tm_yday=158, tm_isdst=0)
>>> time.strptime('2016-06-06 22:04:00','%Y-%m-%d %H:%M:%S')#格式化字符串
time.struct_time(tm_year=2016, tm_mon=6, tm_mday=6, tm_hour=22, tm_min=4, tm_sec
=0, tm_wday=0, tm_yday=158, tm_isdst=-1)
>>> time.strftime('%Y-%m-%d %H:%M:%S')
'2016-06-06 22:07:26'
>>> time.strftime('%Y-%m-%d')
'2016-06-06'
>>> time.strftime('%Y-%m-%d %H:%M:%S')
'2016-06-06 22:07:26'
>>> time.asctime()
'Mon Jun 06 22:07:58 2016'
>>> time.asctime(time.localtime())
'Mon Jun 06 22:08:11 2016'
>>> time.ctime(time.time())
'Mon Jun 06 22:08:29 2016'


'''
datetime.date:表示日期的类。常用的属性有year, month, day
datetime.time:表示时间的类。常用的属性有hour, minute, second, microsecond
datetime.datetime:表示日期时间
datetime.timedelta:表示时间间隔,即两个时间点之间的长度
timedelta([days[, seconds[, microseconds[, milliseconds[, minutes[, hours[, weeks]]]]]]])
strftime("%Y-%m-%d")
'''
import datetime
datetime.datetime.now()#获取当前时间
datetime.datetime(2016, 6, 6, 22, 13, 10, 372000)
datetime.datetime.now() - datetime.timedelta(days=5)
datetime.datetime(2016, 6, 1, 22, 13, 31, 274000)
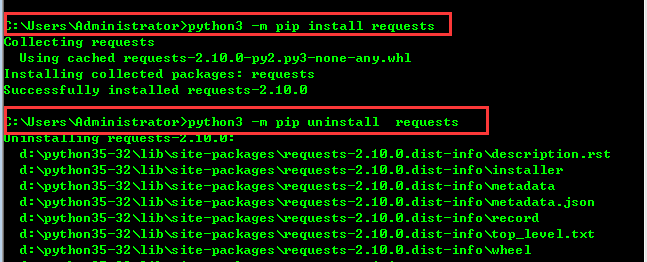
第三方模块(requests为例)
使用python -m pip install requests可以安装该模块,相应也可使用uninstall卸载该模块。
安装以后可以调用,方法参考面的例子。
import requests

response = requests.get('http://wthrcdn.etouch.cn/weather_mini?city=北京')
response.encoding = 'utf-8'
print(response.text,type(response.text))
结果:
{"desc":"OK","status":1000,"data":{"wendu":"28","ganmao":"各项气象条件适宜,发生感冒机率较低。但请避免长期处于空调房间中,以防感冒。","forecast":[{"fengxiang":"无持续风向","fengli":"微风级","high":"高温 35℃","type":"阴","low":"低温 21℃","date":"09日星期四"},{"fengxiang":"北风","fengli":"3-4级","high":"高温 32℃","type":"多云","low":"低温 20℃","date":"10日星期五"},{"fengxiang":"无持续风向","fengli":"微风级","high":"高温 34℃","type":"晴","low":"低温 22℃","date":"11日星期六"},{"fengxiang":"无持续风向","fengli":"微风级","high":"高温 36℃","type":"多云","low":"低温 24℃","date":"12日星期天"},{"fengxiang":"无持续风向","fengli":"微风级","high":"高温 32℃","type":"雷阵雨","low":"低温 23℃","date":"13日星期一"}],"yesterday":{"fl":"微风","fx":"无持续风向","high":"高温 35℃","type":"雷阵雨","low":"低温 23℃","date":"08日星期三"},"aqi":"94","city":"北京"}} <class 'str'>
logging
python通过logging模块可以记录五个级别的日志信息: 'CRITICAL', 'DEBUG', 'ERROR', 'WARNING','INFO'
import logging
logging.debug('debug message')
logging.info('info message')
logging.warning('warning message')
logging.error('error message')
logging.critical('critical message')
结果:
WARNING:root:warning message
ERROR:root:error message
CRITICAL:root:critical message
看起来只返回了三个结果,logging默认显示级别为warning以上,如果想要显示debug和info则需配置显示级别。当然日志是需要记录到文件中去的,不止是显示的问题。
import logging
# 创建一个logger
logger = logging.getLogger('mylogger')
logger.setLevel(logging.DEBUG)
# 创建一个handler,用于写入日志文件
fh = logging.FileHandler('test.log')
fh.setLevel(logging.DEBUG)
# 再创建一个handler,用于输出到控制台
ch = logging.StreamHandler()
ch.setLevel(logging.DEBUG)
# 定义handler的输出格式
formatter = logging.Formatter('%(asctime)s - %(name)s - %(levelname)s - %(message)s')
fh.setFormatter(formatter)
ch.setFormatter(formatter)
# 给logger添加handler
logger.addHandler(fh)
logger.addHandler(ch)
# 记录一条日志
logger.info('foorbar')
这样就会在控制台和当前目录下的test.log中显示
2016-06-09 22:00:28,914 - mylogger - INFO - foorbar
zipfile 和 tarfile
如前缀所示,这是打包的函数,可以将操作系统中的文件打包和解压操作
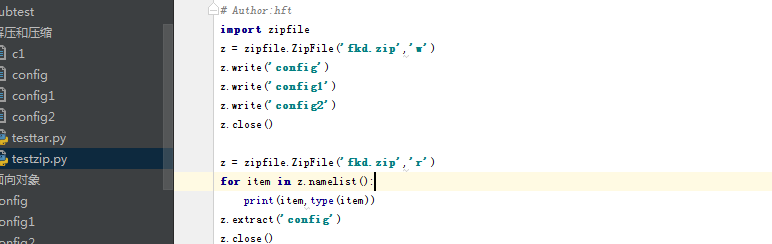
如图,有config/config1/config2调用zip函数可对这些文件打包
import zipfile
z = zipfile.ZipFile('fkd.zip','w')
z.write('config')
z.write('config1')
z.write('config2')
z.close()
使用zip的extract函数可对某个文件进行解压,extracts可以解压所有文件。
z = zipfile.ZipFile('fkd.zip','r')
for item in z.namelist():
    print(item,type(item))
z.extract('config')
z.close()
同理tarfile,且它可以对压缩对象进行重命名
import tarfile

t = tarfile.TarFile('fukuda.tar','w')
t.add('config','c1')
t.add('testzip.py','tz.py')
t.close()

t = tarfile.TarFile('fukuda.tar','r')
for item in t.getnames():#获取文件名
    print(item, type(item))
obj = t.getmember('c1')
print(obj)
t.extract(obj)
t.close()
configparser和xml
有config文件:
#注释
[section1]
k1 = 123
k2:456

;注释2
[section2]
k1 = test
调用configparser对其进行操作
# configparser用于处理特定格式的文件,其本质上是利用open来操作文件。
import configparser
config = configparser.ConfigParser()
config.read("config",encoding='utf-8')
#显示所有key值
ret1 = config.sections()
ret2 = config.values()
# for i in ret2:
#     print(i)
#查看节点键值对
ret3 = config.items('section1')
#查看节点的键
ret4 = config.options('section1')
#查看节点特定值
ret5 = config.get('section1','k1')
# print(ret1,ret3,ret4,ret5)
#查看是否有某节点【节点key】
has_sec = config.has_option('section1','k1')
print(has_sec)
#节点操作
config.add_section('section3')
print(config.sections())
config.write(open('config1','w'))
config.remove_section('section3')
config.write(open('config2','w'))
#节点key值操作
config.remove_option('section1','k1')
print(config.items('section1'))
config.set('section1','k10','10000')
print(config.items('section1'))
xml文件如下
<data>
    <country name="Liechtenstein">
        <rank updated="yes">2</rank>
        <year>2023</year>
        <gdppc>141100</gdppc>
        <neighbor direction="E" name="Austria" />
        <neighbor direction="W" name="Switzerland" />
    </country>
    <country name="Singapore">
        <rank updated="yes">5</rank>
        <year>2026</year>
        <gdppc>59900</gdppc>
        <neighbor direction="N" name="Malaysia" />
    </country>
    <country name="Panama">
        <rank updated="yes">69</rank>
        <year>2026</year>
        <gdppc>13600</gdppc>
        <neighbor direction="W" name="Costa Rica" />
        <neighbor direction="E" name="Colombia" />
    </country>
</data>
对其进行操作可获取节点:
from xml.etree import ElementTree as ET

tree = ET.parse('oncla.xml')
root = tree.getroot()

for child in root:
    print(child.tag,child.attrib)
    for gradechild in child:
        print("  ",gradechild.tag, gradechild.text)
country {'name': 'Liechtenstein'}
   rank 2
   year 2023
   gdppc 141100
   neighbor None
   neighbor None
country {'name': 'Singapore'}
   rank 5
   year 2026
   gdppc 59900
   neighbor None
country {'name': 'Panama'}
   rank 69
   year 2026
   gdppc 13600
   neighbor None
   neighbor None