树莓派上用 fswebcam + USB 摄像头拍摄

在实践过程中,树莓派对 USB 摄像头的支持不如 CSI 摄像头完美。偶尔会出现无法使用 USB 摄像头的情况,自带的摄像头操作命令 raspistill、raspivid 也无法使用。
而 fswebcam 这是一款小型摄像头程序(官网),则可以很好地支持 USB 摄像头。使用方法也很简便。
安装 fswebcam
安装 fswebcam,用于访问摄像头、进行拍照。
|
1
|
sudo apt-get install fswebcam |
fswebcam 的用法
|
1
2
3
4
5
6
7
8
9
10
11
12
13
14
15
16
17
18
19
20
21
22
23
24
25
26
27
28
29
30
31
32
33
34
35
36
37
38
39
40
41
42
43
44
45
46
47
48
49
50
51
52
53
54
55
56
57
58
|
fswebcam --helpUsage: fswebcam [<options>] <filename> [[<options>] <filename> ... ] Options: -?, --help Display this help page and exit. -c, --config <filename> Load configuration from file. -q, --quiet Hides all messages except for errors. -v, --verbose Displays extra messages while capturing --version Displays the version and exits. -l, --loop <seconds> Run in loop mode. -b, --background Run in the background. -o, --output <filename> Output the log to a file. -d, --device <name> Sets the source to use. -i, --input <number/name> Selects the input to use. -t, --tuner <number> Selects the tuner to use. -f, --frequency <number> Selects the frequency use. -p, --palette <name> Selects the palette format to use. -D, --delay <number> Sets the pre-capture delay time. (seconds) -r, --resolution <size> Sets the capture resolution. --fps <framerate> Sets the capture frame rate. -F, --frames <number> Sets the number of frames to capture. -S, --skip <number> Sets the number of frames to skip. --dumpframe <filename> Dump a raw frame to file. -s, --set <name>=<value> Sets a control value. --revert Restores original captured image. --flip <direction> Flips the image. (h, v) --crop <size>[,<offset>] Crop a part of the image. --scale <size> Scales the image. --rotate <angle> Rotates the image in right angles. --deinterlace Reduces interlace artifacts. --invert Inverts the images colours. --greyscale Removes colour from the image. --swapchannels <c1c2> Swap channels c1 and c2. --no-banner Hides the banner. --top-banner Puts the banner at the top. --bottom-banner Puts the banner at the bottom. (Default) --banner-colour <colour> Sets the banner colour. (#AARRGGBB) --line-colour <colour> Sets the banner line colour. --text-colour <colour> Sets the text colour. --font <[name][:size]> Sets the font and/or size. --no-shadow Disables the text shadow. --shadow Enables the text shadow. --title <text> Sets the main title. (top left) --no-title Clears the main title. --subtitle <text> Sets the sub-title. (bottom left) --no-subtitle Clears the sub-title. --timestamp <format> Sets the timestamp format. (top right) --no-timestamp Clears the timestamp. --gmt Use GMT instead of local timezone. --info <text> Sets the info text. (bottom right) --no-info Clears the info text. --underlay <PNG image> Sets the underlay image. --no-underlay Clears the underlay. --overlay <PNG image> Sets the overlay image. --no-overlay Clears the overlay. --jpeg <factor> Outputs a JPEG image. (-1, 0 - 95) --png <factor> Outputs a PNG image. (-1, 0 - 10) --save <filename> Save image to file. --exec <command> Execute a command and wait for it to complete. |
使用 fswebcam
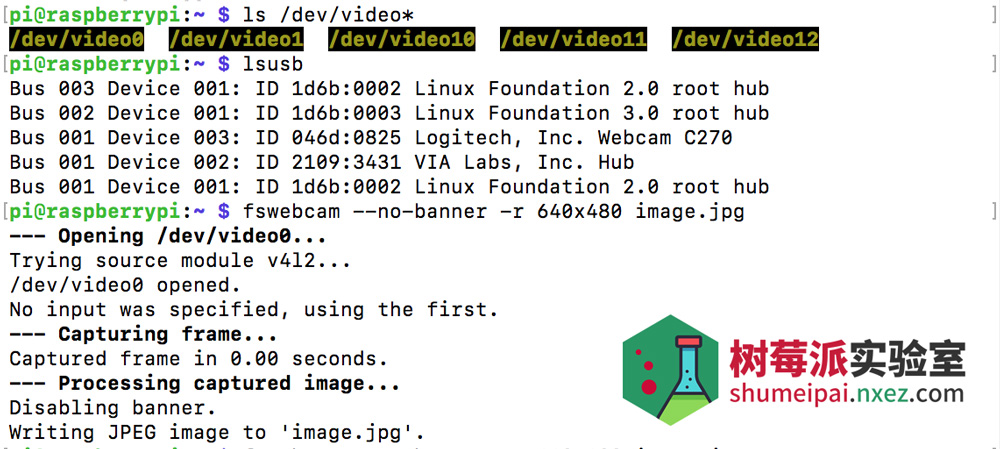
命令行下查看 /dev/下有video0 的设备。
运行 lsusb 命令,有相关摄像头的信息。
在终端中运行下面的命令来抓去一张来自摄像头的照片。
|
1
|
fswebcam --no-banner -r 640x480 image.jpg |
或者你可以直接用:
|
1
|
fswebcam image.jpg |
可以直接拍照,-d 用于指定使用哪个摄像头设备。-r 指定图片的分辨率,最后的是照片保存的路径。
如果拍摄出来的照片是一片漆黑,可能和摄像头启动延迟有关,可以通过加 -S 参数来跳过前面几帧解决。例如使用命令:
|
1
|
fswebcam -S 10 image.jpg |
文章标题:树莓派上用 fswebcam + USB 摄像头拍摄 - 树莓派实验室
fswebcam /dev/video0 --no-banner -r 640x480 ~/image01.jpg 中的参数功能:
/dev/video0:指定操作设备,像我插入usb摄像头后增加了两个设备,实测 video0 和video1 都可以用,都是同一个摄像头。
--no-banner:图片上隐藏横幅。
-r 640x480:设置分辨率 640x480。
~/image01.jpg:存储路径,当前用户目录下,保存为 image01.jpg。
fswebcam /dev/video0 -r 640x480 ~/image01.jpg
指定摄像头
fswebcam -d /dev/video0 -r 640x480 image01.jpg
在图片上有横幅,上面有时间戳信息。
