先看官网。。。。。
https://spring.io/projects/spring-boot
总览
通过Spring Boot,可以轻松地创建独立的,基于生产级别和基于Spring的应用程序,并且可以“运行”它们。
我们对Spring平台和第三方库坚持自己的的观点,因此您可以以最小的麻烦开始使用。大多数Spring Boot应用程序只需要需要非常少的的Spring配置。
特征
-
创建独立的Spring应用程序
-
直接嵌入Tomcat,Jetty或Undertow(无需部署WAR文件)
-
提供默认的“入门”依赖项,以简化构建配置
-
尽可能自动配置Spring和第三方库
-
提供可用于生产的功能,例如指标,运行状况检查和外部化配置
-
完全没有代码生成,也不需要XML配置
入门
-
超级快-尝试快速入门指南。
-
更笼统-尝试使用Spring Boot构建应用程序
-
更具体-尝试构建RESTful Web服务。
好了,开始看源码吧
2.1、先看注解:运行Spring的应用程序,正在创建和刷新一个新的ApplicationContext(Spring IOC容器),大体的意思就是要创建并刷新一个IOC容器,也就是说Spring boot基于IOC容器的扩展,不同的地方应该大部分在于扩展的部分
   /**
     * Run the Spring application, creating and refreshing a new
     * {@link ApplicationContext}.
     * @param args the application arguments (usually passed from a Java main method)
     * @return a running {@link ApplicationContext}
     */
2.2、外围的主要方法就是这些了,直接看注释
  /**
     * Run the Spring application, creating and refreshing a new
     * {@link ApplicationContext}.
     * @param args the application arguments (usually passed from a Java main method)
     * @return a running {@link ApplicationContext}
     */
    public ConfigurableApplicationContext run(String... args) {
        // 1、计时器 启动
        StopWatch stopWatch = new StopWatch();
        stopWatch.start();

        // 2、设置一个可配置的应用上下文(IOC容器)变量,赋默认值
        ConfigurableApplicationContext context = null;
        // 3、初始化一个异常报告器列表
        Collection<SpringBootExceptionReporter> exceptionReporters = new ArrayList<>();
        // 4、配置一个java.awt.headless系统属性,好像是用来配置像linux服务器这种没有显示设备的机子用的
        configureHeadlessProperty();
        // 5、获取Spring应用程序运行监听器,这些监听器看起来主要应用在spring boot的run方法之中,没有和spring refresh方法里面的一起
        SpringApplicationRunListeners listeners = getRunListeners(args);
        // 6、看上去像是启动监听器,实际上是传播starting事件给监听器,listeners可以理解为组合模式吧,这个容器包裹了一堆监听器,对外的方法基本上都是遍历调用这些监听器的具体方法
        // (一)第一次监听器传播 应用启动事件
        listeners.starting();
        try {
            // 7、将命令行参数包裹到容器中
            ApplicationArguments applicationArguments = new DefaultApplicationArguments(args);
            // 8、初始化一个可配置的环境(根据应用类型),这边主要是准备工作(listeners将在这里第二次调用,(二)第二次监听器传播,环境准备就绪事件)
            ConfigurableEnvironment environment = prepareEnvironment(listeners, applicationArguments);
            // 9、从环境变量中读取是否忽略beanInfo信息的配置,并设置到系统参数
            configureIgnoreBeanInfo(environment);
            // 10、打印banner,就是用命令行打印出spring boot的那个logo的一些信息
            Banner printedBanner = printBanner(environment);
            // 11、给应用上下文设置一个实际的对象(根据应用类型)
            context = createApplicationContext();
            // 12、从spring.factory中读取并初始化异常报告器
            exceptionReporters = getSpringFactoriesInstances(SpringBootExceptionReporter.class,
                    new Class[] { ConfigurableApplicationContext.class }, context);
            // 13、context的准备工作,包括一些属性设置,初始化器的调用,(三)第三次监听器传播,context读取就绪事件...
            prepareContext(context, environment, listeners, applicationArguments, printedBanner);
            // 14、刷新容器,基本上就又到了Spring IOC的核心方法,refresh里面了
            refreshContext(context);
            // 15、扩展用的,在刷新context之后调用
            afterRefresh(context, applicationArguments);
            // 1、计时器 结束
            stopWatch.stop();
            if (this.logStartupInfo) {
                new StartupInfoLogger(this.mainApplicationClass).logStarted(getApplicationLog(), stopWatch);
            }
            // 16、(四)第四次监听器传播,应用启动事件
            listeners.started(context);
            // 17、执行一些注册好的命令对象ApplicationRunner或CommandLineRunner的bean list
            callRunners(context, applicationArguments);
        }
        catch (Throwable ex) {
            handleRunFailure(context, ex, exceptionReporters, listeners);
            throw new IllegalStateException(ex);
        }

        try {
            // 18、(五)第五次监听器传播,应用运行中事件
            listeners.running(context);
        }
        catch (Throwable ex) {
            handleRunFailure(context, ex, exceptionReporters, null);
            throw new IllegalStateException(ex);
        }
        return context;
    }
2.3、里面各自有很多细节,如果一个一个讲没太大意思,还是要自己看;主要还是看看Spring boot的自动配置、自动装配的部分
2.3.1、重点外围方法:prepareContext这里面主要是有两个事情,一个是注册了我们的主类到DefaultListableBeanFactory到BeanDefinition里面(后面会用来作为根节点解析配置文件)【入口是load方法】,另一个是init了添加了两个beanFactoryPostProcess【入口是:applyInitializers】
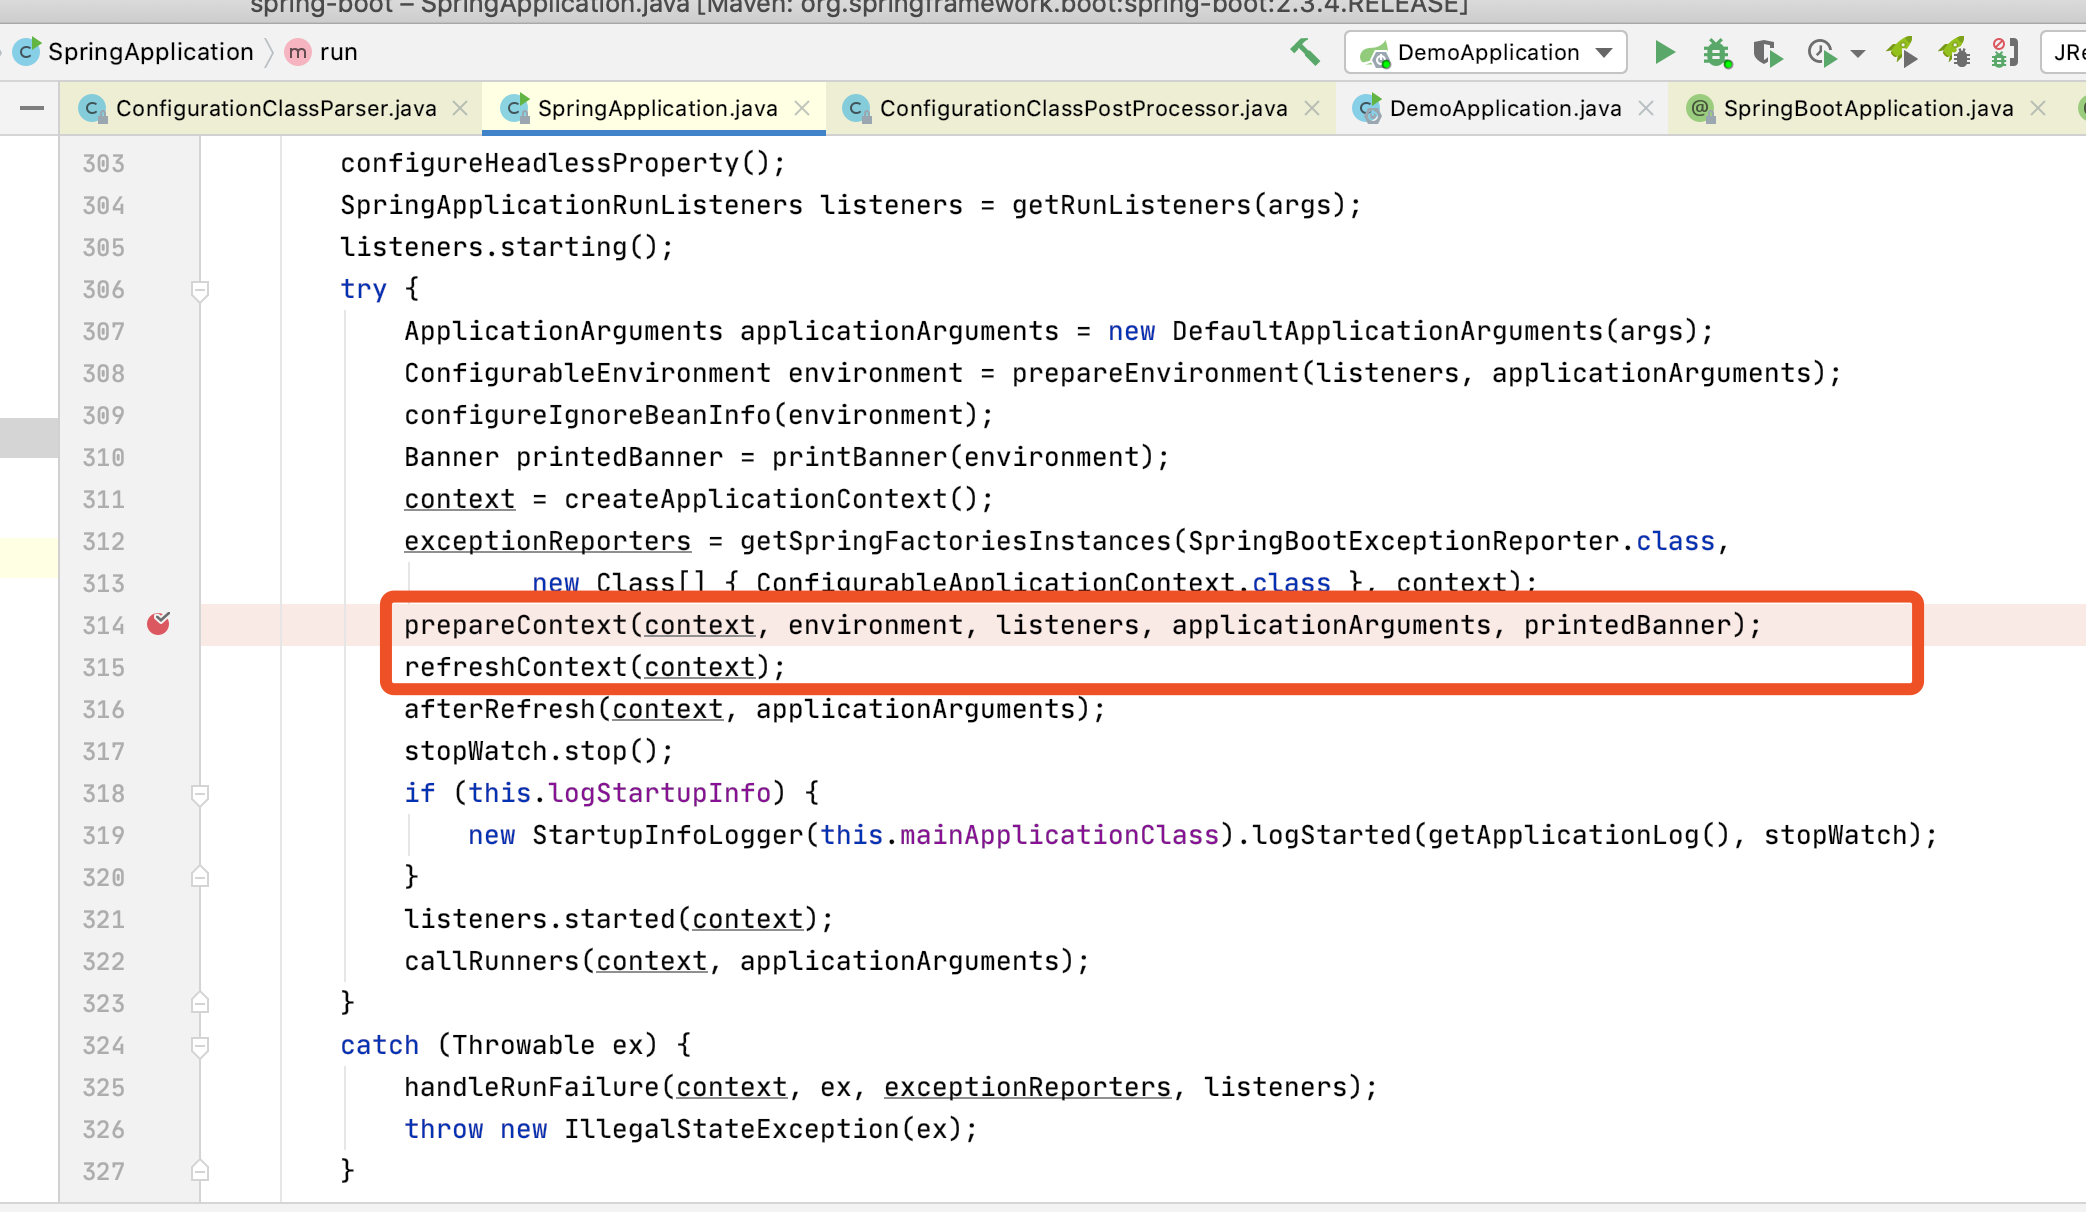
2.3.2、refreshContext这个方法看名字就知道最终会调用到Spring的refresh方法,spring的就不再细看了,直接看spring预留用来执行扩展方法的invokeBeanFactoryPostProcessors方法
最终跟到PostProcessorRegistrationDelegate这个类中的invokeBeanFactoryPostProcessors方法
public static void invokeBeanFactoryPostProcessors(
            ConfigurableListableBeanFactory beanFactory, List<BeanFactoryPostProcessor> beanFactoryPostProcessors) {

        // Invoke BeanDefinitionRegistryPostProcessors first, if any.
        Set<String> processedBeans = new HashSet<>();

        if (beanFactory instanceof BeanDefinitionRegistry) {
            BeanDefinitionRegistry registry = (BeanDefinitionRegistry) beanFactory;
            List<BeanFactoryPostProcessor> regularPostProcessors = new ArrayList<>();
            List<BeanDefinitionRegistryPostProcessor> registryProcessors = new ArrayList<>();
            // 1、分组
            for (BeanFactoryPostProcessor postProcessor : beanFactoryPostProcessors) {
                if (postProcessor instanceof BeanDefinitionRegistryPostProcessor) {
                    BeanDefinitionRegistryPostProcessor registryProcessor =
                            (BeanDefinitionRegistryPostProcessor) postProcessor;
                    registryProcessor.postProcessBeanDefinitionRegistry(registry);
                    registryProcessors.add(registryProcessor);
                }
                else {
                    regularPostProcessors.add(postProcessor);
                }
            }

            // Do not initialize FactoryBeans here: We need to leave all regular beans
            // uninitialized to let the bean factory post-processors apply to them!
            // Separate between BeanDefinitionRegistryPostProcessors that implement
            // PriorityOrdered, Ordered, and the rest.
            List<BeanDefinitionRegistryPostProcessor> currentRegistryProcessors = new ArrayList<>();

            // 2、执行优先级最高的BeanDefinitionRegistryPostProcessors处理器 开始
            // First, invoke the BeanDefinitionRegistryPostProcessors that implement PriorityOrdered.
            String[] postProcessorNames =
                    beanFactory.getBeanNamesForType(BeanDefinitionRegistryPostProcessor.class, true, false);
            for (String ppName : postProcessorNames) {
                if (beanFactory.isTypeMatch(ppName, PriorityOrdered.class)) {
                    currentRegistryProcessors.add(beanFactory.getBean(ppName, BeanDefinitionRegistryPostProcessor.class));
                    processedBeans.add(ppName);
                }
            }
            sortPostProcessors(currentRegistryProcessors, beanFactory);
            registryProcessors.addAll(currentRegistryProcessors);
            // 我只引入了spring-boot-web,这里仅仅获取到了ConfigurationClassPostProcessor,
            invokeBeanDefinitionRegistryPostProcessors(currentRegistryProcessors, registry);
            currentRegistryProcessors.clear();
            // 2、执行优先级最高的BeanDefinitionRegistryPostProcessors处理器  结束

            // Next, invoke the BeanDefinitionRegistryPostProcessors that implement Ordered.
            postProcessorNames = beanFactory.getBeanNamesForType(BeanDefinitionRegistryPostProcessor.class, true, false);
            for (String ppName : postProcessorNames) {
                if (!processedBeans.contains(ppName) && beanFactory.isTypeMatch(ppName, Ordered.class)) {
                    currentRegistryProcessors.add(beanFactory.getBean(ppName, BeanDefinitionRegistryPostProcessor.class));
                    processedBeans.add(ppName);
                }
            }
            sortPostProcessors(currentRegistryProcessors, beanFactory);
            registryProcessors.addAll(currentRegistryProcessors);
            invokeBeanDefinitionRegistryPostProcessors(currentRegistryProcessors, registry);
            currentRegistryProcessors.clear();

            // Finally, invoke all other BeanDefinitionRegistryPostProcessors until no further ones appear.
            boolean reiterate = true;
            while (reiterate) {
                reiterate = false;
                postProcessorNames = beanFactory.getBeanNamesForType(BeanDefinitionRegistryPostProcessor.class, true, false);
                for (String ppName : postProcessorNames) {
                    if (!processedBeans.contains(ppName)) {
                        currentRegistryProcessors.add(beanFactory.getBean(ppName, BeanDefinitionRegistryPostProcessor.class));
                        processedBeans.add(ppName);
                        reiterate = true;
                    }
                }
                sortPostProcessors(currentRegistryProcessors, beanFactory);
                registryProcessors.addAll(currentRegistryProcessors);
                invokeBeanDefinitionRegistryPostProcessors(currentRegistryProcessors, registry);
                currentRegistryProcessors.clear();
            }

            // Now, invoke the postProcessBeanFactory callback of all processors handled so far.
            invokeBeanFactoryPostProcessors(registryProcessors, beanFactory);
            invokeBeanFactoryPostProcessors(regularPostProcessors, beanFactory);
        }

        else {
            // Invoke factory processors registered with the context instance.
            invokeBeanFactoryPostProcessors(beanFactoryPostProcessors, beanFactory);
        }

        // Do not initialize FactoryBeans here: We need to leave all regular beans
        // uninitialized to let the bean factory post-processors apply to them!
        String[] postProcessorNames =
                beanFactory.getBeanNamesForType(BeanFactoryPostProcessor.class, true, false);

        // Separate between BeanFactoryPostProcessors that implement PriorityOrdered,
        // Ordered, and the rest.
        List<BeanFactoryPostProcessor> priorityOrderedPostProcessors = new ArrayList<>();
        List<String> orderedPostProcessorNames = new ArrayList<>();
        List<String> nonOrderedPostProcessorNames = new ArrayList<>();
        for (String ppName : postProcessorNames) {
            if (processedBeans.contains(ppName)) {
                // skip - already processed in first phase above
            }
            else if (beanFactory.isTypeMatch(ppName, PriorityOrdered.class)) {
                priorityOrderedPostProcessors.add(beanFactory.getBean(ppName, BeanFactoryPostProcessor.class));
            }
            else if (beanFactory.isTypeMatch(ppName, Ordered.class)) {
                orderedPostProcessorNames.add(ppName);
            }
            else {
                nonOrderedPostProcessorNames.add(ppName);
            }
        }

        // First, invoke the BeanFactoryPostProcessors that implement PriorityOrdered.
        sortPostProcessors(priorityOrderedPostProcessors, beanFactory);
        invokeBeanFactoryPostProcessors(priorityOrderedPostProcessors, beanFactory);

        // Next, invoke the BeanFactoryPostProcessors that implement Ordered.
        List<BeanFactoryPostProcessor> orderedPostProcessors = new ArrayList<>(orderedPostProcessorNames.size());
        for (String postProcessorName : orderedPostProcessorNames) {
            orderedPostProcessors.add(beanFactory.getBean(postProcessorName, BeanFactoryPostProcessor.class));
        }
        sortPostProcessors(orderedPostProcessors, beanFactory);
        invokeBeanFactoryPostProcessors(orderedPostProcessors, beanFactory);

        // Finally, invoke all other BeanFactoryPostProcessors.
        List<BeanFactoryPostProcessor> nonOrderedPostProcessors = new ArrayList<>(nonOrderedPostProcessorNames.size());
        for (String postProcessorName : nonOrderedPostProcessorNames) {
            nonOrderedPostProcessors.add(beanFactory.getBean(postProcessorName, BeanFactoryPostProcessor.class));
        }
        invokeBeanFactoryPostProcessors(nonOrderedPostProcessors, beanFactory);

        // Clear cached merged bean definitions since the post-processors might have
        // modified the original metadata, e.g. replacing placeholders in values...
        beanFactory.clearMetadataCache();
    }
   ConfigurationClassPostProcessor这个对象的postProcessBeanDefinitionRegistry方法会先被执行,里面方法还比较杂
   后面会运行到processConfigBeanDefinitions这个方法里面
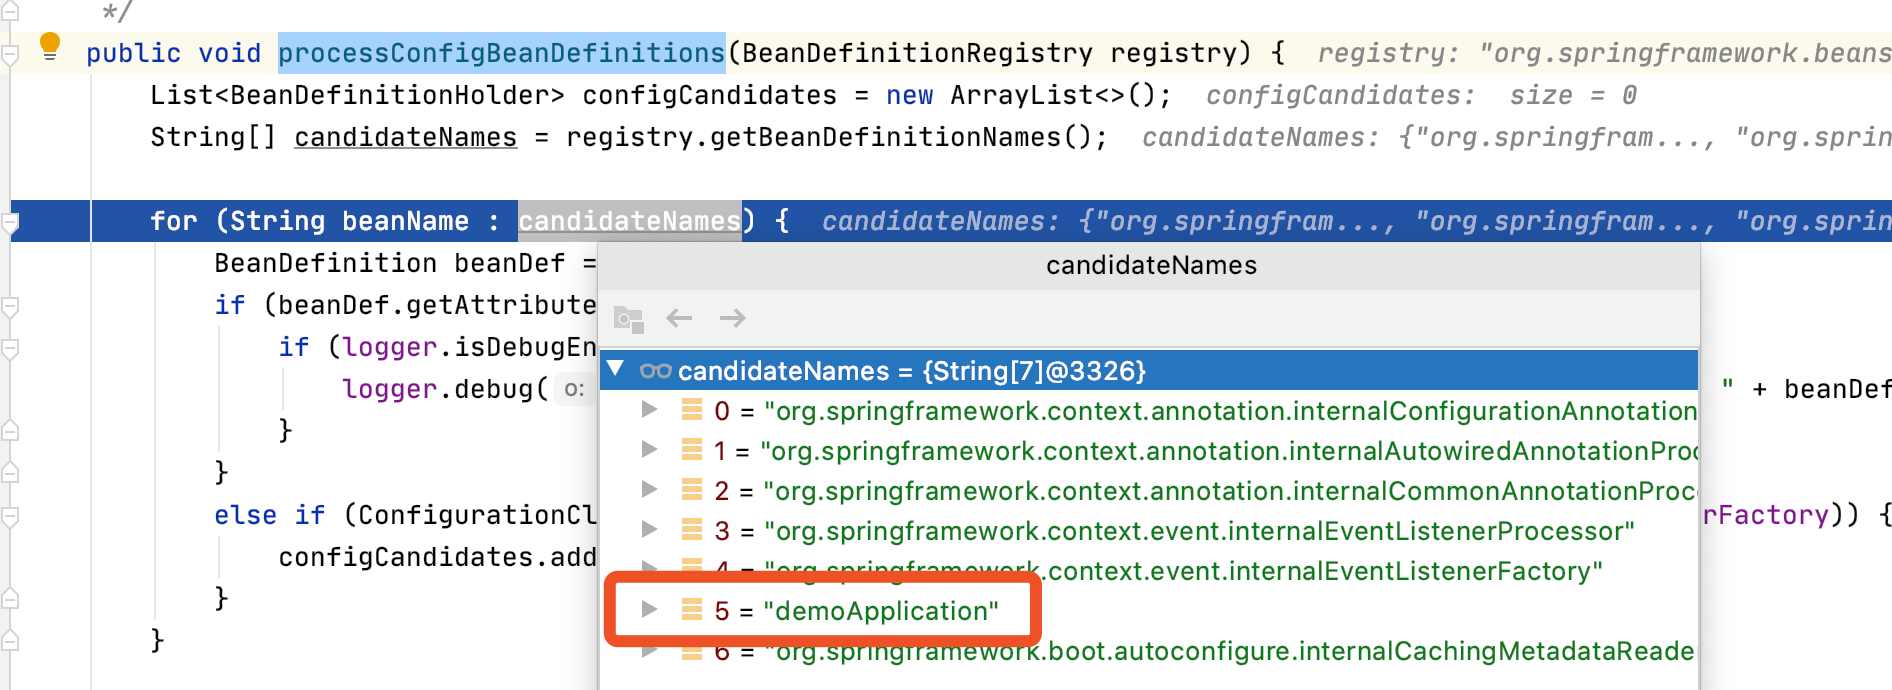
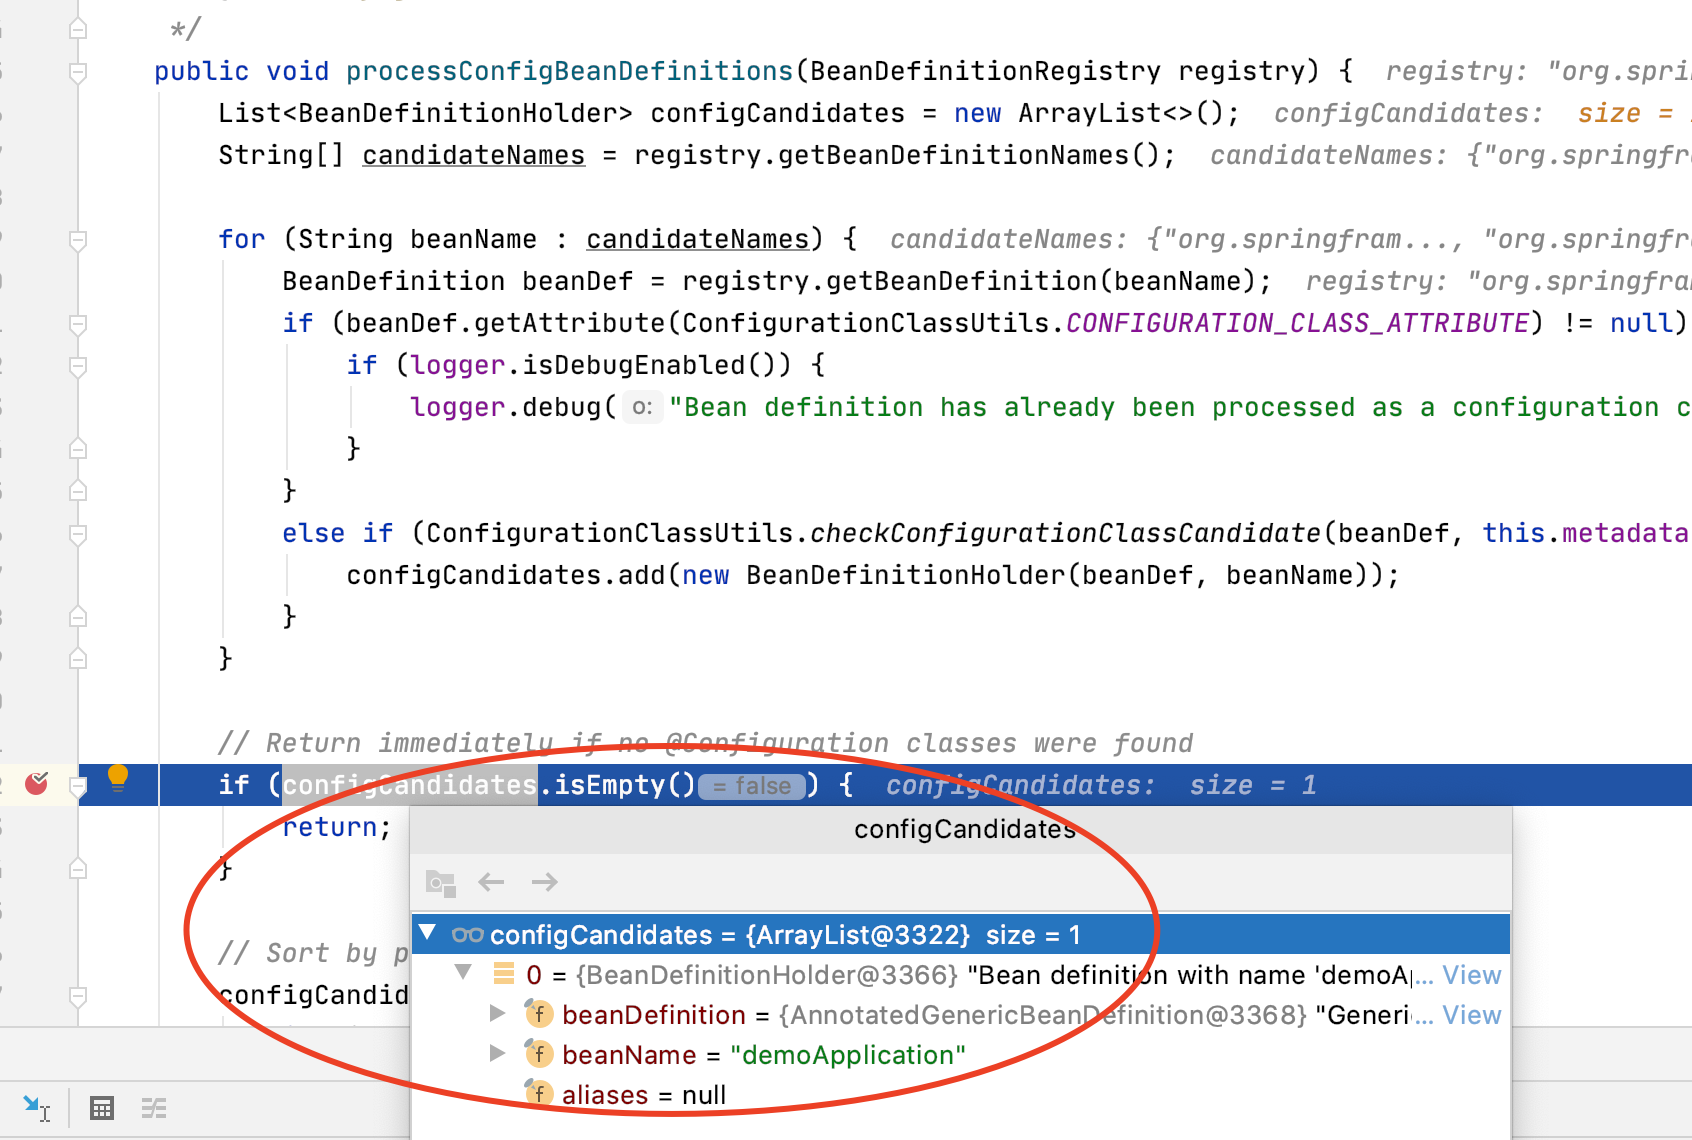
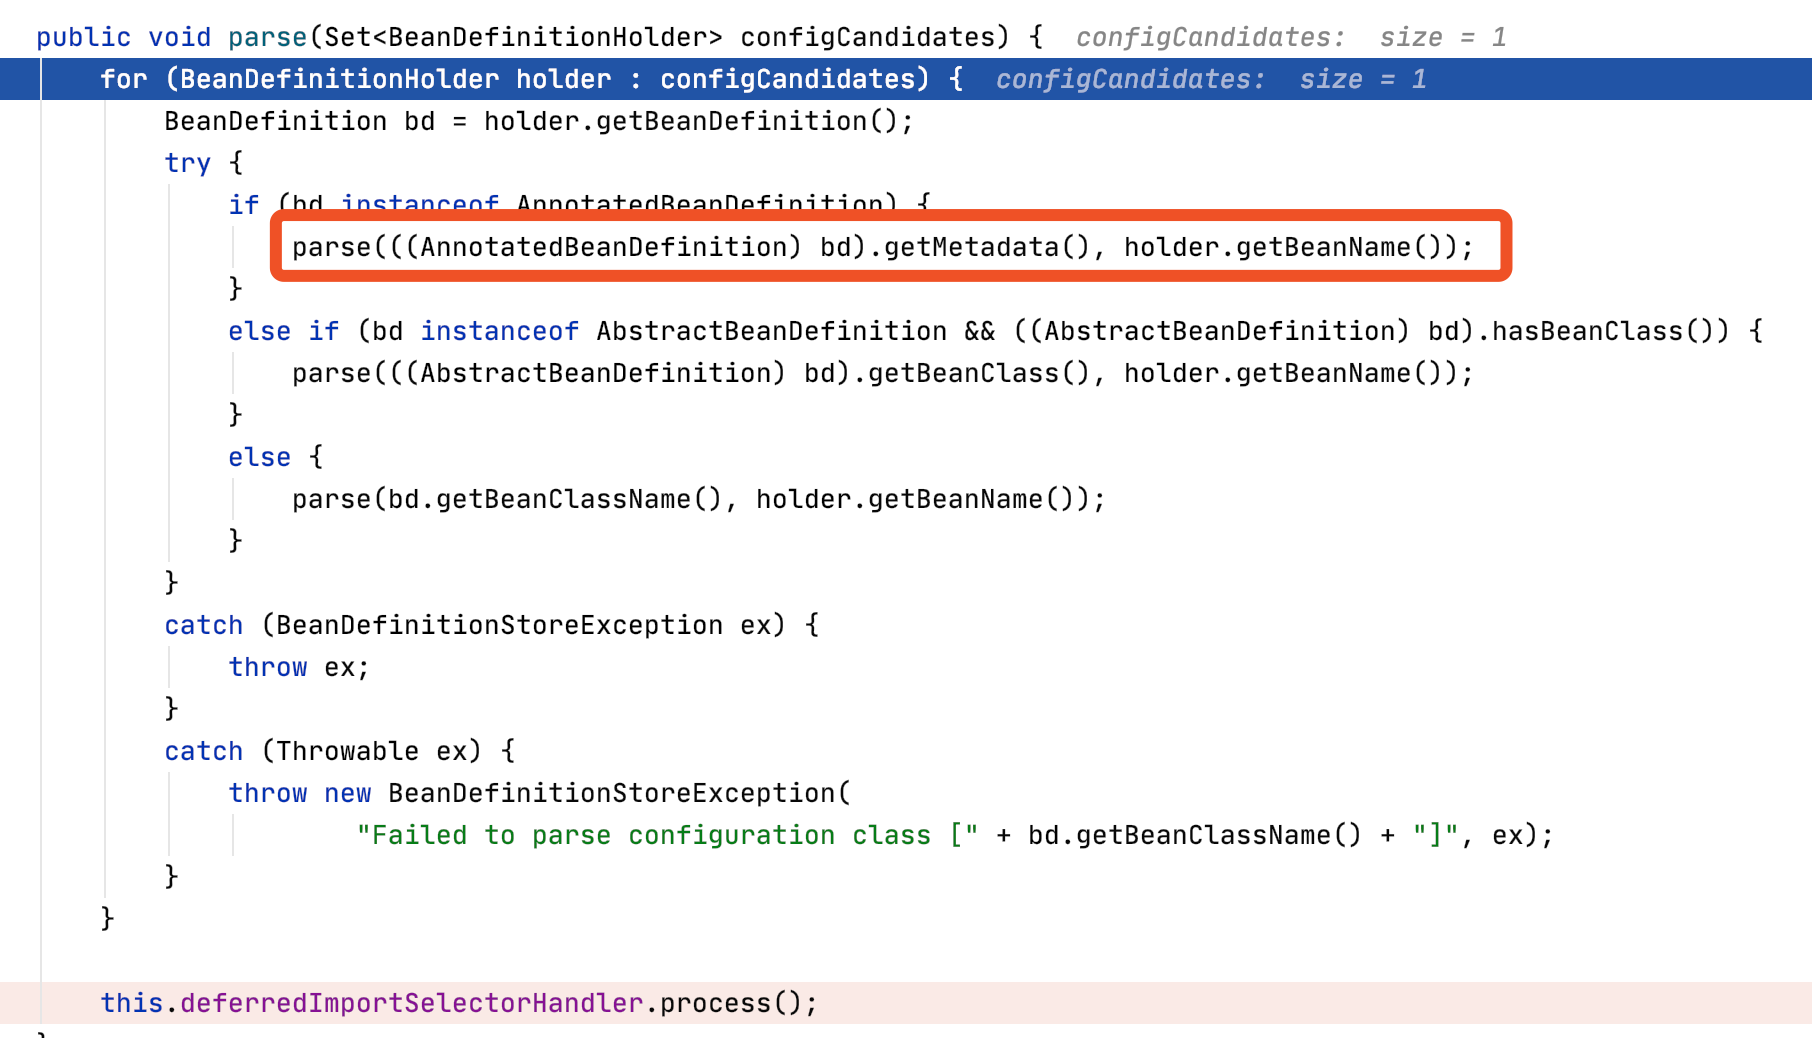
可以看到最终只过滤到了这个主类
再看到parse这行代码
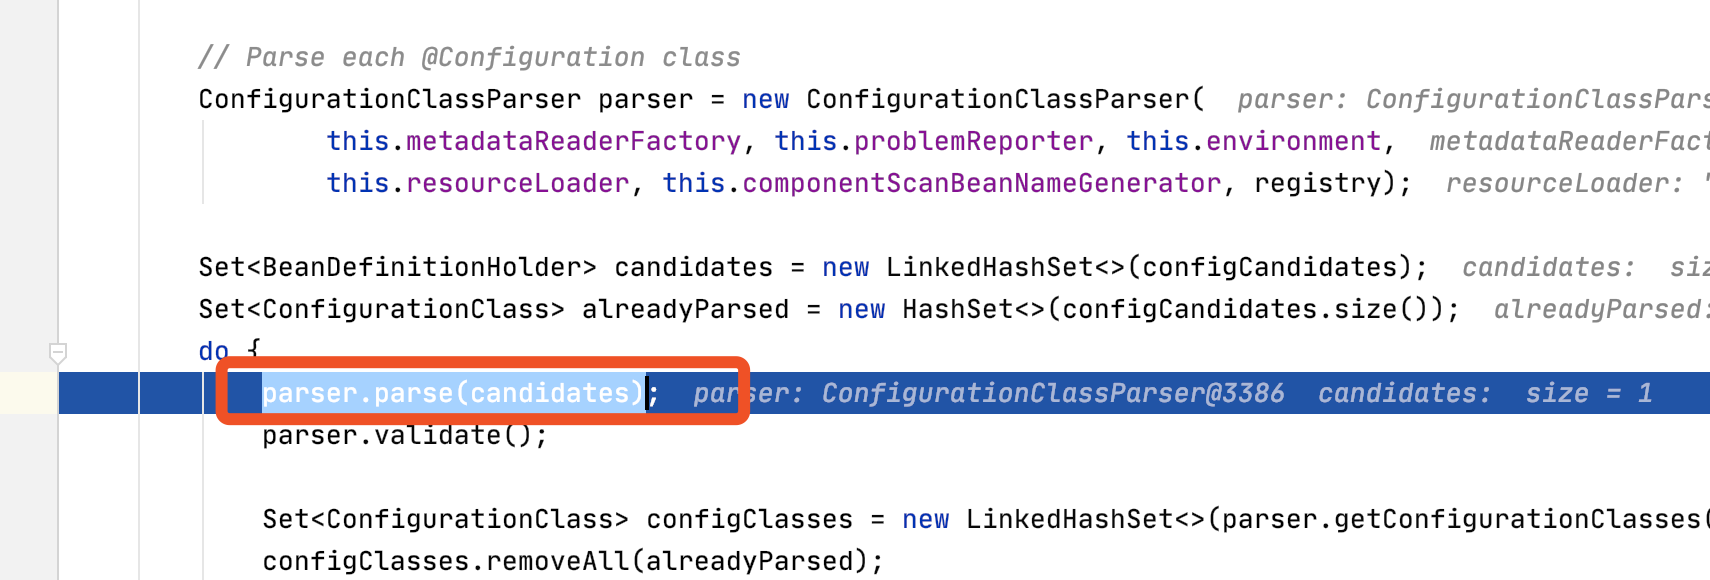

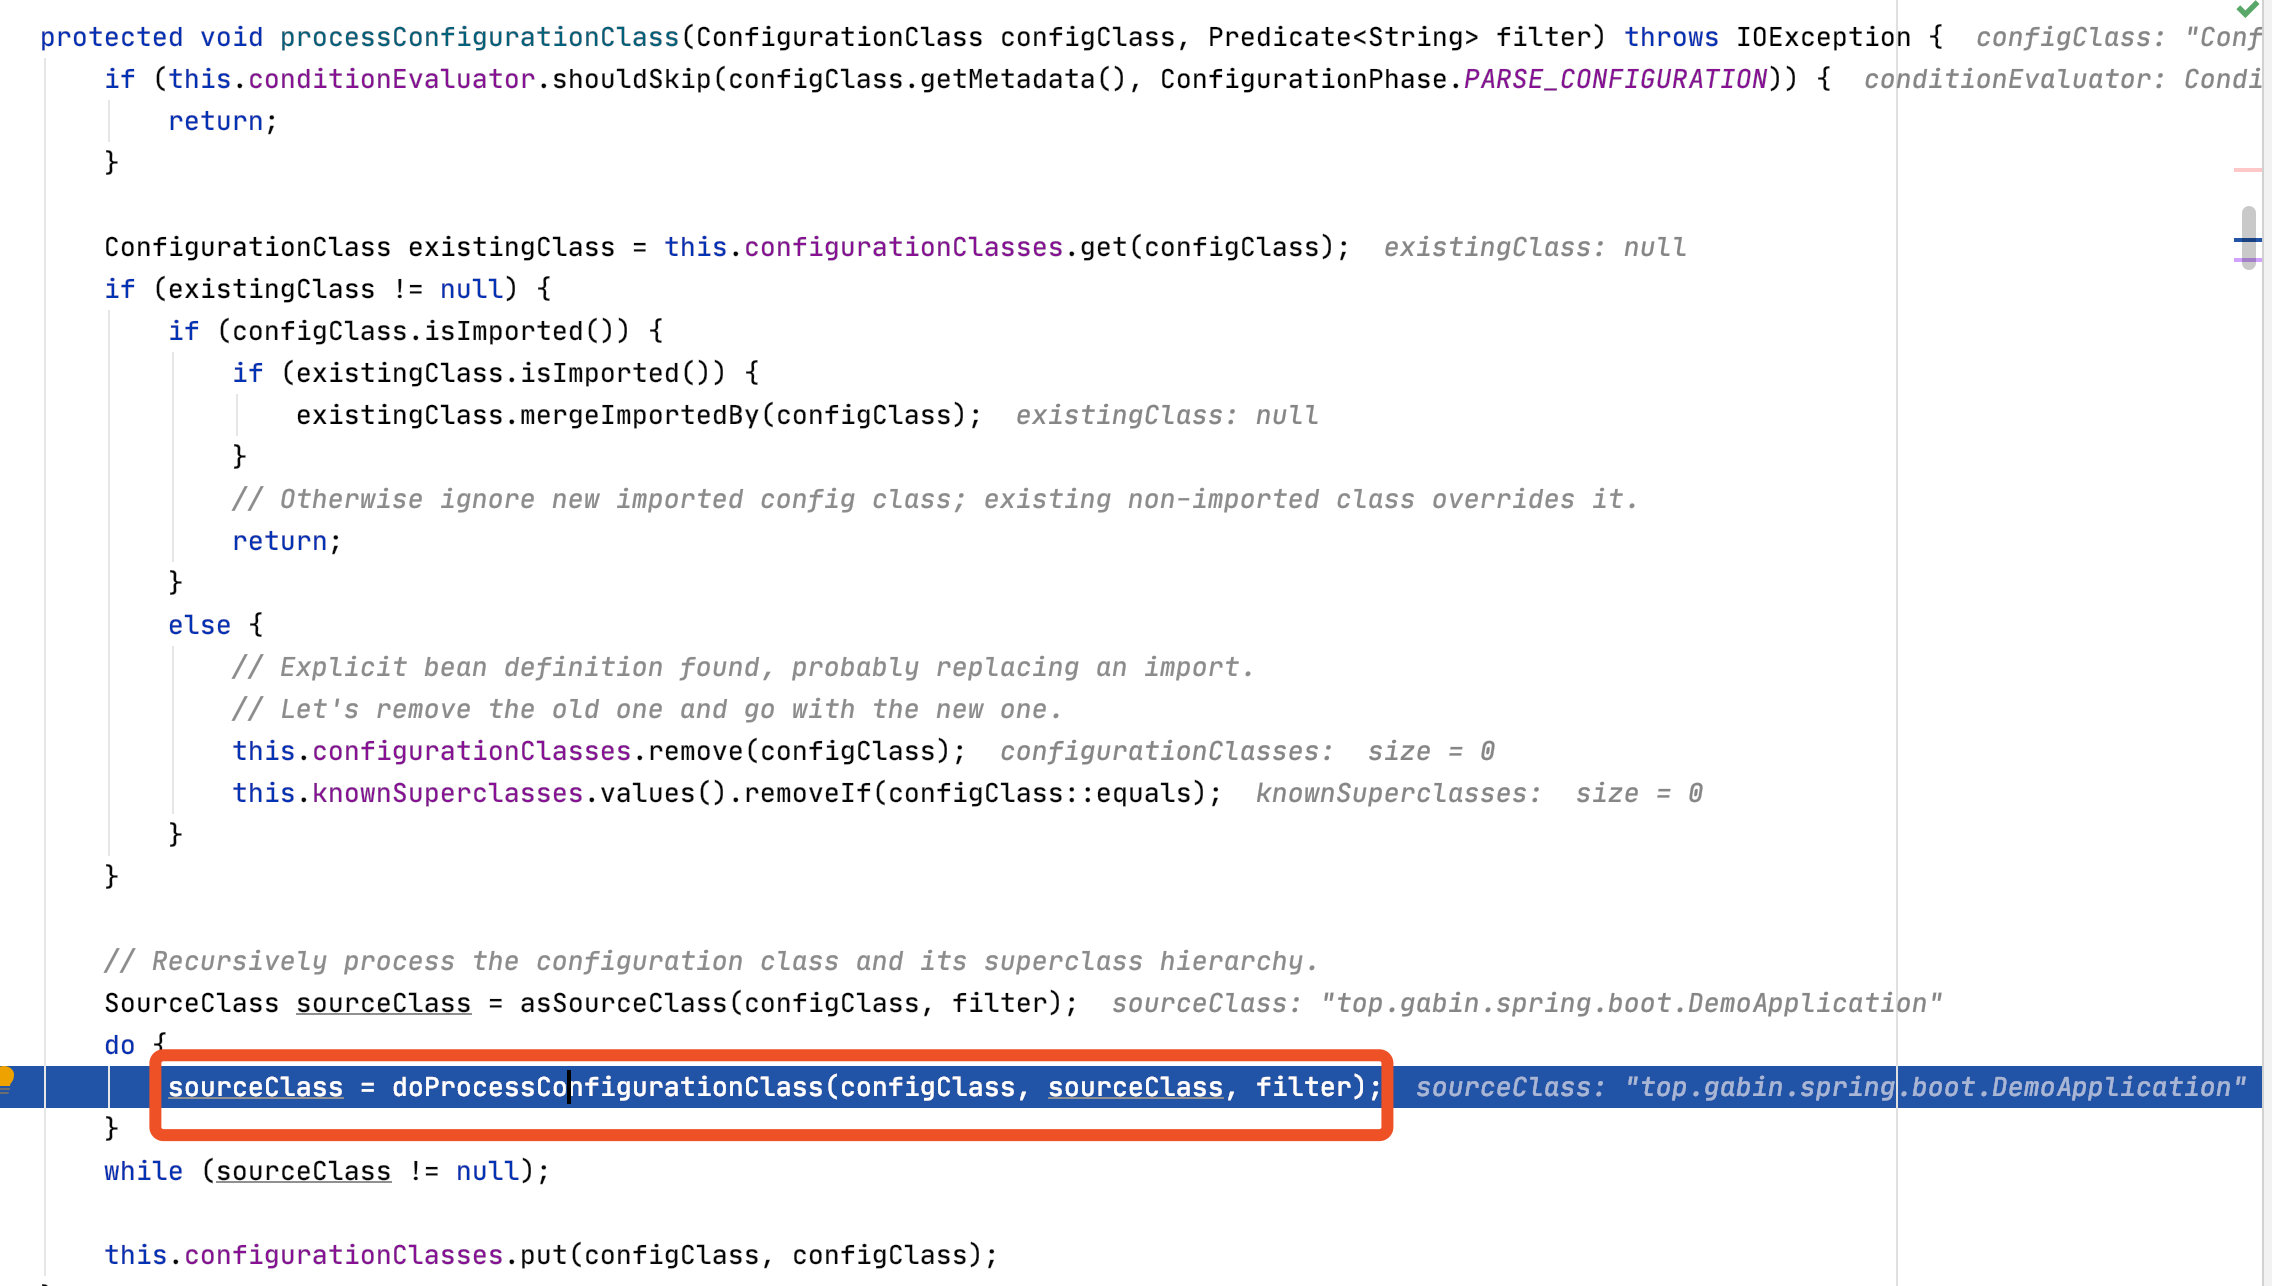
接下来这个方法实在代码有点多,反正上面这个方法入口进去之后,大致就是不断自下而上(就是子配置加载完,再加载父类的配置,
直到没有父类)地解析配置(主要是注解)
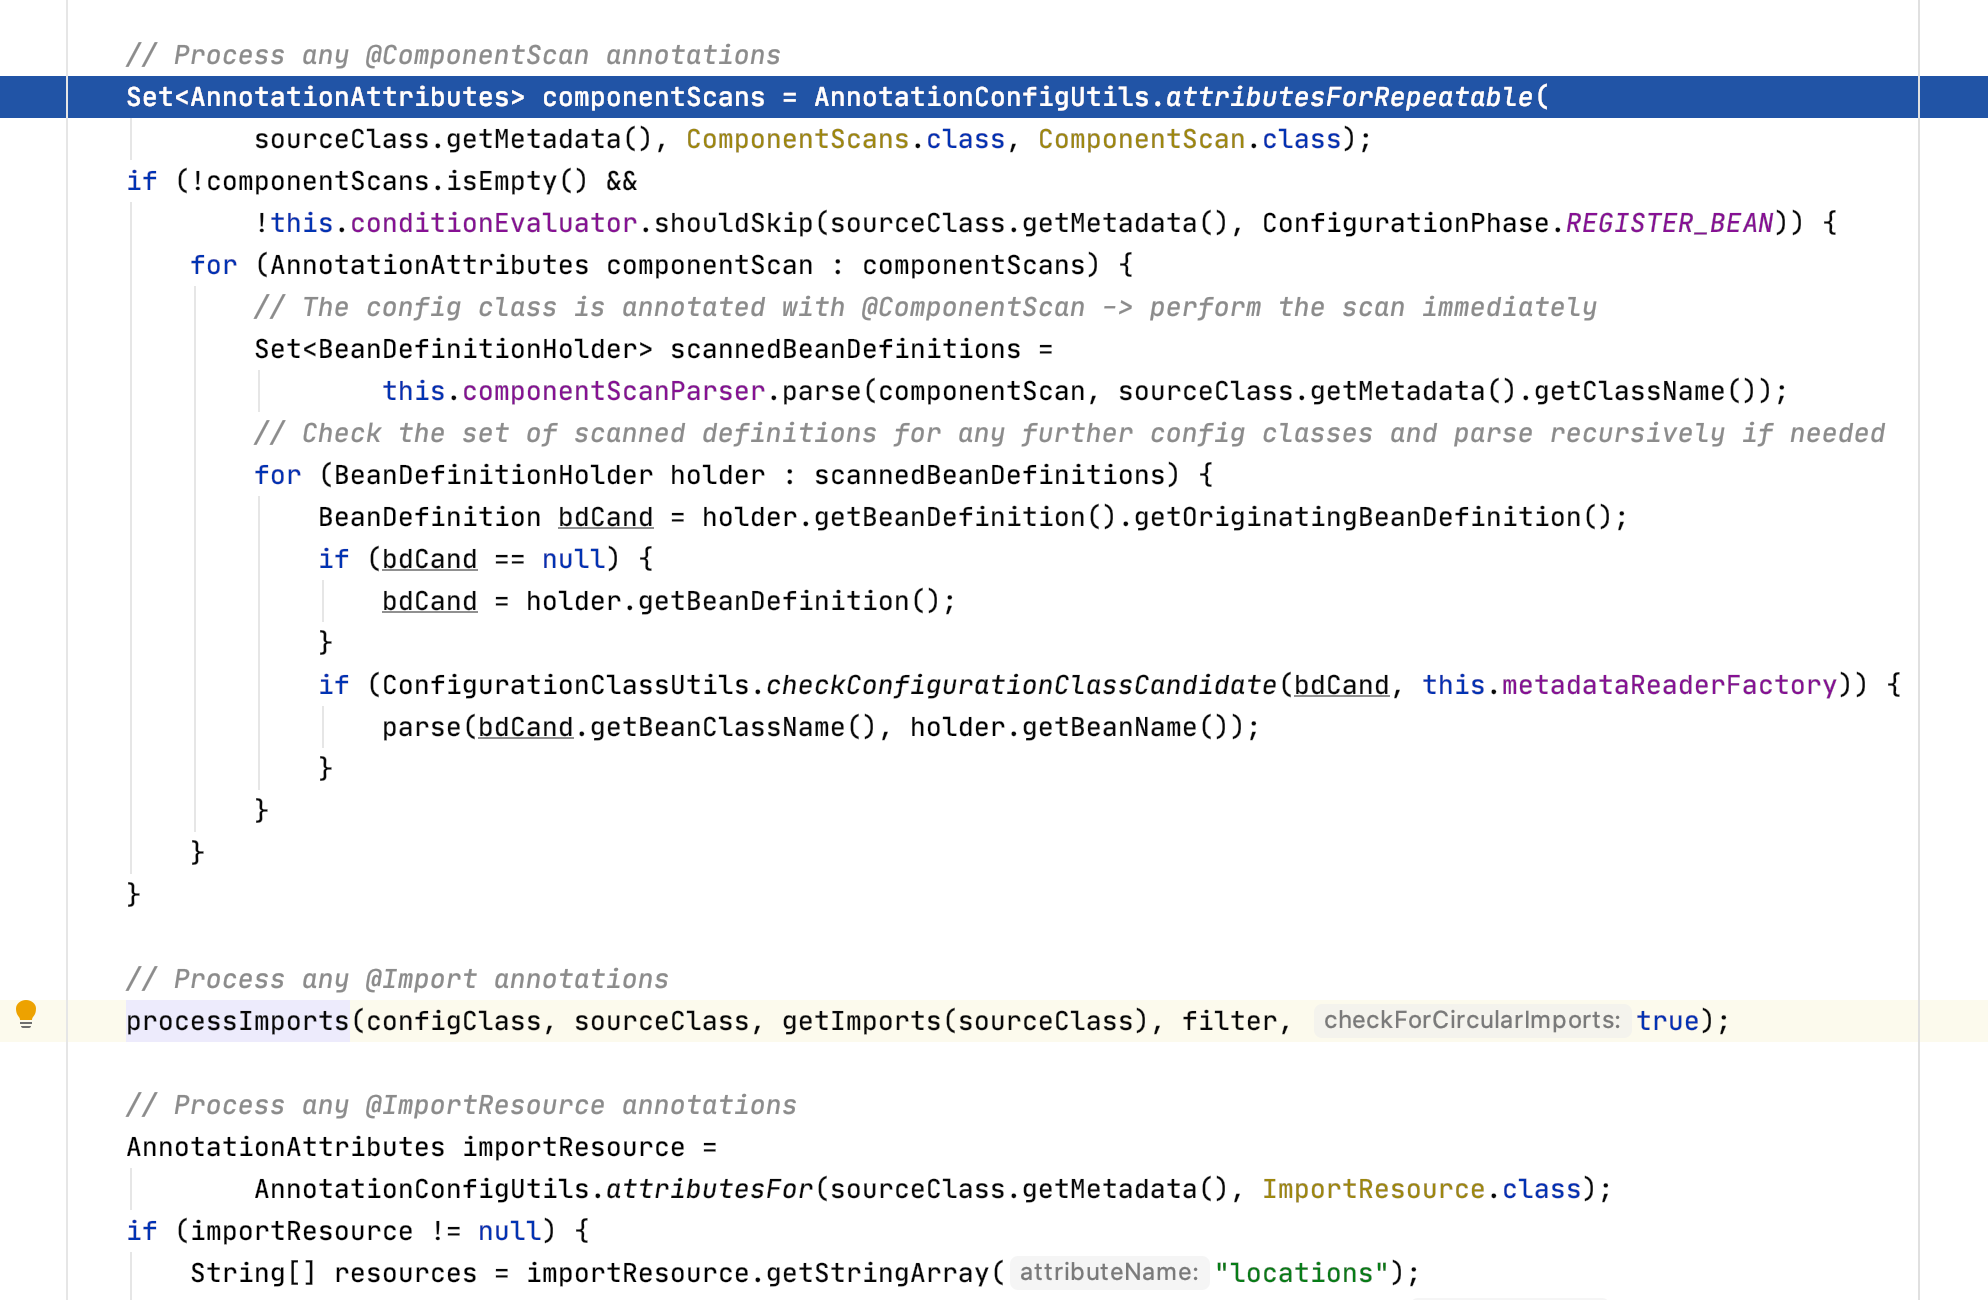
大概看一下也能知道,@CompentScan和@Import,都是自动配置装配相关的,这里会尽可能地将配置都解析出来
(不过应该还不包含一些要动态引入的,其次是这里还不是最终处理的逻辑,主要还是解析) 解析完了之后我们回
到下面这个方法
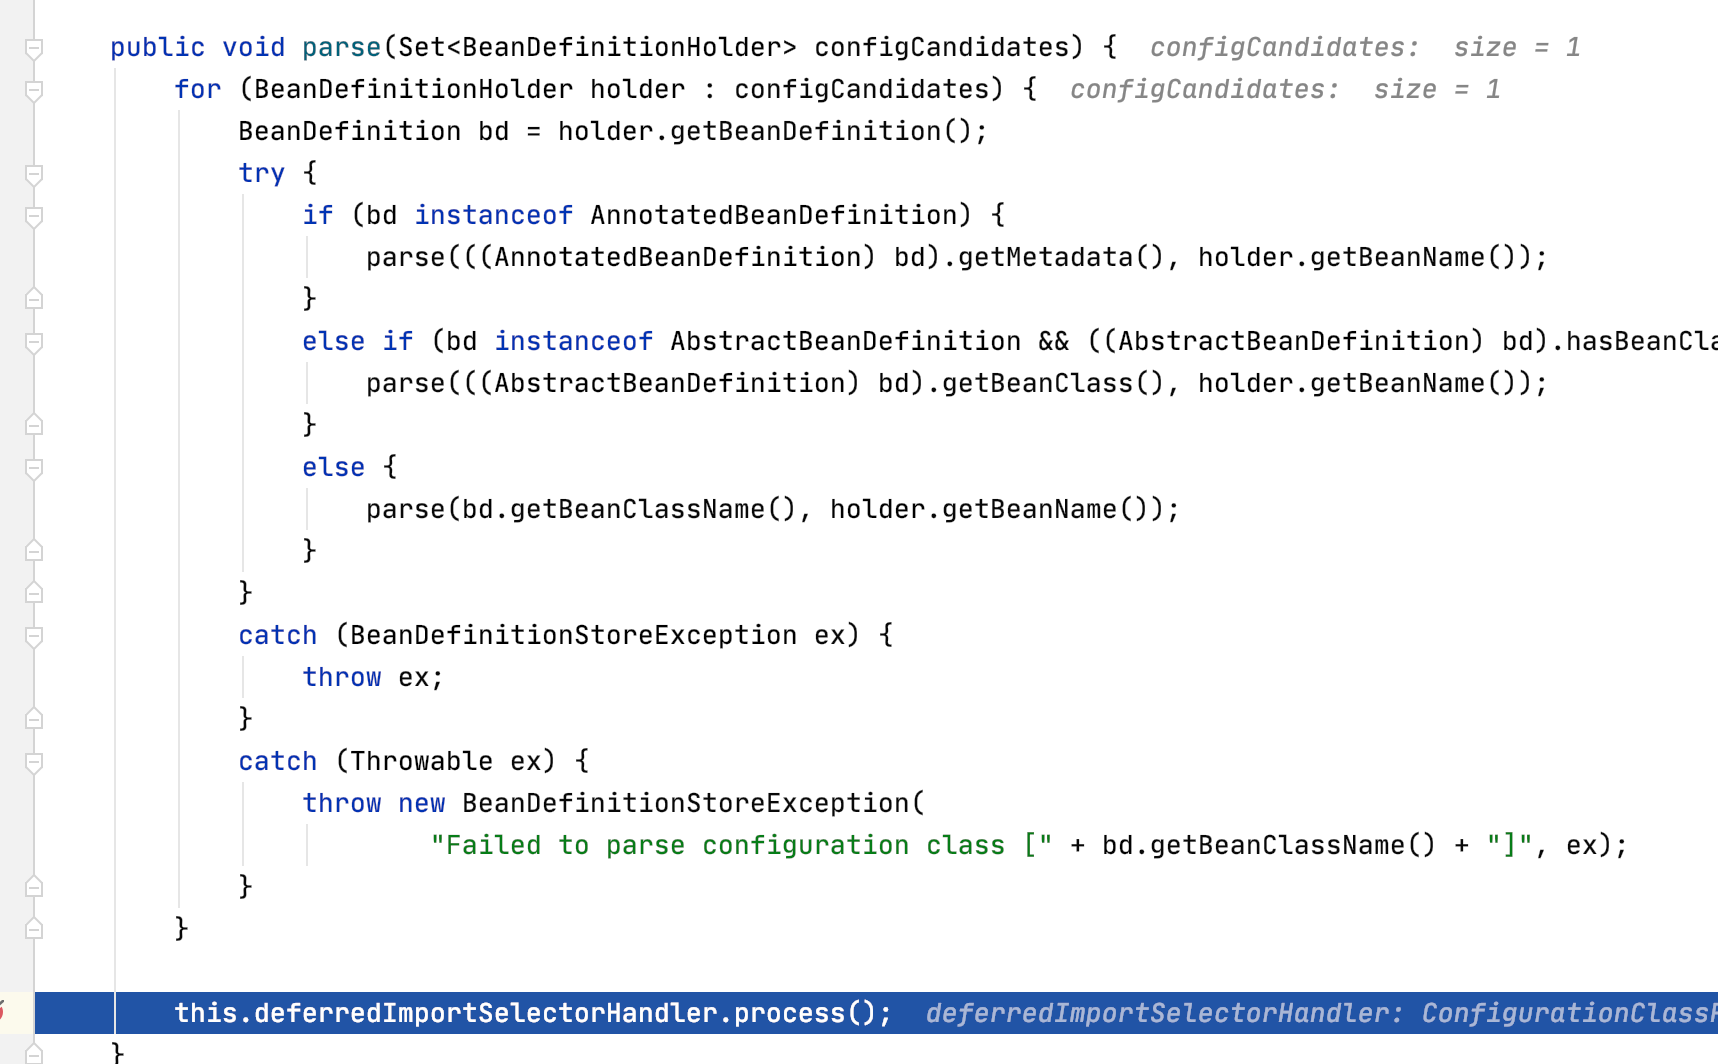
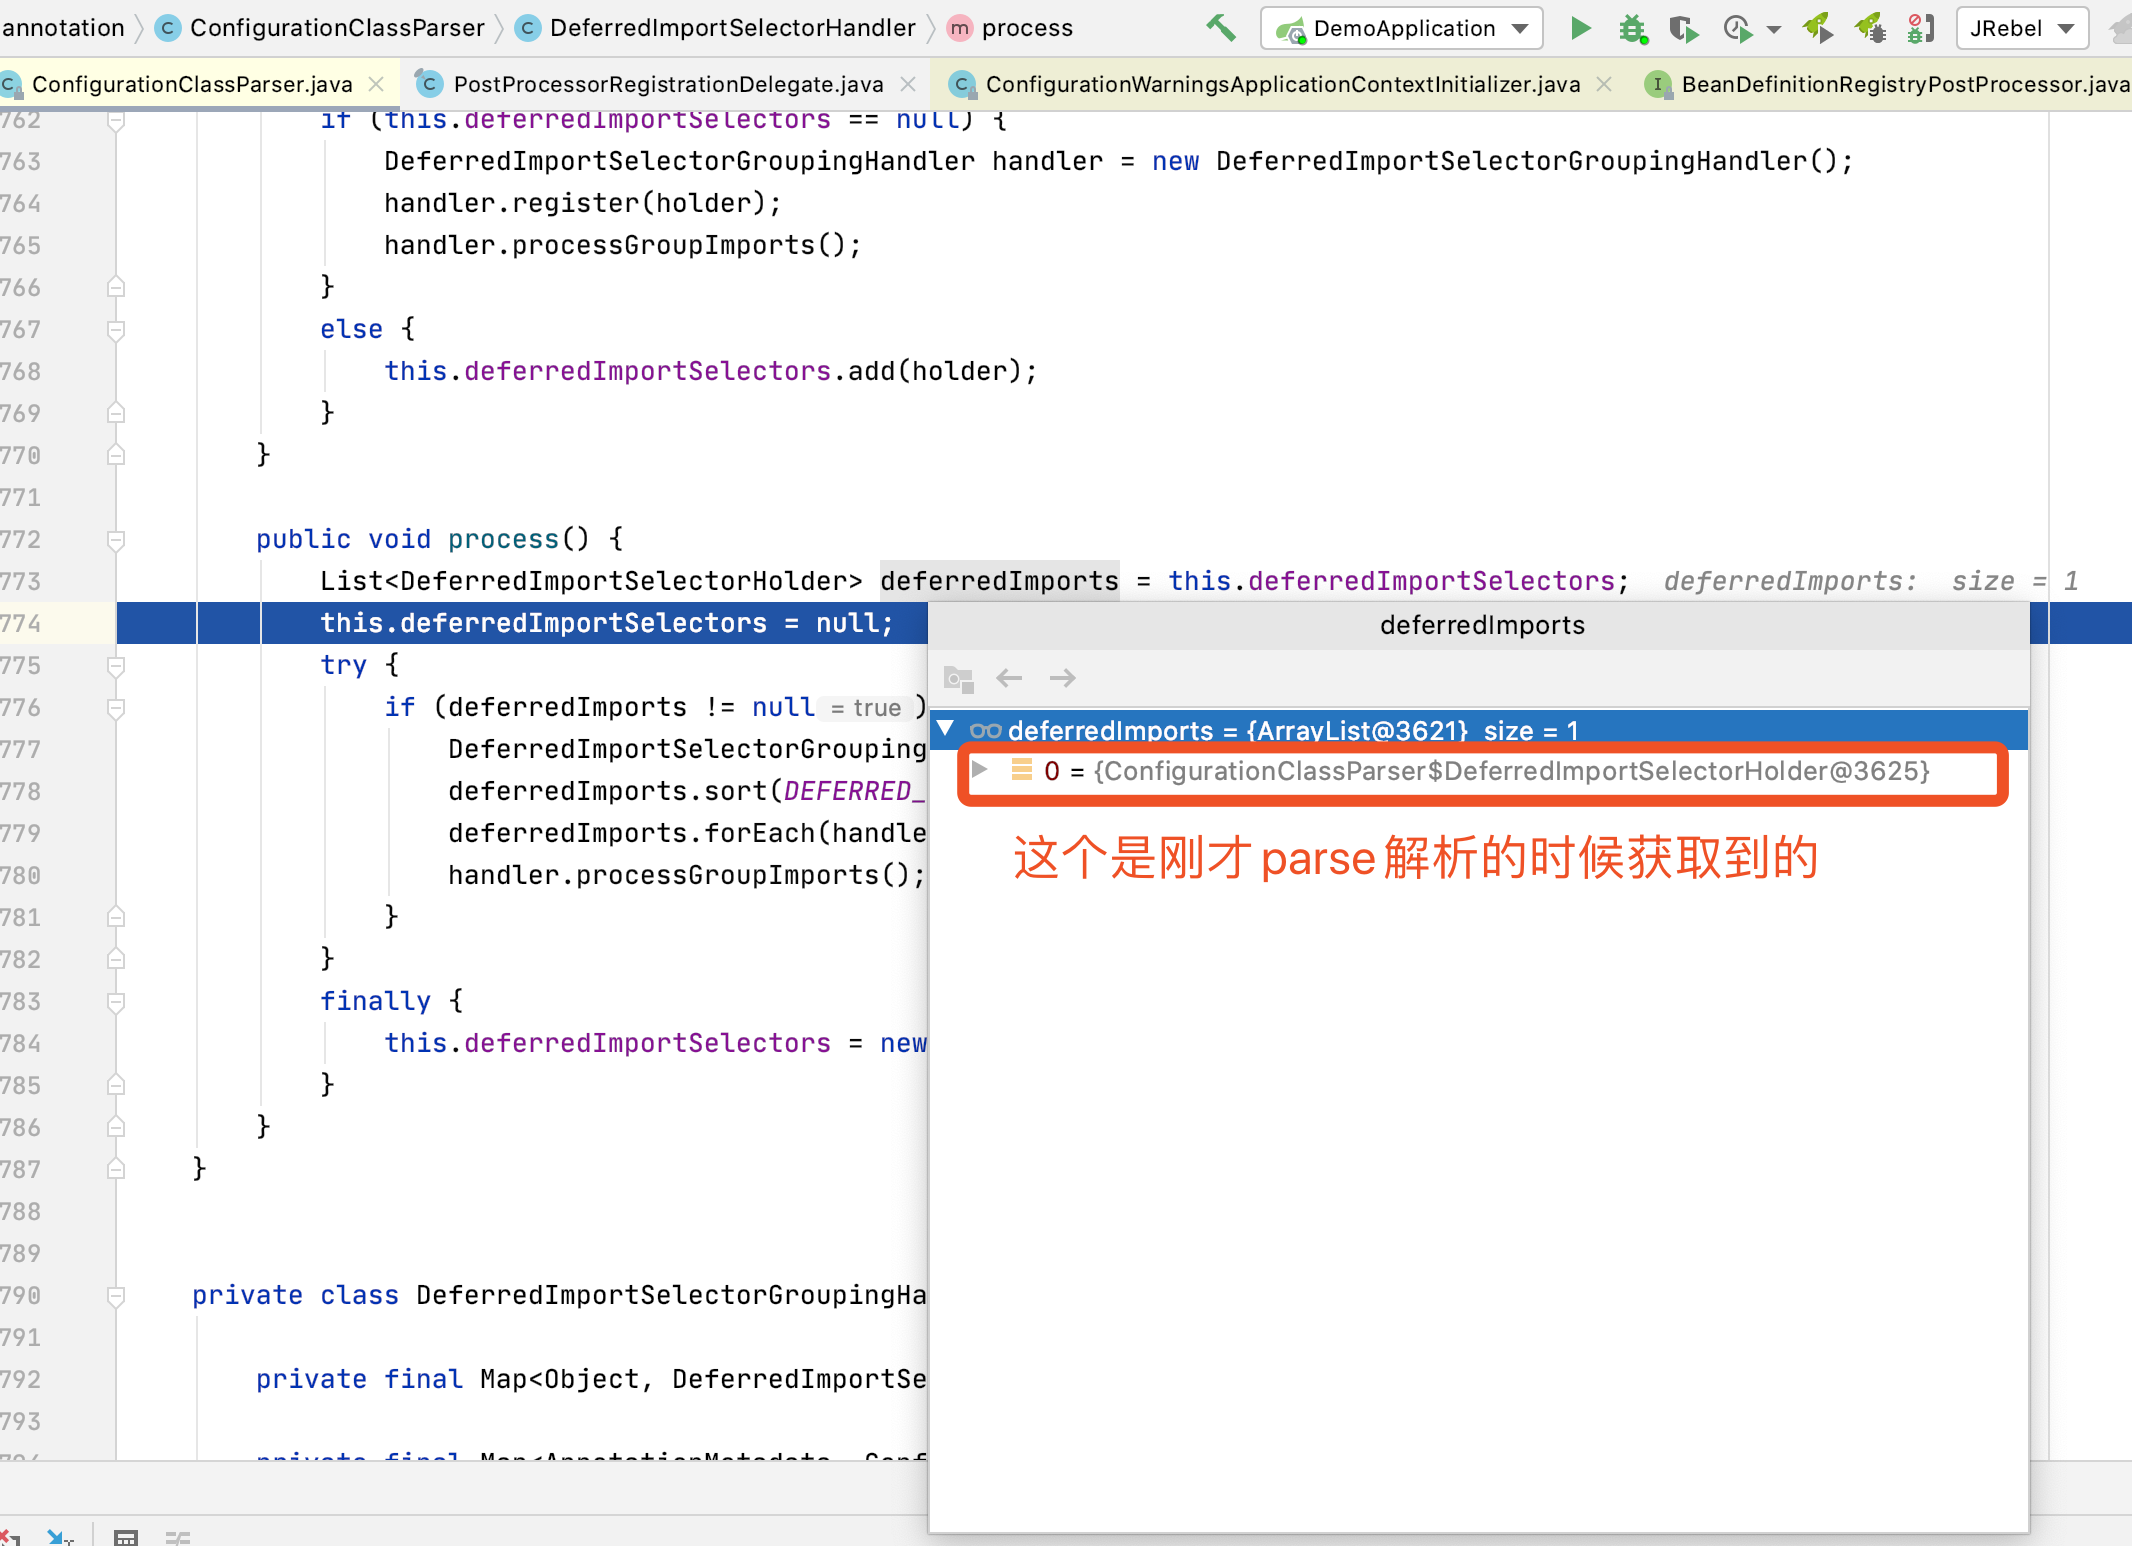
接下来这个就是最终实际执行的方法
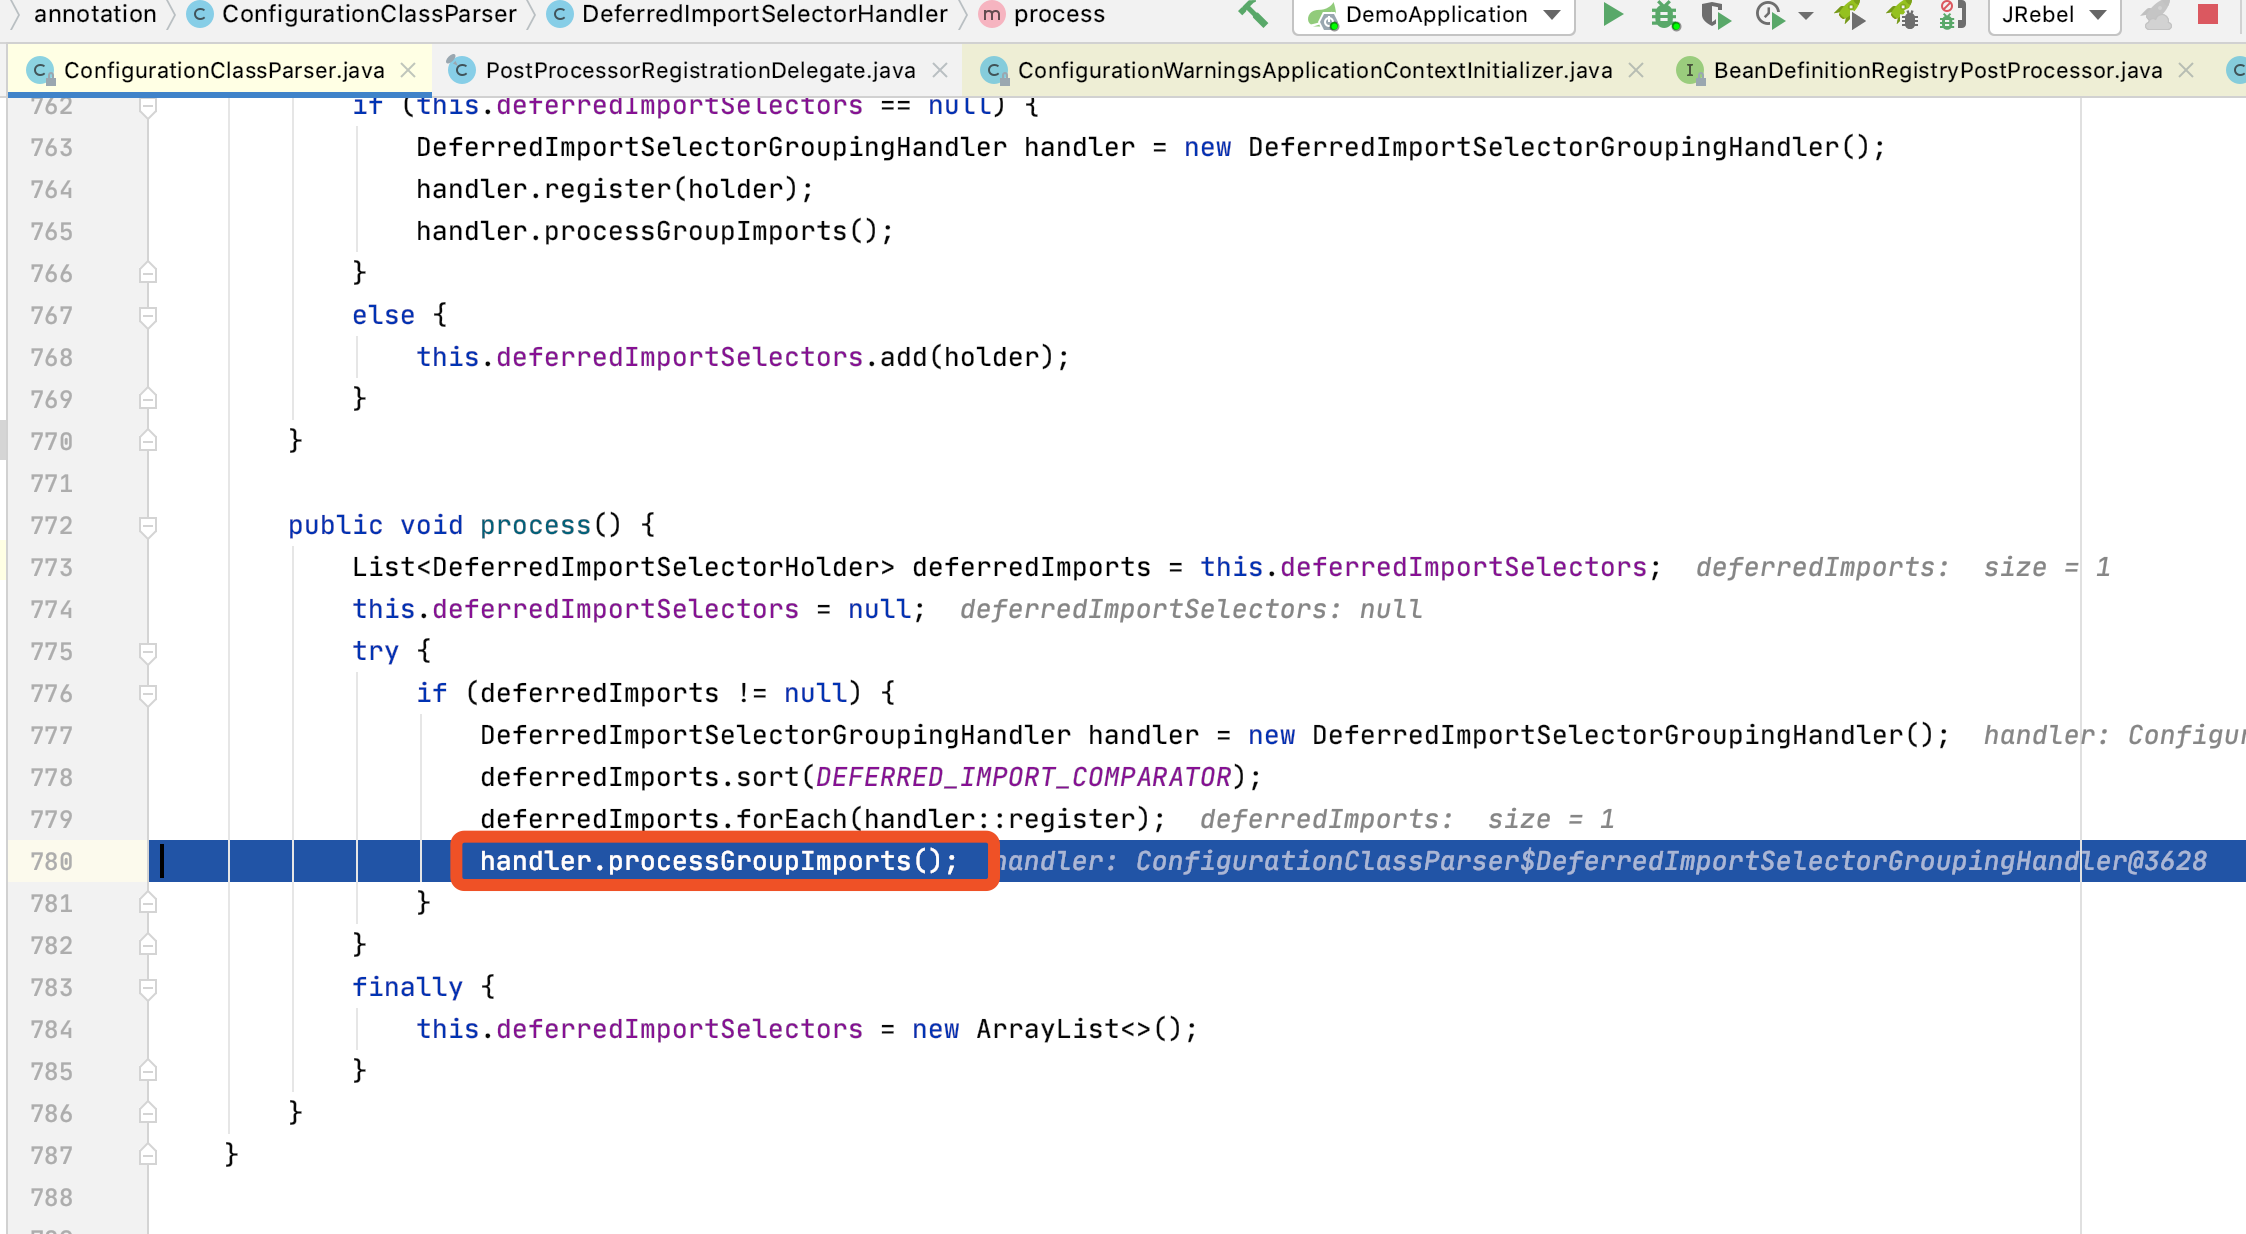
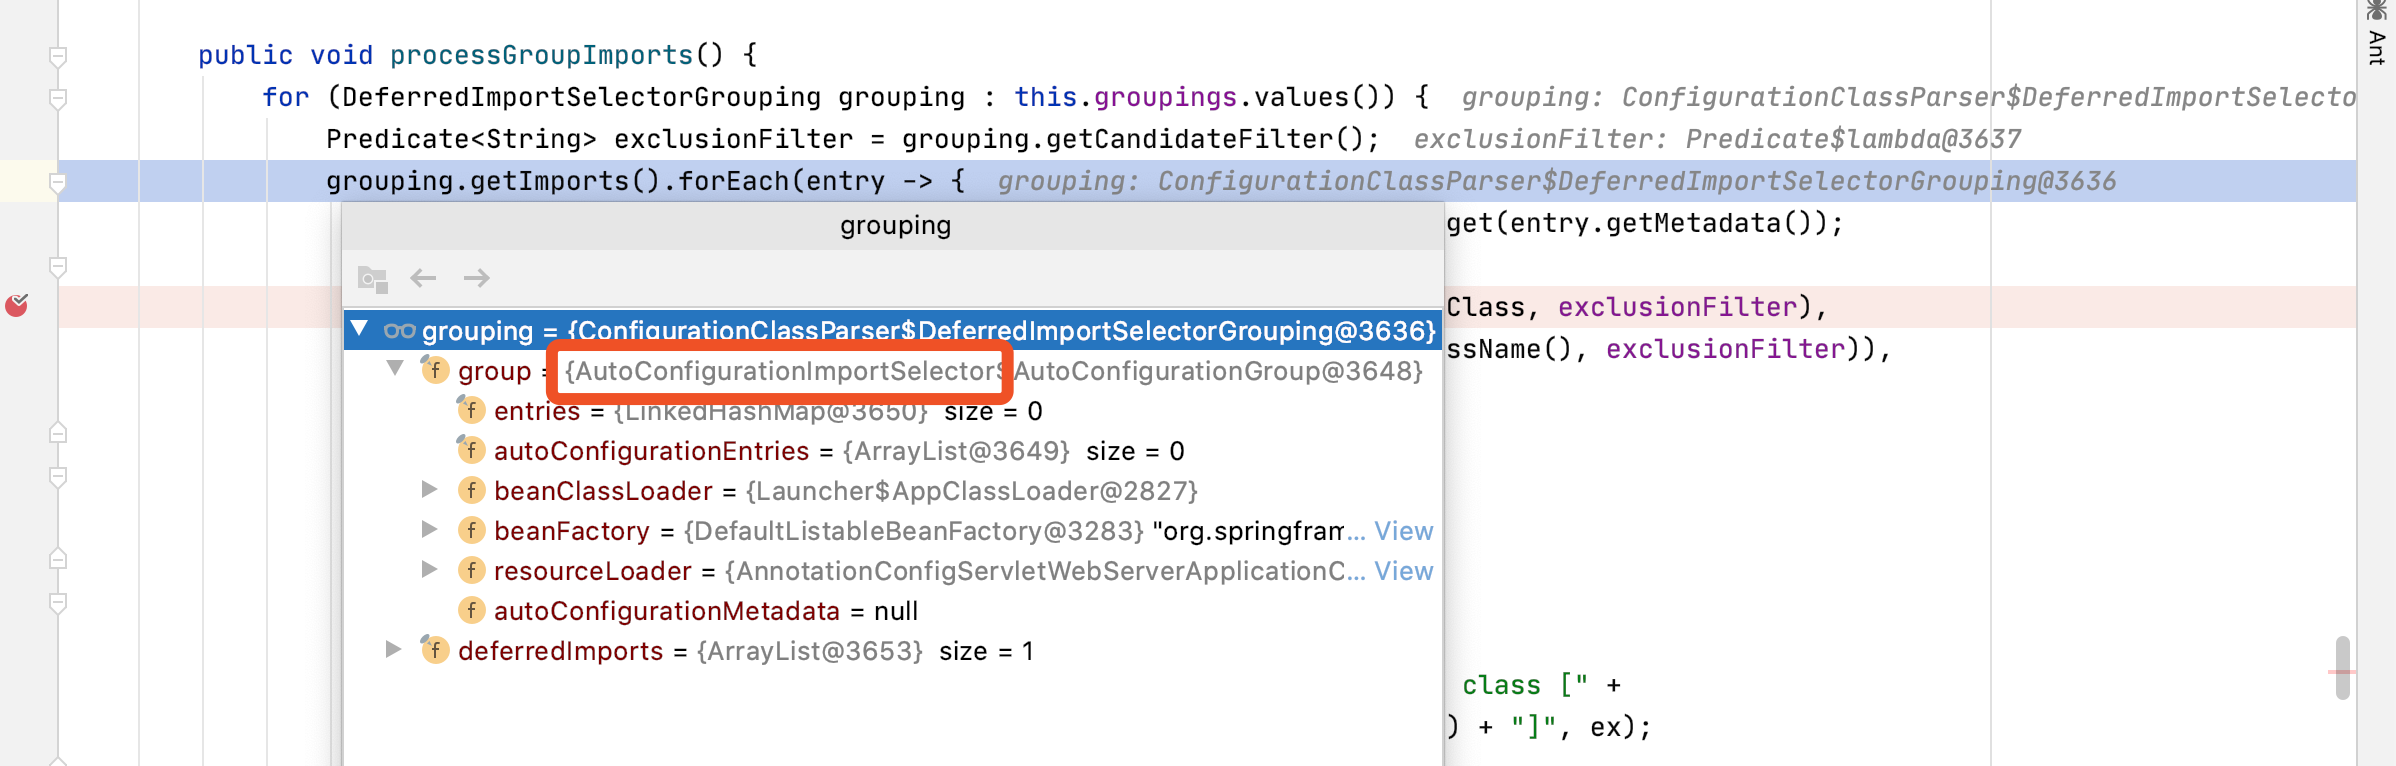
注意看下上面这个group实际是AutoConfigurationImportSelector
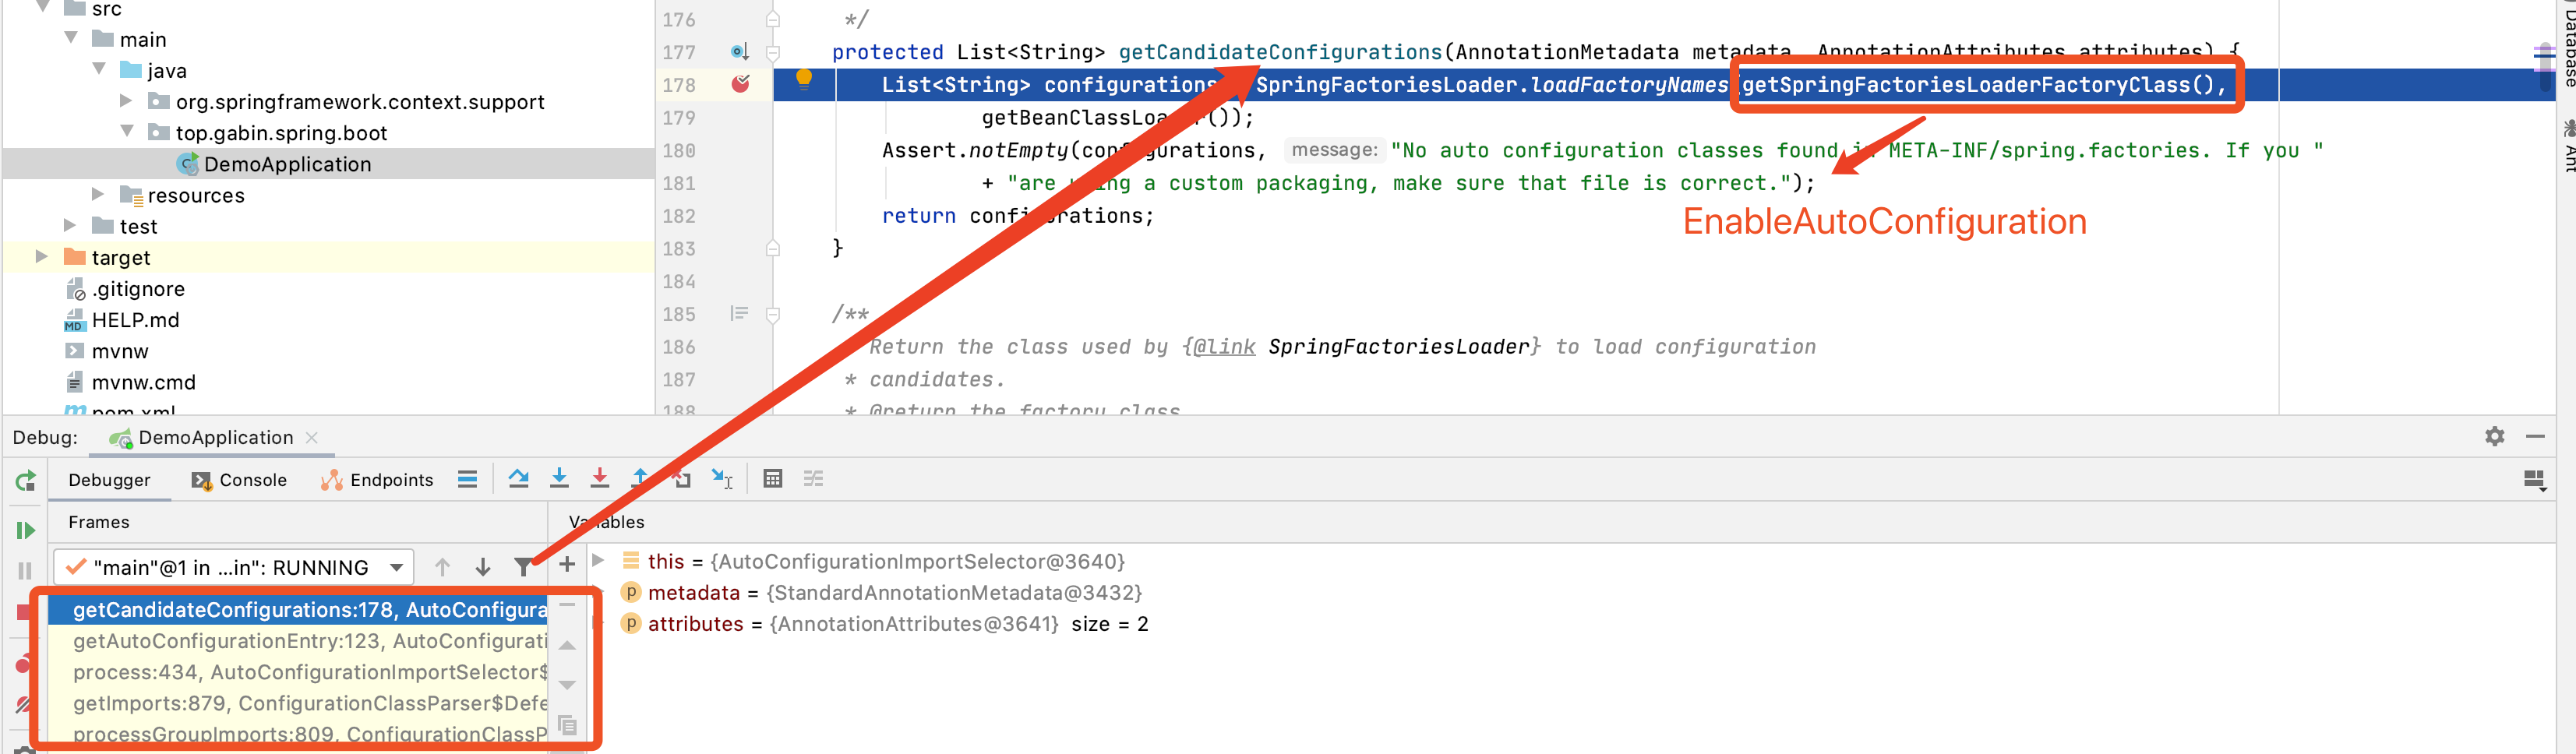
上面这个方法,实际最终从spring.factories文件里面读取出来n多个(目前我的项目里面是120多个),自动化配置需要加载的配置文件
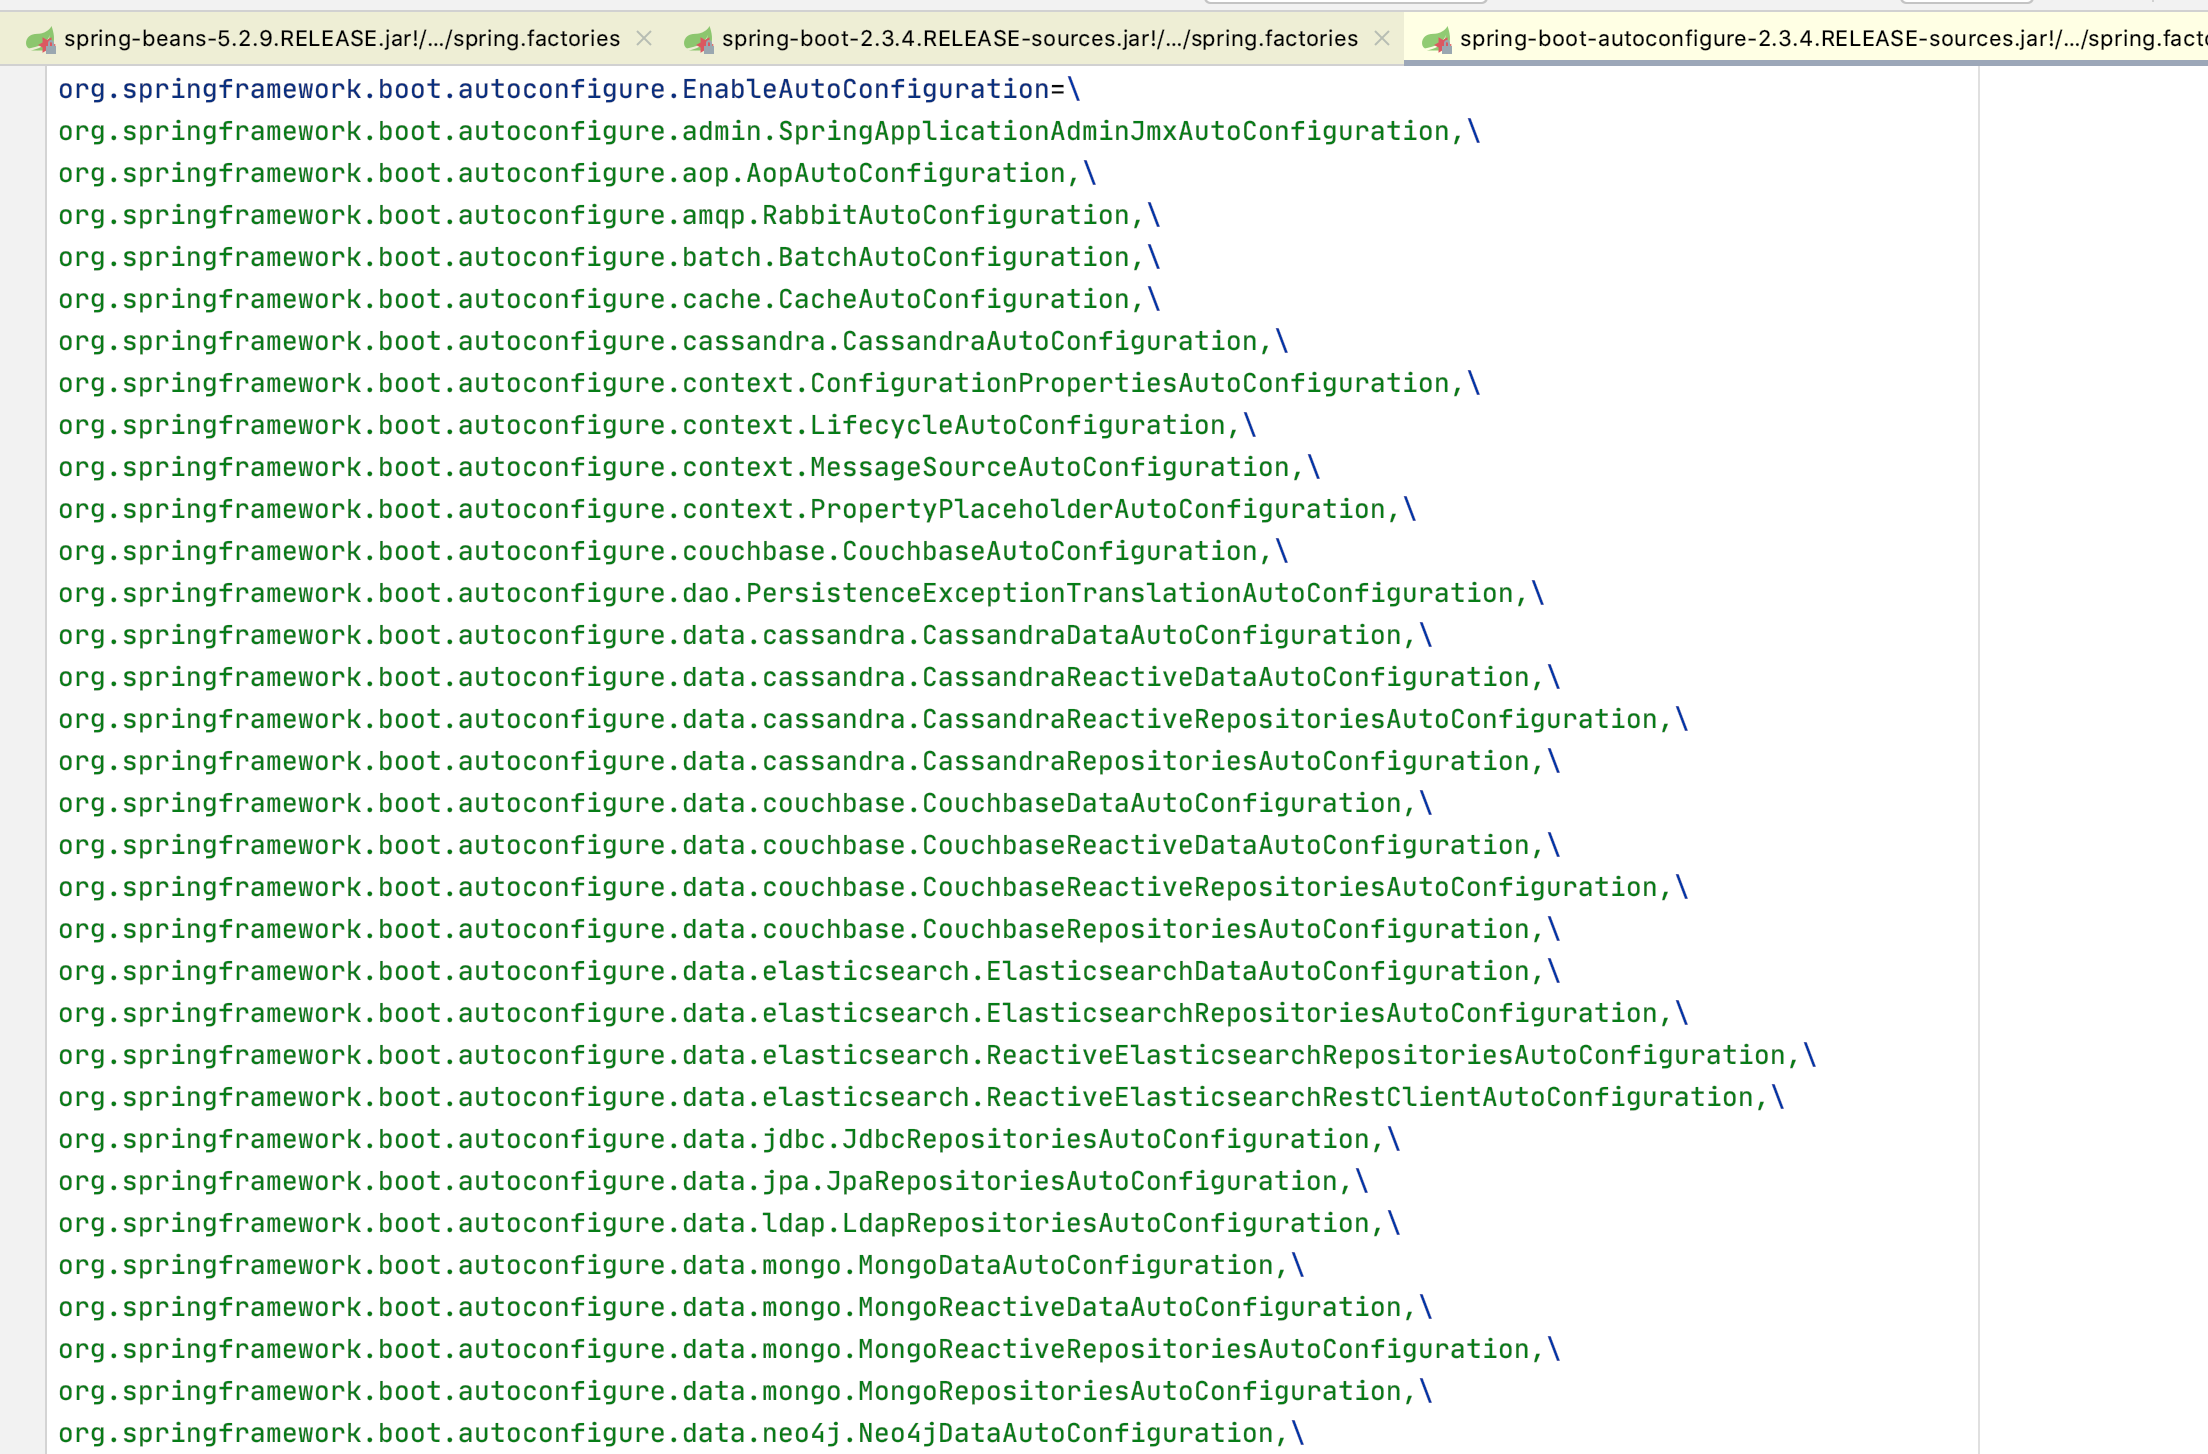
不过最终还会过滤掉一些重复或者不需要的配置,这边过滤完之后是剩下20几条
最后又会回到解析配置的那步(就是自下而上一直解析配置的那里)
反正。。。。最终解析完之后,又到了spring的refresh方法里面去实例化bean,大致是这样吧。
从上面的过程来看,其实也可以推导出,如果我们要自己设置一个starter,那么基本上只要自己配置一个class,并且将其写入spring.factories里面的,基本上就ok了
org.springframework.boot.autoconfigure.EnableAutoConfiguration=
ps:由于理解有限,可能有错误的点自己也不清楚,读者自己要自己留意下,哈哈(也许有坑),毕竟看源码容易把人看晕掉
简单总结下:
- SpringApplication的一些方法执行
- prepareContext -> 添加主类到要扫描的配置文件列表中,注册BeanFactoryPostProcess
- refreshContext -> AbstractApplicationContext refresh()
- AbstractApplicationContext的refresh方法
- invokeBeanFactoryPostProcessors方法
- 调用优先级最高的BeanFactoryPostProcess(ConfigurationClassPostProcessor)处理BeanDefinition的注册
- 调用到ConfigurationClassParser解析,
- 初步解析(初步解析是通过主类,将所有配置加载寄哪里)
- 继续调用importSelector的解析(相当于解析到了@Import,然后将AutoConfigurationImportSelector先放到一个列表中,在这一步继续解析)
- 最终应该又得调用初步解析中调用到的方法,把所有的配置都加载出来
- AbstractApplicationContext的finishBeanFactoryInitialization方法,把所有配置和普通bean都实例化
- 最终程序启动,写的太细的话,绝对要晕,这边就写个大概
反正思路吧。首先我们先读过spring 源码,就大概知道留了个beanFactoryPostProcess的口给扩展的人了
其次,通过使用,我们知道关键的注解是EnableAutoConfiguration(当然一般在这里我们还不一定知道和@Import(AutoConfigurationImportSelector.class) 的关系)
所以只能跟着源码运行最终发现初步解析之后,还会继续处理ImportSelector的解析,我们才发现上面这个关系
最终理解了,就是先加载主类配置,通过主类配置发现EnableAutoConfiguration,再通过EnableAutoConfiguration import AutoConfigurationImportSelector
AutoConfigurationImportSelector解析了spring.factories里面的EnableAutoConfiguration下的配置列表
千万千万不要被那个重复解析的代码给绕晕了,其次是不要在这里找实例化代码,如果我理解没错的话,实例化最终是spring 容器的事情,还有就是不要用spring cloud的版本来看,我差点没被搞死。。。第一次看还是老实点,看纯净版的