Excel对象模型 (.Net Perspective)
本文主要针对在Visual Studio中使用C# 开发关于Excel的应用程序
本文的PDF下载地址:C#操作Excel2007.pdf
来源:Understandingthe Excel Object Model from a .NET Developer's Perspective
所有Excel对象请参考MSDN:
----------------------------------------------华丽分割-------------------------------------------------
1. Application
首先讨论Application对象,Application对象的成员大概可以分成5大类
- l 控制Excel的状态与显示
- l 返回对象
- l 执行Action
- l 控制文件操作(handle file manipulation)
- l 其他
1.1 Application成员之:控制Excel的状态与显示
|
Property |
Type |
Description |
|
Cursor |
XlMousePointer (xlDefault, xlIBeam, xlNorthwestArrow, xlWait) |
设置/取得 鼠标指针的Appearence |
|
EditDirectlyInCell |
Boolean |
Gets or sets the ability to edit cells directly in place. If False, you can only edit cells in the formula bar. |
|
FixedDecimal |
Boolean |
If True, all numeric values use the FixedDecimalPlacesproperty to determine the number of decimal places; otherwise, FixedDecimalPlaces property is ignored (the default value is False). |
|
FixedDecimalPlaces |
Long |
Determines the number of decimal places to be used for numeric data if the FixedDecimal property is True. |
|
Interactive |
Boolean |
Gets or sets the ability of the user to interact with Excel via the keyboard and mouse; if you set this property to False, make absolutely sure you set it back to True in your exception handler. Excel won't reset it for you. |
|
MoveAfterReturn |
Boolean |
如果为真,表示按下回车键后移动到下一个单元格 |
|
MoveAfterReturnDirection |
xlDirection (xlDown, xlToLeft, xlToRight, xlUp) |
设置按下回车键后,单元格focus的移动方向,( 仅在MoveAfterReturn 属性为真时有效) 默认移动方向:xlDown. |
|
ScreenUpdating |
Boolean |
If True, Excel updates its screen after each method call. To save time, and to make your application look more professional,you can turn off the display while your code is running. Make sure you reset this property to True again once you're done. Excel won't reset it for you. |
|
SheetsInNewWorkbook |
Long |
Gets or sets the number of sheets Excel automatically places in new workbooks |
|
StandardFont |
String |
Gets or sets the name of the default font in Excel; doesn't take effect until you restart Excel. |
|
StandardFontSize |
Long |
Gets or sets the size of the default font in Excel; doesn't take effect until you restart Excel. |
|
StartupPath (read-only |
String |
Returns the complete path of the folder containing the Excel startup add-ins. |
|
TemplatesPath (read-only) |
String |
Returns the complete path of the folder containing templates; this value represents one of the Windows special folders. |
上面列出的属性中,比较重要的是:ScreenUpdating
它的含义是:是否在任一函数执行完成后更新Excel的界面显示。如果你在进行大数据量的计算,这一功能尽量关闭,因为这可以提高你的任务执行速度。
ScreenUpdating在C#中的使用方法是:(执行完任务记得重新开启该功能)
- // C#
- try
- {
- ThisApplication.ScreenUpdating = false;
- // Do your work that updates the screen.
- }
- finally
- {
- ThisApplication.ScreenUpdating = true;
- }
下面再介绍几个有关属性:
|
Property |
Type |
Description |
|
DisplayAlerts |
Boolean |
If True (the default value), Excel displays warning messages while your code runs, as necessary--when deleting a sheet, for example. Set to False to bypass warnings. Excel acts as if you had selected the default value for each alert. |
|
DisplayFormulaBar |
Boolean |
If True (the default value), Excel displays the standard formula bar for editing cells; set to False to hide the editing bar. |
|
DisplayFullScreen |
Boolean |
If True, Excel runs in full-screen mode (which has a different effect from simply maximizing the Excel window); the default value is False. |
1.2 Application成员之: who return objects
Excel库包含很多类,但是在Visual Studio中提供给开发人员的只有Excel.Application,Workbook等,那么我们怎么获得其他很多有用的类型呢?
比如,我想获得当前活动的单元格(cell),怎么办?不用担心,Application对象提供很多属性能够返回其他很多类型的对象的引用。下面具体来看一下:
|
Property |
Type |
Description |
|
ActiveCell |
Range |
Returns a reference to the currently active cell in the active window (the window that's on top). If there's no active window, this property raises an error. |
|
ActiveChart |
Chart |
Returns a reference to the currently active chart. An embedded chart is only considered active when it's selected or activated. |
|
ActiveSheet |
Object |
Returns a reference to the active sheet in the active workbook. |
|
ActiveWindow |
Window |
Returns a reference to the active window (the window that's on top); returns Nothing if there are no active windows. |
|
Charts |
Sheets |
Returns a collection of Sheet objects (the parent for bothChart and Worksheet objects) containing references to each of the charts in the active workbook. |
|
Selection |
Object |
Returns the selected object within the application. Might be a Range, a Worksheet, or any other object—also applies to the Window class, in which case the selection is generally a Range object. If no object is currently selected, returns Nothing. |
|
Sheets |
Sheets |
Returns a collection of Sheet objects containing references to each of the sheets in the active workbook. |
|
Workbooks |
Workbooks |
Returns a collection of Workbook objects containing references to all the open workbooks. |
上面的属性中,Workbooks属性无疑是最常用的。通过这个属性,我们可以打开或者创建一个workbook,下面我们具体看一下该属性的一些行为。
1. 创建workbook
- Excel.Workbook wb = ThisApplication.Workbooks.Add(Type.Missing);
2. 关闭workbook
- ThisApplication.Workbooks.Close();
3. 打开一个存在的workbook
- Excel.Workbook wb = ThisApplication.Workbooks.Open(
- "C:\YourPath\Yourworkbook.xls",
- Type.Missing, Type.Missing, Type.Missing, Type.Missing,
- Type.Missing, Type.Missing, Type.Missing, Type.Missing,
- Type.Missing, Type.Missing, Type.Missing, Type.Missing,
- Type.Missing, Type.Missing);
4. 用Excel的方式打开XML文件,数据库文件或者TXT文件
OpenXML,OpenDatabase,OpenText
5. 通过名字或者索引引用workbook
- Excel.Workbook wb = ThisApplication.Workbooks[1];
- wb = ThisApplication.Workbooks["Book1"];//在workbook未保存的情况下
- wb = ThisApplication.Workbooks["Book1.xls"];//在workbook已经保存的情况下
1.3 Application成员之: Execute Actions
这类成员包括Calculate,CheckSpelling,Evaluate,Sendmaid,Undo,Quit。。。实在是太多了,请参考原文。
1.4 Application成员之: Handles File Manipulation
l 缺省文件路径 DefaultFilePath
- // C#
- // When the workbook opens:
- ThisApplication.get_Range("DefaultFilePath", Type.Missing).
- Value2 = ThisApplication.DefaultFilePath;
- // When you save the DefaultFilePath property:
- ThisApplication.DefaultFilePath =
- ThisApplication.get_Range("DefaultFilePath", Type.Missing).
- Value2.ToString();
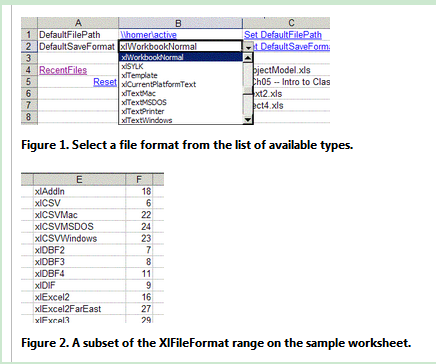
l 默认的保存文件格式 DefaultSaveFormat
下图展示了Excel支持的保存文件格式
- // 例1
- // When the workbook opens, convert the enumerated value
- // into a string:
- //获得默认的保存格式属性DefaultSaveFormat
- ThisApplication.get_Range("DefaultSaveFormat", Type.Missing).
- Value2 = ThisApplication.DefaultSaveFormat.ToString();
- //例2.设置该属性,相对比较复杂
- // 步骤1.Retrieve the name of the new save format, as a string:
- string strSaveFormat = ThisApplication.
- get_Range("DefaultSaveFormat", Type.Missing).
- Value2.ToString();
- //步骤2
- Excel.Range rng = ThisApplication.
- get_Range("xlFileFormat", Type.Missing);
- Excel.Range rngFind = rng.Find(strSaveFormat,
- Type.Missing, Type.Missing, Type.Missing, Type.Missing,
- Excel.XlSearchDirection.xlNext, Type.Missing, Type.Missing,
- Type.Missing);
- // In C#, use the get_Offset method instead of the Offset property:
- int intSaveFormat =
- Convert.ToInt32(rngFind.get_Offset(0, 1).Value2);
- //步骤3.
- ThisApplication.DefaultSaveFormat =
- Excel.XlFileFormat) intSaveFormat;
l RecentFiles属性
- // 列出最近打开的文档<strong>
- </strong>private void ListRecentFiles()
- {
- Excel.Range rng = (Excel.Range)ThisApplication.
- get_Range("RecentFiles", Type.Missing).Cells[1, 1];
- for (int i = 1; i <= ThisApplication.RecentFiles.Count; i++)
- {
- rng.get_Offset(i - 1, 0).Value2 =
- ThisApplication.RecentFiles[i].Name;
- }
- }
l FileDialog属性
Using this dialog box, you cantake advantage of all the file handling capabilities provided by MicrosoftOffice.
The FileDialog property requires that you select aparticular use of the dialog box by passing it one of themsoFileDialogType enumerated values:
msoFileDialogFilePicker,
msoFileDialogFolderPicker,
msoFileDialogOpen, or
msoFileDialogSaveAs.
You can then interact with the FileDialog object returned by the property.
使用该属性需要引用Microsoft.Office.Core 命名空间
- // C#
- using Office = Microsoft.Office.Core;
执行打开文件对话框的show()函数,将显示该对话框。用户点击OK,则该函数返回-1,若点击Cancel,则该函数返回0。
- // 打开FileDialog,选择一个文件打开
- dlg = ThisApplication.get_FileDialog(
- Office.MsoFileDialogType.msoFileDialogOpen);
- dlg.Filters.Clear();
- dlg.Filters.Add("Excel Files", "*.xls;*.xlw", Type.Missing);
- dlg.Filters.Add("All Files", "*.*", Type.Missing);
- if(dlg.Show() != 0)
- dlg.Execute();
大致包括以下几类:(具体请参考MSDN)
- WorksheetFunctionClass
- WindowClass & Window Collection
- NameClass & Name Collection
- ApplicationEvent
2. Workbook
该类提供约90个属性。很多是开发者想象不到的属性,比如:
- AutoUpdateFrequency 返回一个共享的workbook的自动更新间隔时间
- Date1904 返回true表示当前使用的是data 1904 时间系统
- PasswordEncryptionAlgorithm允许你设置加密算法。
下面给出最常使用的Workbook属性
- Name,Fullname ,Path
- ThisApplication.get_Range("WorkbookName", Type.Missing).
- Value2 = ThisWorkbook.Name;
- ThisApplication.get_Range("WorkbookPath", Type.Missing).
- Value2 = ThisWorkbook.Path;
- ThisApplication.get_Range("WorkbookFullName", Type.Missing).
- Value2 = ThisWorkbook.FullName;
- Password(给EXCEL文件加密)
- private void SetPassword()
- {
- Password frm = new Password();
- if (frm.ShowDialog() == DialogResult.OK)
- ThisWorkbook.Password = frm.Value;
- frm.Dispose();
- }
- PrecisionAsDisplayed
- private void TestPrecisionAsDisplayed(
- bool IsPrecisionAsDisplayedOn)
- {
- ThisWorkbook.PrecisionAsDisplayed =
- IsPrecisionAsDisplayedOn;
- }
- ReadOnly (boolean) 返回当前打开的文件是否是只读的
- Saved (boolean) 设置/获取 saved state
Working with Styles
- // 风格设置
- private void ApplyStyle()
- {
- const String STYLE_NAME = "PropertyBorder";
- // Get the range containing all the document properties.
- Excel.Range rng = GetDocPropRange();
- Excel.Style sty;
- try
- {
- sty = ThisWorkbook.Styles[STYLE_NAME];
- }
- catch
- {
- sty = ThisWorkbook.Styles.Add(STYLE_NAME, Type.Missing);
- }
- sty.Font.Name = "Verdana";
- sty.Font.Size = 12;
- sty.Font.Color = ColorTranslator.ToOle(Color.Blue);
- sty.Interior.Color = ColorTranslator.ToOle(Color.LightGray);
- sty.Interior.Pattern = Excel.XlPattern.xlPatternSolid;
- rng.Style = STYLE_NAME;
- rng.Columns.AutoFit();
- }
- private Excel.Range GetDocPropRange()
- {
- Excel.Range rng =
- ThisApplication.get_Range("DocumentProperties", Type.Missing);
- Excel.Range rngStart =
- (Excel.Range) rng.Cells[1, 1];
- Excel.Range rngEnd =
- rng.get_End(Excel.XlDirection.xlDown).get_Offset(0, 1);
- return ThisApplication.get_Range(rngStart, rngEnd);
- }
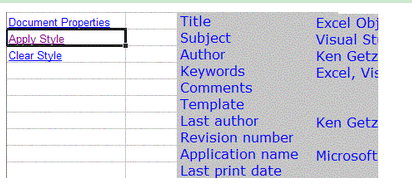
设置风格后的样子:
当然,设置Style后也可以清除Style
- // C#
- private void ClearStyle()
- {
- // Get the range containing all the document properties, and
- // clear the style.
- GetDocPropRange().Style = "Normal";
- }
Working with Sheets
- // C# 列出所有Sheet
- private void ListSheets()
- {
- int i = 0;
- Excel.Range rng =
- ThisApplication.get_Range("Sheets", Type.Missing);
- foreach (Excel.Worksheet sh in ThisWorkbook.Sheets)
- {
- rng.get_Offset(i, 0).Value2 = sh.Name;
- i = i + 1;
- }
- }
3. WorkSheet
当你阅读到这里的时候,你已经了解了大部分关于worksheet的概念。尽管Worksheet类提供了大量属性,方法,事件;但其实它们的实现方法基本与Application和Workbook中的实现方法相同。这一节着重介绍之前没有讨论的内容。3.1 There is no Sheet Class..
什么?没有Sheet类?
我们知道,Workbook对象有一个属性叫做Sheets,它是一个Workbook中Sheet的集合,但Excel中确实没有叫做Sheet的类。取而代之的是,Sheets集合中的每一个元素都是一个WorkSheet对象或者Chart对象。你可以这样去想: Worksheet以及Chart类都是specialized instances of an internal Sheet Class
3.2 Working with Protection
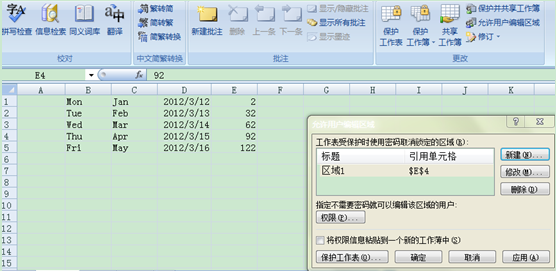
通常,protection特性用于防止用户修改worksheet中的对象。一旦你使能了worksheet的protection功能,那么用户将无法编辑&修改该sheet。在用户界面,你可以选择Tools | Protection | ProtectSheet(Excel2007下面是 审阅 | 更改 | 保护工作表)来使能protection。如下图所示:

你也可以定义允许用户编辑的区域:
通过以上两个对话框,你就可以锁定sheet,同时允许用户编辑指定的选项以及区域(edit specificfeatures and ranges)。
当然,上述的内容也可以让C#帮我们完成。
- // C#
- WorksheetObject.Protect(Password, DrawingObjects, Contents,
- Scenarios, UserInterfaceOnly, AllowFormattingCells,
- AllowFormattingColumns, AllowFormattingRows,
- AllowInsertingColumns, AllowInsertingRows,
- AllowInsertingHyperlinks, AllowDeletingColumns,
- AllowDeletingRows, AllowSorting, AllowFiltering,
- AllowUsingPivotTables);
上面的Protect方法有很多参数,分别对应保护的内容。
- Password 对应密码,当你要撤销保护时需要指定密码
- DrawingObjects 保护Shapes on the worksheet
- Contents 保护cells,即所有单元格内容
- Scenarios 保护情景
- UserInterfaceOnly 允许通过代码修改,不允许通过用户界面修改AllowFormattingCells AllowFormattingColumns….后面不再赘述
下面这个例子,设置了密码,同时只允许Sorting
- // C#
- ((Excel.Worksheet)ThisApplication.Sheets[1]).Protect(
- "MyPassword", Type.Missing, Type.Missing, Type.Missing,
- Type.Missing, Type.Missing, Type.Missing, Type.Missing,
- Type.Missing, Type.Missing, Type.Missing, Type.Missing,
- Type.Missing, true, Type.Missing, Type.Missing);
下面的代码展示如何去保护(提示让用户输入密码)
- // C#
- ((Excel.Worksheet)ThisApplication.Sheets[1]).
- Unprotect(GetPasswordFromUser());
除此之外,Protection还提供了AllowEditRanges属性,可以让你指定可编辑的范围。AllowEditRanges属性是AllowEditRange对象的集合,每一个对象都提供了一些有用的属性,比如:
- l Range get/set range of the editable area
- l Title get/set the title of the editableregion
- l Users get/set a collection of UserAccessobject
下面这个例子演示了Protection的功能,当你点击Protect时,你只能编辑阴影区域,点击Unprotect可以去保护。

代码如下:(对应点击图中的链接(Protect,Unprotect)执行的代码)
- // C#
- private void ProtectSheet()
- {
- Excel.Worksheet ws =
- (Excel.Worksheet)ThisApplication.ActiveSheet;
- Excel.AllowEditRanges ranges = ws.Protection.AllowEditRanges;
- ranges.Add("Information",
- ThisApplication.get_Range("Information", Type.Missing),
- Type.Missing);
- ranges.Add("Date",
- ThisApplication.get_Range("Date", Type.Missing), Type.Missing);
- ws.Protect(Type.Missing, Type.Missing, Type.Missing,
- Type.Missing, Type.Missing,Type.Missing, Type.Missing,
- Type.Missing,Type.Missing, Type.Missing, Type.Missing,
- Type.Missing,Type.Missing,Type.Missing,
- Type.Missing,Type.Missing);
- }
- private void UnprotectSheet()
- {
- Excel.Worksheet ws =
- (Excel.Worksheet) ThisApplication.Sheets["Worksheet Class"];
- ws.Unprotect(Type.Missing);
- // Delete all protection ranges, just to clean up.
- // You must loop through this using the index,
- // backwards. This collection doesn't provide
- // an enumeration method, and it doesn't handle
- // being resized as you're looping in a nice way.
- Excel.AllowEditRanges ranges = ws.Protection.AllowEditRanges;
- for (int i = ranges.Count; i >= 1; i--)
- {
- ranges[i].Delete();
- }
- }
Worksheet类提供了一些属性(that return objects),下面介绍两个有用属性:
Comments以及Outline
3.3.1 Comments (批注)
在Excel2007中,选中一块区域或者单元格后,点击右键,可以插入批注。插入批注后的样子如下图所示

Worksheet类提供Comments属性,通过该属性,你可以访问该工作表内的所有批注。Comments类没有多少属性,你可能会使用Visible属性来控制批注的显示与隐藏,Delete属性来删除批注,或者你可能会发现Text方法比较有用,因为可以通过它来给批注增加内容或者重写批注。
下面是一个及其简单的例子,来控制显示批注
- // C#
- private void ShowOrHideComments(bool show)
- {
- // Show or hide all the comments:
- Excel.Worksheet ws =
- (Excel.Worksheet) ThisApplication.Sheets["Worksheet Class"];
- for (int i = 1; i <= ws.Comments.Count; i++)
- {
- ws.Comments[i].Visible = show;
- }
- }
Outline的功能是把row划分成组,使得Excel的显示更有层次感与结构气息。
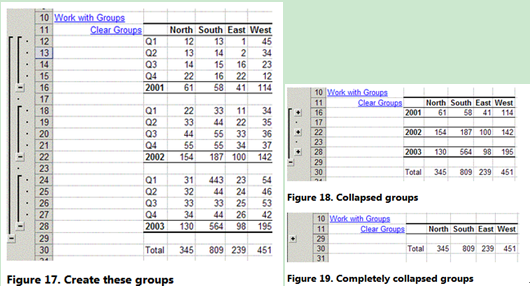
例如,下面两张图片
左图:创建Outline 右图:折叠后效果
tline属性本身是一个Outline对象,它自身属性不多,主要有以下几个:
- l AutomaticStyles 告诉Excel是否应用automatic style to outline
- l SummaryColumn get or set the location of the summarycolumns, (两个选项: xlSummaryOnLeft xlSummaryOnRight)
- l SummaryRow get or set the location of thesummary rows,(两个选项: xlSummaryAbove xlSummaryBelow)
- l ShowLevels 允许你折叠/扩展outline groups to the row level and/or column levelyou want.
经过上面的介绍,你应该对Outline有了基本的了解,下面开始使用C#操作Outline。
首先是创建Group,创建Group是简单的,你可以调用range对象的Group()方法;调用Ungroup()方法移除Group。
- // C#
- private void WorkWithGroups()
- {
- Excel.Worksheet ws =
- (Excel.Worksheet) ThisApplication.ActiveSheet;
- // Set worksheet-level features for the outline.
- // In this case, summary rows are below
- // the data rows (so Excel knows where to put
- // the summary rows), and we don't want Excel
- // to format the summary rows--that's already been done.
- ws.Outline.SummaryRow = Excel.XlSummaryRow.xlSummaryBelow;
- ws.Outline.AutomaticStyles = false;
- // Group the two named ranges. Each of these
- // ranges extends across entire rows.
- ThisApplication.get_Range("Data2001", Type.Missing).
- Group(Type.Missing, Type.Missing, Type.Missing, Type.Missing);
- ThisApplication.get_Range("Data2002", Type.Missing).
- Group(Type.Missing, Type.Missing, Type.Missing, Type.Missing);
- ThisApplication.get_Range("AllData", Type.Missing).
- Group(Type.Missing, Type.Missing, Type.Missing, Type.Missing);
- // The range of rows from 24 to 27 doesn't have
- // a named range, so you can work with that
- // range directly.
- Excel.Range rng = (Excel.Range)ws.Rows["24:27", Type.Missing];
- rng.Group(Type.Missing, Type.Missing, Type.Missing,
- Type.Missing);
- // Collapse to the second group level.
- ws.Outline.ShowLevels(2, Type.Missing);
- }
对于unnamed range,方法如下:
- // C#
- Excel.Range rng = (Excel.Range)ws.Rows["24:27", Type.Missing];
- rng.Group(Type.Missing, Type.Missing,
- Type.Missing, Type.Missing);
在前面的图片中点击Clear Groups link将清除Groups,对应代码如下:
- // C#
- private void ClearGroups()
- {
- Excel.Worksheet ws =
- (Excel.Worksheet) ThisWorkbook.Sheets["Worksheet Class"];
- // Specify RowLevels and/or ColumnLevels parameters:
- ws.Outline.ShowLevels(3, Type.Missing);
- Excel.Range rng = (Excel.Range) ws.Rows["24:27", Type.Missing];
- rng.Ungroup();
- ThisApplication.get_Range("Data2001", Type.Missing).Ungroup();
- ThisApplication.get_Range("Data2002", Type.Missing).Ungroup();
- ThisApplication.get_Range("AllData", Type.Missing).Ungroup();
- }
OK,通过上面的技巧,你就可以创建&移除groups了。同时你也可以控制工作表上显示的group的层次了!
----------------------------------------------华丽分割-----------------------------------------------
4. Range
Range 对象将是你在开发关于Excel的应用程序中最经常使用的,在你操作任何Excel中的区域之前,你都要使用一个Range对象来表示该区域,然后通过Range对象的方法和属性来操作该区域。Range对象是如此的重要,以至于本文上述所有的例子几乎都存在Range对象。通常,一个Range对象可以代表一个单元格,一行,一列,一块区域(containing oneor more blocks of cells)甚至是一组在不同sheets中的单元格。
不幸的是,由于Range对象太大,成员太多,故不可能对其成员进行逐一描述。所以,下面从三个比较重要的方面介绍Range对象
- l 在代码中引用ranges
- l 在代码中操作ranges
- l 使用Range对象完成特定任务
Work with current selection 等价于修改当前选中Range的属性和行为,不过你最好避免这么做。因为 ,selection within Excel代表着用户的选择。如果你修改了它,那么将导致用户失去对“当前选择”的控制。关于selection,第一准则是:you should call the Selectmethod only if your intent is to change the user’s selection.
例如,下面的代码将清除用户当前选中单元格旁边的单元格的内容
- // C#
- ThisApplication.ActiveCell.CurrentRegion.Select();
- ((Excel.Range)ThisApplication.Selection).ClearContents();
4.2 Referring to a Range in Code
1) 基本的引用Range方法
1. 引用ActiveCell
- rng = ThisApplication.ActiveCell;
2. 使用get_Range方法,指定Range范围
- // C#
- rng = ws.get_Range("A1", Type.Missing);
- rng = ws.get_Range("A1:B12", Type.Missing);
3. 使用Cells属性
- // C#
- rng = (Excel.Range)ws.Cells[1, 1];
4. 指定Range的角,同时可以直接引用该Range的Cells Rows Columns属性
- // C#
- rng = ws.get_Range("A1", "C5");
- rng = ws.get_Range("A1", "C5").Cells;
- rng = ws.get_Range("A1", "C5").Rows;
- rng = ws.get_Range("A1", "C5").Columns;
5. 引用一个带名字的Range
- // C#
- rng = ThisApplication.Range("SomeRangeName", Type.Missing);
6. 引用特定的行或者列
- // C#
- rng = (Excel.Range)ws.Rows[1, Type.Missing];
- rng = (Excel.Range)ws.Rows["1:3", Type.Missing];
- rng = (Excel.Range)ws.Columns[3, Type.Missing];
7. 使用Application对象的Selection方法获取选中Cells对应的Range

执行下面代码,将在调试窗口看到:"$C$3"
- // C#
- System.Diagnostics.Debug.WriteLine(
- ((Excel.Range)ThisApplication.Selection).
- get_Address( Type.Missing, Type.Missing,
- Excel.XlReferenceStyle.xlA1,
- Type.Missing, Type.Missing)
- );
8. 两个Range合并为一个Range
- // 简单的合并方法
- rng = ThisApplication.get_Range("A1:D4, F2:G5", Type.Missing);
- // 相对复杂的合并方法
- rng1 = ThisApplication.get_Range("A1", "D4");
- rng2 = ThisApplication.get_Range("F2", "G5");
- // Note that the Union method requires you to supply thirty
- // parameters:
- rng = ThisApplication.Union(rng1, rng2,
- Type.Missing, Type.Missing, Type.Missing, Type.Missing,
- Type.Missing, Type.Missing, Type.Missing, Type.Missing,
- Type.Missing, Type.Missing, Type.Missing, Type.Missing,
- Type.Missing, Type.Missing, Type.Missing, Type.Missing,
- Type.Missing, Type.Missing, Type.Missing, Type.Missing,
- Type.Missing, Type.Missing, Type.Missing, Type.Missing,
- Type.Missing, Type.Missing, Type.Missing, Type.Missing);
9. Range的Offset属性
- // adds content to the area under the cell at row 1, column 1
- rng = (Excel.Range) ws.Cells[1, 1];
- for (int i = 1; i <= 5; i++)
- {
- rng.get_Offset(i, 0).Value2 = i.ToString();//参数1代表Row,2代表Col
- }
经过上面的介绍,是不是有一点晕呢?下面通过一个小例子来演示一下Range的功能吧。
在使用Excel中,我们可能希望在选中一个单元格后使整行加粗显示,即实现选中效果,但是Excel中没有对该功能的支持。但是,通过代码不难实现该功能,首先看一下实际效果吧。
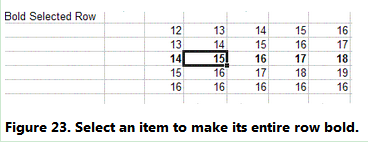
可以看到,选中的单元格所在行变成了Bold显示。
其实现代码如下:
- // C#
- private int LastBoldedRow = 0;
- private void BoldCurrentRow(Excel.Worksheet ws)
- {
- // Keep track of the previously bolded row.
- // Work with the current active cell.
- Excel.Range rngCell = ThisApplication.ActiveCell;
- // Bold the current row.
- rngCell.EntireRow.Font.Bold = true;
- // Make sure intRow isn't 0 (meaning that
- // this is your first pass through here).
- if (LastBoldedRow != 0)
- {
- // If you're on a different
- // row than the last time through here,
- // make the old row not bold.
- if (rngCell.Row != LastBoldedRow)
- {
- Excel.Range rng =
- (Excel.Range)ws.Rows[LastBoldedRow, Type.Missing];
- rng.Font.Bold = false;
- }
- }
- // Store away the new row number
- // for next time.
- LastBoldedRow = rngCell.Row;
- }
下面的代码verifies that the new selection is within the correct range using the Intersect method ofthe Application object
- // C#
- protected void ThisWorkbook_SheetSelectionChange(
- System.Object sh, Excel.Range Target)
- {
- // Don't forget that the Intersect method requires
- // thirty parameters.
- if (ThisApplication.Intersect(Target,
- ThisApplication.get_Range("BoldSelectedRow", Type.Missing),
- Type.Missing, Type.Missing, Type.Missing, Type.Missing,
- Type.Missing, Type.Missing, Type.Missing, Type.Missing,
- Type.Missing, Type.Missing, Type.Missing, Type.Missing,
- Type.Missing, Type.Missing, Type.Missing, Type.Missing,
- Type.Missing, Type.Missing, Type.Missing, Type.Missing,
- Type.Missing, Type.Missing, Type.Missing, Type.Missing,
- Type.Missing, Type.Missing, Type.Missing, Type.Missing)
- != null)
- {
- // The selection is within the range where you're making
- //the selected row bold.
- BoldCurrentRow((Excel.Worksheet) sh);
- }
- }
一旦你获得了一个Range的引用,你能做什么呢?答案是: Endless,as you can imagine。下面介绍两个典型的场景。
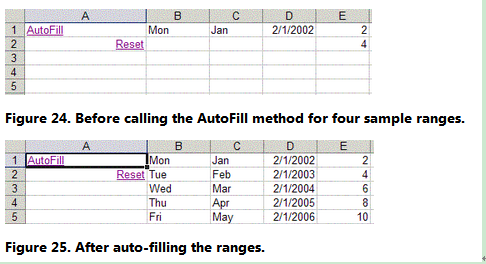
4.3.1 Autimatically Filling Ranges自动填充功能 (AutoFill方法用于向一个范围中填充递增或者递减的值)
首先看一下:XlAutoFillType 枚举类型
- l xlFillDays
- l xlFillFormats
- l xlFillSeries
- l xlFillWeekdays,
- l xlGrowthTrend
- l xlFillCopy
- l xlFillDefault
- l xlFillMonths
- l xlFillValues
- l xlFillYears
- l xlLinearTrend
- // 实现图示自动填充的C#代码
- private void AutoFill()
- {
- Excel.Range rng = ThisApplication.get_Range("B1", Type.Missing);
- rng.AutoFill(ThisApplication.get_Range("B1:B5", Type.Missing),
- Excel.XlAutoFillType.xlFillDays);
- rng = ThisApplication.get_Range("C1", Type.Missing);
- rng.AutoFill(ThisApplication.get_Range("C1:C5", Type.Missing),
- Excel.XlAutoFillType.xlFillMonths);
- rng = ThisApplication.get_Range("D1", Type.Missing);
- rng.AutoFill(ThisApplication.get_Range("D1:D5", Type.Missing),
- Excel.XlAutoFillType.xlFillYears);
- rng = ThisApplication.get_Range("E1:E2", Type.Missing);
- rng.AutoFill(ThisApplication.get_Range("E1:E5", Type.Missing),
- Excel.XlAutoFillType.xlFillSeries);
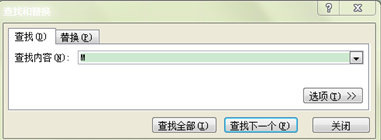
Range类的Find方法允许你在Range中进行搜索。当然你也可以再Excel界面中使用Ctrl+F打开搜索对话框,如下图所示
下表列出了Range.Find方法的参数
|
What (required) |
Object |
The data to find; can be a string or any Excel data type. |
|
After |
Range |
The range after which you want the search to start (this cell won't be included in the search); if you don't specify this cell, the search begins in the upper-left corner of the range. |
|
LookIn |
XlFindLookin (xlValue, xlComments, xlFormulas) |
The type of information to be searched; cannot be combined using the Or operator. |
|
LookAt |
XlLookAt (xlWhole, xlPart) |
Determines whether the search matches entire cells, or partial cells. |
|
SearchOrder |
XlSearchOrder (xlByRows, xlByColumns) |
Determines the order for the search; xlByRows (the default) causes the search to go across and then down, and xlByColumns causes the search to go down and then across. |
|
SearchDirection |
XlSearchDirection (xlNext, xlPrevious) |
Determines the direction of the search; the default is xlNext. |
|
MatchCase |
Boolean |
Determines whether the search is case-sensitive. |
|
MatchByte |
Boolean |
Determines whether double-byte characters match only double-byte characters (True) or equivalent single-byte characters (False); only applies if you've installed double-byte support. |

不难看出,我们要搜索apples。下面是其实现的代码:
- // C#
- private void DemoFind()
- {
- //得到range对象
- Excel.Range rng = ThisApplication.get_Range("Fruits", Type.Missing);
- Excel.Range rngFound;
- // Keep track of the first range you find.
- Excel.Range rngFoundFirst = null;
- // You should specify all these parameters
- // every time you call this method, since they
- // can be overriden in the user interface.
- rngFound = rng.Find("apples", Type.Missing,
- Excel.XlFindLookIn.xlValues, Excel.XlLookAt.xlPart,
- Excel.XlSearchOrder.xlByRows, Excel.XlSearchDirection.xlNext,
- false, Type.Missing, Type.Missing);
- while (rngFound != null)
- {
- if (rngFoundFirst == null )
- {
- rngFoundFirst = rngFound;
- }
- else if (GetAddress(rngFound) == GetAddress(rngFoundFirst))
- {
- break;
- }
- rngFound.Font.Color = ColorTranslator.ToOle(Color.Red);
- rngFound.Font.Bold = true;
- rngFound = rng.FindNext(rngFound);
- }
- }
若要取消查找后的显示效果:
- // 取消查找结构的显示
- private void ResetFind()
- {
- Excel.Range rng = ThisApplication.
- get_Range("Fruits", Type.Missing);
- rng.Font.Color = ColorTranslator.ToOle(Color.Black);
- rng.Font.Bold = false;
- }
-----------------------------------------华丽分割-----------------------------------
OK,终于写完了。本文主要介绍了Excel的几大对象,主要介绍的是一些API。后面将会通过实例,结合 VS2010,用C#来实现对Excel的操作。感谢阅读。
-------------------------------------------------------------------------------------
本文的PDF版本下载:点此下载