JS事件对象,筋斗云导航练习,跟随鼠标练习,放大镜练习,进度条练习
- btn.onclick = function(event) { 语句 } 其中event就是事件对象,在这个方法中指向的对象是onclick事件
- 普通浏览器支持event,也就是以上的写法;蛋疼的ie678支持window.event
- 所以有了兼容写法如下:
var event = event || window.event;
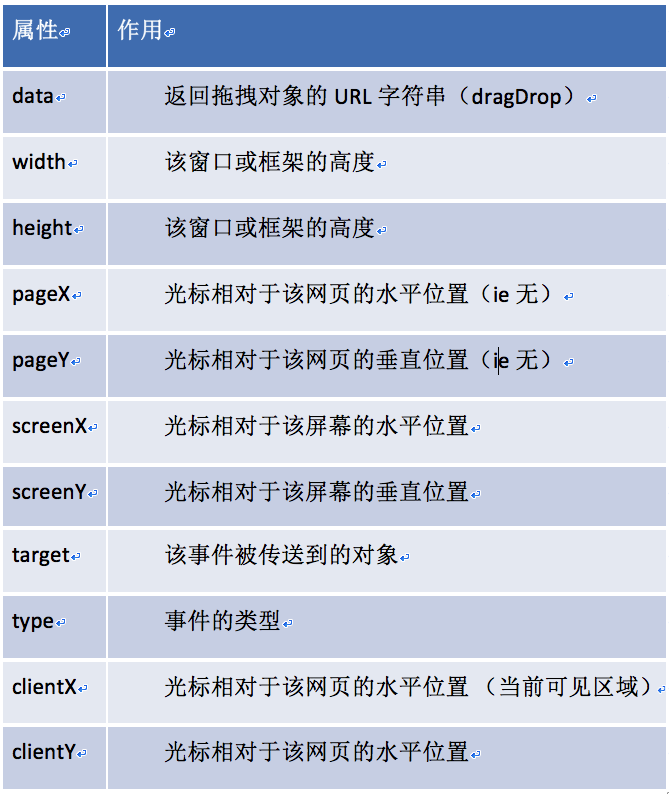
本节重点 - 事件的属性
1.筋斗云导航练习
- 效果图

- HTML
<!DOCTYPE html>
<html lang="en">
<head>
    <meta charset="UTF-8">
    <title>筋斗云导航栏</title>
    <style>
        * {
            margin: 0;
            padding: 0;
        }
        body {
            background: #eeeeee;
        }
        .nav {
             880px;
            height: 42px;
            background: #ffffff url("0404Images/rss.png") no-repeat right center;
            margin: 100px auto;
            border-radius: 5px;
            position: relative;
        }
        .cloud {
            background: url("0404Images/cloud.gif") no-repeat center;
             83px;
            height: 42px;
            position: absolute;
            top: 0;
            left: 0;
        }
        .nav ul {
            list-style: none;
            position: absolute;
        }
        .nav ul li {
             83px;
            height: 42px;
            float: left;
            text-align: center;
            line-height: 42px;
            cursor: pointer;
        }
    </style>
</head>
<body>
    <div class="nav" id="navJS">
        <p class="cloud"></p>
        <ul>
            <li>首页新闻</li>
            <li>师资力量</li>
            <li>活动策划</li>
            <li>企业文化</li>
            <li>招聘信息</li>
            <li>公司简介</li>
            <li>上海校区</li>
            <li>广州校区</li>
        </ul>
    </div>
</body>
</html>
- JavaScript
<script>
    window.onload = function () {
        var nav = document.getElementById("navJS");
        var cloud = nav.children[0];
        var lis = nav.children[1].children;
        var leader = 0;
        var target = 0;
        var clickLeft = 0;
        for (var i=0;i<lis.length;i++) {
            lis[i].onmouseover = function () {
                target = this.offsetLeft;
            }
            lis[i].onmouseout = function () {
                target = clickLeft; // 记录点击的位置
            }

            lis[i].onclick = function () {
                clickLeft = this.offsetLeft;
            }
        }

        setInterval(function () {
            leader = leader + (target - leader) / 5;
            cloud.style.left = leader + "px";
        },30);
    }
</script>
2.跟随鼠标练习
- 效果图

- html&JavaScript
<!DOCTYPE html>
<html lang="en">
<head>
    <meta charset="UTF-8">
    <title>跟随鼠标</title>
    <style>
        img {
             80px;
            position: absolute;
            left: 0;
            top: 0;
        }
    </style>
    <script>
        window.onload = function () {
            var img = document.getElementsByTagName("img")[0];
            var leaderX = 0;
            var leaderY = 0;
            var targetX = 0;
            var targetY = 0;
            var timer = null;
            document.onmousemove = function (event) {

                clearInterval(timer);
                var event = event || window.event;

                targetX = event.clientX;
                targetY = event.clientY;

                timer =  setInterval(function () {
                    leaderX = leaderX + (targetX - leaderX) / 10;
                    leaderY = leaderY + (targetY - leaderY) / 10;
                    img.style.left = leaderX - img.offsetWidth * 0.5 + "px";
                    img.style.top = leaderY - img.offsetHeight * 0.5 + "px";
                },30);
            }
        }
    </script>
</head>
<body>
<img src="0404Images/img.jpg" alt="">
</body>
</html>
3.放大镜练习 注意事项 - block = none的盒子获取不到宽度
- 效果图

- html
<!DOCTYPE html>
<html lang="en">
<head>
    <meta charset="UTF-8">
    <title>放大镜</title>
    <style>
        * {
            margin: 0;
            padding: 0;
        }
        .box {
             350px;
            height: 350px;
            border: 1px solid #cccccc;
            margin: 100px;
            position: relative;
        }
        .small {
             350px;
            height: 350px;
            position: relative;
            overflow: hidden;
        }
        .big {
            border: 1px solid #cccccc;
             450px;
            height: 450px;
            position: absolute;
            top: 0;
            left: 360px;
            overflow: hidden;
            display: none;
        }
        .big img {
            position: absolute;
            left: 0;
            top: 0;
        }
        .mask {
             100px;
            height: 100px;
            background-color: rgba(255,255,0,0.4);
            position: absolute;
            top: 0;
            left: 0;
            display: none;
            cursor: move;
        }

    </style>
</head>
<body>
    <div class="box" id="boxJS">
        <div class="small">
            <img src="0407images/001.jpg" alt="">
            <div class="mask"></div>
        </div>
        <div class="big">
            <img src="0407images/0001.jpg" alt="">
        </div>
    </div>
</body>
</html>
- JavaScript
<script>
    var box = document.getElementById("boxJS");
    var mask = box.children[0].children[1];
    var small = box.children[0];
    var big = box.children[1];
    var bigImg = big.children[0];

    // 这里获取到的scale永远是0,big盒子初始状态是block = none,获取不到宽度
    //    var scale = big.offsetWidth / small.offsetWidth;
    small.onmouseover = function () {
        mask.style.display = "block";
        big.style.display = "block";
    }
    small.onmouseout = function () {
        mask.style.display = "none";
        big.style.display = "none";
    }
    small.onmousemove = function (event) {
        var event = event || window.event;
        // 获取坐标
        var x = event.clientX - box.offsetLeft;
        var y = event.clientY - box.offsetTop;
        if (x <= 0 || y <= 0 || x >= box.offsetHeight || y >= box.offsetHeight) {
            mask.style.display = "none";
            return;
        }
        mask.style.left = x - mask.offsetWidth * 0.5 + "px";
        mask.style.top = y - mask.offsetHeight * 0.5 + "px";

        // 改变大图坐标
        bigImg.style.left = -x * big.offsetWidth / small.offsetWidth + "px";
        bigImg.style.top = -y * big.offsetWidth / small.offsetWidth + "px";
    }
</script>
4.进度条练习 注意事项 - 鼠标拖动事件的实现,分为以下三步骤
// 1.鼠标按下
bar.onmousedown = function (event) {
  // 2.鼠标移动  注意事件源是整个文档,因为这个是在整个文档内拖动
  document.onmousemove = function (event) { }
}
// 3.鼠标抬起   清空鼠标移动事件
document.onmouseup = function () {
  document.onmousemove = null;
}
- 效果图

- html
<!DOCTYPE html>
<html lang="en">
<head>
    <meta charset="UTF-8">
    <title>拖动进度条</title>
    <style>
        * {
            margin: 0;
            padding: 0;
        }
        .box {
             400px;
            height: 10px;
            background-color: #cccccc;
            margin: 100px;
            position: relative;
        }
        .bar {
             10px;
            height: 24px;
            background-color: #fa0;
            position: absolute;
            top: -7px;
            left: 0;
            cursor: pointer;
        }
        .mask {
            position: absolute;
            top: 0;
            left: 0;
             0;
            height: 100%;
            background-color: #ff0000;
        }
    </style>
</head>
<body>
<div class="box" id="boxJS">
    <div class="bar"></div>
    <div class="mask"></div>
</div>
</body>
</html>
- JavaScript
<script>
    window.onload = function () {
        var box = document.getElementById("boxJS");
        var bar = box.children[0];
        var mask = box.children[1];
        var leading = 0;
        var ending = box.offsetWidth - bar.offsetWidth;
        bar.onmousedown = function (event) {
            var event = event || window.event;
            var leftVal = event.clientX - this.offsetLeft;
            console.log("leftVal = " + leftVal);
            document.onmousemove = function (event) {
                var event = event || window.event;

                var move = event.clientX - leftVal;
                if(move < leading) {
                    move = leading;
                }
                if(move > ending) {
                    move = ending;
                }
                bar.style.left = move + "px";
                mask.style.width = move + "px";
            }
        }
        document.onmouseup = function () {
            document.onmousemove = null;
        }
    }
</script>