srcplatformswebentry-runtime-with-compiler.js 源码开始位置(引入了Vue构造函数)
扩展$mount,处理可能存在的templete或者el选项,重新编译template为render函数
srcplatformsweb
untimeindex.js(按照上面的引入vue往上查找)
一、定义了一个_patch_函数
render函数的目的:获取虚拟dom vdom
patch函数的目的:(diff算法也在里面)1、初始化 2、更新
不管是初始化还是更新,都是将虚拟dom变成真实dom
$mount的目的:生成真实dom($mount里面一定会调用render和patch)
二、实现$mount,这样在第一个路径里才可以扩展mount
$mount最后return了一个mountComponent(vm,el, hydrating:boolean)
srccoreindex.js(再往上查找Vue构造函数)
// 1.声明构造函数
function Vue (options) {
  if (process.env.NODE_ENV !== 'production' &&
    !(this instanceof Vue)
  ) {
    warn('Vue is a constructor and should be called with the `new` keyword')
  }
  this._init(options)   //下面的方法initMixin(Vue)执行this._init方法
}
2、实例属性,实例方法
// 2.实例属性,实例方法:
initMixin(Vue) // _init()
stateMixin(Vue) // $data/$props/$set()/$delete()/$watch()
eventsMixin(Vue) // $emit()/$on/$off()/$once()
lifecycleMixin(Vue) // _update()/$forceUpdate()/$destroy()
renderMixin(Vue) // $nextTick()/_render()
进入initMixin()方法当中(实现_init初始化方法)
问题:new Vue()的时候都发生了什么?
实现_init初始化方法,都做了哪些事情
1、合并选项,代理$data(merge options)(本来有自己写的data,el等,再合并vue提供的一些初始化options,例如filters,component等)
2、初始化核心逻辑
initLifecycle(vm) // $parent/$root/...初始化生命周期
initEvents(vm) // 自定义事件监听(事件的派发和监听都是同个组件)
initRender(vm) // $slots 插槽的初始化/$createElement=》 render函数中的h就是createElement/定义$attrs和$listener的响应式(
)
callHook(vm, 'beforeCreate')
//beforeCreate钩子之后才有下面数据的初始化
initInjections(vm) // resolve injections before data/props
initState(vm) // props/methods/data/computed/watch
initProvide(vm) // resolve provide after data/props
callHook(vm, 'created')
3、当设置了el选项时,自动调用了$mount
// 当设置了el选项时,自动调用$mount
    if (vm.$options.el) {
      vm.$mount(vm.$options.el)
    }
$mount把虚拟dom变成真实dom,查看Vue.prototype.$mount,它真正调用的是mountComponent()函数
接下来是mountComponent()函数
1、先是callHook(vm,beforeMount),即在挂载之前先执行beforeMount
2、后面new Watcher(vm,updateComponent(更新函数)) 这说明了一个组件就会有一个watcher
updateComponent = ()=> { vm._update(vm._render(),hydrating)}
所以执行顺序如下:
$mount => _render()渲染函数,获取当前组件的虚拟dom vnode => _update() 将虚拟dom转化为真实dom
下面的截图是_update() 的具体处理逻辑
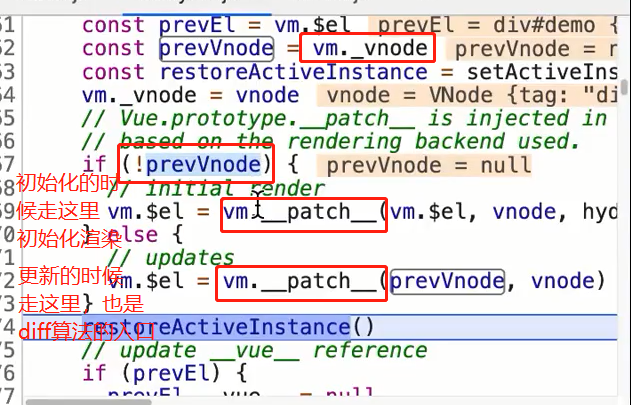
总结(以上的整体流程捋一捋)
new Vue()==> _init ==> $mount ==> mountComponent ==> new Watcher() ==> updateComponent ==> _render() ==> _update() ==> __patch__ 是否是初始化渲染,是的话将虚拟dom转化为真实dom,不是的话patch走diff算法对比
数据响应式
起始位置:new Vue() => initMixin() => 初始化核心逻辑中 initState() 主要处理props/methods/data/computed/watch的初始化 => 接下来主要看initState中对data的响应式处理
递归响应式处理会触发observe()函数,每个函数都会只要有一个对象,就会产生一个ObServer的实例:
每个对象一个Ob实例,作用是判断对象类型做相对应的响应式处理(数组和对象)
如果这个对象已经是一个响应式的数据,就会有一个标识,这个标识是“__ob__”,所以我们经常在控制台看到的“__ob__”,说明这个对象已经是一个响应式的对象
接下来看Observer构造函数
Observer构造函数判断是数组(Array.isArray())还是对象(this.walk(value)) walk中遍历所有data属性,执行defineReactive()
注意:Observer中也有dep(大管家:负责对象如果有动态新增或删除属性时通知更新。数组有新元素增加和删除,通知更新)
进入defineReactive()函数,作用:给一个对象定义一个响应式属性
const dep = new Dep (小管家:dep和data中的所有key都是一对一的关系)(如果key的值发生变化,通知更新)
defineReactive函数
Object.defineProperty(obj, key, {
    enumerable: true,
    configurable: true,
    get: function reactiveGetter () {
      const value = getter ? getter.call(obj) : val
      if (Dep.target) {
        dep.depend() // dep和watcher互相添加映射关系(dep和watcher是多对多的关系)
        // 子Ob实例也要添加映射关系
        if (childOb) {
          childOb.dep.depend()
          if (Array.isArray(value)) {
            dependArray(value)
          }
        }
      }
      return value
    },
    set: function reactiveSetter (newVal) {
      const value = getter ? getter.call(obj) : val
      /* eslint-disable no-self-compare */
      if (newVal === value || (newVal !== newVal && value !== value)) {
        return
      }
      /* eslint-enable no-self-compare */
      if (process.env.NODE_ENV !== 'production' && customSetter) {
        customSetter()
      }
      // #7981: for accessor properties without setter
      if (getter && !setter) return
      if (setter) {
        setter.call(obj, newVal)
      } else {
        val = newVal
      }
      childOb = !shallow && observe(newVal)
      dep.notify()
    }
  })
响应式处理数组的源码
// 1.获取原型
const arrayProto = Array.prototype
// 2.克隆副本
export const arrayMethods = Object.create(arrayProto)
// 3.定义要覆盖的7个方法
const methodsToPatch = [
  'push',
  'pop',
  'shift',
  'unshift',
  'splice',
  'sort',
  'reverse'
]

/**
 * Intercept mutating methods and emit events
 */
// 4.遍历覆盖
methodsToPatch.forEach(function (method) {
  // cache original method
  // 5.获取原始方法
  const original = arrayProto[method]
  // 6.覆盖该方法
  def(arrayMethods, method, function mutator (...args) {
    // 7.先执行原始方法
    const result = original.apply(this, args)
    // 8.扩展逻辑:变更通知
    const ob = this.__ob__
    // 如果是插入型操作,对新插入的元素要做响应式处理
    let inserted
    switch (method) {
      case 'push':
      case 'unshift':
        inserted = args
        break
      case 'splice':
        inserted = args.slice(2)
        break
    }
    if (inserted) ob.observeArray(inserted)
    // notify change
    // 变更通知
    ob.dep.notify()
    return result
  })
})