截图函数
PyAutoGUI可以截取屏幕截图,将其保存到文件中,并在屏幕中查找图像。如果您有一个小图像,例如需要单击并希望在屏幕上找到它的按钮,这将非常有用。这些功能由PyScreeze模块提供,该模块与PyAutoGUI一起安装。
屏幕截图功能需要Pillow模块。OS X使用操作系统screencapture附带的命令。Linux使用该scrot命令,可以通过运行来安装。sudo apt-get install scrot
截图()函数
调用screenshot()将返回Image对象(有关详细信息,请参阅Pillow或PIL模块文档)。传递文件名字符串会将屏幕截图保存到文件中,并将其作为Image对象返回。
>>> import pyautogui
>>> im1 = pyautogui.screenshot()
>>> im2 = pyautogui.screenshot('my_screenshot.png')
在1920 x 1080的屏幕上,该screenshot()功能大约需要100毫秒 - 它并不快,但速度并不慢。
region如果您不想要整个屏幕的屏幕截图,还有一个可选的关键字参数。您可以传递区域左侧,顶部,宽度和高度的四个整数元组来捕获:
>>> import pyautogui
>>> im = pyautogui.screenshot(region=(0,0, 300, 400))
定位函数
注意:从版本0.9.41开始,如果locate函数找不到提供的图像,它们将引发ImageNotFoundException而不是返回None。
如果您有图像文件,可以在屏幕上直观地找到某些内容。例如,假设计算器应用程序正在您的计算机上运行,看起来像这样:
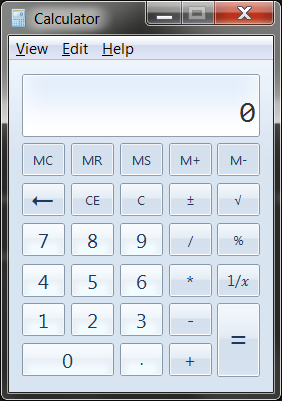
如果您不知道计算器按钮的确切屏幕坐标,则无法调用moveTo()和click()函数。每次启动计算器时,计算器都会出现略微不同的位置,导致您每次都重新找到坐标。但是,如果您有按钮的图像,例如7按钮的图像:

...你可以调用locateOnScreen('calc7key.png')函数来获取屏幕坐标。返回值是一个4整数元组:(左,顶,宽,高)。可以传递此元组center()以获得该区域中心的X和Y坐标。如果在屏幕上找不到图像,则locateOnScreen()加注ImageNotFoundException。
>>> import pyautogui
>>> button7location = pyautogui.locateOnScreen('calc7key.png')
>>> button7location
Box(left=1416, top=562, width=50, height=41)
>>> button7location[0]
1416
>>> button7location.left
1416
>>> button7point = pyautogui.center(button7location)
>>> button7point
Point(x=1441, y=582)
>>> button7point[0]
1441
>>> button7point.x
1441
>>> button7x, button7y = button7point
>>> pyautogui.click(button7x, button7y)  # clicks the center of where the 7 button was found
>>> pyautogui.click('calc7key.png') # a shortcut version to click on the center of where the 7 button was found
可选confidence关键字参数指定函数在屏幕上定位图像的准确性。如果函数由于可忽略的像素差异而无法定位图像,这将非常有用:
>>> import pyautogui
>>> button7location = pyautogui.locateOnScreen('calc7key.png', confidence=0.9)
>>> button7location
Box(left=1416, top=562, width=50, height=41)
该locateCenterOnScreen()功能结合locateOnScreen()和center():
>>> import pyautogui
>>> x, y = pyautogui.locateCenterOnScreen('calc7key.png')
>>> pyautogui.click(x, y)
在1920 x 1080屏幕上,定位功能调用大约需要1或2秒。这对于动作视频游戏来说可能太慢,但适用于大多数目的和应用程序。
有几个“定位”功能。他们都开始查看屏幕的左上角(或图像)并向右看,然后向下看。参数可以是a
locateOnScreen(image, grayscale=False)- 返回image屏幕上第一个找到的实例的(左,顶部,宽度,高度)坐标。ImageNotFoundException如果在屏幕上找不到则会引发。locateCenterOnScreen(image, grayscale=False)- 返回image屏幕上第一个找到的实例中心的(x,y)坐标。ImageNotFoundException如果在屏幕上找不到则会引发。locateAllOnScreen(image, grayscale=False)- 返回一个生成器,该生成器生成(左,顶部,宽度,高度)元组,用于在屏幕上找到图像的位置。locate(needleImage, haystackImage, grayscale=False)-返回(左,上,宽度,高度)的第一坐标发现的实例needleImage在haystackImage。ImageNotFoundException如果在屏幕上找不到则会引发。locateAll(needleImage, haystackImage, grayscale=False)- 返回一个生成器(生成(左,顶部,宽度,高度)元组的位置needleImage)haystackImage。
“locate all”函数可用于for循环或传递给list():
>>> import pyautogui
>>> for pos in pyautogui.locateAllOnScreen('someButton.png')
...   print(pos)
...
(1101, 252, 50, 50)
(59, 481, 50, 50)
(1395, 640, 50, 50)
(1838, 676, 50, 50)
>>> list(pyautogui.locateAllOnScreen('someButton.png'))
[(1101, 252, 50, 50), (59, 481, 50, 50), (1395, 640, 50, 50), (1838, 676, 50, 50)]
这些“定位”功能相当昂贵; 他们可以花一整秒钟来跑步。加速它们的最好方法是传递一个region参数(4个整数元组(左,顶部,宽度,高度))来仅搜索屏幕的较小区域而不是全屏:
>>> import pyautogui
>>> pyautogui.locateOnScreen('someButton.png', region=(0,0, 300, 400))
灰度匹配
或者,您可以传递grayscale=True给locate函数以提供轻微的加速(大约30%-ish)。这会使图像和屏幕截图中的颜色去饱和,从而加快定位速度,但可能导致误判。
>>> import pyautogui
>>> button7location = pyautogui.locateOnScreen('calc7key.png', grayscale=True)
>>> button7location
(1416, 562, 50, 41)
像素匹配
要获取屏幕截图中像素的RGB颜色,请使用Image对象的getpixel()方法:
>>> import pyautogui
>>> im = pyautogui.screenshot()
>>> im.getpixel((100, 200))
(130, 135, 144)
或者作为单个函数,调用pixel()PyAutoGUI函数,它是以前调用的包装器:
>>> import pyautogui
>>> pix = pyautogui.pixel(100, 200)
>>> pix
RGB(red=130, green=135, blue=144)
>>> pix[0]
130
>>> pix.red
130
如果您只需要验证单个像素与给定像素匹配,请调用该pixelMatchesColor()函数,向其传递X坐标,Y坐标和它所代表颜色的RGB元组:
>>> import pyautogui
>>> pyautogui.pixelMatchesColor(100, 200, (130, 135, 144))
True
>>> pyautogui.pixelMatchesColor(100, 200, (0, 0, 0))
False
可选tolerance关键字参数指定在匹配时每个红色,绿色和蓝色值可以变化的程度:
>>> import pyautogui
>>> pyautogui.pixelMatchesColor(100, 200, (130, 135, 144))
True
>>> pyautogui.pixelMatchesColor(100, 200, (140, 125, 134))
False
>>> pyautogui.pixelMatchesColor(100, 200, (140, 125, 134), tolerance=10)
True
来源:https://pyautogui.readthedocs.io/en/latest/screenshot.html#