先安装xls插件
cnpm install -S file-saver xlsx
引入解析代码,可以单独放在一个vue文件中,我这里放在了HelloWorld.vue文件中了
<template>
  <div>
    <input ref="excel-upload-input" class="excel-upload-input" type="file" accept=".xlsx, .xls" @change="handleClick">
    <div class="drop" @drop="handleDrop" @dragover="handleDragover" @dragenter="handleDragover">
      Drop excel file here or
      <el-button :loading="loading" style="margin-left:16px;" size="mini" type="primary" @click="handleUpload">
        Browse
      </el-button>
    </div>
  </div>
</template>

<script>
import XLSX from 'xlsx'

export default {
  props: {
    beforeUpload: Function, // eslint-disable-line
    onSuccess: Function// eslint-disable-line
  },
  data() {
    return {
      loading: false,
      excelData: {
        header: null,
        results: null
      }
    }
  },
  methods: {
    generateData({ header, results }) {
      this.excelData.header = header
      this.excelData.results = results
      this.onSuccess && this.onSuccess(this.excelData)
    },
    handleDrop(e) {
      e.stopPropagation()
      e.preventDefault()
      if (this.loading) return
      const files = e.dataTransfer.files
      if (files.length !== 1) {
        this.$message.error('Only support uploading one file!')
        return
      }
      const rawFile = files[0] // only use files[0]

      if (!this.isExcel(rawFile)) {
        this.$message.error('Only supports upload .xlsx, .xls, .csv suffix files')
        return false
      }
      this.upload(rawFile)
      e.stopPropagation()
      e.preventDefault()
    },
    handleDragover(e) {
      e.stopPropagation()
      e.preventDefault()
      e.dataTransfer.dropEffect = 'copy'
    },
    handleUpload() {
      this.$refs['excel-upload-input'].click()
    },
    handleClick(e) {
      const files = e.target.files
      const rawFile = files[0] // only use files[0]
      if (!rawFile) return
      this.upload(rawFile)
    },
    upload(rawFile) {
      this.$refs['excel-upload-input'].value = null // fix can't select the same excel

      if (!this.beforeUpload) {
        this.readerData(rawFile)
        return
      }
      const before = this.beforeUpload(rawFile)
      if (before) {
        this.readerData(rawFile)
      }
    },
    readerData(rawFile) {
      this.loading = true
      return new Promise((resolve, reject) => {
        const reader = new FileReader()
        reader.onload = e => {
          const data = e.target.result
          const workbook = XLSX.read(data, { type: 'array' })
          const firstSheetName = workbook.SheetNames[0]
          const worksheet = workbook.Sheets[firstSheetName]
          const header = this.getHeaderRow(worksheet)
          const results = XLSX.utils.sheet_to_json(worksheet)
          this.generateData({ header, results })
          this.loading = false
          resolve()
        }
        reader.readAsArrayBuffer(rawFile)
      })
    },
    getHeaderRow(sheet) {
      const headers = []
      const range = XLSX.utils.decode_range(sheet['!ref'])
      let C
      const R = range.s.r
      /* start in the first row */
      for (C = range.s.c; C <= range.e.c; ++C) { /* walk every column in the range */
        const cell = sheet[XLSX.utils.encode_cell({ c: C, r: R })]
        /* find the cell in the first row */
        let hdr = 'UNKNOWN ' + C // <-- replace with your desired default
        if (cell && cell.t) hdr = XLSX.utils.format_cell(cell)
        headers.push(hdr)
      }
      return headers
    },
    isExcel(file) {
      return /.(xlsx|xls|csv)$/.test(file.name)
    }
  }
}
</script>

<style scoped>
.excel-upload-input{
  display: none;
  z-index: -9999;
}
.drop{
  border: 2px dashed #bbb;
   600px;
  height: 160px;
  line-height: 160px;
  margin: 0 auto;
  font-size: 24px;
  border-radius: 5px;
  text-align: center;
  color: #bbb;
  position: relative;
}
</style>
在你需要使用上传的地方引用该组件即可
<template>
<div>
<UploadExcelComponent :on-success="handleSuccess" :before-upload="beforeUpload"/>
</div>
</template>
<script>
import UploadExcelComponent from '@/components/HelloWorld.vue'
export default {
name: 'UploadExcel',
components: { UploadExcelComponent },
data() {
return {
tableData: [],
tableHeader: []
}
},
methods: {
beforeUpload(file) {
const isLt1M = file.size / 1024 / 1024 < 1
if (isLt1M) {
return true
}
this.$message({
message: 'Please do not upload files larger than 1m in size.',
type: 'warning'
})
return false
},
handleSuccess({ results, header }) {
this.tableData = results
this.tableHeader = header
}
}
}
</script>
<style scoped>
</style>
这里我说明几点:
1、上传子组件里面包含了两个参数;
2、beforeUpload方法是图片上传之前判断大小是否超过了1M,或者你自己写上传前的方法,这个也可以不写;
3、handleSuccess方法必须要写,因为上传成功后的数据都在这个里面;
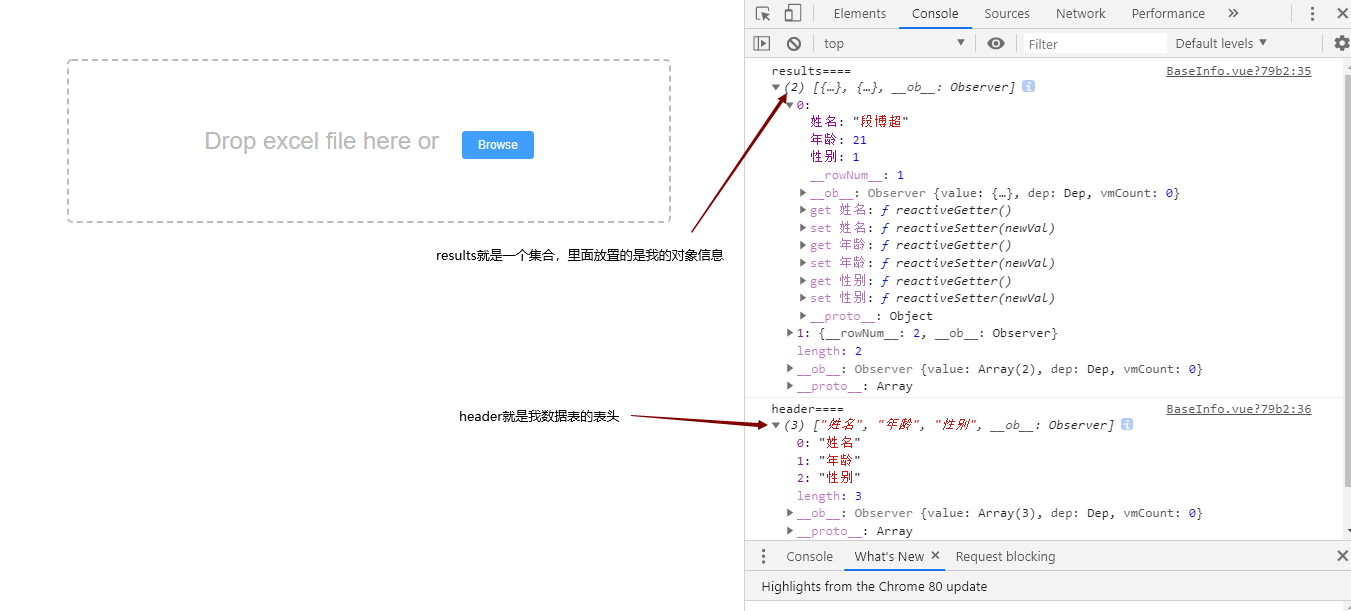
引入后的界面如下

我要上传的表的数据

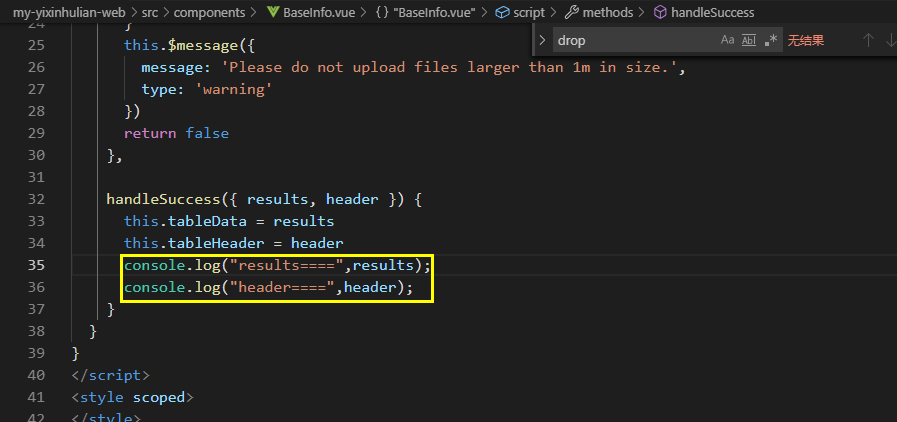
为了方便演示,我在这里将上传成功后的数据进行打印

上传后的结果

至此ok.
补:
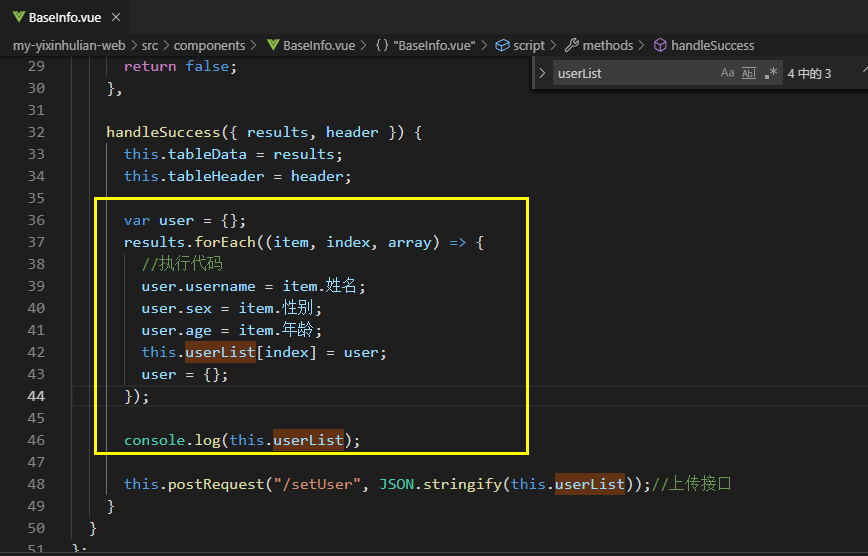
大家注意解析后的key是中文,不能直接映射到具体的实体类中

处理办法

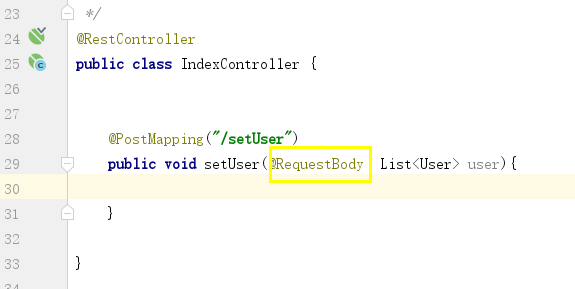
然后后台使用List接收即可,注意有@RequestBody注解(因为我们的前端数据没有对应的user key)

至此ok