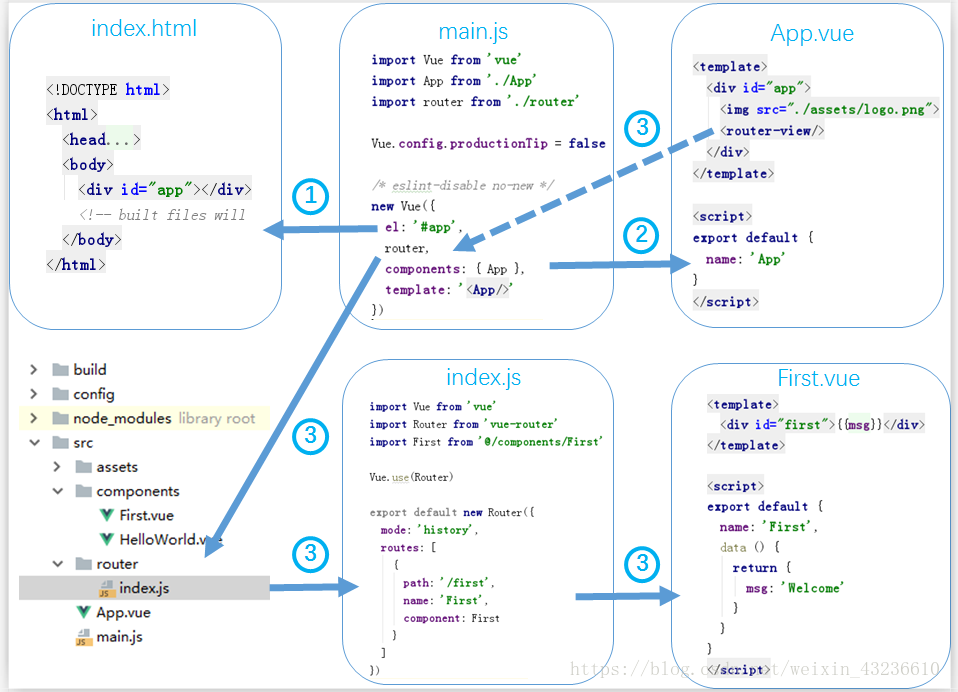
最近在学习Vue,学习Vue必定离不开vue-cli脚手架的运用,这里给大家梳理一下vue-cli的相关文件以及其调用关系。
话不多说,直接上图(笔者从网上找的)

使用到vue项目的文件包括一个.html,两个.js,两个.vue文件,关系如上图所示
1、index.xml为vue项目默认首页,里面默认引用了app.vue根组件
2、main.js为vue项目的入口文件,加载了各种公共组件(需要引用和初始化组件实例)。比如app.vue
main.js中引入相关资源文件

引入Vue实际完整写法是 import Vue from "../node_modules/vue/dist/vue.js,即从node_modules中加载相应名称的模块
import App from './App'就是引入同目录层次下的App.vue文件
import router from './router',引入路由文件
初始化组件实例

其中new Vue的参数,解释如下:
el:官方解释为实例提供挂载的元素。此处为index.html中的<div id="app"><div>。
router:为router:router,的简写,指向引入文件中的routes:[]
components:注册哪些组件,需在顶部引入文件。
template:替换挂载元素的模板组件,而挂载元素的内容都将被忽略。即用template替换index.html里面的<div id="app"></div>
index.js路由文件
首页看看index.js文件的内容
import Vue from 'vue'
import Router from 'vue-router'
import HelloWorld from '@/components/HelloWorld'
import First from '@/components/First'

Vue.use(Router)

export default new Router({
  model:'history',
  routes: [
   {
      path: '/hello',
      name: 'HelloWorld',
      component: HelloWorld
    },
    {
      path: '/',
      name: 'First',
      component: First
    }
  ]
})
内容主要包含引入相关资源以及初始化路由两部分
vue-router 默认 hash 模式 —— 使用 URL 的 hash 来模拟一个完整的 URL,于是当 URL 改变时,页面不会重新加载。
如果不想要很丑的 hash,我们可以用路由的 history 模式,这种模式充分利用 history.pushState API 来完成 URL 跳转而无须重新加载页面。

路由的引用方式
1.router-link 标签
<router-link to="/">返回path为/的路径</router-link>
2.方法中调用
this.$router.push('/');

路由地址中传参
1.<router-link v-if="ok" :to="{path:'/mainPage',query:{title:'首页',mcontent:'首页内容在此'}}"></router-link>
2.this.$router.push({path:'/mainPage',query:{title:'首页',mcontent:'首页内容在此'}});

接收参数
<h3>{{$route.query.title}}-{{$route.query.mcontent}}</h3>