Android SDK 定义了多种布局方式以方便用户设计 UI。各种布局方式均为 ViewGroup 类的子类,结构如图 1 所示。
Android五大布局:FrameLayout(单帧布局)、LinearLayout(线性布局)、AbsoluteLayout(绝对布局)、RelativeLayout(相对布局)和TableLayout(表格布局)
- 这是Android在最初发布时的五大布局,但在2.0时,将AbsoluteLayout(绝对布局)被标志已过期,可以用帧布局和相对布局进行管理布局。
- 在Android 4.0 时,引入GridLayout(网格布局),和 TableLayout(表格布局) 有点类似,不过它功能更多,也更加好用。
而ConstraintLayout,可以翻译为约束布局,在2016年Google I/O 大会上发布。可以在Api9以上的Android系统使用它,它的出现主要是为了解决布局嵌套过多的问题,以灵活的方式定位和调整小部件。- 所以有人会说,Android有四种、五种、六种、甚至七种,都是对的!!
以下将对常用的五大布局介绍:FrameLayout(单帧布局)、LinearLayout(线性布局)、ConstraintLayout (约束布局)、TableLayout(表格布局)和RelativeLayout(相对布局)。

LinearLayout(线性布局)
- 线性布局(LinearLayout)主要以水平或垂直方式来显示界面中的控件。
- 当控件水平排列时,显示顺序依次为从左到右;
- 当控件垂直排列时,显示顺序依次为从上到下。
- 线性布局中,每行或每列中只允许有一个子视图或控件。
-
LinearLayout的最主要的属性有:
-
android:gravity:设置内部控件的显示位置。
-
android:orientation:设置内部控件的排列方向,常量horizontal(默认值)表示水平排列,vertical表示垂直排列。
-
android:layout_weight:设置内部控件在LinearLayout中所占的权重。
-
-
注意:当控件使用权重属性时,布局宽度或高度属性值通常设置为0。
-
所有的组件都有一个 layout_weight 值,默认为0。意思是需要显示多大的视图就占据多大的屏幕空间。
-
若赋值为大于 0 的值,则将可用的空间分割,分割的大小取决于当前的 layout_weight 数值与其他空间的 layout_weight 值的比率,即权重。
-
实例 LinearLayoutDemo 演示了 LinearLayout 布局的使用方法,效果如下图所示。
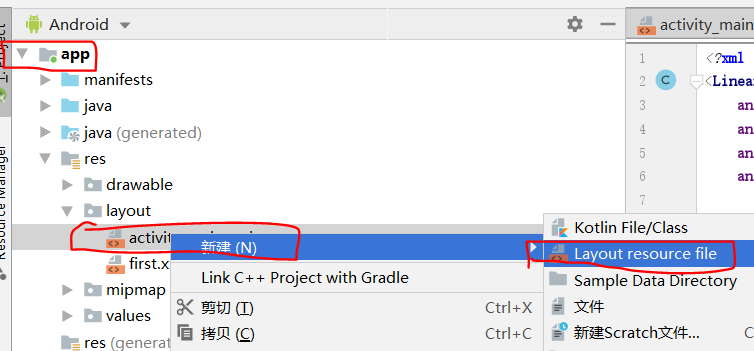
- 点击Layout,右键New->Layout resource file,给这个布局起一个名字。
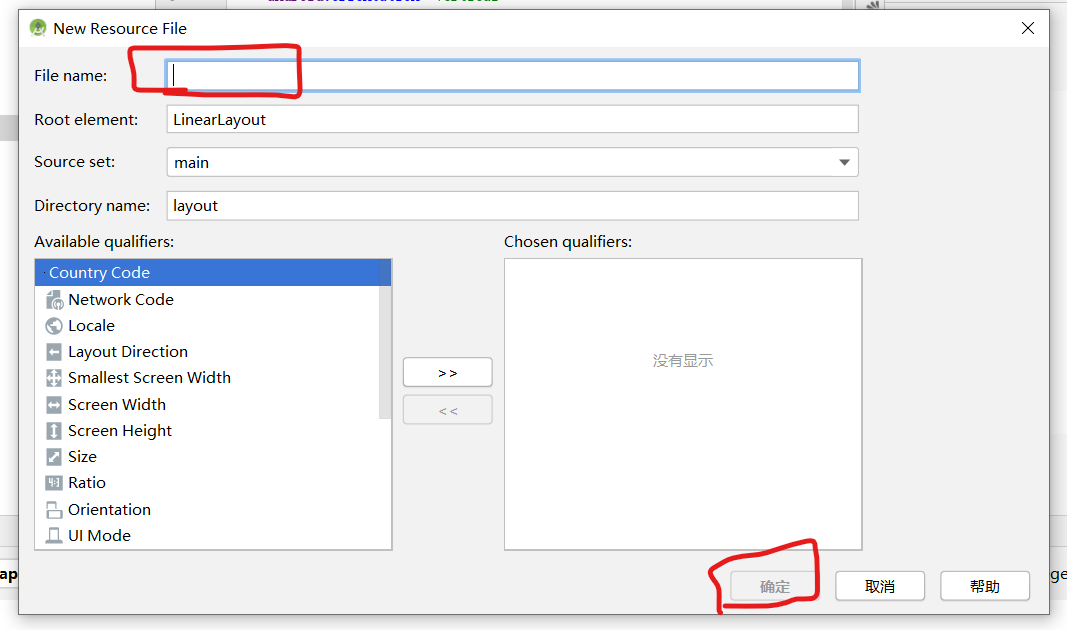
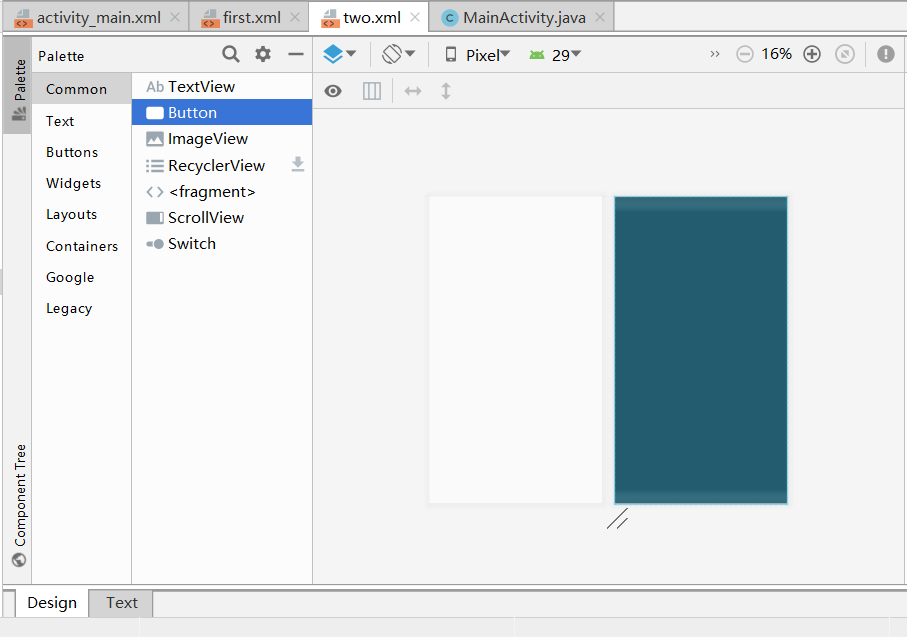
- 新建了一个two.xml->点击Design->拖拽Button(3个)->形成如下图:

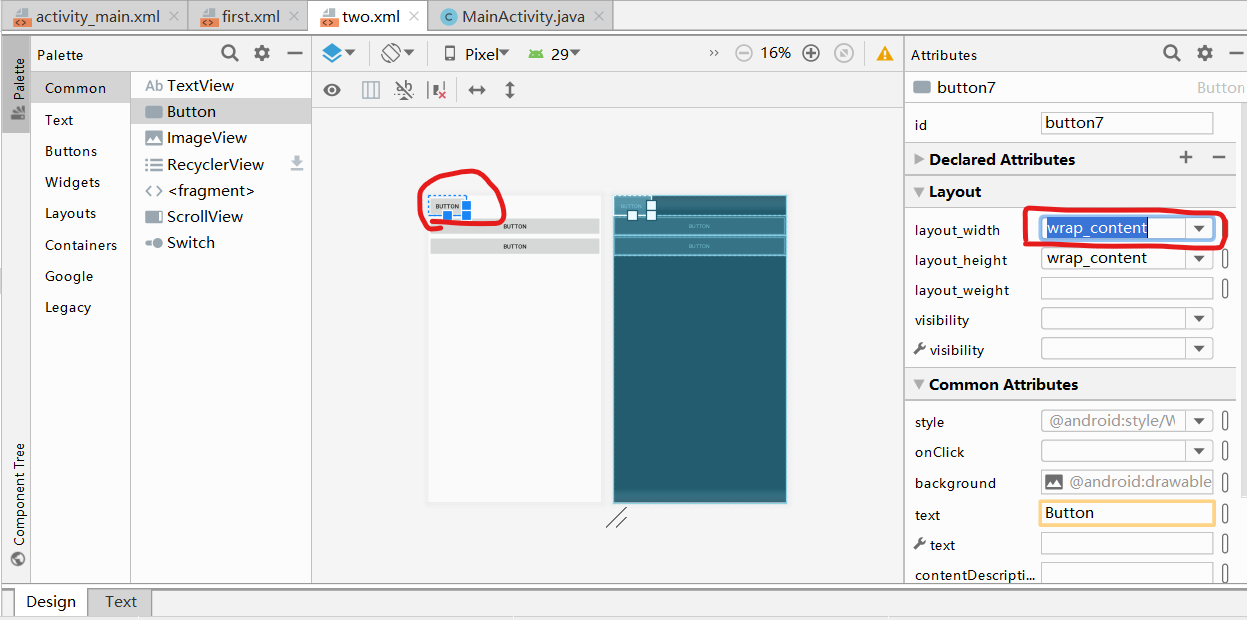
- 按住Ctrl,点击图中三个Button,再点击右侧菜单中layout_width的下拉菜单,将match_parent改为wrap_content,形成如图:
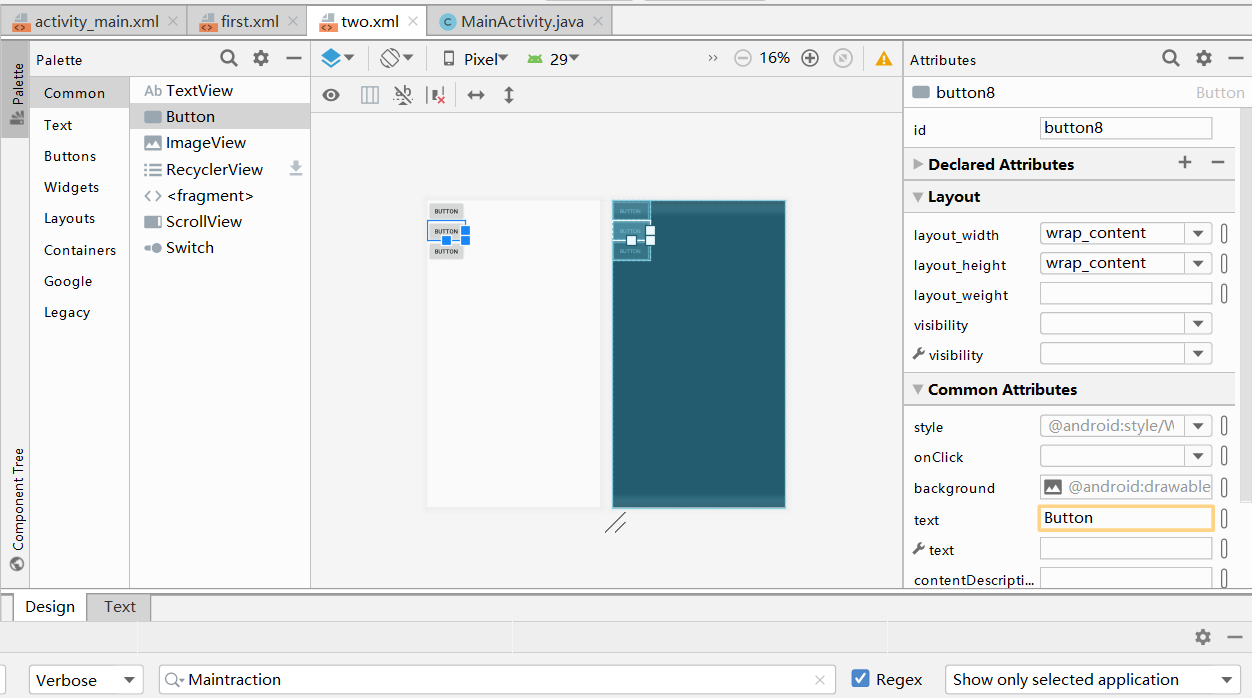
- 点击Text,查看相关代码,如下:
 1 <?xml version="1.0" encoding="utf-8"?>
 2 <LinearLayout xmlns:android="http://schemas.android.com/apk/res/android"
 3     android:orientation="vertical"
 4     android:layout_width="match_parent"
 5     android:layout_height="match_parent">
 6
 7     <Button
 8         android:id="@+id/button7"
 9         android:layout_width="wrap_content"
10         android:layout_height="wrap_content"
11         android:text="Button" />
12
13     <Button
14         android:id="@+id/button8"
15         android:layout_width="wrap_content"
16         android:layout_height="wrap_content"
17         android:text="Button" />
18
19     <Button
20         android:id="@+id/button10"
21         android:layout_width="wrap_content"
22         android:layout_height="wrap_content"
23         android:text="Button" />
24 </LinearLayout>
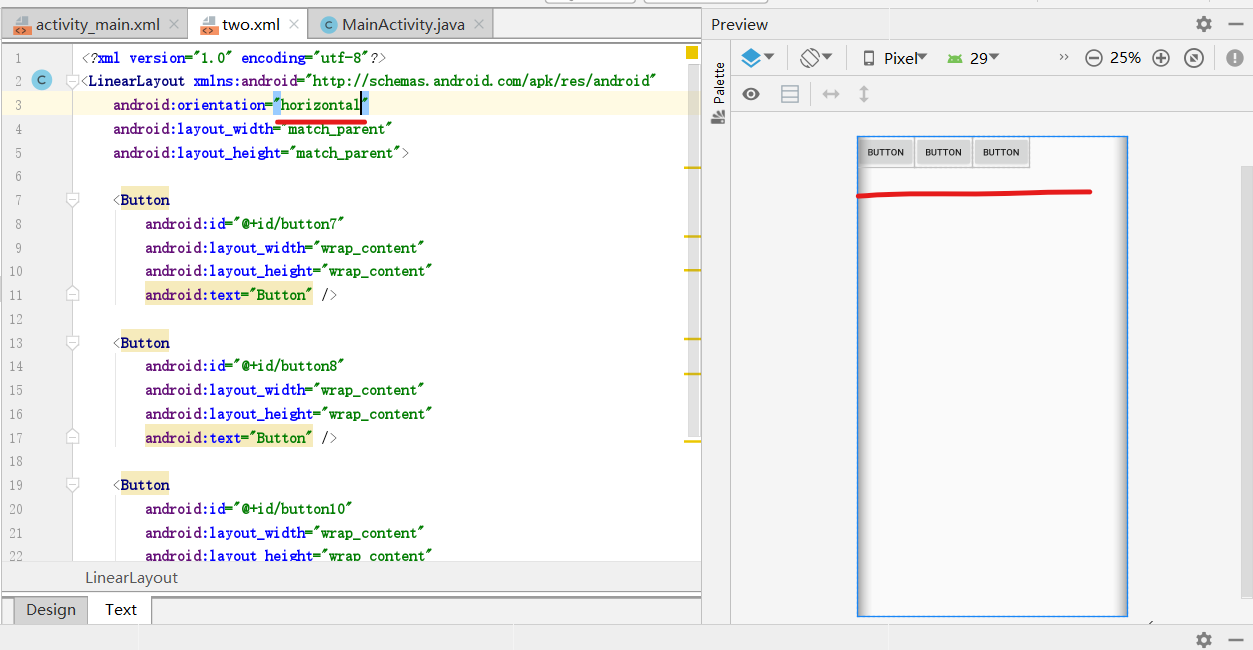
- 将第三行的vertical,改为horizontal,可以看到一改完这个界面就变成水平排列的了。
- LinearLayout 布局通过 android:orientation="horizontal" 属性将布局设置为横向线性排列。
- LinearLayout 布局通过 android:orientation="vertical" 属性将布局设置为纵向线性排列。
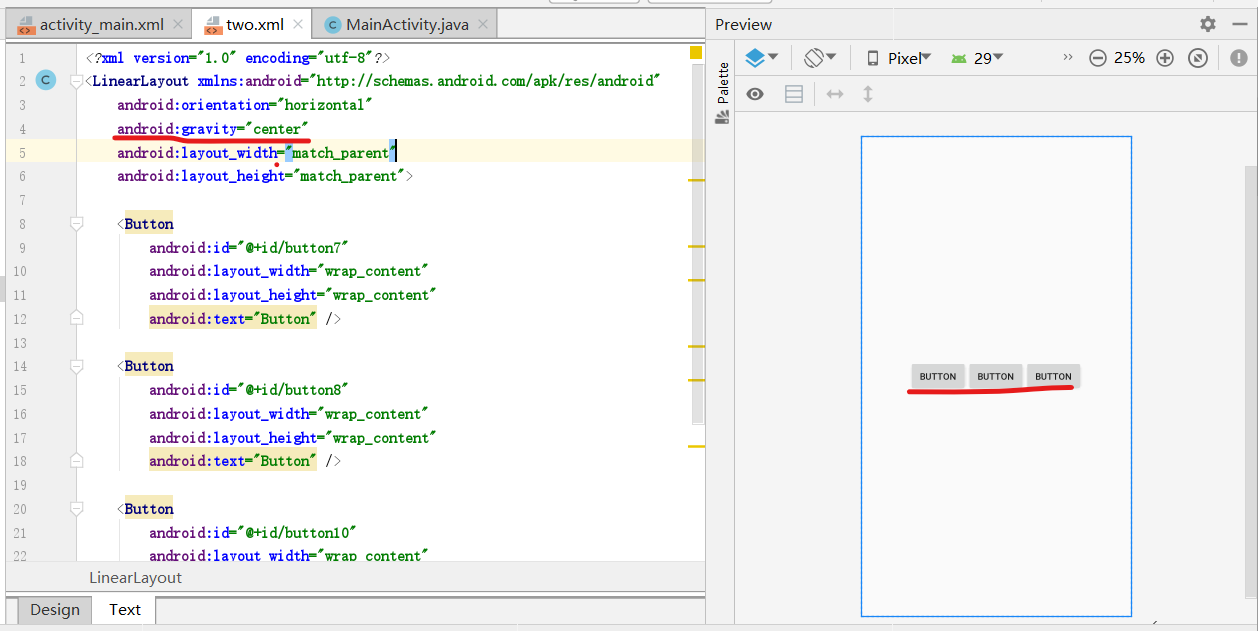
- 在上面的代码第三与第四行之间添加一句:android:gravity="center",可以看到三个button就居中了(左图),而改为android:gravity="center_horizontal",可以看到三个button就水平居中了(右图)。
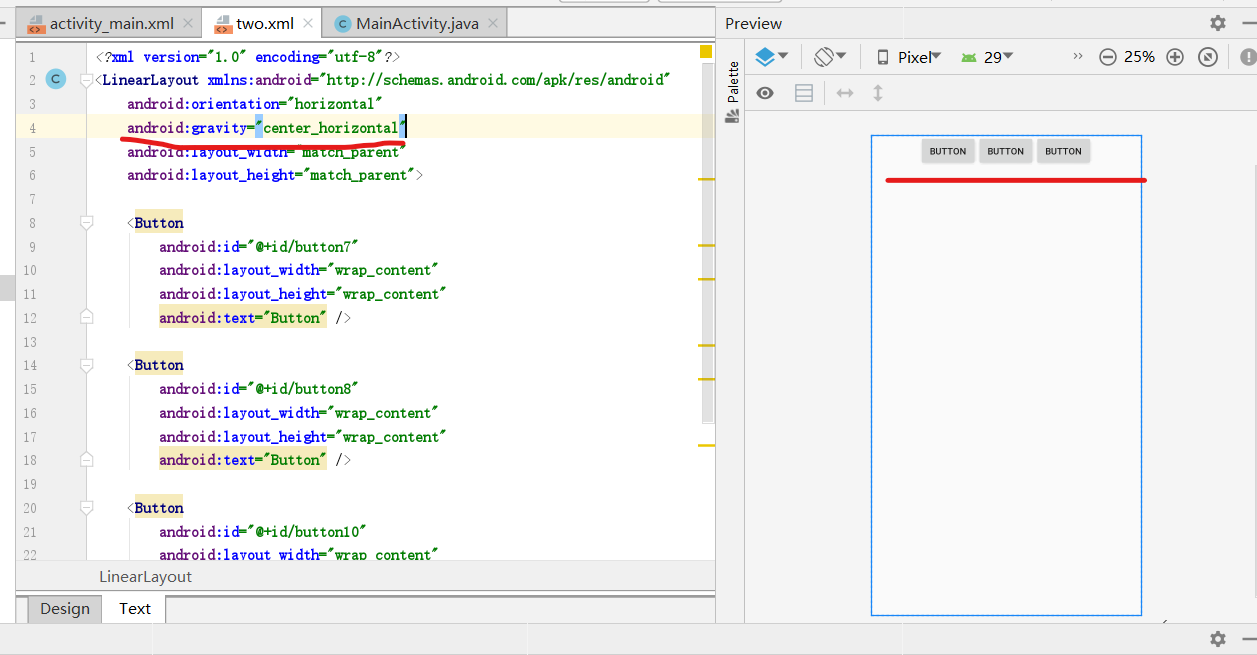
将源代码改为如下:
 1 <?xml version="1.0" encoding="utf-8"?>
 2 <LinearLayout xmlns:android="http://schemas.android.com/apk/res/android"
 3     android:orientation="vertical"
 4     android:gravity="center"
 5     android:layout_width="match_parent"
 6     android:layout_height="match_parent">
 7
 8     <Button
 9         android:id="@+id/button7"
10         android:layout_weight="1"
11         android:layout_width="wrap_content"
12         android:layout_height="0dp"
13         android:text="Button" />
14
15     <Button
16         android:id="@+id/button8"
17         android:layout_weight="1"
18         android:layout_width="wrap_content"
19         android:layout_height="0dp"
20         android:text="Button" />
21
22     <Button
23         android:id="@+id/button10"
24         android:layout_weight="1"
25         android:layout_width="wrap_content"
26         android:layout_height="0dp"
27         android:text="Button" />
28 </LinearLayout>
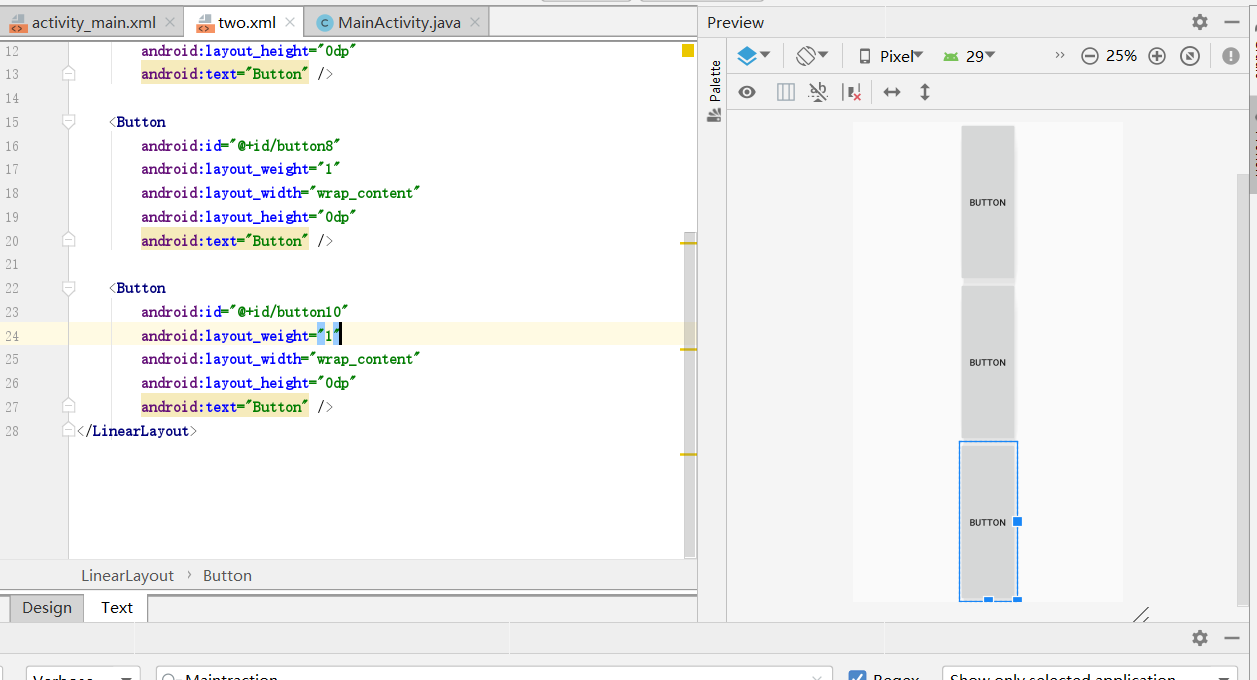
- 你可能会奇怪,每一个button中有两个android:layout_weight,
- 第一个则是每个button在其中所占的权重,而上面有三个,每个都为1,则每个的权重即:每个权重(即1)/所有权重的和(即3),也就是1/3;如上图所示!!!
- 第二个wrap_content:是layout_width和layout_height的属性值之一,表示和自身内容一样的长度。
- LinearLayout 布局可使用嵌套。活用 LinearLayou 布局可以设计出各种各样漂亮的布局方式。
约束布局ConstraintLayout
- 约束布局ConstraintLayout是一个ViewGroup,可以在Api9以上的Android系统使用它,它的出现主要是为了解决布局嵌套过多的问题,以灵活的方式定位和调整小部件。
- ConstraintLayout是Google在2016年的Google I/O大会上提出的一个可以灵活控制子控件的位置和大小的新布局。官方文档
- 从 Android Studio 2.3起,官方的模板默认使用 ConstraintLayout。所以可见ConstraintLayout的重要性。
-
ConstraintLayout可以在不嵌套ViewGroup的情况下实现非常庞大、复杂的布局,实现扁平化。
-
ConstraintLayout同时具有RelativeLayout和LinearLayout的优点、特
性、功能强大。
-
使用ConstraintLayout来布局时性能要比其他布局方式高。 -
ConstraintLayout无论是通过布局管理器拖搜,鼠标控制的形式实现还
是使用XML代码去写,都比较方便。
- 对于新手,建议先学会线性布局和相对布局,再学习约束布局,效果可能会更好!!!
默认情况下,Android Studio建立的工程,它的主界面就是约束布局的。
实例 MyApplication 演示了 ConstraintLayout 布局的使用方法,效果如图所示。
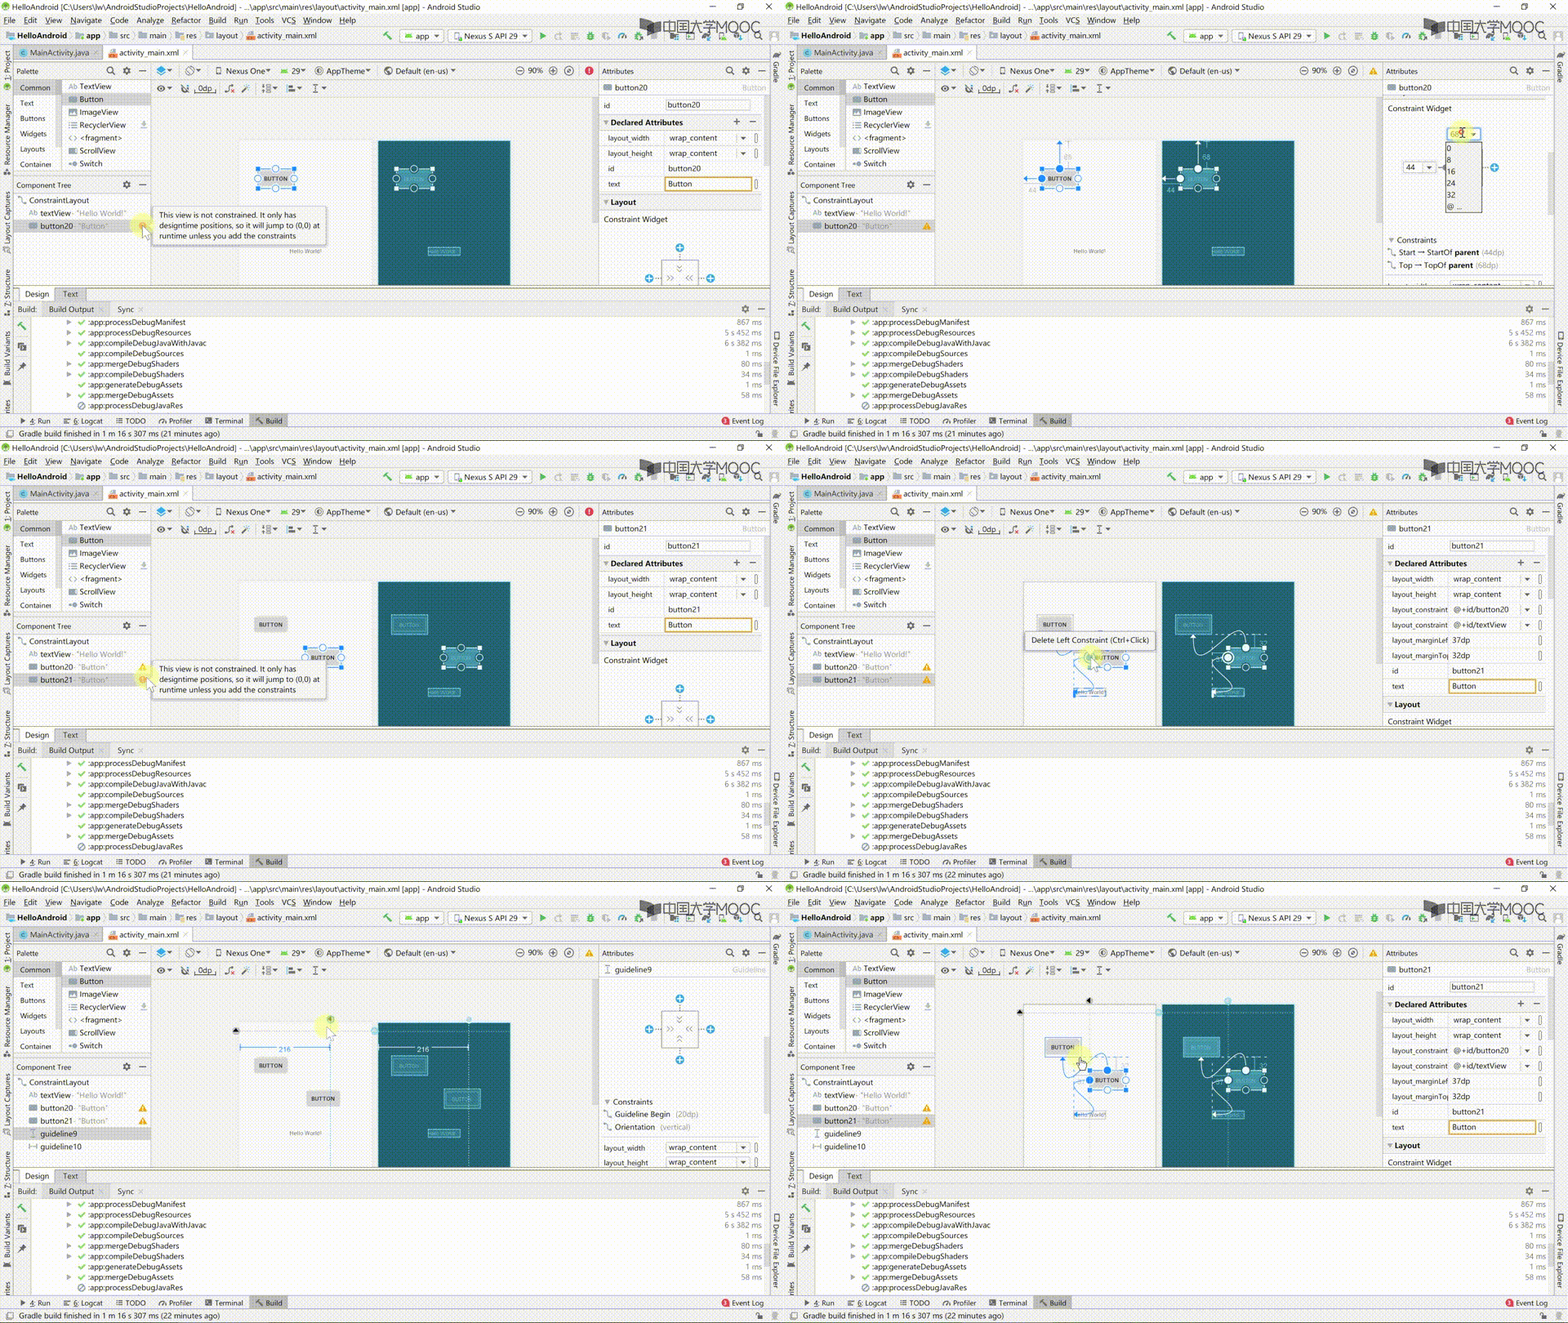
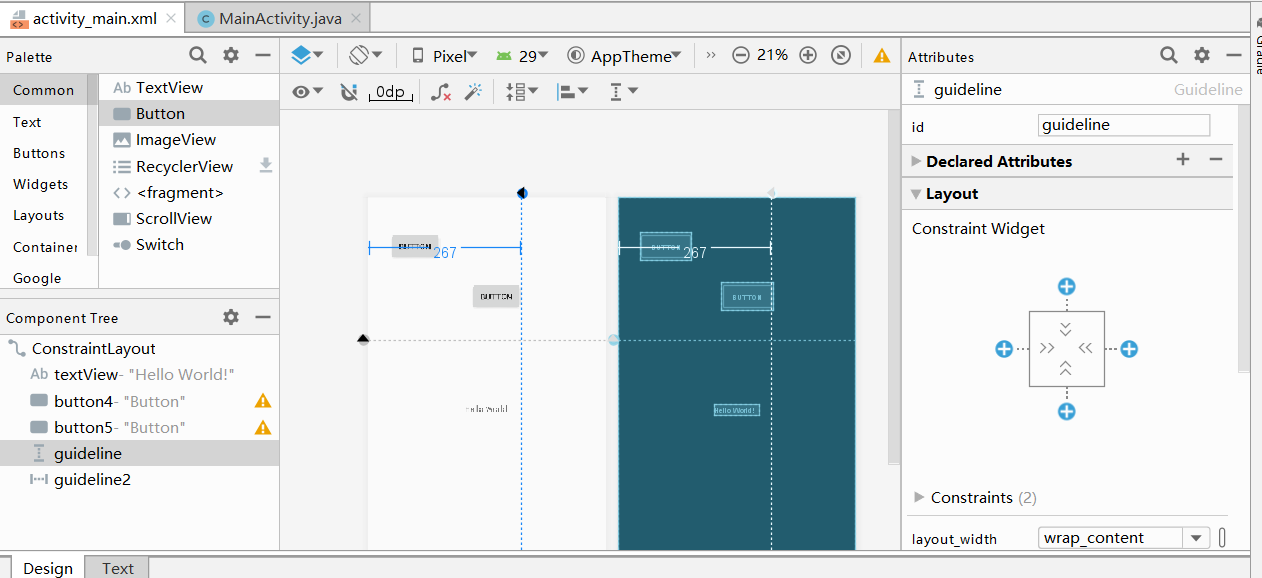
实例 MyApplication 中 activity_main.xml的代码如下:
 1 <?xml version="1.0" encoding="utf-8"?>
 2 <androidx.constraintlayout.widget.ConstraintLayout
 3     xmlns:android="http://schemas.android.com/apk/res/android"
 4     xmlns:app="http://schemas.android.com/apk/res-auto"
 5     xmlns:tools="http://schemas.android.com/tools"
 6     android:layout_width="match_parent"
 7     android:layout_height="match_parent"
 8     tools:context=".MainActivity">
 9
10     <TextView
11         android:id="@+id/textView"
12         android:layout_width="wrap_content"
13         android:layout_height="wrap_content"
14         android:text="Hello World!"
15         app:layout_constraintBottom_toBottomOf="parent"
16         app:layout_constraintLeft_toLeftOf="parent"
17         app:layout_constraintRight_toRightOf="parent"
18         app:layout_constraintTop_toTopOf="parent" />
19
20     <Button
21         android:id="@+id/button4"
22         android:layout_width="wrap_content"
23         android:layout_height="wrap_content"
24         android:layout_marginStart="32dp"
25         android:layout_marginTop="60dp"
26         android:layout_marginEnd="280dp"
27         android:text="Button"
28         app:layout_constraintEnd_toEndOf="parent"
29         app:layout_constraintStart_toStartOf="parent"
30         app:layout_constraintTop_toTopOf="parent" />
31
32     <Button
33         android:id="@+id/button5"
34         android:layout_width="wrap_content"
35         android:layout_height="wrap_content"
36         android:layout_marginStart="53dp"
37         android:layout_marginTop="39dp"
38         android:text="Button"
39         app:layout_constraintStart_toEndOf="@+id/button4"
40         app:layout_constraintTop_toBottomOf="@+id/button4" />
41
42     <androidx.constraintlayout.widget.Guideline
43         android:id="@+id/guideline"
44         android:layout_width="wrap_content"
45         android:layout_height="wrap_content"
46         android:orientation="vertical"
47         app:layout_constraintGuide_begin="267dp" />
48
49     <androidx.constraintlayout.widget.Guideline
50         android:id="@+id/guideline2"
51         android:layout_width="wrap_content"
52         android:layout_height="wrap_content"
53         android:orientation="horizontal"
54         app:layout_constraintGuide_begin="247dp" />
55
56 </androidx.constraintlayout.widget.ConstraintLayout>
该布局中放置了两个 ConstraintLayout 布局对象。
- 其中Button4有三个约束条件,分别是对应距离左边距32dp,距离右边距280dp,距离上边距60dp
-
而Button5则只有两个边距,分别是它的左边距距离Button4的右边距为53dp,它的上边距距离 Button4的下边距为39dp
- 相关属性如下:参考
|
四周牵引 |
|
layout_constraintLeft_toLeftOf: 将目标控件的左侧牵引到另外一个控件的左侧 |
|
layout_constraintRight_toLeftOf: 将目标控件的右侧牵引到另外一个控件的左侧 |
|
layout_constraintLeft_toRightOf: 将目标控件的左侧牵引到另外一个控件的右侧 |
|
layout_constraintRight_toRightOf: 将目标控件的右侧牵引到另外一个控件的右侧 |
|
layout_constraintTop_toTopOf: 将目标控件的上侧牵引到另外一个控件的上侧 |
|
layout_constraintTop_toBottomOf: 将目标控件的上侧牵引到另外一个控件的下侧 |
|
layout_constraintBottom_toTopOf: 将目标控件的下侧牵引到另外一个控件的上侧 |
|
layout_constraintBottom_toBottomOf: 将目标控件的下侧牵引到另外一个控件的下侧 |
基线对齐 |
|
layout_constrainBaseline_toBaselineOf:与目标控件的基线对齐 |
|
start,end类(与left,right类似) |
|
layout_constrainStart_toEndOf:将目标控件的左侧与另一控件的右侧对齐 |
|
layout_constrainStart_toStartOf:将目标控件的左侧与另一控件的左侧对齐 |
|
layout_constrainEnd_toStartOf:将目标控件的右侧与另一控件的左侧对齐 |
|
layout_constrainEnd_toEndOf:将目标控件的右侧与另一控件的右侧对齐 |
|
布局边距 |
|
layout_marginStart:左边距 |
|
layout_marginEnd:右边距 |
|
layout_marginLeft:左边距 |
|
layout_marginRight:右边距 |
|
layout_marginLeft:左边距 |
|
layout_marginTop:上边距 |
|
layout_marginBottom:下边距 |
|
基准线(guideline) |
|
orientation:vertical/horizontal 基准线的方向 |
|
layout_constrainGuide_begin:基准线起点 |
|
layout_constrainGuide_end:基准线终点 |
|
layout_constrainGuide_percent:基准线百分比模式,用于指定位置 |
|
牵引力 |
|
layout_constrainHorizontal_bias:水平方向上的牵引力 |
|
layout_constrainVertical_bias:垂直方向上的牵引力 |
FrameLayout(单帧布局)
- FrameLayout 又称单帧布局,是 Android 所提供的布局方式里最简单的布局方式,它指定屏幕上的一块空白区域,在该区域填充一个单一对象。例如图片、文字、按钮等。
-
帧布局主要掌握以下两个属性的使用:android:layout_gravity、android:visibility
-
默认情况下,控件位于帧布局的左上角。可通过控件的 android:layout_gravity属性控制其位置。
-
android:layoutgravity属性可设置为下列值:
-
top:控件位于布局顶部。
-
bottom:控件位于布局底部,单独使用时等价于“left|bottom“。
-
left:控件位于布局左侧。
-
right:控件位于布局右侧,单独使用时等价于“top|right“。
-
center:控件位于布局中心。
-
center_vertical:控件位于垂直方向上的中间位置,单独使用时等价于“left|centervertical“。
-
center_horizontal:控件位于水平方向上的中间位置,单独使用时等价于“top|center_horizontal“。
-
-
gravity的中文意思就是“重心“,就是表示view横向和纵向的停靠位置。
-
android:gravity:是对控件本身来说的,是用来设置控件本身的内容应该显示在控件的什么位置,默认值是左侧,也可以用来设置布局中的控件位置。
- android:layout_gravity:是相对于包含该控件的父控件来说的,设置该控件在父控件的什么位置。

- android:visibility
- View.VISIALBE 可见,显示到页面
- View.INVISIABLE不可见,但是还是占用位置
- View.GONE隐藏,不可见并且不占用位置
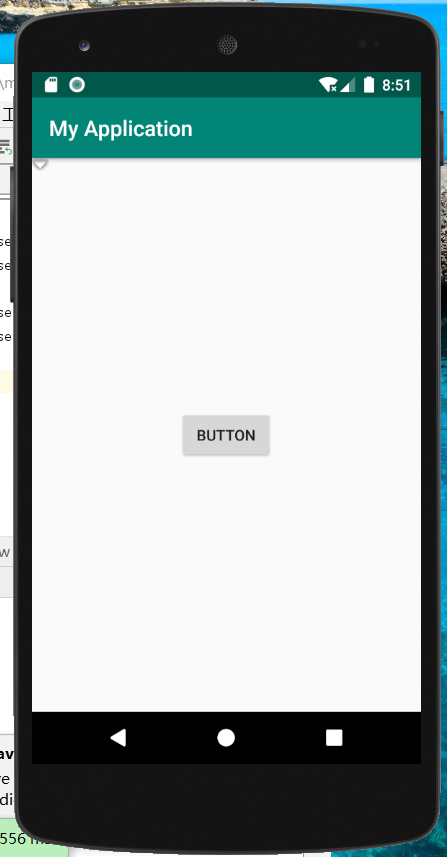
实例演示了 FrameLayout 的布局效果。该布局中有 3个组件,前2个组件为ImageView 以默认方式放置到布局中,其中一个不显示,另一个显示,第 3 个组件为 Button让它居中,运行效果如图。

 1 <?xml version="1.0" encoding="utf-8"?>
 2 <FrameLayout xmlns:android="http://schemas.android.com/apk/res/android"
 3     xmlns:app="http://schemas.android.com/apk/res-auto"
 4     android:layout_width="match_parent" android:layout_height="match_parent">
 5
 6
 7     <ImageView
 8         android:id="@+id/imageView"
 9         android:visibility="invisible"
10         android:layout_width="wrap_content"
11         android:layout_height="wrap_content"
12         app:srcCompat="@android:drawable/btn_dialog" />
13
14     <ImageView
15         android:id="@+id/imageView2"
16         android:visibility="visible"
17         android:layout_width="wrap_content"
18         android:layout_height="wrap_content"
19         app:srcCompat="@android:drawable/arrow_down_float" />
20
21     <Button
22         android:id="@+id/button"
23         android:layout_gravity="center"
24         android:layout_width="wrap_content"
25         android:layout_height="wrap_content"
26         android:text="Button" />
27 </FrameLayout>
 1 package com.example.myapplication;
 2
 3 import androidx.appcompat.app.AppCompatActivity;
 4
 5 import android.os.Bundle;
 6 import android.view.View;
 7 import android.widget.Button;
 8 import android.widget.ImageView;
 9
10 public class MainActivity extends AppCompatActivity {
11     private Button button;
12     private ImageView imageView1,imageView2;
13     private int count;
14
15     @Override
16     protected void onCreate(Bundle savedInstanceState) {
17         super.onCreate(savedInstanceState);
18         setContentView(R.layout.syhdt);
19
20         button = (Button)findViewById(R.id.button);
21         imageView1 = (ImageView)findViewById(R.id.imageView);
22         imageView2 = (ImageView)findViewById(R.id.imageView2);
23
24         button.setOnClickListener(new View.OnClickListener(){
25             @Override
26             public void onClick(View v) {
27                 if(count%2==0){
28                     imageView1.setVisibility(View.VISIBLE);
29                     imageView2.setVisibility(View.INVISIBLE);
30                 }else{
31                     imageView1.setVisibility(View.INVISIBLE);
32                     imageView2.setVisibility(View.VISIBLE);
33                 }
34                 count++;
35             }
36         });
37     }
38 }
其中:
1 android:layout_width="wrap_content" 2 android:layout_height="wrap_content"
表明 FrameLayout 布局覆盖了整个屏幕空间。
表格布局(TableLayout)
- 表格布局(TableLayout)是以表格形式排列控件的,通过行和列将界面划分为多个单元格,每个单元格都可以添加控件。
- 表格布局需要和TableRow配合使用,每一行都由TableRow对象组成,因此TableRow的数量决定表格的行数。而表格的列数是由包含最多控件的TableRow决定的,例如第1个TableRow有两个控件,第2个TableRow有三个控件,则表格列数为3。
表格布局属性
- android:stretchColumns设置该列被拉伸
- android:shrinkColumns设置该列被收缩
- android:collapseColumns设置该列被隐藏
表格布局控件属性
- android:layout_column设置该单元显示位置
- android:layout_span设置该单元格占据几列,默认为1列
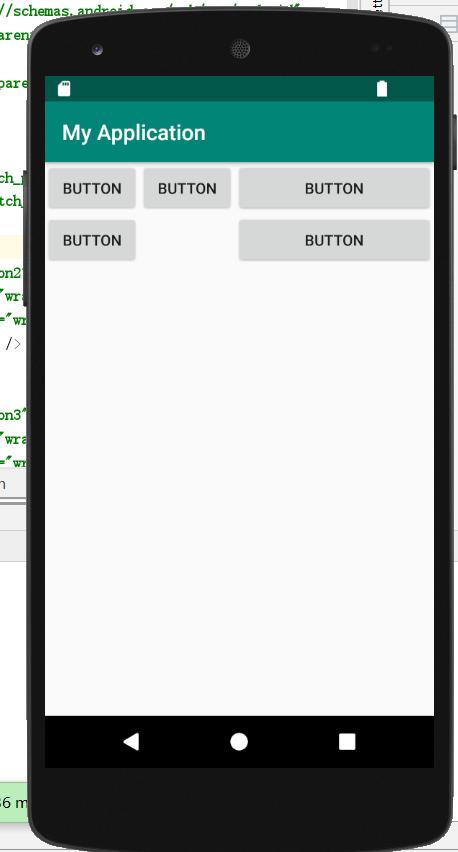
实例演示了使用 TableLayout 制作 UI 的方法,效果如图所示。
- 不废话上代码:
 1 <?xml version="1.0" encoding="utf-8"?>
 2 <TableLayout xmlns:android="http://schemas.android.com/apk/res/android"
 3     android:layout_width="match_parent"
 4     android:stretchColumns="2"
 5     android:layout_height="match_parent">
 6
 7     <TableRow
 8         android:gravity="center"
 9         android:layout_width="match_parent"
10         android:layout_height="match_parent" >
11
12         <Button
13             android:id="@+id/button2"
14             android:layout_width="wrap_content"
15             android:layout_height="wrap_content"
16             android:text="Button" />
17
18         <Button
19             android:id="@+id/button3"
20             android:layout_width="wrap_content"
21             android:layout_height="wrap_content"
22             android:text="Button" />
23
24         <Button
25             android:id="@+id/button4"
26             android:layout_width="wrap_content"
27             android:layout_height="wrap_content"
28             android:text="Button" />
29     </TableRow>
30
31     <TableRow
32         android:layout_width="match_parent"
33         android:layout_height="match_parent" >
34
35         <Button
36             android:id="@+id/button5"
37             android:layout_width="wrap_content"
38             android:layout_height="wrap_content"
39             android:text="Button" />
40
41         <Button
42             android:id="@+id/button6"
43             android:layout_column="2"
44             android:layout_width="wrap_content"
45             android:layout_height="wrap_content"
46             android:text="Button" />
47     </TableRow>
48 </TableLayout>
- 创建了两个 TableRow ,第一个 TableRow有三个Button,并让它们居中;第二个 TableRow 有两个Button, 让其中的第二个在第三列,并让整体第三列拉伸。具体如上图显示。
RelativeLayout(相对布局)
- 从名称上可以看出,这种布局方式是以一种让组件以相对于容器或者相对于容器中的另一个组件的相对位置进行放置的布局方式。
- RelativeLayout 布局提供了一些常用的布局设置属性用于确定组件在视图中的相对位置。下面列举了 RelativeLayout 相关属性及其所代表的含义。
相对于父元素控件布局
| 属性 | 含义 |
|---|---|
| android:layout_centerHrizontal | 水平居中 |
| android:layout_centerVertical | 垂直居中 |
| android:layout_centerInparent | 相对于父元素完全居中 |
| android:layout_alignParentBottom | 位于父元素的下边缘 |
| android:layout_alignParentLeft | 位于父元素的左边缘 |
| android:layout_alignParentRight | 位于父元素的右边缘 |
| android:layout_alignParentTop | 位于父元素的上边缘 |
| android:layout_alignWithParentIfMissing | 如果对应的兄弟元素找不到的话就以父元素做参照物 |
相对于某个元素控件布局
注意:属性值必须为id的引用名“@id/id-name”
| 属性 | 含义 |
|---|---|
| android:layout_below | 位于元素的下方 |
| android:layout_above | 位于元素的的上方 |
| android:layout_toLeftOf | 位于元素的左边 |
| android:layout_toRightOf | 位于元素的右边 |
| android:layout_alignTop | 该元素的上边缘和某元素的的上边缘对齐 |
| android:layout_alignLeft | 该元素的左边缘和某元素的的左边缘对齐 |
| android:layout_alignBottom | 该元素的下边缘和某元素的的下边缘对齐 |
| android:layout_alignRight | 该元素的右边缘和某元素的的右边缘对齐 |
相对像素值
| 属性 | 含义 |
|---|---|
| android:layout_marginBottom | 底边缘的距离 |
| android:layout_marginLeft | 左边缘的距离 |
| android:layout_marginRight | 右边缘的距离 |
| android:layout_marginTop | 上边缘的距离 |
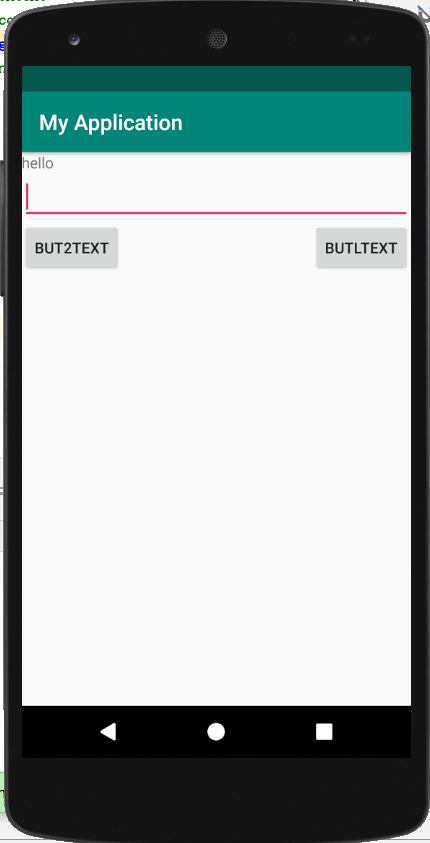
实例演示了相对布局的使用方法,其运行效果如图所示。
- 上代码
 1 <?xml version="1.0" encoding="utf-8"?>
 2
 3 <RelativeLayout xmlns:android="http://schemas.android.com/apk/res/android"
 4     android:layout_width="fill_parent"
 5     android:layout_height="fill_parent">
 6
 7     <TextView
 8         android:id="@+id/label"
 9         android:layout_width="fill_parent"
10         android:layout_height="wrap_content"
11         android:text="hello" />
12
13     <EditText
14         android:id="@+id/enter"
15         android:layout_width="fill_parent"
16         android:layout_height="wrap_content"
17         android:layout_alignParentLeft="true"
18         android:layout_below="@+id/label" />
19
20     <Button
21         android:id="@+id/button1"
22         android:layout_width="wrap_content"
23         android:layout_height="wrap_content"
24         android:layout_alignParentRight="true"
25         android:layout_below="@+id/enter"
26         android:text="butltext" />
27
28     <Button
29         android:id="@+id/ok"
30         android:layout_width="wrap_content"
31         android:layout_height="wrap_content"
32         android:layout_alignBottom="@+id/button1"
33         android:layout_alignParentLeft="true"
34         android:text="but2text" />
35
36 </RelativeLayout>
该 RelativeLayout 布局的过程如下:
- 放置一个 ID 为 label 的 TextView 组件。
- 通过 android:layout_below="@+id/label" 属性将 ID 为 enter 的组件 EditText 放置到 TextView 的下面。
- 在布局中加入一个 ID 为 button1 的 Button,通过 android:layout_below="@+id/enter" 属性将该 Button 放置到 enter 的下面,通过 android:layout_alignParentRight= "true" 属性将 Button 放置到相对布局的右侧。
- 在相对布局中加入一个名为 ok 的 Button,通过 android:layout_alignBottom="@+ id/button1" 属性将该 Button 底边与 button1 对齐,通过 android:layout_alignParentLeft ="true" 属性将该 Button 放置到布局的左边。