redis是一个key-value存储系统.和Memcached类似,它支持存储的value类型相对更多,包括string(字符串)、list(链表)、set(集合)、zset(sorted set --有序集合)和hashs(哈希类型).这些数据类型都支持push/pop、add/remove及取交集并集和差集及更丰富的操作,而且这些操作都是原子性的.在此基础上,redis支持各种不同方式的排序.与memcached一样,为了保证效率,数据都是缓存在内存中.区别的是redis会周期性的把更新的数据写入磁盘或者把修改操作写入追加的记录文件,并且在此基础上实现了master-slave(主从)同步。
Redis的优点:
性能极高 – Redis能支持超过 100K+ 每秒的读写频率。
丰富的数据类型 – Redis支持二进制案例的 Strings, Lists, Hashes, Sets 及 Ordered Sets 数据类型操作。
原子 – Redis的所有操作都是原子性的,同时Redis还支持对几个操作全并后的原子性执行。
丰富的特性 – Redis还支持 publish/subscribe, 通知, key 过期等等特性。
下面是官方的bench-mark数据:
测试完成了50个并发执行100000个请求。
设置和获取的值是一个256字节字符串。
Linux box是运行Linux 2.6,这是X3320 Xeon 2.5 ghz。
文本执行使用loopback接口(127.0.0.1)。
结果:写的速度是110000次/s,读的速度是81000次/s 。
redis常用命令:
就DB来说,Redis成绩已经很惊人了,且不说memcachedb和tokyocabinet之流,就说原版的memcached,速度似乎也只能达到这个级别。Redis根本是使用内存存储,持久化的关键是这三条指令:SAVE BGSAVE LASTSAVE .
当接收到SAVE指令的时候,Redis就会dump数据到一个文件里面。值得一说的是它的独家功能:存储列表和集合,这是它与mc之流相比更有竞争力的地方。
不介绍mc里面已经有的东东,只列出特殊的:
TYPE key — 用来获取某key的类型
KEYS pattern — 匹配所有符合模式的key,比如KEYS * 就列出所有的key了,当然,复杂度O(n)
RANDOMKEY - 返回随机的一个key
RENAME oldkeynewkey— key也可以改名
列表操作,精华
RPUSH key string — 将某个值加入到一个key列表头部
LPUSH key string — 将某个值加入到一个key列表末尾
LLEN key — 列表长度
LRANGE key start end — 返回列表中某个范围的值,相当于mysql里面的分页查询那样
LTRIM key start end — 只保留列表中某个范围的值
LINDEX key index — 获取列表中特定索引号的值,要注意是O(n)复杂度
LSET key index value — 设置列表中某个位置的值
LPOP key
RPOP key — 和上面的LPOP一样,就是类似栈或队列的那种取头取尾指令,可以当成消息队列来使用了
集合操作
SADD key member — 增加元素
SREM key member — 删除元素
SCARD key — 返回集合大小
SISMEMBER key member — 判断某个值是否在集合中
SINTER key1 key2 ... keyN — 获取多个集合的交集元素
SMEMBERS key — 列出集合的所有元素
还有Multiple DB的命令,可以更换db,数据可以隔离开,默认是存放在DB 0
redis安装方法:
可以在Windows下进行安装
Redis安装文件解压后,有以下几个文件。见下图
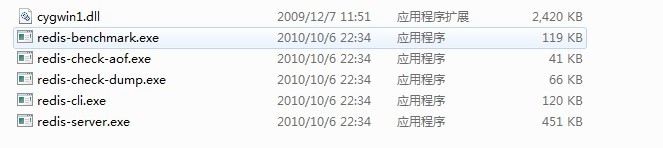
redis-server.exe:服务程序
redis-check-dump.exe:本地数据库检查
redis-check-aof.exe:更新日志检查
redis-benchmark.exe:性能测试,用以模拟同时由N个客户端发送M个 SETs/GETs 查询 (类似于 Apache 的ab 工具).
在解压好redis的安装文件到E:根目录后,还需要在redis根目录增加一个redis的配置文件redis.conf,文件具体内容附件中有,不过这里我仍然把配置文件的内容贴上来:
# Redis configuration file example
# By default Redis does not run as a daemon. Use 'yes' if you need it.
# Note that Redis will write a pid file in /var/run/redis.pid when daemonized.
daemonize no
# When run as a daemon, Redis write a pid file in /var/run/redis.pid by default.
# You can specify a custom pid file location here.
pidfile /var/run/redis.pid
# Accept connections on the specified port, default is 6379
port 6379
# If you want you can bind a single interface, if the bind option is not
# specified all the interfaces will listen for connections.
#
# bind 127.0.0.1
# Close the connection after a client is idle for N seconds (0 to disable)
timeout 300
# Set server verbosity to 'debug'
# it can be one of:
# debug (a lot of information, useful for development/testing)
# notice (moderately verbose, what you want in production probably)
# warning (only very important / critical messages are logged)
loglevel debug
# Specify the log file name. Also 'stdout' can be used to force
# the demon to log on the standard output. Note that if you use standard
# output for logging but daemonize, logs will be sent to /dev/null
logfile stdout
# Set the number of databases. The default database is DB 0, you can select
# a different one on a per-connection basis using SELECT <dbid> where
# dbid is a number between 0 and 'databases'-1
databases 16
################################ SNAPSHOTTING #################################
#
# Save the DB on disk:
#
# save <seconds> <changes>
#
# Will save the DB if both the given number of seconds and the given
# number of write operations against the DB occurred.
#
# In the example below the behaviour will be to save:
# after 900 sec (15 min) if at least 1 key changed
# after 300 sec (5 min) if at least 10 keys changed
# after 60 sec if at least 10000 keys changed
save 900 1
save 300 10
save 60 10000
# Compress string objects using LZF when dump .rdb databases?
# For default that's set to 'yes' as it's almost always a win.
# If you want to save some CPU in the saving child set it to 'no' but
# the dataset will likely be bigger if you have compressible values or keys.
rdbcompression yes
# The filename where to dump the DB
dbfilename dump.rdb
# For default save/load DB in/from the working directory
# Note that you must specify a directory not a file name.
dir ./
################################# REPLICATION #################################
# Master-Slave replication. Use slaveof to make a Redis instance a copy of
# another Redis server. Note that the configuration is local to the slave
# so for example it is possible to configure the slave to save the DB with a
# different interval, or to listen to another port, and so on.
#
# slaveof <masterip> <masterport>
# If the master is password protected (using the "requirepass" configuration
# directive below) it is possible to tell the slave to authenticate before
# starting the replication synchronization process, otherwise the master will
# refuse the slave request.
#
# masterauth <master-password>
################################## SECURITY ###################################
# Require clients to issue AUTH <PASSWORD> before processing any other
# commands. This might be useful in environments in which you do not trust
# others with access to the host running redis-server.
#
# This should stay commented out for backward compatibility and because most
# people do not need auth (e.g. they run their own servers).
#
# requirepass foobared
################################### LIMITS ####################################
# Set the max number of connected clients at the same time. By default there
# is no limit, and it's up to the number of file descriptors the Redis process
# is able to open. The special value '0' means no limts.
# Once the limit is reached Redis will close all the new connections sending
# an error 'max number of clients reached'.
#
# maxclients 128
# Don't use more memory than the specified amount of bytes.
# When the memory limit is reached Redis will try to remove keys with an
# EXPIRE set. It will try to start freeing keys that are going to expire
# in little time and preserve keys with a longer time to live.
# Redis will also try to remove objects from free lists if possible.
#
# If all this fails, Redis will start to reply with errors to commands
# that will use more memory, like SET, LPUSH, and so on, and will continue
# to reply to most read-only commands like GET.
#
# WARNING: maxmemory can be a good idea mainly if you want to use Redis as a
# 'state' server or cache, not as a real DB. When Redis is used as a real
# database the memory usage will grow over the weeks, it will be obvious if
# it is going to use too much memory in the long run, and you'll have the time
# to upgrade. With maxmemory after the limit is reached you'll start to get
# errors for write operations, and this may even lead to DB inconsistency.
#
# maxmemory <bytes>
############################## APPEND ONLY MODE ###############################
# By default Redis asynchronously dumps the dataset on disk. If you can live
# with the idea that the latest records will be lost if something like a crash
# happens this is the preferred way to run Redis. If instead you care a lot
# about your data and don't want to that a single record can get lost you should
# enable the append only mode: when this mode is enabled Redis will append
# every write operation received in the file appendonly.log. This file will
# be read on startup in order to rebuild the full dataset in memory.
#
# Note that you can have both the async dumps and the append only file if you
# like (you have to comment the "save" statements above to disable the dumps).
# Still if append only mode is enabled Redis will load the data from the
# log file at startup ignoring the dump.rdb file.
#
# The name of the append only file is "appendonly.log"
#
# IMPORTANT: Check the BGREWRITEAOF to check how to rewrite the append
# log file in background when it gets too big.
appendonly no
# The fsync() call tells the Operating System to actually write data on disk
# instead to wait for more data in the output buffer. Some OS will really flush
# data on disk, some other OS will just try to do it ASAP.
#
# Redis supports three different modes:
#
# no: don't fsync, just let the OS flush the data when it wants. Faster.
# always: fsync after every write to the append only log . Slow, Safest.
# everysec: fsync only if one second passed since the last fsync. Compromise.
#
# The default is "always" that's the safer of the options. It's up to you to
# understand if you can relax this to "everysec" that will fsync every second
# or to "no" that will let the operating system flush the output buffer when
# it want, for better performances (but if you can live with the idea of
# some data loss consider the default persistence mode that's snapshotting).
appendfsync always
# appendfsync everysec
# appendfsync no
############################### ADVANCED CONFIG ###############################
# Glue small output buffers together in order to send small replies in a
# single TCP packet. Uses a bit more CPU but most of the times it is a win
# in terms of number of queries per second. Use 'yes' if unsure.
glueoutputbuf yes
# Use object sharing. Can save a lot of memory if you have many common
# string in your dataset, but performs lookups against the shared objects
# pool so it uses more CPU and can be a bit slower. Usually it's a good
# idea.
#
# When object sharing is enabled (shareobjects yes) you can use
# shareobjectspoolsize to control the size of the pool used in order to try
# object sharing. A bigger pool size will lead to better sharing capabilities.
# In general you want this value to be at least the double of the number of
# very common strings you have in your dataset.
#
# WARNING: object sharing is experimental, don't enable this feature
# in production before of Redis 1.0-stable. Still please try this feature in
# your development environment so that we can test it better.
# shareobjects no
# shareobjectspoolsize 1024
将附件中的redis_conf.rar解压下来放到redis的根目录中即可。到此,redis的安装已经完毕。下面开始使用redis数据库。
启动redis:
输入命令:redis-server.exe redis.conf
启动后如下图所示:
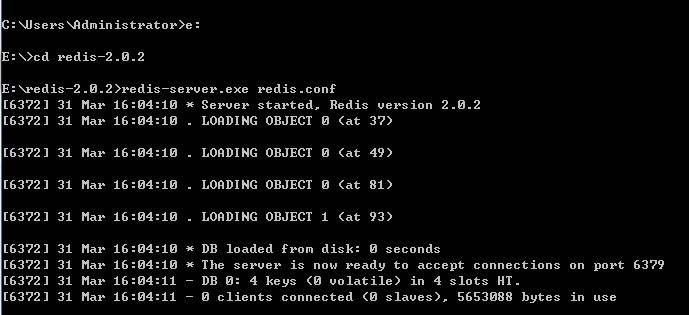
启动cmd窗口要一直开着,关闭后则Redis服务关闭。
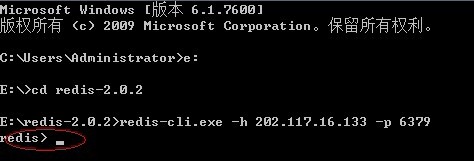
这时服务开启着,另外开一个窗口进行,设置客户端:
输入命令:redis-cli.exe -h 202.117.16.133 -p 6379
输入后如下图所示:
然后可以开始玩了:
设置一个Key并获取返回的值:
$ ./redis-cli set mykey somevalue
OK
$ ./redis-cli get mykey
Somevalue
如何添加值到list:
$ ./redis-cli lpush mylist firstvalue
OK
$ ./redis-cli lpush mylist secondvalue
OK
$ ./redis-cli lpush mylist thirdvalue
OK
$ ./redis-cli lrange mylist 0 -1
. thirdvalue
. secondvalue
. firstvalue
$ ./redis-cli rpop mylist
firstvalue
$ ./redis-cli lrange mylist 0 -1
. thirdvalue
. secondvalue
redis-benchmark.exe:性能测试,用以模拟同时由N个客户端发送M个 SETs/GETs 查询 (类似于 Apache 的 ab 工具).
./redis-benchmark -n 100000 –c 50
====== SET ======
100007 requests completed in 0.88 seconds (译者注:100004 查询完成于 1.14 秒 )
50 parallel clients (译者注:50个并发客户端)
3 bytes payload (译者注:3字节有效载荷)
keep alive: 1 (译者注:保持1个连接)
58.50% <= 0 milliseconds(译者注:毫秒)
99.17% <= 1 milliseconds
99.58% <= 2 milliseconds
99.85% <= 3 milliseconds
99.90% <= 6 milliseconds
100.00% <= 9 milliseconds
114293.71 requests per second(译者注:每秒 114293.71 次查询)
Windows下测试并发客户端极限为60