CentOS7基本设置
1. 查看相关信息
1.1. 查看系统信息
1.1.1. 查看系统位数
方法1:
[root@centos7 ~]# uname -a
Linux centos7.smartmap 3.10.0-514.el7.x86_64 #1 SMP Tue Nov 22 16:42:41 UTC 2016 x86_64 x86_64 x86_64 GNU/Linux
方法2:显示系统程序信息
[root@centos7 ~]# file /bin/ls
/bin/ls: ELF 64-bit LSB executable, x86-64, version 1 (SYSV), dynamically linked (uses shared libs), for GNU/Linux 2.6.32, BuildID[sha1]=3d705971a4c4544545cb78fd890d27bf792af6d4, stripped
方法3:
[root@centos7 ~]# cat /proc/version
Linux version 3.10.0-514.el7.x86_64 (builder@kbuilder.dev.centos.org) (gcc version 4.8.5 20150623 (Red Hat 4.8.5-11) (GCC) ) #1 SMP Tue Nov 22 16:42:41 UTC 2016
方法4:
(32位的系统中int类型和long类型一般都是4字节,64位的系统中int类型还是4字节的,但是long已变成了8字节inux系统中可用"getconf WORD_BIT"和"getconf LONG_BIT"获得word和long的位数。64位系统中应该分别得到32和64。)
[root@centos7 ~]# getconf LONG_BIT
64
1.1.2. 查看系统版本
方法1:
[root@centos7 ~]# lsb_release -a
方法2:
[root@centos7 ~]# cat /etc/os-release
NAME="CentOS Linux"
VERSION="7 (Core)"
ID="centos"
ID_LIKE="rhel fedora"
VERSION_ID="7"
PRETTY_NAME="CentOS Linux 7 (Core)"
ANSI_COLOR="0;31"
CPE_NAME="cpe:/o:centos:centos:7"
HOME_URL="https://www.centos.org/"
BUG_REPORT_URL="https://bugs.centos.org/"
CENTOS_MANTISBT_PROJECT="CentOS-7"
CENTOS_MANTISBT_PROJECT_VERSION="7"
REDHAT_SUPPORT_PRODUCT="centos"
REDHAT_SUPPORT_PRODUCT_VERSION="7"
方法3:
[root@centos7 ~]# cat /etc/redhat-release
CentOS Linux release 7.3.1611 (Core)
方法4:
[root@centos7 ~]# rpm -q centos-release
centos-release-7-3.1611.el7.centos.x86_64
1.1.3. 查看内核版本
方法1:
[root@centos7 ~]# cat /proc/version
Linux version 3.10.0-514.el7.x86_64 (builder@kbuilder.dev.centos.org) (gcc version 4.8.5 20150623 (Red Hat 4.8.5-11) (GCC) ) #1 SMP Tue Nov 22 16:42:41 UTC 2016
方法2:
[root@centos7 ~]# uname -a
Linux centos7.smartmap 3.10.0-514.el7.x86_64 #1 SMP Tue Nov 22 16:42:41 UTC 2016 x86_64 x86_64 x86_64 GNU/Linux
1.1.4. 查看默认语言
方法1:
[root@centos7 ~]# echo $LANG $LANGUAGE
en_US.UTF-8
1.2. 查看主机名
方法1:
[root@centos7 ~]# hostname
centos7.smartmap
方法2:
[root@centos7 ~]# cat /etc/hostname
centos7.smartmap
方法3:
[root@centos7 ~]# hostnamectl
Static hostname: centos7.smartmap
Icon name: computer-vm
Chassis: vm
Machine ID: 7f288507ab404a89bfcfc3030e334c3b
Boot ID: f8a46efd003c4e83bead7cb635cbc21a
Virtualization: vmware
Operating System: CentOS Linux 7 (Core)
CPE OS Name: cpe:/o:centos:centos:7
Kernel: Linux 3.10.0-514.el7.x86_64
Architecture: x86-64
方法4:
[root@centos7 ~]# nmcli general hostname
centos7.smartmap
1.3. 查看IP
/etc/sysconfig/network 说是全局设置,默认里面啥也没有,可以添加全局默认网关
/etc/hostname 用nmtui修改hostname后,主机名保存在这里
/etc/resolv.conf 保存DNS设置,不需要手工改,nmtui里面设置的DNS会出现在这里
/etc/sysconfig/network-scripts/ 连接配置信息 ifcfg 文件
/etc/NetworkManager/system-connections/ VPN、移动宽带、PPPoE连接
方法1:
[root@centos7 ~]# ip addr
1: lo: <LOOPBACK,UP,LOWER_UP> mtu 65536 qdisc noqueue state UNKNOWN qlen 1
link/loopback 00:00:00:00:00:00 brd 00:00:00:00:00:00
inet 127.0.0.1/8 scope host lo
valid_lft forever preferred_lft forever
inet6 ::1/128 scope host
valid_lft forever preferred_lft forever
2: ens33: <BROADCAST,MULTICAST,UP,LOWER_UP> mtu 1500 qdisc pfifo_fast state UP qlen 1000
link/ether 00:0c:29:56:e1:f1 brd ff:ff:ff:ff:ff:ff
inet 192.168.1.101/24 brd 192.168.1.255 scope global dynamic ens33
valid_lft 4765sec preferred_lft 4765sec
inet6 fe80::2eef:6152:a121:4867/64 scope link
valid_lft forever preferred_lft forever
方法2:
[root@centos7 ~]# nmcli
ens33: connected to ens33
"Intel 82545EM Gigabit Ethernet Controller (Copper) (PRO/1000 MT Single Port Adapter)"
ethernet (e1000), 00:0C:29:56:E1:F1, hw, mtu 1500
ip4 default
inet4 192.168.1.101/24
inet6 fe80::2eef:6152:a121:4867/64
lo: unmanaged
loopback (unknown), 00:00:00:00:00:00, sw, mtu 65536
Use "nmcli device show" to get complete information about known devices and
"nmcli connection show" to get an overview on active connection profiles.
Consult nmcli(1) and nmcli-examples(5) manual pages for complete usage details.
1.4. 查看网关
方法1:
[root@centos7 ~]# cat /etc/sysconfig/network
# Created by anaconda
NETWORKING=yes
HOSTNAME=appserver.smartmap.com
方法2:
1.5. 查看路由
方法1:
[root@centos7 ~]# ip route
default via 192.168.1.1 dev ens33 proto static metric 100
192.168.1.0/24 dev ens33 proto kernel scope link src 192.168.1.101 metric 100
方法2:
[root@centos7 ~]# ip route show
default via 192.168.1.1 dev ens33 proto static metric 100
192.168.1.0/24 dev ens33 proto kernel scope link src 192.168.1.101 metric 100
192.168.1.101 dev ens33 proto kernel scope link src 192.168.1.101 metric 100
1.6. 查看DNS
方法1:
[root@centos7 ~]# cat /etc/resolv.conf
# Generated by NetworkManager
search smartmap
nameserver 218.30.19.50
nameserver 61.134.1.5
2. 修改主机名
方法1:
[root@centos7 ~]# hostnamectl set-hostname appserver.smartmap
[root@centos7 ~]# hostname
appserver.smartmap
[root@centos7 ~]# cat /etc/hostname
192.168.1.110 appserver appserver.smartmap.com
方法2:
[root@centos7 ~]# nmcli general hostname centos7.smartmap
[root@centos7 ~]# hostname
centos7.smartmap
3. 修改IP
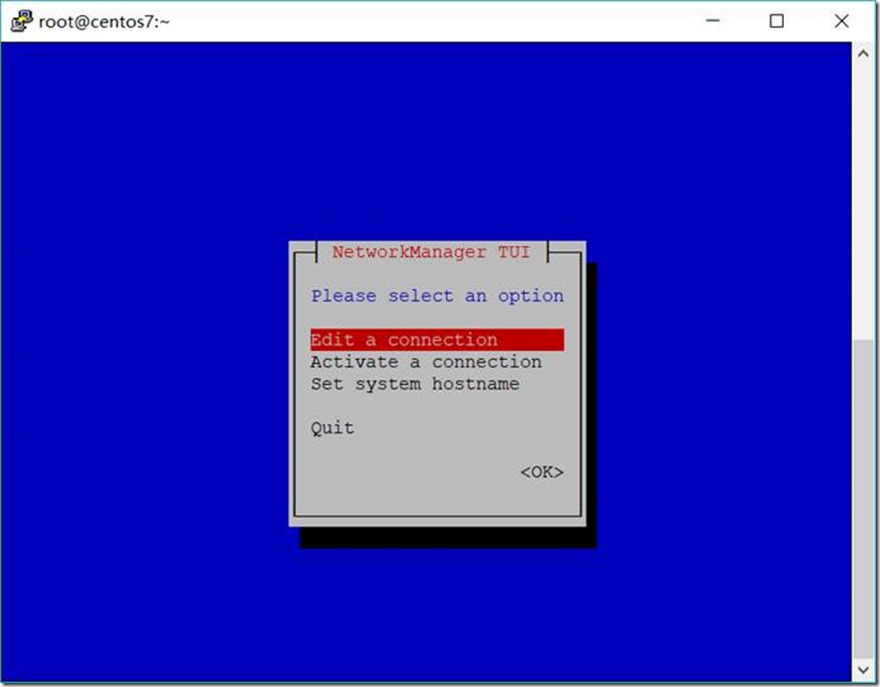
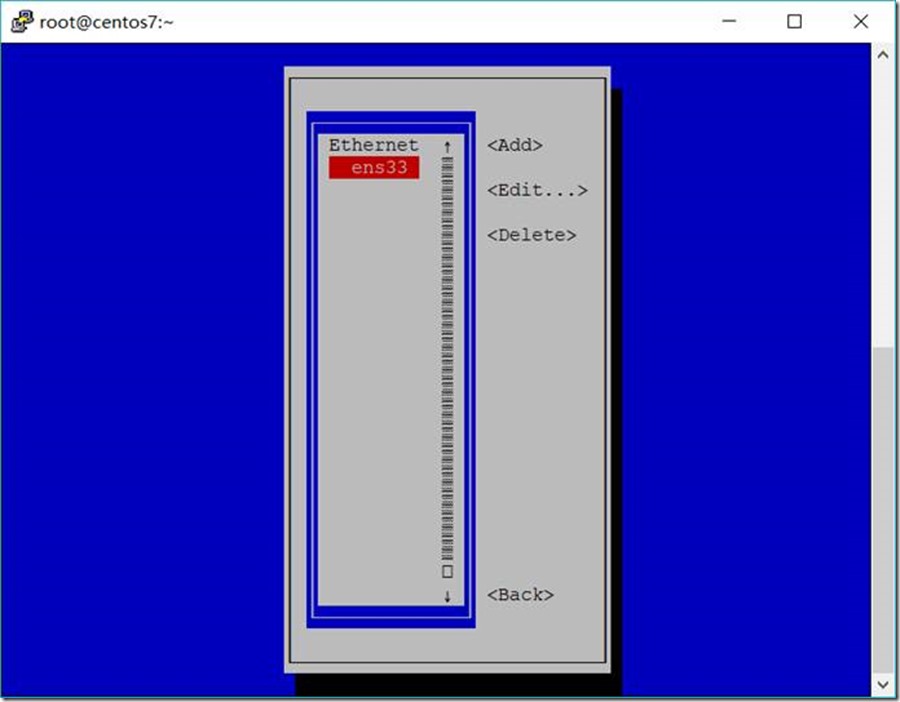
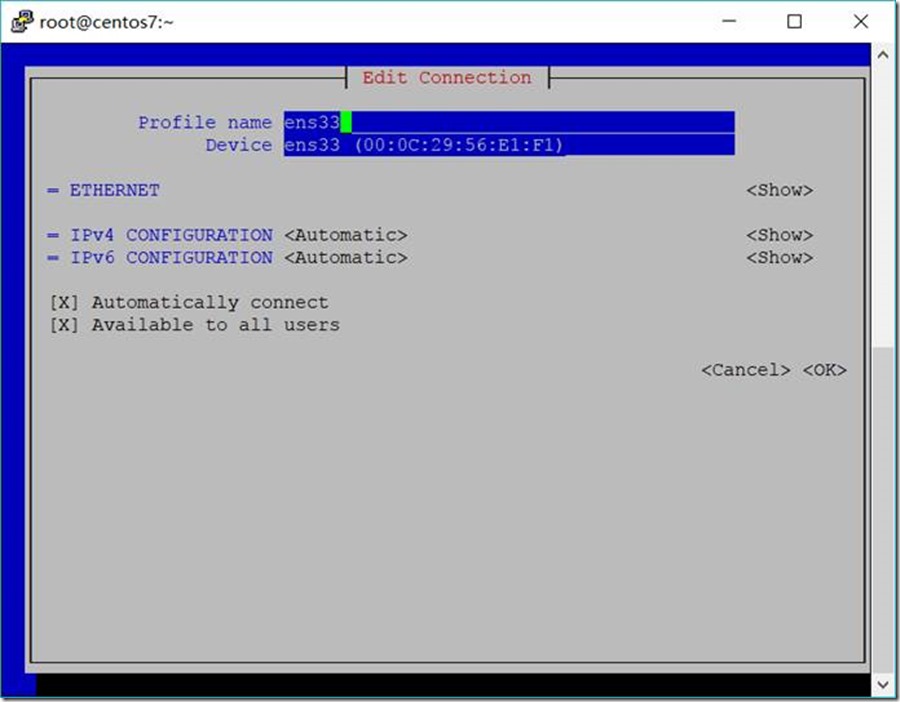
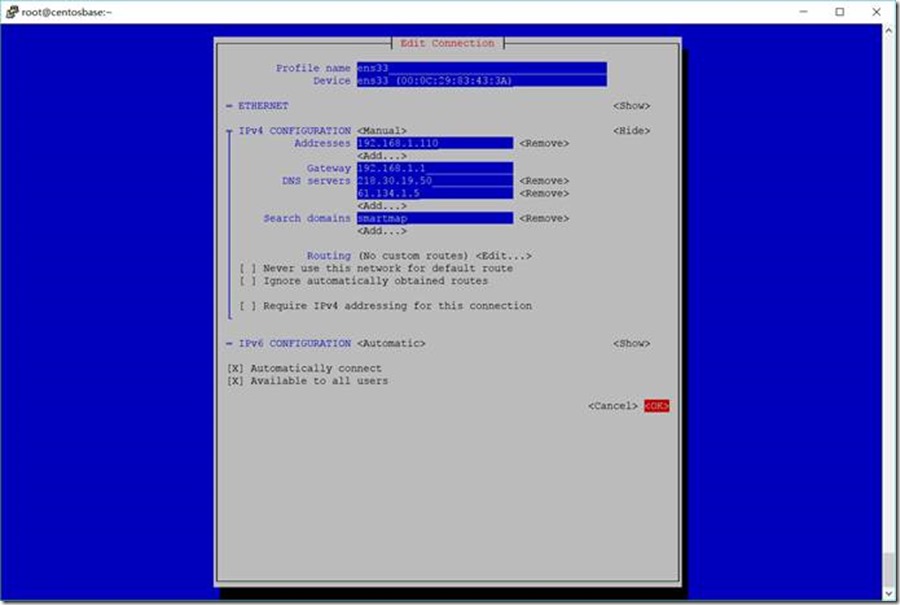
3.1. 应用nmtui的字符界面修改IP:
[root@centos7 ~]# nmtui
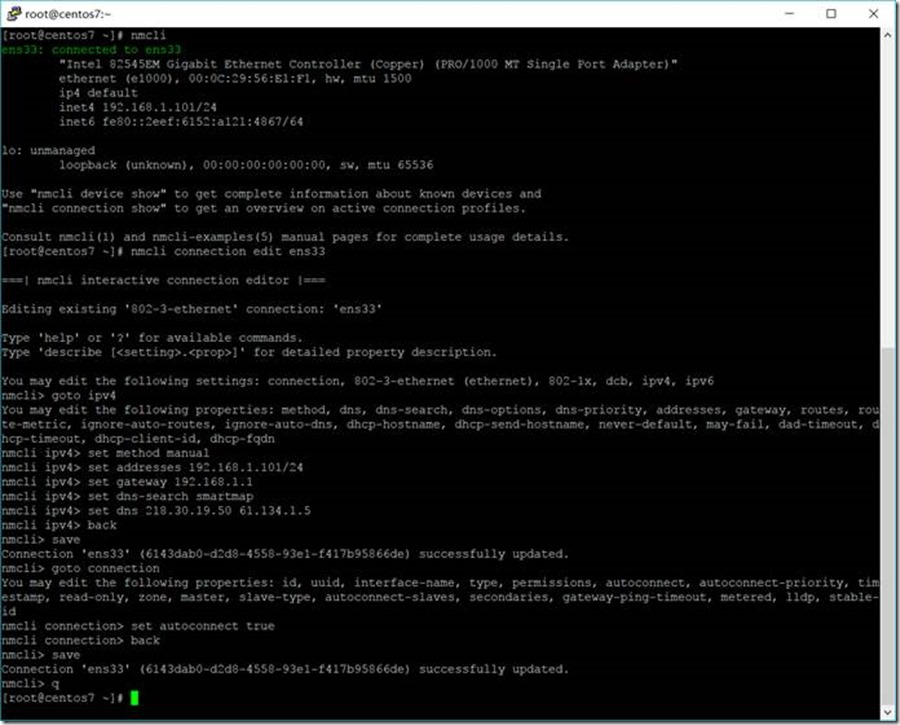
3.2. 应用nmcli的命令修改IP:
[root@centos7 ~]# nmcli
ens33: connected to ens33
"Intel 82545EM Gigabit Ethernet Controller (Copper) (PRO/1000 MT Single Port Adapter)"
ethernet (e1000), 00:0C:29:56:E1:F1, hw, mtu 1500
ip4 default
inet4 192.168.1.101/24
inet6 fe80::2eef:6152:a121:4867/64
lo: unmanaged
loopback (unknown), 00:00:00:00:00:00, sw, mtu 65536
Use "nmcli device show" to get complete information about known devices and
"nmcli connection show" to get an overview on active connection profiles.
Consult nmcli(1) and nmcli-examples(5) manual pages for complete usage details.
[root@centos7 ~]# nmcli connection edit ens33
===| nmcli interactive connection editor |===
Editing existing '802-3-ethernet' connection: 'ens33'
Type 'help' or '?' for available commands.
Type 'describe [<setting>.<prop>]' for detailed property description.
You may edit the following settings: connection, 802-3-ethernet (ethernet), 802-1x, dcb, ipv4, ipv6
nmcli> goto ipv4
You may edit the following properties: method, dns, dns-search, dns-options, dns-priority, addresses, gateway, routes, route-metric, ignore-auto-routes, ignore-auto-dns, dhcp-hostname, dhcp-send-hostname, never-default, may-fail, dad-timeout, dhcp-timeout, dhcp-client-id, dhcp-fqdn
nmcli ipv4> set method manual
nmcli ipv4> set addresses 192.168.1.101/24
nmcli ipv4> set gateway 192.168.1.1
nmcli ipv4> set dns-search smartmap
nmcli ipv4> set dns 218.30.19.50 61.134.1.5
nmcli ipv4> back
nmcli> save
Connection 'ens33' (6143dab0-d2d8-4558-93e1-f417b95866de) successfully updated.
nmcli> goto connection
You may edit the following properties: id, uuid, interface-name, type, permissions, autoconnect, autoconnect-priority, timestamp, read-only, zone, master, slave-type, autoconnect-slaves, secondaries, gateway-ping-timeout, metered, lldp, stable-id
nmcli connection> set autoconnect true
nmcli connection> back
nmcli> save
Connection 'ens33' (6143dab0-d2d8-4558-93e1-f417b95866de) successfully updated.
nmcli> q
查看修改结果
[root@centos7 ~]# cat /etc/sysconfig/network-scripts/ifcfg-ens33
TYPE=Ethernet
BOOTPROTO=none
DEFROUTE=yes
IPV4_FAILURE_FATAL=no
IPV6INIT=yes
IPV6_AUTOCONF=yes
IPV6_DEFROUTE=yes
IPV6_FAILURE_FATAL=no
IPV6_ADDR_GEN_MODE=stable-privacy
NAME=ens33
UUID=6143dab0-d2d8-4558-93e1-f417b95866de
DEVICE=ens33
ONBOOT=yes
DNS1=218.30.19.50
DNS2=61.134.1.5
DOMAIN=smartmap
IPADDR1=192.168.1.101
PREFIX1=32
IPADDR=192.168.1.101
PREFIX=24
GATEWAY=192.168.1.1
IPV6_PEERDNS=yes
IPV6_PEERROUTES=yes
IPV6_PRIVACY=no
4. 重启网卡
[root@centos7 ~]# systemctl restart network.service
5. 关闭selinux
[root@centos7 ~]# getenforce
Disabled
[root@centos7 ~]# vi /etc/sysconfig/selinux
修改SELINUX=enforcing为SELINUX=disabled
# This file controls the state of SELinux on the system.
# SELINUX= can take one of these three values:
# enforcing - SELinux security policy is enforced.
# permissive - SELinux prints warnings instead of enforcing.
# disabled - No SELinux policy is loaded.
SELINUX=disabled
# SELINUXTYPE= can take one of three two values:
# targeted - Targeted processes are protected,
# minimum - Modification of targeted policy. Only selected processes are protected.
# mls - Multi Level Security protection.
SELINUXTYPE=targeted
6. 关闭firewall
[root@centos7 ~]# systemctl status firewalld
● firewalld.service - firewalld - dynamic firewall daemon
Loaded: loaded (/usr/lib/systemd/system/firewalld.service; disabled; vendor preset: enabled)
Active: inactive (dead)
Docs: man:firewalld(1)
[root@centos7 ~]# systemctl stop firewalld.service
[root@centos7 ~]# systemctl disable firewalld.service
Removed symlink /etc/systemd/system/dbus-org.fedoraproject.FirewallD1.service.
Removed symlink /etc/systemd/system/basic.target.wants/firewalld.service.
[root@centos7 ~]# reboot
7. 系统更新
[root@centos7 ~]# yum -y update
参考: http://www.cnblogs.com/panblack/p/Centos7-WhatsNew-02-networking.html
