一、安装Nginx
1)准备 pcre2-10.30.tar.gz。该文件为正则表达式库。让nginx支持rewrite需要安装这个库。
2)准备 nginx-1.14.0.tar.gz。该文件为nginx的linux版本安装文件。
pcre : http://www.pcre.org/
nginx:http://nginx.org/
先安装系统常用的支持库
# yum install -y gcc gdb strace gcc-c++ autoconf libjpeg libjpeg-devel libpng libpng-devel freetype freetype-devel libxml2 libxml2-devel zlib zlib-devel glibc glibc-devel glib2 glib2-devel bzip2 bzip2-devel ncurses ncurses-devel curl curl-devel e2fsprogs patch e2fsprogs-devel krb5-devel libidn libidn-devel openldap-devel nss_ldap openldap-clients openldap-servers libevent-devel libevent uuid-devel uuid mysql-devel
如果出现以下的情况
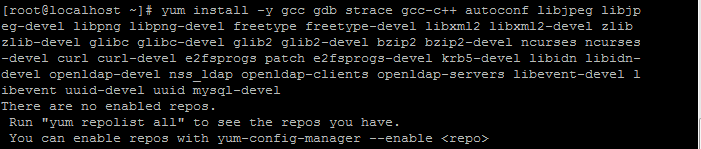
运行命令
[root@localhost ~]# mkdir /media/rhel7-repo-iso
[root@localhost ~]# mount /dev/cdrom /media/rhel7-repo-iso/
结果又出现以下情况,没出现的自行忽略

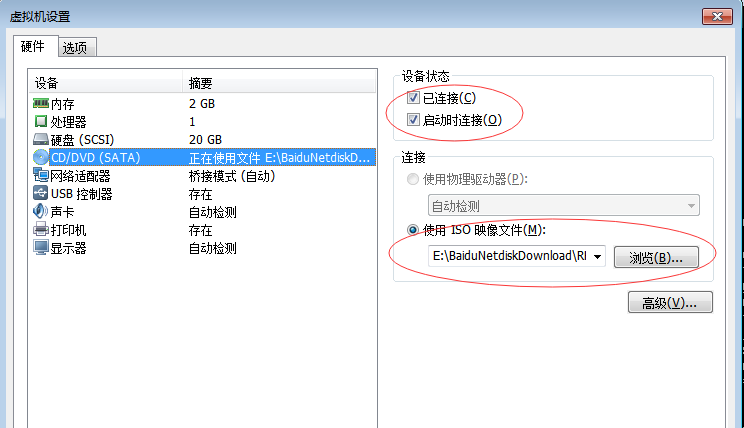
原因是:iso镜像并没有加载到虚拟机系统内。
解决方法:虚拟机设置CD,勾选使用ISO映像文件,选择你的ISO文件路径
继续执行 命令

现在你的iso已经挂载在/media/rhel7-repo-iso/上面了
[root@localhost ~]# vim /etc/yum.repos.d/rhel_7_disc.repo
打开文件输入
[RHEL_7_Disc]
name=RHEL_7_x86_64_Disc
baseurl="file:///media/rhel7-repo-iso/"
gpgcheck=0
保存,然后运行命令
[root@localhost ~]# yum repolist

看到这串东西表示成功了
再来安装系统常用的支持库,结果如下
# yum install -y gcc gdb strace gcc-c++ autoconf libjpeg libjpeg-devel libpng libpng-devel freetype freetype-devel libxml2 libxml2-devel zlib zlib-devel glibc glibc-devel glib2 glib2-devel bzip2 bzip2-devel ncurses ncurses-devel curl curl-devel e2fsprogs patch e2fsprogs-devel krb5-devel libidn libidn-devel openldap-devel nss_ldap openldap-clients openldap-servers libevent-devel libevent uuid-devel uuid mysql-devel

等待安装完成。。。。
解压pcre
# tar -zxvf pcre2-10.30.tar.gz
进入目录
# cd pcre2-10.30
配置
# ./configure
编译
# make
安装
# make install
创建安装目录和日记目录
# mkdir /usr/local/nginx
# mkdir /usr/local/logs
判断系统是否安装了zlib-devel,
# rpm -qa | grep zlib-devel
如果没有安装则使用
# yum install -y zlib-devel
解压
# tar -zvxf nginx-1.14.0.tar.gz
进入目录
# cd nginx-1.14.0.tar.gz
配置,通常将软件安装在/usr/local下面
# ./configure --prefix=/usr/local/nginx --with-http_stub_status_module --with-http_ssl_module --with-http_realip_module
编译安装
# make && make install
检查是否安装成功
# cd /usr/local/nginx/sbin
# ./nginx -t
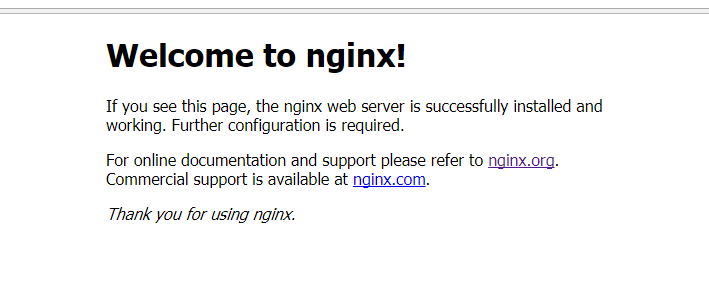
结果显示:

OK,nginx 安装成功
配置防火墙80端口
# vim /etc/sysconfig/iptables
添加配置
-A INPUT -m state --state NEW -m tcp -p tcp --dport 80 -j ACCEPT
重启防火墙
# service iptables restart
注意:如果是Centos 7 或者RHEL 的使用命令 systemctl restart firewalld
否则会出现以下情况

创建并设置nginx运行账号:
groupadd nginx
useradd -M -g nginx -s /sbin/nologin nginx
cd /usr/local/nginx/conf
vim nginx.conf,设置user参数如下:
user nginx nginx
其他配置参数暂时无需改动。
设置nginx为系统服务
vim /lib/systemd/system/nginx.service
文件内容:
[Unit]
Description=nginx
After=network.target
[Service]
Type=forking
ExecStart=/usr/local/nginx/sbin/nginx
ExecReload=/usr/local/nginx/sbin/nginx -s reload
ExecStop=/usr/local/nginx/sbin/nginx -s stop
PrivateTmp=true
[Install]
WantedBy=multi-user.target
设置nginx开机自启动
systemctl enable nginx.service
开启nginx服务:
systemctl start nginx.service
查看nginx是否启动成功:
ps -A | grep nginx
启动nginx(首次启动需:/usr/local/nginx/sbin/nginx -c /usr/local/nginx/conf/nginx.conf)
# cd /usr/local/nginx/sbin
# ./nginx
测试端口
# netstat -na | grep 80
#浏览器测试
http://ip:80
重启nginx
# ./nginx -s reload
防火墙开放80端口(nginx默认使用80端口,可在nginx.conf中配置,若无需进行远程访问则不需要开放端口)
永久开放80端口:
firewall-cmd --zone=public --add-port=80/tcp --permanent
重启防火墙:
firewall-cmd --reload
查看防火墙开启状态:
systemctl status firewalld
查看80端口是否开放成功:
firewall-cmd --zone=public --query-port=80/tcp