自动化运维工具-Ansible基础
自动化运维的含义
1.手动运维时代

2.自动化运维时代

3.自动化运维工具给运维带来的好处

Ansible 基础及安装
1.什么是Ansible
Ansible是一个自动化统一配置管理工具
2.同类型软件对比
1.puppet 学习难,安装ruby环境难,没有远程执行功能
2.ansible 轻量级,大规模环境下只通过ssh会很慢,串行的
3.saltstack 一般选择salt会使用C/S结构的模式,salt-master和salt-minion,并行的,大规模批量操作的情况下,会比Ansible速度快一些,底层使用的是zero-MQ消协队列
Ansible使用的是python2
saltstack即有python2也有python3
Ansible的功能及优点
1.远程执行
批量执行远程命令,可以对多台主机进行远程操作
2.配置管理
批量配置软件服务,可以进行自动化方式配置,服务的统一配置管理,和启停
3.事件驱动
通过Ansible的模块,对服务进行不同的事件驱动
比如:
1)修改配置后重启
2)只修改配置文件,不重启
3)修改配置文件后,重新加载
4)远程启停服务管理
4.管理公有云
通过API接口的方式管理公有云,不过这方面做的不如saltstack.
saltstack本身可以通过saltcloud管理各大云厂商的云平台。
5.二次开发
因为语法是Python,所以便于运维进行二次开发。
6.任务编排
可以通过playbook的方式来统一管理服务,并且可以使用一条命令,实现一套架构的部署
7.跨平台,跨系统
几乎不受到平台和系统的限制,比如安装apache和启动服务
在Ubuntu上安装apache服务名字叫apache2
在CentOS上安装apache服务名字叫httpd
在CentOS6上启动服务器使用命令:/etc/init.d/nginx start
在CentOS7上启动服务器使用命令:systemctl start nginx
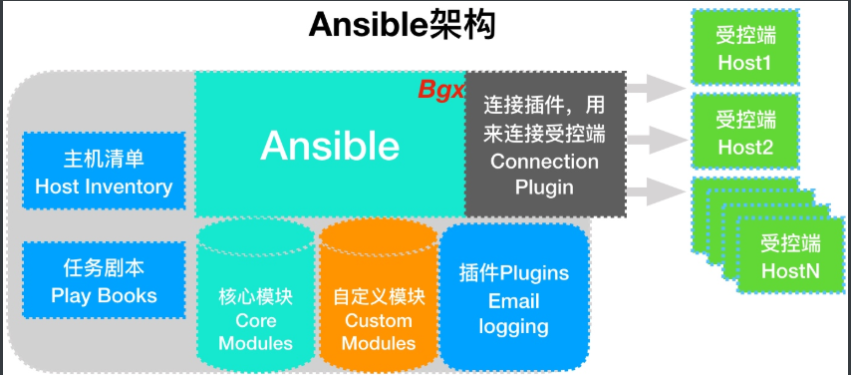
Ansible的架构
1、连接插件connectior plugins用于连接主机 用来连接被管理端
2、核心模块 core modules 连接主机实现操作, 它依赖于具体的模块来做具体的事情
3、自定义模块 custom modules,根据自己的需求编写具体的模块
4、插件 plugins,完成模块功能的补充
5、剧本 playbooks,ansible的配置文件,将多个任务定义在剧本中,由ansible自动执行
6、主机清单 inventor,定义ansible需要操作主机的范围最重要的一点是 ansible是模块化的 它所有的操作都依赖于模块
Ansible的执行流程
1.Ansible读取playbook剧本,剧本中会记录对哪些主机执行哪些任务。
2.首先Ansible通过主机清单找到要执行的主机,然后调用具体的模块。
3.其次Ansible会通过连接插件连接对应的主机并推送对应的任务列表。
4.最后被管理的主机会将Ansible发送过来的任务解析为本地Shell命令执行。
安装Ansible
1.环境准备
| 主机名 | wanIP | lanIP | 角色 |
|---|---|---|---|
| m01 | 10.0.0.61 | 172.16.1.61 | Ansible控制端 |
| web01 | 10.0.0.7 | 172.16.1.7 | Ansible被控端 |
| web02 | 10.0.0.8 | 172.16.1.8 | Ansible被控端 |
2.安装ansible
[root@m01 ~]# yum install -y ansible
3.查看ansible模块及版本
[root@m01 ~]# ansible --version
ansible 2.8.4
  config file = /etc/ansible/ansible.cfg
  configured module search path = [u'/root/.ansible/plugins/modules', u'/usr/share/ansible/plugins/modules']
  ansible python module location = /usr/lib/python2.7/site-packages/ansible
  executable location = /usr/bin/ansible
  python version = 2.7.5 (default, Oct 30 2018, 23:45:53) [GCC 4.8.5 20150623 (Red Hat 4.8.5-36)]
4.ansible参数
# ansible <host-pattern> [options]
--version   #ansible版本信息
-v          #显示详细信息
-i          #主机清单文件路径,默认是在/etc/ansible/hosts
-m          #使用的模块名称,默认使用command模块
-a          #使用的模块参数,模块的具体动作
-k          #提示输入ssh密码,而不使用基于ssh的密钥认证
-C          #模拟执行测试,但不会真的执行
-T          #执行命令的超时
5.ansible配置文件读取顺序
[root@m01 ~]# vim /etc/ansible/ansible.cfg
# nearly all parameters can be overridden in ansible-playbook
# or with command line flags. ansible will read ANSIBLE_CONFIG,
# ansible.cfg in the current working directory, .ansible.cfg in
# the home directory or /etc/ansible/ansible.cfg, whichever it
# finds first

1、$ANSIBLE_CONFIG
2、./ansible.cfg
3、~/.ansible.cfg
4、/etc/ansible/ansible.cfg
ansible配置文件
#inventory      = /etc/ansible/hosts      #主机列表配置文件
#library        = /usr/share/my_modules/  #库文件存放目录
#remote_tmp     = ~/.ansible/tmp          #临时py文件存放在远程主机目录
#local_tmp      = ~/.ansible/tmp          #本机的临时执行目录
#forks          = 5                       #默认并发数
#sudo_user      = root                    #默认sudo用户
#ask_sudo_pass = True                     #每次执行是否询问sudo的ssh密码
#ask_pass      = True                     #每次执行是否询问ssh密码
#remote_port    = 22                      #远程主机端口
host_key_checking = False                 #跳过检查主机指纹
log_path = /var/log/ansible.log           #ansible日志

#普通用户提权操作
[privilege_escalation]
#become=True
#become_method=sudo
#become_user=root
#become_ask_pass=False
ansible Inventory(主机清单文件)
/etc/ansible/hosts 是ansible 默认主机资产清单文件,用于定义被管理机的认证信息,例如ssh登录用户名、密码、以及key相关信息。Inventory文件中填写需要被管理的主机与主机组信息。还可以自定义Inventory 主机清单的位置,使用-i 指定文件位置即可。
场景一:密码方式连接
[root@m01 ~]# cat /etc/ansible/hosts

#方式一、IP+端口+用户+密码
[webs]
10.0.0.7 ansible_ssh_port=22 ansible_ssh_user=root ansible_ssh_pass='1'
10.0.0.8 ansible_ssh_port=22 ansible_ssh_user=root ansible_ssh_pass='1'

#方式二、主机名+密码
[webs]
web0[1:2] ansible_ssh_pass='123456'

#方式三、主机+密码
[webs]
web0[1:2]
[webs:vars]
ansible_ssh_pass='123456'

注意:方式二和方式三,都需要做hosts解析
场景二:密钥方式连接,需要先创建公钥和私钥,并下发公钥至被控端
#创建密钥对
[root@m01 ~]# ssh-keygen
#推送公钥
[root@m01 ~]# ssh-copy-id -i ~/.ssh/id_rsa.pub root@172.16.1.7
[root@m01 ~]# ssh-copy-id -i ~/.ssh/id_rsa.pub root@172.16.1.8

#方式一:主机+端口+密钥
[web_group]
172.16.1.7
172.16.1.8

#方式二:别名+主机+端口+密钥
[webs]
web01 ansible_ssh_host=172.16.1.7
web02 ansible_ssh_host=172.16.1.8
场景三:主机组定义方式
[root@m01 ~]# vim hosts
[web_group]
web01 ansible_ssh_host=172.16.1.7
web02 ansible_ssh_host=172.16.1.8

[db_group]
db01 ansible_ssh_host=172.16.1.51
lb01 ansible_ssh_host=172.16.1.5
[db_group:vars]
ansible_ssh_pass='1'

[nfs_group]
nfs ansible_ssh_host=172.16.1.31
#定义多组,多组汇总整合
[nfs_server:children]
web_group
nfs_group

[lnmp:children]
web_group
db_group

#查看所有主机数量
[root@m01 ~]# ansible 'all' --list-host
  hosts (5):
    nfs
    web01
    web02
    db01
    lb01
[root@m01 ~]# ansible 'web_group' --list-host
  hosts (2):
    web01
    web02
[root@m01 ~]# ansible 'db_group' --list-host
  hosts (2):
    db01
    lb01
[root@m01 ~]# ansible 'lnmp' --list-host
  hosts (4):
    web01
    web02
    db01
    lb01
Ansible ad-hoc
1.什么是AD-HOC
ad-hoc 简而言之就是临时命令,执行完即结束,并不会保存
2.ad-hoc模式的使用场景
比如在多台机器上查看某个进程是否启动,或拷贝指定文件到本地,等等。
3.ad-hoc模式的命令使用

ad-hoc 执行结果返回颜色说明
绿色: 代表被管理端主机没有被修改,或者只是对远程节点信息进行查看
黄色: 代表被管理端主机发现变更
红色: 代表出现了故障,注意查看提示
紫色:表示对命令执行发出警告信息(可能存在的问题,给你一下建议)
ansible常用模块
1.command命令模块
# 默认模块, 执行命令
[root@m01 ~]# ansible 'web_group'  -a "hostname"

# 如果需要一些管道操作,则使用shell
[root@m01 ~]# ansible 'web_group' -m shell -a "ifconfig|grep eth0" -f 50

# -f =forks   /etc/ansible/ansible.cfg #结果返回的数量

[root@m01 ~]# ansible 'web_group' -m command -a 'free -m'
web02 | CHANGED | rc=0 >>
              total        used        free      shared  buff/cache   available
Mem:            972         140         489           7         342         658
Swap:          1023           0        1023

web01 | CHANGED | rc=0 >>
              total        used        free      shared  buff/cache   available
Mem:            972         113         412          13         446         669
Swap:          1023           0        1023
2.shell
[root@m01 ~]# ansible 'web_group' -m shell -a 'ps -ef|grep nginx'
web02 | CHANGED | rc=0 >>
root      12584  12583  0 20:16 pts/1    00:00:00 /bin/sh -c ps -ef|grep nginx
root      12586  12584  0 20:16 pts/1    00:00:00 grep nginx

web01 | CHANGED | rc=0 >>
root      14575  14570  0 12:16 pts/1    00:00:00 /bin/sh -c ps -ef|grep nginx
root      14577  14575  0 12:16 pts/1    00:00:00 grep nginx
注意:
1)command不支持特殊符号
2)shell模块支持特殊符号
3)不指定-m 默认使用的是command模块
3.script脚本模块
#编写脚本
[root@m01 ~]# vim vsftpd.sh
#!/usr/bin/bash
mkdir /tmp/zls

#在本地运行模块,等同于在远程执行,不需要将脚本文件进行推送目标主机执行
[root@m01 ~]# ansible 'web01' -m script -a '/root/vsftpd.sh'
[root@m01 ~]# ansible 'web01' -m shell -a 'ls -l /tmp'
4.yum安装软件模块
[root@m01 ~]# ansible 'web_group' -m yum -a 'name=vsftpd state=present'
#相当于:yum install -y vsftpd

[root@m01 ~]# ansible 'web_group' -m yum -a 'name=https://mirrors.aliyun.com/zabbix/zabbix/4.0/rhel/7/x86_64/zabbix-agent-4.0.0-2.el7.x86_64.rpm state=present'
#相当于:yum install -y https://mirrors.aliyun.com/zabbix/zabbix/4.0/rhel/7/x86_64/zabbix-agent-4.0.0-2.el7.x86_64.rpm

[root@m01 ~]# ansible 'web_group' -m yum -a 'name=file:///root/nagios-4.4.3-1.el7.x86_64.rpm state=present'
#相当于:yum localinstall -y nagios-4.4.3-1.el7.x86_64.rpm

[root@m01 ~]# ansible 'web_group' -m yum -a 'name=vsftpd state=absent'
#相当于:yum remove -y vsftpd

name
    httpd                       #指定要安装的软件包名称
    file://                     #指定本地安装路径(yum localinstall 本地rpm包)
    http://                     #指定yum源(从远程仓库获取rpm包)

state                           #指定使用yum的方法
    installed,present           #安装软件包
    removed,absent              #移除软件包
    latest                      #安装最新软件包
5.yum_repository
- name: Add repository
  yum_repository:
    name: epel
    description: EPEL YUM repo
    baseurl: https://download.fedoraproject.org/pub/epel/$releasever/$basearch/


#添加yum仓库
ansible 'web_group' -m yum_repository -a 'name=zls_epel  description=EPEL baseurl=https://download.fedoraproject.org/pub/epel/$releasever/$basearch/ gpgcheck=no enabled=yes file=zls_epel'

#添加mirrorlist
ansible 'web_group' -m yum_repository -a 'name=zls_epel  description=EPEL baseurl=https://download.fedoraproject.org/pub/epel/$releasever/$basearch/ gpgcheck=no enabled=yes file=epel mirrorlist=http://mirrorlist.repoforge.org/el7/mirrors-rpmforge'

#删除yum仓库
ansible 'web_group' -m yum_repository -a 'name=zls_epel,zls_base file=zls_epel state=absent'

#修改yum仓库
ansible 'web_group' -m yum_repository -a 'name=epel  description=EPEL baseurl=https://download.fedoraproject.org/pub/epel/$releasever/$basearch/ gpgcheck=no enabled=no file=epel'

name 				#指定仓库名字
description			#添加描述(repo文件中的name)
baseurl				#指定yum仓库的地址
gpgcheck			#是否开启校验
	yes
	no
enabled				#是否启用yum仓库
	yes
	no
file				#指定仓库文件名
state
	absent			#删除yum仓库
	present			#创建yum仓库


ansible 'web_group' -m yum_repository -a 'name=zls_yum  description=EPEL baseurl=http://www.driverzeng.com gpgcheck=no enabled=no file=zls'
ansible文件管理模块
1.copy
- name: Copy file with owner and permissions
copy:
src: /srv/myfiles/foo.conf
dest: /etc/foo.conf
owner: foo
group: foo
mode: '0644'
#推送文件
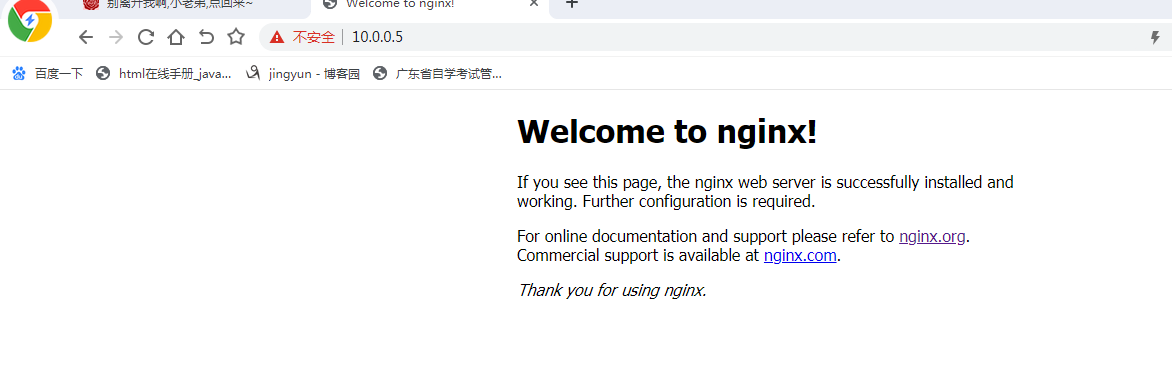
[root@m01 ~]# ansible 'web_group' -m copy -a 'src=/root/index.html dest=/var/www/html owner=root group=root mode=0644'
#推送文件并备份
[root@m01 ~]# ansible 'web_group' -m copy -a 'src=/root/index.html dest=/var/www/html owner=root group=root mode=0644 backup=yes'
#编辑nfs配置文件
[root@m01 ~]# ansible 'web_group' -m copy -a 'content="/data 172.16.1.0/24(rw,sync,all_squash,anonuid=666,anongid=666)" dest=/etc/exports'
src #指定推送的源文件
dest #指定推送的目标位置
owner #指定属主
group #指定属组
mode #指定权限(数字方式)
content #在指定文件中添加内容
backup #是否备份(注意:控制端和被控端,内容不一致才会备份)
yes
no
2.file文件配置模块
- name: Create an insecure file
  file:
    path: /work
    owner: root
    group: root
    mode: 0755

#创建目录 mkdir
[root@m01 ~]# ansible 'web_group' -m file -a 'path=/backup state=directory owner=adm group=adm mode=0700'

#递归创建目录并授权chown -R  chmod -R
[root@m01 ~]# ansible 'web_group' -m file -a 'path=/zls/mysql/db01 state=directory owner=adm group=adm mode=0700 recurse=yes'

#创建文件(前提条件,上级目录必须存在)  touch
[root@m01 ~]# ansible 'web_group' -m file -a 'path=/root/zls.txt state=touch'

#删除目录  rm -fr
[root@m01 ~]# ansible 'web_group' -m file -a 'path=/backup state=absent'

#做软链接 ln -s
[root@m01 ~]# ansible 'web_group' -m file -a 'src=/root/zls.txt dest=/root/zls.txt.ori state=link'

src					#指定软链接的源文件
dest				#指定软连接的目标文件
path				#指定创建目录或文件
state
	touch			#创建文件
	directory		#创建目录
	absent			#删除目录或文件
	link			#做软链接
owner				#指定属主
group				#指定属组
mode				#指定权限
recurse				#递归授权
	yes
	no
3.get_url服务模块
- name: Download foo.conf
  get_url:
    url: http://example.com/path/file.conf
    dest: /etc/foo.conf
    mode: '0440'

#下载worldpress代码
[root@m01 ~]# ansible 'web_group' -m get_url -a 'url=http://test.driverzeng.com/Nginx_Code/wordpress-5.0.3-zh_CN.tar.gz dest=/root mode=0777'

#下载并校验MD5
[root@m01 ~]# ansible 'web_group' -m get_url -a 'url=http://test.driverzeng.com/Nginx_Code/test.txt dest=/root mode=0777 checksum=md5:ba1f2511fc30423bdbb183fe33f3dd0f'

url				#指定下载文件的url
dest			#指定下载的位置
mode			#指定下载后的权限
checksum		#校验
	md5			#md5校验
	sha256		#sha256校验
ansible服务管理模块
1.service,systemd
[root@m01 ~]# ansible 'web_group' -m systemd -a 'name=httpd state=stopped enabled=yes'
[root@m01 ~]# ansible 'web_group' -m systemd -a 'name=httpd state=started enabled=yes'
[root@m01 ~]# ansible 'web_group' -m systemd -a 'name=httpd state=restarted enabled=yes'
[root@m01 ~]# ansible 'web_group' -m systemd -a 'name=httpd state=reloaded enabled=yes'

name					#指定服务名称
state
	started				#启动
	stopped				#停止
	restarted			#重启
	reloaded			#重载
enabled					#是否开机自启
	yes
	no
ansible用户管理模块
1.group
- name: Ensure group "somegroup" exists
  group:
    name: somegroup
    state: present

#创建组
[root@m01 ~]# ansible 'web_group' -m group -a 'name=www gid=666 state=present'

#删除组
[root@m01 ~]# ansible 'web_group' -m group -a 'name=www gid=666 state=absent'

name			#指定组名
gid				#指定gid
state
	present		#创建
	absent		#删除
2.user
- name: Create a 2048-bit SSH key for user jsmith in ~jsmith/.ssh/id_rsa
  user:
    name: jsmith
    generate_ssh_key: yes
    ssh_key_bits: 2048
    ssh_key_file: .ssh/id_rsa

#创建用户
[root@m01 ~]# ansible 'web_group' -m user -a 'name=www uid=666 group=www state=present shell=/sbin/nologin create_home=false'

#删除用户
[root@m01 ~]# ansible 'web_group' -m user -a 'name=www uid=666  state=absent'

#创建用户的同时创建密钥对
[root@m01 ~]# ansible 'web_group' -m user -a 'name=zls generate_ssh_key=yes ssh_key_bits=2048 ssh_key_file=.ssh/id_rsa'

name					#指定用户名
uid						#指定uid
group					#指定属组
groups					#指定附加组
state
	present				#创建用户
	absent				#删除用户
shell					#指定用户登录的shell
	/bin/bash
	/sbin/nologin
create_home				#是否创建家目录
	true
	false
comment					#添加注释
generate_ssh_key		#创建密钥对
ssh_key_bits			#指定密钥对长度
ssh_key_file			#指定密钥文件
实战
写主机清单,一键部署rsync,nfs,nginx,httpd,上传作业代码
1.配置主机
[root@m01 ~]# yum install -y ansible
#创建密钥对
[root@m01 ~]# ssh-keygen
#推送公钥
[root@m01 ~]# ssh-copy-id -i ~/.ssh/id_rsa.pub root@172.16.1.7
[root@m01 ~]# ssh-copy-id -i ~/.ssh/id_rsa.pub root@172.16.1.8
[root@m01 ~]# ssh-copy-id -i ~/.ssh/id_rsa.pub root@172.16.1.9
[root@m01 ~]# ssh-copy-id -i ~/.ssh/id_rsa.pub root@172.16.1.31
[root@m01 ~]# ssh-copy-id -i ~/.ssh/id_rsa.pub root@172.16.1.41
[root@m01 ~]# ssh-copy-id -i ~/.ssh/id_rsa.pub root@172.16.1.51
[root@m01 ~]# ssh-copy-id -i ~/.ssh/id_rsa.pub root@172.16.1.52
[root@m01 ~]# ssh-copy-id -i ~/.ssh/id_rsa.pub root@172.16.1.5
[root@m01 ~]# ssh-copy-id -i ~/.ssh/id_rsa.pub root@172.16.1.6
[root@m01 ~]# ssh-copy-id -i ~/.ssh/id_rsa.pub root@172.16.1.61
2.编写主机清单
[web_group]
gjy_web01 ansible_ssh_host=172.16.1.7
gjy_web02 ansible_ssh_host=172.16.1.8
gjy_web03 ansible_ssh_host=172.16.1.9

[db_group]
gjy_db01 ansible_ssh_host=172.16.1.51
gjy_db02 ansible_ssh_host=172.16.1.52

[nfs_group]
gjy_nfs ansible_ssh_host=172.16.1.31

[backup_group]
gjy_backup ansible_ssh_host=172.16.1.41

[daili_group]
gjy_lb01 ansible_ssh_host=172.16.1.5
gjy_lb02 ansible_ssh_host=172.16.1.6

[m01]
gjy_m01 ansible_ssh_host=172.16.1.61

[rsync_server:children]
nfs_group
backup_group

[nfs_server:children]
web_group
nfs_group

[lnmp_server:children]
web_group
daili_group
3.先编写一个比较low的脚本测试下
#!/bin/bash
#创建用户及组
ansible 'all' -m group -a 'name=www gid=666 state=present' &&
ansible 'all' -m user -a 'name=www uid=666 group=www state=present shell=/sbin/nologin create_home=false' &&
#部署httpd服务
ansible 'web_group' -m yum -a 'name=httpd,php state=present' &&
#替换http服务启动用户及组
ansible 'web_group' -m shell -a "sed -i '/^User/c User www' /etc/httpd/conf/httpd.conf" &&
ansible 'web_group' -m shell -a "sed -i '/^Group/c Group www' /etc/httpd/conf/httpd.conf" &&
#启动httpd服务
ansible 'web_group' -m systemd -a 'name=httpd state=started enabled=yes' &&
#上传代码,并修改图片路径
ansible 'web_group' -m copy -a 'src=/root/httpd_file/ dest=/var/www/html/ owner=www group=www '
#远程推送作业代码
ansible 'web_group' -m file -a 'path=/var/www/html/uploads state=directory owner=www group=www' &&
#部署nfs服务
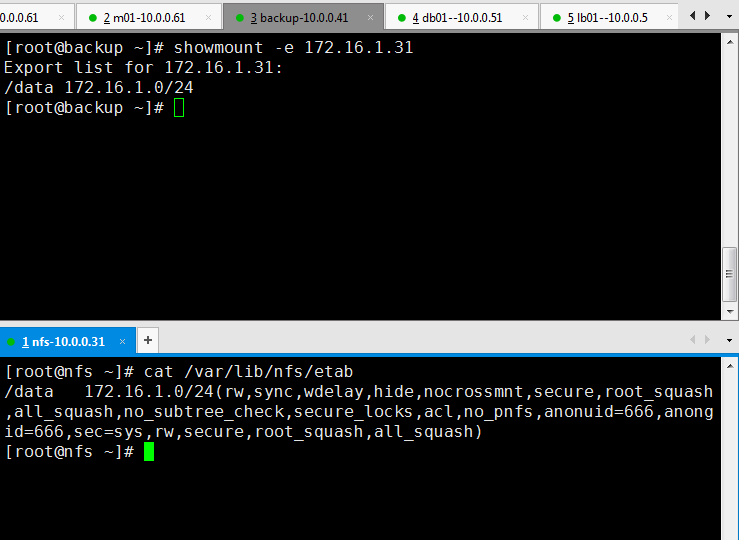
ansible 'nfs_server' -m yum -a 'name=nfs-utils state=present' &&
#推送nfs服务配置文件
ansible 'nfs_group' -m copy -a 'content="/data 172.16.1.0/24(rw,sync,all_squash,anonuid=666,anongid=666)" dest=/etc/exports' &&
#启动nfs服务并开机自启
ansible 'nfs_server' -m systemd -a 'name=nfs-server state=started enabled=yes' &&
#远程下载rsync服务
ansible 'rsync_server' -m yum -a 'name=rsync state=present' &&
#推送rsync配置文件
ansible 'backup_group' -m copy -a 'src=/root/rsync_file dest=/etc/rsyncd.conf' &&
#推送密码文件至rsync服务端
ansible 'backup_group' -m copy -a 'content=rsync_backup:123 dest=/etc/rsync.passwd mode=0600' &&
#推送密码文件至rsync客户端
ansible 'nfs_group' -m copy -a 'content=123 dest=/etc/rsync.pass mode=0600' &&
#启动rsync服务,并加入开机自启
ansible 'rsync_server' -m systemd -a 'name=rsyncd state=started enabled=yes' &&
#远程下载mariadb服务
ansible 'db_group' -m yum -a 'name=mariadb-server state=present' &&
#启动并加入开机自启
ansible 'db_group' -m systemd -a 'name=mariadb state=started enabled=yes' &&
#推送nginx 官方源
ansible 'lnmp_server' -m copy -a 'src=/etc/yum.repos.d/nginx.repo dest=/etc/yum.repos.d/' &&
#远程下载nginx
ansible 'lnmp_server' -m yum -a 'name=nginx state=present' &&
#远程修改nginx配置文件
ansible 'lnmp_server' -m shell -a "sed -i '/^user/c user www;' /etc/nginx/nginx.conf" &&
#启动nginx
ansible 'lnmp_server' -m systemd -a 'name=nginx state=started enabled=yes'
4.写与脚本对应的配置文件
[root@m01 ~]# vim /root/rsync_file
uid = www
gid = www
port = 873
fake super = yes
use chroot = no
max connections = 200
timeout = 600
ignore errors
read only = false
list = false
auth users = rsync_backup
secrets file = /etc/rsync.passwd
log file = /var/log/rsyncd.log
#####################################
[backup]
comment = welcome to oldboyedu backup!
path = /backup
[data]
comment = welcome to oldboyedu nfs!
path = /data

#传作业压缩包到目录里,并解压修改上传图片路径
[root@m01 ~]# cd httpd_file

#编写nginx官方源
[root@m01 ~]# vim /etc/yum.repos.d/nginx.repo
[nginx]
name=nginx repo
baseurl=http://nginx.org/packages/centos/7/$basearch/
gpgcheck=0
enabled=1
5.执行脚本
测试:1.web上http服务,上传作业代码

2.lb_group,nginx服务
3.测试db_group ,mysql服务
4.测试nfs配置
5.测试rsync服务