Celery介绍和基本使用
Celery 是一个 基于python开发的分布式异步消息任务队列,通过它可以轻松的实现任务的异步处理, 如果你的业务场景中需要用到异步任务,就可以考虑使用celery。举几个实例场景中可用的例子:
- 你想对100台机器执行一条批量命令,可能会花很长时间 ,但你不想让你的程序等着结果返回,而是给你返回 一个任务ID,你过一段时间只需要拿着这个任务id就可以拿到任务执行结果, 在任务执行ing进行时,你可以继续做其它的事情。
- 你想做一个定时任务,比如每天检测一下你们所有客户的资料,如果发现今天 是客户的生日,就给他发个短信祝福
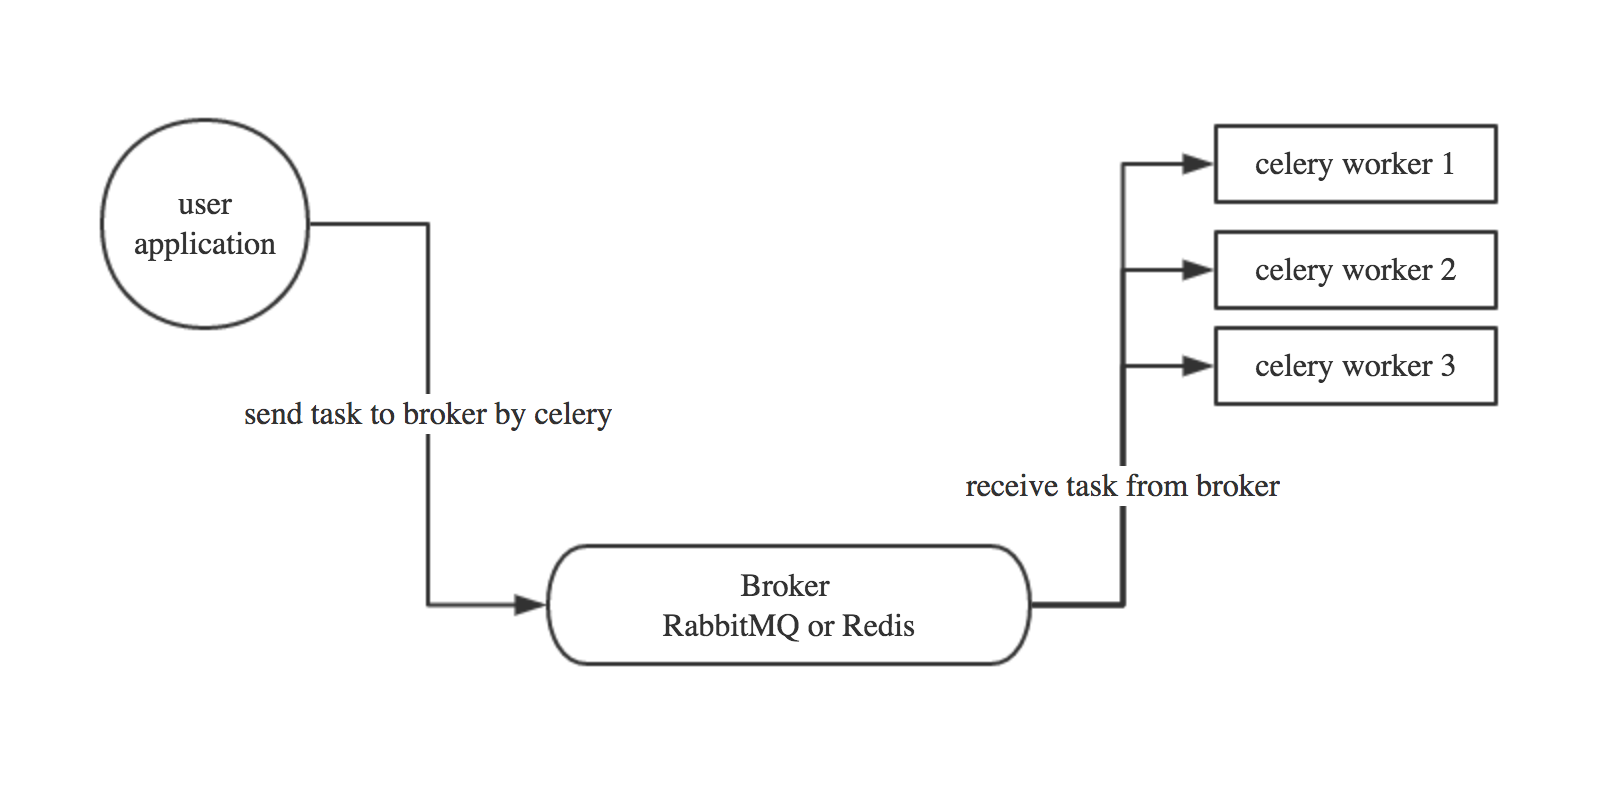
Celery 在执行任务时需要通过一个消息中间件来接收和发送任务消息,以及存储任务结果, 一般使用rabbitMQ or Redis,
1.1 Celery有以下优点:
- 简单:一单熟悉了celery的工作流程后,配置和使用还是比较简单的
- 高可用:当任务执行失败或执行过程中发生连接中断,celery 会自动尝试重新执行任务
- 快速:一个单进程的celery每分钟可处理上百万个任务
- 灵活: 几乎celery的各个组件都可以被扩展及自定制
Celery基本工作流程图

简单实用下celery
1.部署环境如下:
user application: 172.16.1.120 安装celery redis(2.10.6版本)模块
celery work: 172.16.1.121 安装celery redis(2.10.6版本)模块
broker: 172.16.1.11 安装redis服务
2.user application和celery work都需要安装celery和redis模块,注意redis模块要用2.10.6版本
pip3  install  celery
pip3  install  redis==2.10.6
broker安装redis服务如下:
wget  http://download.redis.io/releases/redis-4.0.11.tar.gz
tar  xf  redis-4.0.11.tar.gz
make
make   install
cp  redis.conf   /etc/
vim  /etc/redis.conf
#设置远程redis需要的密码
requirepass 123456
#设置redis服务监听的ip地址
bind 0.0.0.0
#设置后台启动
daemonize yes

#启动redis服务
redis-server /etc/redis.conf
3.在user application和celery work端创建相同的python脚本 celery_test.py
[root@goser1 ~]# cat celery_test.py
from celery import Celery
import  time

app = Celery('tasks',
             broker='redis://:123456@172.16.1.11',
             backend='redis://:123456@172.16.1.11'
             )
@app.task
def add(x,y):
    print("running...",x,y)
    return x+y
@app.task
def cmd():
    print("cmd runing....")
4.在worker端启动celery worker,在user application端通过redis服务将数据发送给远程worker调用并执行,worker执行完成后再将数据返回到redis服务中,这时候user application端使用get()方法就可以从redis服务中获取worker执行的结果。
#在worker端启动celery  worker
[root@goser2 ~]# celery -A  celery_test  worker -l  info
#在user application端调用远程worker
[root@goser1 ~]# python3
>>> from  celery_test import add
>>> result = add.delay(32,32)
>>> result.get()
64
5.在redis服务中验证user application和celery work端之间通信的key
[root@linux-node1 ~]# redis-cli  -h 127.0.0.1  -a 123456
127.0.0.1:6379> keys *
1) "age"
2) "_kombu.binding.celery.pidbox"
3) "celery-task-meta-c3a0dac5-17e1-4ede-b7a8-9f1f386cdd21"
4) "celery-task-meta-010990c8-a39d-4511-aa71-9c43a95f958b"
5) "celery-task-meta-9bec0926-58f6-4438-8f22-7fbbb2058639"
6.如果work执行的时候很长的话,这时候在user application端通过get()获取可能会卡住,可以通过result = ready()来判断work端是否执行完毕,如果没有执行完成返回的是false,如果执行完成返回的就是true。这样user application端在通过get()获取就没问题了
如何在项目中如何使用celery
1.创建一个项目CeleryProject,在项目中创建__init__.py,celery.py,tasks.py文件
#创建项目
[root@goser2 ~]# mkdir CeleryProject
#在项目中创建celery文件和task文件如下
[root@goser2 CeleryProject]# touch __init__.py
[root@goser2 CeleryProject]# vim  celery.py

from __future__ import absolute_import, unicode_literals
#导入的是celery模块的Celery方法,因为上面引用的是绝对路径模块absolute_import
from celery import Celery

app = Celery('proj',
             broker='redis://:123456@172.16.1.11',
             backend='redis://:123456@172.16.1.11',
             #include表示使用项目下的tasks名称定义的事务
             include=['CeleryProject.tasks'])

# Optional configuration, see the application user guide.
app.conf.update(
    result_expires=3600, #定义worker执行结果的过期时间
)

if __name__ == '__main__':
    app.start()

#创建tasks事务模块
[root@goser2 CeleryProject]# vim  tasks.py

from __future__ import absolute_import, unicode_literals
from .celery import app


@app.task
def add(x, y):
    return x + y


@app.task
def mul(x, y):
    return x * y


@app.task
def xsum(numbers):
    return sum(numbers)
2.启动worker并让user application端远程调用work执行的结果
#退回到项目的上级目录
[root@goser2 CeleryProject]# cd ..
#启动一个worker,注意这是对整个项目启动一个worker
[root@goser2 ~]# celery -A CeleryProject worker -l  info
#在user application端远程调用worker的执行结果,首先将项目传到user application端
[root@goser2 ~]# tar  tf  celerypro.tar.gz
[root@goser2 ~]# scp  celerypro.tar.gz 172.16.1.120:/root/
#user application端解压项目,并执行
[root@goser1 ~]# tar  xf  celerypro.tar.gz
[root@goser1 ~]# python3
>>> from CeleryProject import tasks
>>> result = tasks.xsum.delay([23,3,34,5,12,34])
>>> result.get()
111
后台启动celery worker
#后天启动使用multi start 方式,比如启动两个worker为w1和w2
[root@goser2 ~]# celery multi start w1 -A CeleryProject -l info
[root@goser2 ~]# celery multi start w2 -A CeleryProject -l info

#停止后台worker方式为
[root@goser2 ~]# celery multi  stop  w1

#还是等待worker执行完成后再停止,使用stopwait
[root@goser2 ~]# celery multi stopwait  w2
Celery 定时任务
celery支持定时任务,设定好任务的执行时间,celery就会定时自动帮你执行, 这个定时任务模块叫celery beat
1.创建一个定时任务的脚本periodic_task.py
[root@goser2 ~]# vim CeleryProject/periodic_task.py
from __future__ import absolute_import, unicode_literals
from celery.schedules import crontab
from .celery import app


@app.on_after_configure.connect
def setup_periodic_tasks(sender, **kwargs):
    # Calls test('hello') every 10 seconds.
    sender.add_periodic_task(10.0, test.s('hello'), name='add every 10')

    # Calls test('world') every 30 seconds
    sender.add_periodic_task(30.0, test.s('world'), expires=10)

    # Executes every Monday morning at 7:30 a.m.
    sender.add_periodic_task(
        crontab(hour=7, minute=30, day_of_week=1),
        test.s('Happy Mondays!'),
    )

@app.task
def test(arg):
    print(arg)
2.将这个定时任务调价到celery.py文件中,修改如下:
[root@goser2 ~]# cat CeleryProject/celery.py
from __future__ import absolute_import, unicode_literals
from celery import Celery

app = Celery('proj',
             broker='redis://:123456@172.16.1.11',
             backend='redis://:123456@172.16.1.11',
             include=['CeleryProject.tasks','CeleryProject.periodic_task'])

# Optional configuration, see the application user guide.
app.conf.update(
    result_expires=3600,
)

if __name__ == '__main__':
    app.start()
3.启动worker
[root@goser2 ~]# celery -A CeleryProject worker -l info
4.启动任务调度器 celery beat, 通过任务调度器定时地向worker发送任务
[root@goser1 ~]# celery -A CeleryProject.periodic_task beat -l info
5.当然还可在periodic_task.py脚本中使用配置文件的形式定义定时任务,比如修改periodic_task.py脚本如下:
[root@goser2 ~]# vim  CeleryProject/periodic_task.py
from __future__ import absolute_import, unicode_literals
from celery.schedules import crontab
from .celery import app

app.conf.beat_schedule = {
    'add-every-10-seconds': {
        'task': 'CeleryProject.tasks.add',
        'schedule': 10.0,
        'args': (16, 16)
    },
    'add-every-monday-morning': {
        'task': 'CeleryProject.tasks.mul',
        'schedule': crontab(hour=23, minute=56, day_of_week=2),
        'args': (16, 16),
    },
}
app.conf.timezone = 'Asia/Shanghai'

@app.task
def test(arg):
    print(arg)
接下来启动worker和celery beat,这样就可以根据配置文件的格式来定时地处理事务。
[root@goser2 ~]# celery  -A  CeleryProject worker  -l info
[root@goser1 ~]# celery -A CeleryProject.periodic_task beat -l info
最佳实践之与django结合
django 可以轻松跟celery结合实现异步任务,只需通过以下几步简单配置即可,当然要先在user application端安装django==1.11 redis==2.10.6 celery
1.首先创建一个项目,项目名随意,这里创建一个CeleryTest项目,在项目中创建一个celery.py文件,这个文件和settings文件在同一级目录,目录结构如下:
- CeleryTest/
  - CeleryTest/__init__.py
  - CeleryTest/settings.py
  - CeleryTest/celery.py
  - CeleryTest/urls.py
- manage.py


#celery.py文件内容如下:
from __future__ import absolute_import, unicode_literals
import os
from celery import Celery

# set the default Django settings module for the 'celery' program.
os.environ.setdefault('DJANGO_SETTINGS_MODULE', 'CeleryTest.settings')

app = Celery('CeleryTest')

# Using a string here means the worker don't have to serialize
# the configuration object to child processes.
# - namespace='CELERY' means all celery-related configuration keys
#   should have a `CELERY_` prefix.
app.config_from_object('django.conf:settings', namespace='CELERY')

# Load task modules from all registered Django app configs.
app.autodiscover_tasks()


@app.task(bind=True)
def debug_task(self):
    print('Request: {0!r}'.format(self.request))
2.修改__init__.py文件如下:
#在__init__.py文件中添加如下内容,表示启动django时自动导入celery app
from __future__ import absolute_import, unicode_literals

# This will make sure the app is always imported when
# Django starts so that shared_task will use this app.
from .celery import app as celery_app

__all__ = ['celery_app']
3.在app中创建tasks.py文件,这个名字不能改成其他的名字,因为在celery.py文件中会根据tasks这个文件名称自动发现
- app1/
    - tasks.py
    - models.py
- app2/
    - tasks.py
    - models.py
例如在tasks.py中添加一些任务:
# Create your tasks here
from __future__ import absolute_import, unicode_literals
#导入shared_task模块,是为了在一个app中添加的任务在其他app中也可以调用
from celery import shared_task


@shared_task
def add(x, y):
    return x + y


@shared_task
def mul(x, y):
    return x * y


@shared_task
def xsum(numbers):
    return sum(numbers)
4.在settings.py文件中配置后端broker信息,比如配置redis服务作为broker
CELERY_BROKER_URL = 'redis://:xg.1158@172.16.1.11'
CELERY_RESULT_BACKEND = 'redis://:xg.1158@172.16.1.11'
5.设置url和view,在启动django后通过定义url触发一个任务
#添加一个url  index
from django.conf.urls import url
from django.contrib import admin
from app01 import views
urlpatterns = [
    url(r'^admin/', admin.site.urls),
    url(r'^index/', views.index),
]

#添加一个视图函数
from django.shortcuts import render,HttpResponse
from app01 import tasks
from celery.result import AsyncResult
# Create your views here.


def  index(request):
    res_ref =  tasks.add.delay(40,50)
    print("res_ref_id:",res_ref.task_id)
    #AsyncResult模块通过task_id取结果
    result = AsyncResult(res_ref.task_id)
    print(result.status)
    #当结果的状态是SUCCESS的话,就可以通过get()取work端执行后的结果的值
    if  result.status == 'SUCCESS':
        final = result.get()
        return HttpResponse(final)
    return HttpResponse(result.status)
6.最后在linux设备上启动一个worker,注意需要先安装django==1.11 redis==2.10.6 celery等模块,然后将上面的django项目拷贝到linux设备上启动worker
[root@goser2 ~]# unzip CeleryTest.zip
#进入到django项目中启动worker
[root@goser2 ~]# cd CeleryTest
[root@goser2 CeleryTest]# celery  -A CeleryTest worker  -l info
7.user application端就可以通过url来触发任务,让worker执行了 :http://127.0.0.1:8000/index/
在django中使用计划任务功能
1.首先安装django-celery-beat模块
pip install django-celery-beat
2.在settings.py文件中添加django-celery-beat这个app
[root@goser2 CeleryTest]# vim  CeleryTest/settings.py

ALLOWED_HOSTS = ["*"]
INSTALLED_APPS = [
    'django.contrib.admin',
    'django.contrib.auth',
    'django.contrib.contenttypes',
    'django.contrib.sessions',
    'django.contrib.messages',
    'django.contrib.staticfiles',
    'app01.apps.App01Config',
    'django_celery_beat',
]
3.创建celery-beat的定时任务的表结构,并创建admin管理员账号及启动django服务
[root@goser2 CeleryTest]# python3  manage.py   makemigrations
[root@goser2 CeleryTest]# python3  manage.py   migrate
[root@goser2 CeleryTest]# python3  manage.py createsuperuser
[root@goser2 CeleryTest]# python3  manage.py   runserver 0.0.0.0:9000
4.通过admin设置定时任务


5.创建好定时任务,接下来就可以创建worker和celery beat了,你会发现每隔10秒,beat会发起一个任务消息让worker执行app01.tasks.xsum任务
#创建一个worker
[root@goser2 ~]# cd  CeleryTest
[root@goser2 CeleryTest]# celery  -A  CeleryTest worker  -l info
[2018-12-05 16:05:37,658: INFO/MainProcess] Received task: app01.tasks.xsum[54b884e3-8091-47f2-af61-93793f81f8d1]
[2018-12-05 16:05:37,660: INFO/ForkPoolWorker-1] Task app01.tasks.xsum[54b884e3-8091-47f2-af61-93793f81f8d1] succeeded in 0.0006437449919758365s: 551

#创建一个celery beat来触发任务,注意一定要跟上-S  django参数
[root@goser2 ~]# cd  CeleryTest
[root@goser2 CeleryTest]# celery  -A  CeleryTest  beat -S  django -l info
[2018-12-05 16:05:37,617: INFO/MainProcess] Scheduler: Sending due task task  test (app01.tasks.xsum)
注意,经测试,每添加或修改一个任务,celery beat都需要重启一次,要不然新的配置不会被celery beat进程读到