因为安全问题elasticsearch 不让用root用户直接运行,所以要创建新用户。
具体操作如下:
useradd es
passwd es
再输入两次密码(自定义)
mkdir -p /export/servers/data
mkdir -p /export/servers/logs
chown -R es:es /export/servers/elasticsearch
chown -R es:es /export/servers/data
chown -R es:es /export/servers/logs
然后使用es用户启动
切换es用户命令:su es
cd /export/servers/elasticsearch
启动集群命令:bin/elasticsearch
---------------------
作者:NicholasEcho
来源:CSDN
原文:https://blog.csdn.net/weixin_41615494/article/details/79591335
版权声明:本文为博主原创文章,转载请附上博文链接!
原文:https://www.cnblogs.com/zhi-leaf/p/8484337.html
问题出现环境,OS版本:CentOS-7-x86_64-Minimal-1708;ES版本:elasticsearch-6.2.2。
1、max file descriptors [4096] for elasticsearch process is too low, increase to at least [65536]
每个进程最大同时打开文件数太小,可通过下面2个命令查看当前数量
ulimit -Hn
ulimit -Sn
修改/etc/security/limits.conf文件,增加配置,用户退出后重新登录生效
*               soft    nofile          65536
*               hard    nofile          65536

2、max number of threads [3818] for user [es] is too low, increase to at least [4096]
问题同上,最大线程个数太低。修改配置文件/etc/security/limits.conf,增加配置
|
1
2
|
* soft nproc 4096* hard nproc 4096 |
可通过命令查看
ulimit -Hu
ulimit -Su

3、max virtual memory areas vm.max_map_count [65530] is too low, increase to at least [262144]
修改/etc/sysctl.conf文件,增加配置vm.max_map_count=262144
vi /etc/sysctl.conf
sysctl -p
执行命令sysctl -p生效

4、Exception in thread "main" java.nio.file.AccessDeniedException: /usr/local/elasticsearch/elasticsearch-6.2.2-1/config/jvm.options
elasticsearch用户没有该文件夹的权限,执行命令
5.Elasticsearch在linux下使用命令sh elasticsearch start,按键ctrl+c的时候程序就会stop掉,如何将程序在后台启动呢?
需要使用:./elasticsearch -d
这时执行的时候会出现没有权限./elasticsearch: Permission denied
需要授权执行命令:chmod +x bin/elasticsearch
再次执行./elasticsearch -d即可启动
使用ps aux|grep elasticsearch可以查看是否启动
6.
第一个是es的基本配置文件,第二个是日志配置文件,es也是使用log4j来记录日志的,所以logging.yml里的设置按普通log4j配置文件来设置就行了。下面主要讲解下elasticsearch.yml这个文件中可配置的东西。
cluster.name:elasticsearch
配置es的集群名称,默认是elasticsearch,es会自动发现在同一网段下的es,如果在同一网段下有多个集群,就可以用这个属性来区分不同的集群。
node.name:”FranzKafka”
节点名,默认随机指定一个name列表中名字,该列表在es的jar包中config文件夹里name.txt文件中,其中有很多作者添加的有趣名字。
node.master:true
指定该节点是否有资格被选举成为node,默认是true,es是默认集群中的第一台机器为master,如果这台机挂了就会重新选举master。
node.data:true
指定该节点是否存储索引数据,默认为true。
index.number_of_shards:5
设置默认索引分片个数,默认为5片。
index.number_of_replicas:1
设置默认索引副本个数,默认为1个副本。
path.conf:/path/to/conf
设置配置文件的存储路径,默认是es根目录下的config文件夹。
path.data:/path/to/data
设置索引数据的存储路径,默认是es根目录下的data文件夹,可以设置多个存储路径,用逗号隔开,例:
path.data:/path/to/data1,/path/to/data2
path.work:/path/to/work
设置临时文件的存储路径,默认是es根目录下的work文件夹。
path.logs:/path/to/logs
设置日志文件的存储路径,默认是es根目录下的logs文件夹
path.plugins:/path/to/plugins
设置插件的存放路径,默认是es根目录下的plugins文件夹
bootstrap.mlockall:true
设置为true来锁住内存。因为当jvm开始swapping时es的效率会降低,所以要保证它不swap,可以把ES_MIN_MEM和ES_MAX_MEM两个环境变量设置成同一个值,并且保证机器有足够的内存分配给es。同时也要允许elasticsearch的进程可以锁住内存,linux下可以通过`ulimit-lunlimited`命令。
network.bind_host:192.168.0.1
设置绑定的ip地址,可以是ipv4或ipv6的,默认为0.0.0.0。network.publish_host:192.168.0.1
设置其它节点和该节点交互的ip地址,如果不设置它会自动判断,值必须是个真实的ip地址。
network.host:192.168.0.1
这个参数是用来同时设置bind_host和publish_host上面两个参数。
transport.tcp.port:9300
设置节点间交互的tcp端口,默认是9300。
transport.tcp.compress:true
设置是否压缩tcp传输时的数据,默认为false,不压缩。
http.port:9200
设置对外服务的http端口,默认为9200。
http.max_content_length:100mb
设置内容的最大容量,默认100mb
http.enabled:false
是否使用http协议对外提供服务,默认为true,开启。
gateway.type:local
gateway的类型,默认为local即为本地文件系统,可以设置为本地文件系统,分布式文件系统,hadoop的HDFS,和amazon的s3服务器,其它文件系统的设置方法下次再详细说。
gateway.recover_after_nodes:1
设置集群中N个节点启动时进行数据恢复,默认为1。
gateway.recover_after_time:5m
设置初始化数据恢复进程的超时时间,默认是5分钟。
gateway.expected_nodes:2
设置这个集群中节点的数量,默认为2,一旦这N个节点启动,就会立即进行数据恢复。
cluster.routing.allocation.node_initial_primaries_recoveries:4
初始化数据恢复时,并发恢复线程的个数,默认为4。
cluster.routing.allocation.node_concurrent_recoveries:2
添加删除节点或负载均衡时并发恢复线程的个数,默认为4。
indices.recovery.max_size_per_sec:0
设置数据恢复时限制的带宽,如入100mb,默认为0,即无限制。
indices.recovery.concurrent_streams:5
设置这个参数来限制从其它分片恢复数据时最大同时打开并发流的个数,默认为5。
discovery.zen.minimum_master_nodes:1
设置这个参数来保证集群中的节点可以知道其它N个有master资格的节点。默认为1,对于大的集群来说,可以设置大一点的值(2-4)
discovery.zen.ping.timeout:3s
设置集群中自动发现其它节点时ping连接超时时间,默认为3秒,对于比较差的网络环境可以高点的值来防止自动发现时出错。
discovery.zen.ping.multicast.enabled:false
设置是否打开多播发现节点,默认是true。
discovery.zen.ping.unicast.hosts:[“host1″,”host2:port”,”host3[portX-portY]”]
设置集群中master节点的初始列表,可以通过这些节点来自动发现新加入集群的节点
安装head插件(集群管理插件)
cd /usr/share/elasticsearch/bin/
./plugin install mobz/elasticsearch-head
ll /usr/share/elasticsearch/plugins/head
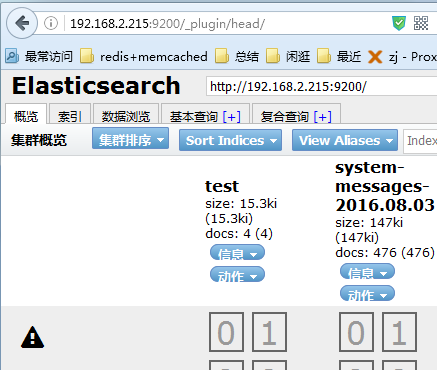
http://192.168.2.215:9200/_plugin/head/

安装kopf插件(集群资源查看和查询插件)
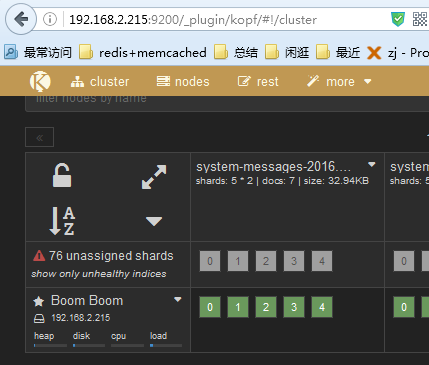
/usr/share/elasticsearch/bin/plugin install lmenezes/elasticsearch-kopf
http://192.168.2.215:9200/_plugin/kopf

启动elasticearch
/etc/init.d/elasticsearch start
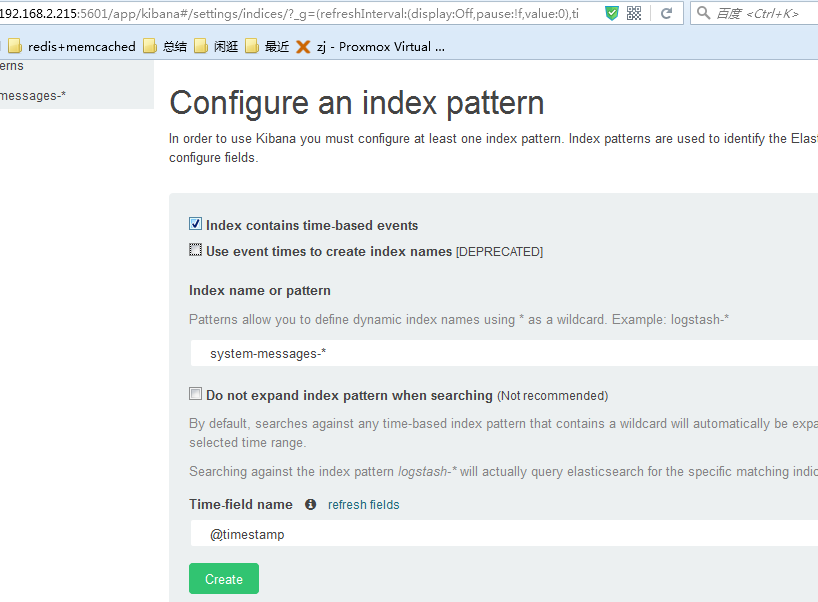
安装kibana
kibana本质上是elasticsearch
web客户端,是一个分析和可视化elasticsearch平台,可通过kibana搜索、查看和与存储在elasticsearch的索引进行交互。可以很方便的执行先进的数据分析和可视化多种格式的数据,如图表、表格、地图等。
Discover页面:交互式的浏览数据。可以访问所匹配的索引模式的每个索引的每个文档。可以提交搜索查询,过滤搜索结果和查看文档数据。还可以搜索查询匹配的文档数据和字段值的统计数据。还可以选定时间以及刷新频率
https://download.elastic.co/kibana/kibana/kibana-4.5.1-linux-x64.tar.gz
tar zxvf kibana-4.5.1-linux-x64.tar.gz
mv kibana-4.5.1-linux-x64 /usr/local/
vi /etc/rc.local
/usr/local/kibana-4.5.1-linux-x64/bin/kibana > /var/log/kibana.log 2>&1 &
vi /usr/local/kibana-4.5.1-linux-x64/config/kibana.yml
server.port: 5601
server.host: "192.168.2.215"
elasticsearch.url: "http://192.168.2.215:9200"


将nginx日志转换成json
vim /usr/local/nginx/conf/nginx.conf
log_format access1 '{"@timestamp":"$time_iso8601",'
'"host":"$server_addr",'
'"clientip":"$remote_addr",'
'"size":$body_bytes_sent,'
'"responsetime":$request_time,'
'"upstreamtime":"$upstream_response_time",'
'"upstreamhost":"$upstream_addr",'
'"http_host":"$host",'
'"url":"$uri",'
'"domain":"$host",'
'"xff":"$http_x_forwarded_for",'
'"referer":"$http_referer",'
'"status":"$status"}';
access_log /var/log/nginx/access.log access1;
重新载入nginx
/usr/local/nginx/sbin/nginx -s reload
安装logstash
在logstash中,包括了三个阶段:
输入input --> 处理filter(不是必须的) --> 输出output
rpm --import https://packages.elastic.co/GPG-KEY-elasticsearch
echo "
[logstash-2.1]
name=Logstash repository for 2.1.x packages
baseurl=http://packages.elastic.co/logstash/2.1/centos
gpgcheck=1
gpgkey=http://packages.elastic.co/GPG-KEY-elasticsearch
enabled=1" >> /etc/yum.repos.d/logstash.repo
yum install logstash -y
通过配置验证Logstash的输入和输出
vim /etc/logstash/conf.d/stdout.conf
input {
stdin {}
}
output {
stdout {
codec => "rubydebug"
}
}
vim /etc/logstash/conf.d/logstash.conf
input {
stdin {}
}
input {
stdin {}
}
output {
elasticsearch {
hosts => ["192.168.2.215:9200"]
index => "test"
}
}
http://192.168.2.215:9200/_plugin/head/
vim /etc/logstash/conf.d/logstash.conf
output {
elasticsearch {
hosts => ["192.168.2.215:9200"]
index => "test"
}
input {
file {
type => "messagelog"
path => "/var/log/messages"
start_position => "beginning"
}
}
output {
file {
path => "/tmp/123.txt"
}
elasticsearch {
hosts => ["192.168.2.215:9200"]
index => "system-messages-%{+yyyy.MM.dd}"
}
}
检查配置文件语法
/etc/init.d/logstash configtest
vim /etc/init.d/logstash
LS_USER=root
LS_GROUP=root
/opt/logstash/bin/logstash -f /etc/logstash/conf.d/logstash.conf &
chown -R es:es /usr/local/elasticsearch/