Numpy介绍
一个用python实现的科学计算,包括:1、一个强大的N维数组对象Array;2、比较成熟的(广播)函数库;3、用于整合C/C++和Fortran代码的工具包;4、实用的线性代数、傅里叶变换和随机数生成函数。numpy和稀疏矩阵运算包scipy配合使用更加方便。
NumPy(Numeric Python)提供了许多高级的数值编程工具,如:矩阵数据类型、矢量处理,以及精密的运算库。
数据类型ndarray
编辑NumPy provides an N-dimensional array type, the ndarray, which describes a collection of “items” of the same type.
NumPy提供了一个N维数组类型ndarray,它描述了相同类型的“items”的集合。
从图中我们可以看出ndarray在存储数据的时候,数据与数据的地址都是连续的,这样就给使得批量操作数组元素时速度更快。
这是因为ndarray中的所有元素的类型都是相同的,而Python列表中的元素类型是任意的,所以ndarray在存储元素时内存可以连续,而python原生list就只能通过寻址方式找到下一个元素,这虽然也导致了在通用性能方面Numpy的ndarray不及Python原生list,但在科学计算中,Numpy的ndarray就可以省掉很多循环语句,代码使用方面比Python原生list简单的多。
numpy内置了并行运算功能,当系统有多个核心时,做某种计算时,numpy会自动做并行计算。
Numpy底层使用C语言编写,内部解除了GIL(全局解释器锁),其对数组的操作速度不受Python解释器的限制,效率远高于纯Python代码。
ndarray的属性:
empty(shape[, dtype, order])
empty_like(a[, dtype, order, subok])
eye(N[, M, k, dtype, order])
identity(n[, dtype])
ones(shape[, dtype, order])
ones_like(a[, dtype, order, subok])
zeros(shape[, dtype, order])
zeros_like(a[, dtype, order, subok])
full(shape, fill_value[, dtype, order])
full_like(a, fill_value[, dtype, order, subok])
Matplotlib 是一个 Python 的 2D绘图库,它以各种硬拷贝格式和跨平台的交互式环境生成出版质量级别的图形。
- 中文名
- 绘图库
- 外文名
- Matplotlib
- 所属领域
- 计算机
- 作 用
- 绘图
- 元 素
- x轴和y轴
Matplotlib 是一个 Python 的 2D绘图库,它以各种硬拷贝格式和跨平台的交互式环境生成出版质量级别的图形 [1] 。
通过 Matplotlib,开发者可以仅需要几行代码,便可以生成绘图,直方图,功率谱,条形图,错误图,散点图等。
Matplotlib基础知识
1.Matplotlib中的基本图表包括的元素
x轴和y轴
水平和垂直的轴线
x轴和y轴刻度
刻度标示坐标轴的分隔,包括最小刻度和最大刻度
x轴和y轴刻度标签
表示特定坐标轴的值
绘图区域
实际绘图的区域
2.hold属性
hold属性默认为True,允许在一幅图中绘制多个曲线;将hold属性修改为False,每一个plot都会覆盖前面的plot。
但是目前不推荐去动hold这个属性,这种做法(会有警告)。因此使用默认设置即可。
3.网格线
grid方法
使用grid方法为图添加网格线
设置grid参数(参数与plot函数相同)
.lw代表linewidth,线的粗细
.alpha表示线的明暗程度
4.axis方法
如果axis方法没有任何参数,则返回当前坐标轴的上下限
5.xlim方法和ylim方法
除了plt.axis方法,还可以通过xlim,ylim方法设置坐标轴范围
6.legend方法
两种传参方法:
【推荐使用】在plot函数中增加label参数
在legend方法中传入字符串列表
配置matplotlib参数
永久配置
matplotlib配置信息是从配置文件读取的。在配置文件中可以为matplotlib的几乎所有属性指定永久有效的默认值
安装级配置文件(Per installation configuration file)
Python的site-packages目录下(site-packages/matplotlib/mpl-data/matplotlibrc)
系统级配置,每次重新安装matplotlib后,配置文件会被覆盖
如果希望保持持久有效的配置,最好选择在用户级配置文件中进行设置
对本配置文件的最佳应用方式,是将其作为默认配置模板
用户级.matplotlib/matplotlibrc文件(Per user .matplotlib/matplotlibrc)
用户的Documents and Settings目录
可以用matplotlib.get_configdir()命令来找到当前用户的配置文件目录
当前工作目录
代码运行的目录
在当前目录下,可以为目录所包含的当前项目代码定制matplotlib配置项。配置文件的文件名是matplotlibrc
在Windows系统中,没有全局配置文件,用户配置文件的位置在C:Documents and Settingsyourname.matplotlib。
在Linux系统中,全局配置文件的位置在/etc/matplotlibrc,用户配置文件的位置在$HOME/.matplotlib/matplotlibrc。
动态配置
程序中配置代码
To finetune settings only for that execution; this overwrites every configuration file.
配置方法的优先级为:
Matplotlib functions in Python code
matplotlibrc file in the current directory
User matplotlibrc file
Global matplotlibrc file
rcParams方法
通过rcParams字典访问并修改所有已经加载的配置项
简单运用


科学坐标绘制
import numpy as np
import matplotlib.pyplot as plt
import matplotlib
matplotlib.rcParams['font.family']='SimHei'
matplotlib.rcParams['font.sans-serif']=['SimHei']
def Draw(pcolor,nt_point,nt_text,nt_size):
    plt.plot(x,y,'k',label="$exp_decay$",color=pcolor,
             linewidth=3,linestyle="-")
    plt.plot(x,z,"b--",label="$cos(x^2)$",linewidth=1)
    plt.xlabel('时间(s)')
    plt.ylabel('幅度(mV)')
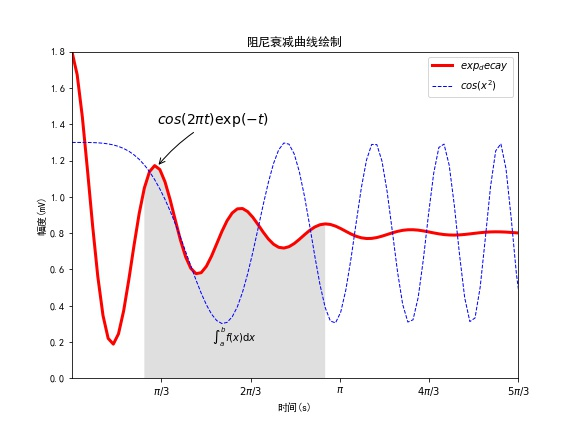
    plt.title("阻尼衰减曲线绘制")
    plt.annotate('$cos(2pi t)exp(-t)$',xy=nt_point,
                 xytext=nt_text,fontsize=nt_size,arrowprops=
                 dict(arrowstyle='->',connectionstyle="arc3,rad=.1"))
def Shadow(a, b):
    ix=(x>a)&(x<b)
    plt.fill_between(x,y,0,where=ix,facecolor='grey',alpha=0.25)
    plt.text(0.5*(a+b),0.2,r"$int_a^b f(x)mathrm{d}x$",
             horizontalalignment='center')
def XY_Axis(x_start,x_end,y_start,y_end):
    plt.xlim(x_start,x_end)
    plt.ylim(y_start,y_end)
    plt.xticks([np.pi/3,2*np.pi/3,1*np.pi,4*np.pi/3,
                5*np.pi/3],['$pi/3$','$2pi/3$','$pi$','$4pi/3$','$5pi/3$'])
x=np.linspace(0.0,6.0,100)
y=np.cos(2*np.pi*x)*np.exp(-x)+0.8
z=0.5*np.cos(x**2)+0.8
note_point,note_text,note_size=(1,np.cos(2*np.pi)*
                                np.exp(-1)+0.8),(1,1.4),14
fig=plt.figure(figsize=(8,6),facecolor='white')
plt.subplot(111)
Draw("red",note_point,note_text,note_size)
XY_Axis(0,5,0,1.8)
Shadow(0.8, 3)
plt.legend()
plt.savefig('sample.jpg')
plt.show()
效果图

手绘风格
from PIL import Image
import numpy as np
im0=np.array(Image.open('D:\故宫.jpg').convert("L"))
im1=255-im0
im2=(100/255)*im0+150
im3=255*(im1/255)**2
pil_im=Image.fromarray(np.uint(im1))
pil_im.save('gugonggai.jpg')
pil_im.show()


将im3改为:im3=255-255*(im1/255)**0.5+150

from PIL import Image
import numpy as np
vec_el=np.pi/2.2
vec_az=np.pi/4.
depth=7.                                            #颜色的深浅,建议不要写太大的值,因为会变得很丑
im=np.array(Image.open('D:\故宫.jpg').convert("L"))
a=np.asany array(im).astype('float')
grad=np.gradient(a)
grad_x,grad_y=grad
grad_x=grad_x*depth/100.
grad_y=grad_y*depth/100.
dx=np.cos(vec_el)*np.cos(vec_az)
dy=np.cos(vec_el)*np.cos(vec_az)
dz=np.sin(vec_el)
A=np.sqrt(grad_x**2+grad_y**2+1.)
uni_x=grad_x/A
uni_y=grad_y/A
uni_z=1./A
a2=255*(dx*uni_x+dy*uni_y+dz*uni_z)
a2=a2.clip(0,255)
im2=Image.fromarray(a2.astype('uint8'))
im2.save('gugong3.jpg')


