一、Channel(通道)介绍
通常来说NIO中的所有IO都是从 Channel(通道) 开始的。
-
从通道进行数据读取 :创建一个缓冲区,然后请求通道读取数据。
-
从通道进行数据写入 :创建一个缓冲区,填充数据,并要求通道写入数据。
数据读取和写入操作图示:

Java NIO Channel通道和流非常相似,主要有以下几点区别:
-
通道可以读也可以写,流一般来说是单向的(只能读或者写,所以之前我们用流进行IO操作的时候需要分别创建一个输入流和一个输出流)。
-
通道可以异步读写。
-
通道总是基于缓冲区Buffer来读写。
Java NIO中最重要的几个Channel的实现:
-
FileChannel: 用于文件的数据读写
-
DatagramChannel: 用于UDP的数据读写
-
SocketChannel: 用于TCP的数据读写,一般是客户端实现
-
ServerSocketChannel: 允许我们监听TCP链接请求,每个请求会创建会一个SocketChannel,一般是服务器实现
类层次结构:
下面的UML图使用Idea生成的。

二、FileChannel的使用
2.1、基本用法
示例一:使用FileChannel读取数据到Buffer(缓冲区)以及利用Buffer(缓冲区)写入数据到FileChannel:
  1 /**
  2  * 1、通道(Channel):
  3  *  用于源节点与目标节点的连接。在Java NIO中负责缓冲区数据的传输。
  4  *  Channel本身不存储数据,因此需要缓冲区进行传输
  5  *
  6  * 2、通道的主要实现类
  7  *  java.nio.channels.Channel 接口
  8  *      |-- FIleChannel
  9  *      |-- SocketChannel
 10  *      |-- ServerSocketChannel
 11  *      |-- DatagramChannel
 12  *
 13  * 3、获取通道
 14  *    1)Java 针对支持通道的类提供类 getChannel() 方法
 15  *      本地IO:
 16  *      FileInputStream/FileOutputStream
 17  *      RandomAccessFile
 18  *
 19  *      网络IO:
 20  *      Socket
 21  *      ServerSocket
 22  *      DatagramSocket
 23  *
 24  *    2)在JDK 1.7 中的 NIO.2 针对各个通道提供类静态方法 open()
 25  *    3)在JDK 1.7 中的 NIO.2 的Files 工具类的 newByteChannel()
 26  *
 27  * 4、通道之间的数据传输
 28  *      transferFrom()
 29  *      transferTo()
 30  *
 31  * 5、分散(Scatter)与聚集(Gather)
 32  * 分散读取(Scattering Reads):将通道中的数据分散到多个缓冲区中
 33  * 聚集写入(Gathering Writes):将多个缓冲区中的数据聚集到通道中
 34  *
 35  * 6、字符集:Charset
 36  * 编码:字符串 -> 字节数组
 37  * 解码:字节数组 -> 字符串
 38  */
 39 public class ChannelTest {
 40
 41
 42     // 1】利用通道完成文件的复制
 43     @Test
 44     public void test1(){
 45
 46         FileInputStream fis = null;
 47         FileOutputStream fos = null;
 48
 49         FileChannel inChannel = null;
 50         FileChannel outChannel = null;
 51         try {
 52             fis = new FileInputStream("tomcat.png");
 53             fos = new FileOutputStream("tomcat2.png");
 54
 55             // 1、获取通道
 56             inChannel = fis.getChannel();
 57             outChannel = fos.getChannel();
 58
 59             // 2、分配指定大小的缓存区
 60             ByteBuffer buf = ByteBuffer.allocate(1024);
 61
 62             // 3、将通道中的数据存入缓冲区中
 63             int len;
 64             while ((len = inChannel.read(buf)) != -1) {
 65                 buf.flip(); // 切换成读取数据的模式
 66                 // 4、将缓冲区中的数据写入通道中
 67                 outChannel.write(buf);
 68                 buf.clear(); // 清空缓冲区
 69             }
 70         } catch (FileNotFoundException e) {
 71             e.printStackTrace();
 72         } catch (IOException e) {
 73             e.printStackTrace();
 74         } finally {
 75             // 5、关闭通道
 76             if(outChannel != null) {
 77                 try {
 78                     outChannel.close();
 79                 } catch (IOException e) {
 80                     e.printStackTrace();
 81                 }
 82             }
 83             if(inChannel != null) {
 84                 try {
 85                     inChannel.close();
 86                 } catch (IOException e) {
 87                     e.printStackTrace();
 88                 }
 89             }
 90             if(fos != null) {
 91                 try {
 92                     fos.close();
 93                 } catch (IOException e) {
 94                     e.printStackTrace();
 95                 }
 96             }
 97             if(fis != null) {
 98                 try {
 99                     fis.close();
100                 } catch (IOException e) {
101                     e.printStackTrace();
102                 }
103             }
104         }
105     }
106  }
示例二:使用直接缓冲区完成文件的复制(内存映射文件)
 1     // 2】使用直接缓冲区完成文件的复制(内存映射文件)
 2     // 异常需要使用try-catch块处理
 3     @Test
 4     public void test2() throws IOException {
 5         // READ 读文件
 6         FileChannel inChannel = FileChannel.open(Paths.get("tomcat.png"), StandardOpenOption.READ);
 7         // WRIT 写文件 CREATE_NEW 文件存在就报错,不存在就创建 CREATE 覆盖
 8         FileChannel outChannel = FileChannel.open(Paths.get("tomcat2.png"), StandardOpenOption.WRITE, StandardOpenOption.READ, StandardOpenOption.CREATE);
 9
10         // 内存映射文件,直接缓冲区内存在物理内存中
11         MappedByteBuffer inMapappedBuf = inChannel.map(FileChannel.MapMode.READ_ONLY, 0, inChannel.size());
12         MappedByteBuffer outMapappedBuf = outChannel.map(FileChannel.MapMode.READ_WRITE, 0, inChannel.size());
13
14         // 直接对缓冲区进行数据的读写操作
15         byte[] dst = new byte[1024];
16         ByteBuffer buf;
17         int len = 0;
18         while (inMapappedBuf.hasRemaining()){
19             len = dst.length > inMapappedBuf.remaining() ? inMapappedBuf.remaining() : dst.length;
20 //            System.out.println(len);
21             inMapappedBuf.get(dst, 0, len) ;
22             outMapappedBuf.put(dst, 0, len);
23         }
24     }
2.2、通道之间数据传输
在Java NIO中,如果两个通道中有一个是FileChannel,那你可以直接将数据从一个channel传输到另外一个channel。
transferFrom()
FileChannel的transferFrom()方法可以将数据从源通道传输到FileChannel中


 1     // 3】通道之间数据传输(也是直接缓冲区方式)
 2     // 异常需要使用try-catch块处理
 3     @Test
 4     public void test3() throws IOException {
 5         // READ 读文件
 6         FileChannel inChannel = FileChannel.open(Paths.get("tomcat.png"), StandardOpenOption.READ);
 7         // WRIT 写文件 CREATE_NEW 文件存在就报错,不存在就创建 CREATE 存在覆盖,不存在创建
 8         FileChannel outChannel = FileChannel.open(Paths.get("tomcat2.png"), StandardOpenOption.WRITE, StandardOpenOption.READ, StandardOpenOption.CREATE);
 9
10 //        inChannel.transferTo(0, inChannel.size(), outChannel);
11         outChannel.transferFrom(inChannel, 0, inChannel.size());
12
13         outChannel.close();
14         inChannel.close();
15     }
transferTo()
transferTo()方法将数据从FileChannel传输到其他的channel中
2.3、分散(scatter)与聚集(gather)
Java NIO开始支持scatter/gather,scatter/gather用于描述从Channel(译者注:Channel在中文经常翻译为通道)中读取或者写入到Channel的操作。
分散(scatter)从Channel中读取是指在读操作时将读取的数据写入多个buffer中。因此,Channel将从Channel中读取的数据“分散(scatter)”到多个Buffer中。
聚集(gather)写入Channel是指在写操作时将多个buffer的数据写入同一个Channel,因此,Channel 将多个Buffer中的数据“聚集(gather)”后发送到Channel。
scatter / gather经常用于需要将传输的数据分开处理的场合,例如传输一个由消息头和消息体组成的消息,你可能会将消息体和消息头分散到不同的buffer中,这样你可以方便的处理消息头和消息体。
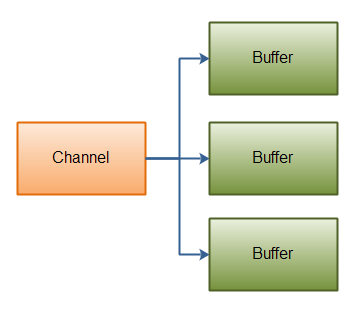
Scattering Reads
Scattering Reads是指数据从一个channel读取到多个buffer中。如下图描述:
代码示例如下:
1 ByteBuffer header = ByteBuffer.allocate(128);
2 ByteBuffer body   = ByteBuffer.allocate(1024);
3
4 ByteBuffer[] bufferArray = { header, body };
5
6 channel.read(bufferArray);
注意buffer首先被插入到数组,然后再将数组作为channel.read() 的输入参数。read()方法按照buffer在数组中的顺序将从channel中读取的数据写入到buffer,当一个buffer被写满后,channel紧接着向另一个buffer中写。
Scattering Reads在移动下一个buffer前,必须填满当前的buffer,这也意味着它不适用于动态消息(译者注:消息大小不固定)。换句话说,如果存在消息头和消息体,消息头必须完成填充(例如 128byte),Scattering Reads才能正常工作。
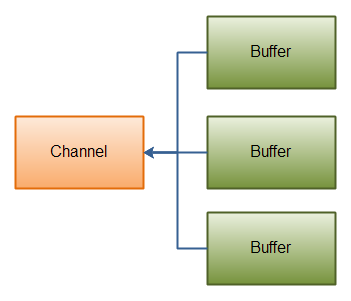
Gathering Writes
Gathering Writes是指数据从多个buffer写入到同一个channel。如下图描述:
代码示例如下:
1 ByteBuffer header = ByteBuffer.allocate(128);
2 ByteBuffer body   = ByteBuffer.allocate(1024);
3
4 //write data into buffers
5
6 ByteBuffer[] bufferArray = { header, body };
7
8 channel.write(bufferArray);
buffers数组是write()方法的入参,write()方法会按照buffer在数组中的顺序,将数据写入到channel,注意只有position和limit之间的数据才会被写入。因此,如果一个buffer的容量为128byte,但是仅仅包含58byte的数据,那么这58byte的数据将被写入到channel中。因此与Scattering Reads相反,Gathering Writes能较好的处理动态消息。
完整示例演示如下:
 1     // 4】分散和聚集
 2     @Test
 3     public void test4() {
 4         FileChannel inRafChannel = null;
 5         FileChannel outRafChannel = null;
 6         try {
 7             RandomAccessFile inRaf = new RandomAccessFile("hello.txt", "r");
 8             RandomAccessFile outRaf = new RandomAccessFile("hello2.txt", "rw");
 9
10             // 1、获取通道
11             inRafChannel = inRaf.getChannel();
12             outRafChannel = outRaf.getChannel();
13
14             // 2、分配指定大小的缓冲区
15             ByteBuffer buf1 = ByteBuffer.allocate(5);
16             ByteBuffer buf2 = ByteBuffer.allocate(10);
17
18             // 3、分散读取
19             ByteBuffer[] bufs = {buf1, buf2};
20             long len;
21             while ((len = inRafChannel.read(bufs)) != -1){
22                 for (ByteBuffer byteBuffer : bufs) {
23                     // 切换读模式
24                     byteBuffer.flip();
25                     System.out.print(new String(byteBuffer.array(), 0, byteBuffer.limit()));
26                 }
27
28                 // 4、聚集写入
29                 outRafChannel.write(bufs);
30
31                 for (ByteBuffer byteBuffer : bufs) {
32                     // 清除缓存
33                     byteBuffer.clear();
34                 }
35             }
36
37         } catch (FileNotFoundException e) {
38             e.printStackTrace();
39         } catch (IOException e) {
40             e.printStackTrace();
41         } finally {
42             if (outRafChannel != null) {
43                 try {
44                     outRafChannel.close();
45                 } catch (IOException e) {
46                     e.printStackTrace();
47                 }
48             }
49             if (inRafChannel != null) {
50                 try {
51                     inRafChannel.close();
52                 } catch (IOException e) {
53                     e.printStackTrace();
54                 }
55             }
56         }
57     }