ScheduledThreadPoolExecutor,它是一个计划任务线程池,可以执行定时任务或者是计划任务。
ScheduledThreadPoolExecutor 继承了ThreadPoolExecutor,需要了解 ThreadPoolExecutor 的原理,参考:【Java多线程】线程池ThreadPoolExecutor实现原理(二十二)
ScheduledThreadPoolExecutor 中的任务队列使用了 阻塞式延迟队列 (DelayedWorkQueue),参考:【Java多线程】DelayQueue源码分析 (二十六)
了解以上2个知识点之后,能更好的理解ScheduledThreadPoolExecutor的原理
参考:【Java多线程】ScheduledThreadPoolExecutor详解(二十八)
本章是对其进行补充
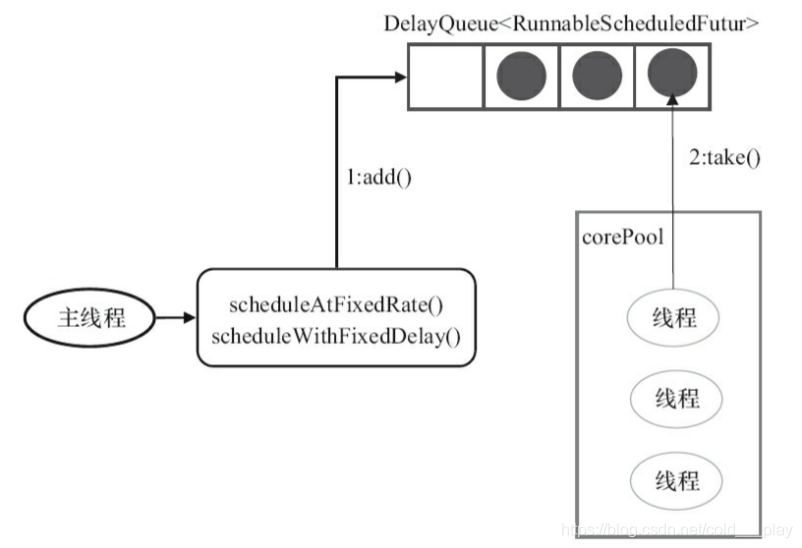
一、ScheduledThreadPoolExecutor原理图
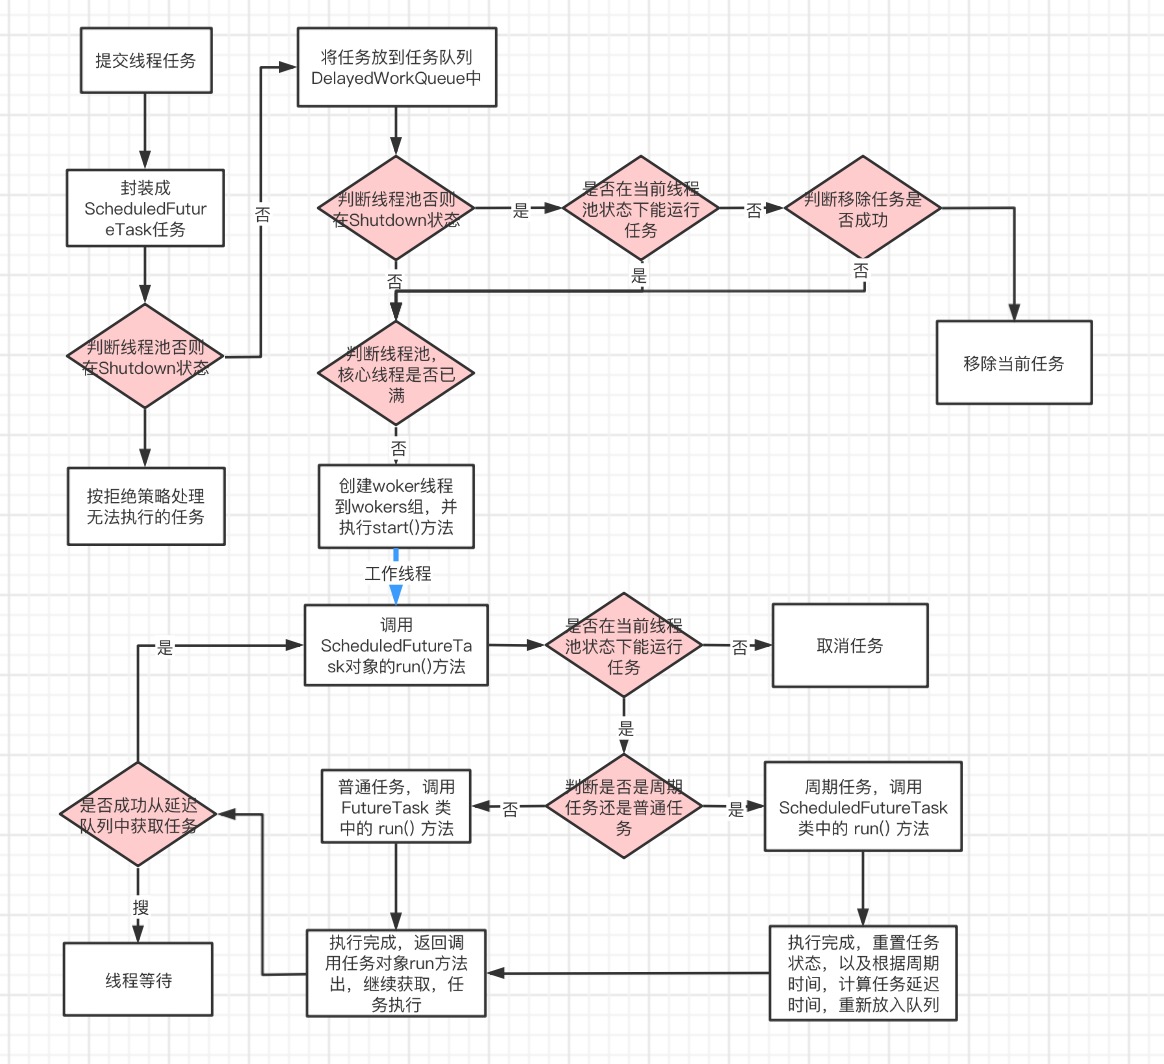
任务传递示意图
二、属性
由于 ScheduledThreadPoolExecutor 是继承了 ThreadPoolExecutor,ThreadPoolExecutor有的属性它都有,以下是另外增加的属性
 1 public class ScheduledThreadPoolExecutor
 2         extends ThreadPoolExecutor
 3         implements ScheduledExecutorService {
 4
 5     // shutdown后继续存在周期任务
 6     private volatile boolean continueExistingPeriodicTasksAfterShutdown;
 7
 8     // shutdown后执行存在延迟任务
 9     private volatile boolean executeExistingDelayedTasksAfterShutdown = true;
10
11     // 取消状态下移除标识
12     private volatile boolean removeOnCancel = false;
13
14     // 序列器
15     private static final AtomicLong sequencer = new AtomicLong();
16
17     ......
18 }
三、方法
在ScheduledThreadPoolExecutor线程池提交任务执行,主要使用的ScheduledThreadPoolExecutor.java、ThreadPoolExecutor.java、ScheduledFutureTask.java、FutureTask.java、DelayedWorkQueue.java等相关类方法,如下:
1、构造方法
 1 // 根据核心线程数创建 ScheduledThreadPool 线程池
 2 public ScheduledThreadPoolExecutor(int corePoolSize) {
 3     super(corePoolSize, Integer.MAX_VALUE, 0, NANOSECONDS,
 4           new DelayedWorkQueue());
 5 }
 6
 7 // 根据核心线程数、线程工厂创建 ScheduledThreadPool 线程池
 8 public ScheduledThreadPoolExecutor(int corePoolSize,
 9                                    ThreadFactory threadFactory) {
10     super(corePoolSize, Integer.MAX_VALUE, 0, NANOSECONDS,
11           new DelayedWorkQueue(), threadFactory);
12 }
13
14 // 根据核心线程数、拒绝策略创建 ScheduledThreadPool
15 public ScheduledThreadPoolExecutor(int corePoolSize,
16                                    RejectedExecutionHandler handler) {
17     super(corePoolSize, Integer.MAX_VALUE, 0, NANOSECONDS,
18           new DelayedWorkQueue(), handler);
19 }
20
21 // 根据核心线程数、线程工厂、拒绝策略创建 ScheduledThreadPool 线程池
22 public ScheduledThreadPoolExecutor(int corePoolSize,
23                                    ThreadFactory threadFactory,
24                                    RejectedExecutionHandler handler) {
25     super(corePoolSize, Integer.MAX_VALUE, 0, NANOSECONDS,
26           new DelayedWorkQueue(), threadFactory, handler);
27 }
2、schedule() 方法
 1 public <V> ScheduledFuture<V> schedule(Callable<V> callable,
 2                                        long delay,
 3                                        TimeUnit unit) {
 4     if (callable == null || unit == null)
 5         throw new NullPointerException();
 6     // 新建一个 RunnableScheduledFuture 对象
 7     RunnableScheduledFuture<V> t = decorateTask(callable,
 8         new ScheduledFutureTask<V>(callable,
 9                                    triggerTime(delay, unit)));
10
11     // 延迟执行任务
12     delayedExecute(t);
13     return t;
14 }
由上可以看出,主要是新建了一个ScheduledFutureTask对象,然后点用延迟执行任务方法 delayedExecute(t)
3、decorateTask() 方法
1 // 包装任务成一个 RunnableScheduledFuture 对象
2 // 实际就是返回了task对象
3 protected <V> RunnableScheduledFuture<V> decorateTask(
4     Callable<V> callable, RunnableScheduledFuture<V> task) {
5     return task;
6 }
返回任务对象
4、delayedExecute() 方法
 1 private void delayedExecute(RunnableScheduledFuture<?> task) {
 2     // 线程池状态是否 Shutdown
 3     if (isShutdown())
 4         // 拒绝任务
 5         reject(task);
 6     //
 7     else {
 8         // 获取任务队列,添加任务
 9         super.getQueue().add(task);
10         // isShutdown() 再次判断任务状态
11         // canRunInCurrentRunState() 是否在当前状态下能运行
12         // remove() 移除任务
13         if (isShutdown() &&
14             !canRunInCurrentRunState(task.isPeriodic()) &&
15             remove(task))
16             // 任务取消
17             task.cancel(false);
18         else
19             // 确保线程池能启动任务
20             ensurePrestart();
21     }
22 }
主要是将任务添加到队列中,然后执行ensurePrestart()确保线程池能启动任务
5、ThreadPoolExecutor 类中的 ensurePrestart() 方法
 1 void ensurePrestart() {
 2     // 获取工作线程数量
 3     int wc = workerCountOf(ctl.get());
 4     // 工作线程数小于 核心线程数
 5     if (wc < corePoolSize)
 6         // 添加工作线程线,以核心线程池数为上限
 7         addWorker(null, true);
 8     else if (wc == 0)
 9         // 添加工作线程线,以最大线程池线程数为上限
10         addWorker(null, false);
11 }
6、ThreadPoolExecutor 类中的 reject() 方法 拒绝任务


1 // 拒绝任务
2 final void reject(Runnable command) {
3     // 调用创建线程池时,使用的拒绝策略对象处理
4     handler.rejectedExecution(command, this);
5 }
7、ThreadPoolExecutor 类中的 remove() 方法 移除任务
1 public boolean remove(Runnable task) {
2     // 从任务队列中
3     boolean removed = workQueue.remove(task);
4     // 尝试终止线程池
5     tryTerminate(); // In case SHUTDOWN and now empty
6     return removed;
7 }
8、ScheduledFutureTask 类中的 run() 方法
 1 // ScheduledFutureTask 的 run() 方法
 2 public void run() {
 3     // 是否是周期任务
 4     boolean periodic = isPeriodic();
 5     // canRunInCurrentRunState() 是否在当前状态下能运行
 6     if (!canRunInCurrentRunState(periodic))
 7         cancel(false);
 8     // 非周期任务
 9     else if (!periodic)
10         // 直接运行任务的run()方法
11         ScheduledFutureTask.super.run();
12     // FutureTask 类中的 runAndReset()方法
13     // 运行且重置
14     else if (ScheduledFutureTask.super.runAndReset()) {
15         // 设置
16         setNextRunTime();
17         reExecutePeriodic(outerTask);
18     }
19 }
9、ScheduledFutureTask 类中的 setNextRuntime() 方法
 1 // 设置下次运行时间
 2 private void setNextRunTime() {
 3     // 周期时间
 4     long p = period;
 5
 6     if (p > 0)
 7         // time 任务到期时间
 8         // 任务完成后,在任务到期时间上 + 一个周期时间,进行延迟。
 9         time += p;
10     else
11         // 现在的时间 + 一个周期时间,进行延迟
12         time = triggerTime(-p);
13 }
重新设置任务的执行时间
10、ScheduledFutureTask 类中的reExecutePeriodic() 方法
 1 // 重新设置周期任务
 2 void reExecutePeriodic(RunnableScheduledFuture<?> task) {
 3     // canRunInCurrentRunState() 是否在当前状态下能运行
 4     if (canRunInCurrentRunState(true)) {
 5         // 将周期任务加入队列
 6         super.getQueue().add(task);
 7         // 再次判断是否在当前状态下能运行
 8         // 不能就移除任务,并取消
 9         if (!canRunInCurrentRunState(true) && remove(task))
10             task.cancel(false);
11         else
12             // 确保线程池能启动任务
13             ensurePrestart();
14     }
15 }
11、ScheduledFutureTask 类中的 compareTo() 方法 任务比较优先级
View Code在放入任务到队列或取出时,用到比较方法
12、ScheduledFutureTask 类中的getDelay() 方法 获取延迟时间
1 // 返回当前元素还需要延迟多长时间,单位是纳秒
2 public long getDelay(TimeUnit unit) {
3     return unit.convert(time - now(), NANOSECONDS);
4 }
13、ScheduledFutureTask 类中的 cancel() 方法
 1 // ScheduledFutureTask类中的 cancel() 方法
 2 // 参数 mayInterruptIfRunning :如果任务运行是否可以被中断
 3 // 取消任务
 4 public boolean cancel(boolean mayInterruptIfRunning) {
 5     // 调用 FutureTask类中的 cancel() 方法
 6     boolean cancelled = super.cancel(mayInterruptIfRunning);
 7     // 取消成功 且 移除取消的成功 且 heapIndex(数组中位置下表) 大于等于0
 8     if (cancelled && removeOnCancel && heapIndex >= 0)
 9         // 移除自己
10         remove(this);
11
12     return cancelled;
13 }
14、FutureTask类中的run() 方法
 1 // FutureTask 类中的 run(); 方法
 2 public void run() {
 3     // 给任务对象添加runner属性值,值为当前线程
 4     if (state != NEW ||
 5         !UNSAFE.compareAndSwapObject(this, runnerOffset,
 6                                      null, Thread.currentThread()))
 7         return;
 8
 9     try {
10         Callable<V> c = callable;
11         // 判断callable 不为空以及 state状态 为NUM
12         if (c != null && state == NEW) {
13             V result;
14             boolean ran;
15             try {
16                 // 调用c的 call返回,并接受返回值
17                 result = c.call();
18                 // 运行完成标识
19                 ran = true;
20             } catch (Throwable ex) {
21                 result = null;
22                 ran = false;
23                 setException(ex);
24             }
25             // 完成之后,设置结果给属性
26             if (ran)
27                 set(result);
28         }
29     } finally {
30         // runner must be non-null until state is settled to
31         // prevent concurrent calls to run()
32         runner = null;
33         // state must be re-read after nulling runner to prevent
34         // leaked interrupts
35         int s = state;
36         // 是否中断
37         if (s >= INTERRUPTING)
38             // 处理中断情况
39             handlePossibleCancellationInterrupt(s);
40     }
41 }
15、FutureTask类中的run() 方法
 1 // FutureTask 类中的 runAndReset(); 方法
 2 protected boolean runAndReset() {
 3     // 给任务对象添加runner属性值,值为当前线程
 4     if (state != NEW ||
 5         !UNSAFE.compareAndSwapObject(this, runnerOffset,
 6                                      null, Thread.currentThread()))
 7         // 失败返回false
 8         return false;
 9
10     boolean ran = false;
11     // 任务状态
12     int s = state;
13     try {
14         Callable<V> c = callable;
15         if (c != null && s == NEW) {
16             try {
17                 // 调用sft任务对象的callable属性对应的对象,call()方法
18                 // 由于是周期任务,调用call返回之后不会接收返回值
19                 c.call(); // don't set result
20                 // 调用完成标识
21                 ran = true;
22             } catch (Throwable ex) {
23                 setException(ex);
24             }
25         }
26     } finally {
27         // runner must be non-null until state is settled to
28         // prevent concurrent calls to run()
29         // 任务的运行线程属性置空
30         runner = null;
31         // state must be re-read after nulling runner to prevent
32         // leaked interrupts
33         // 重置后任务状态不变
34         s = state;
35         if (s >= INTERRUPTING)
36             // 状态改变成中断,进行中断处理
37             handlePossibleCancellationInterrupt(s);
38     }
39     // 运行完成 且 状态还是 NEW 返回成功
40     return ran && s == NEW;
41 }
42
16、FutureTask类中的 cancel() 方法
 1 // FutureTask类中的 cancel() 方法
 2 // 参数 mayInterruptIfRunning :如果任务运行是否可以被中断
 3 // 取消任务
 4 public boolean cancel(boolean mayInterruptIfRunning) {
 5     // 任务状态是 新建NEW状态,且CAS修改任务状态为 INTERRUPTING(中断) 或: CANCELLED(取消)
 6     if (!(state == NEW &&
 7           UNSAFE.compareAndSwapInt(this, stateOffset, NEW,
 8               mayInterruptIfRunning ? INTERRUPTING : CANCELLED)))
 9         // CAS失败,返回false
10         return false;
11
12     try {    // in case call to interrupt throws exception
13         if (mayInterruptIfRunning) {
14             try {
15                 // 获取运行线程,
16                 // runner由来:任务FutureTask,运行时,会CAS设置 runner = Thread.currentThread();
17                 Thread t = runner;
18                 if (t != null)
19                     // 中断线程
20                     t.interrupt();
21             } finally { // final state
22                 // 修改任务状态为INTERRUPTED 中断
23                 UNSAFE.putOrderedInt(this, stateOffset, INTERRUPTED);
24             }
25         }
26     } finally {
27         //
28         finishCompletion();
29     }
30     return true;
31 }
17、FutureTask 类中的 finishCompletion() 方法
 1 // FutureTask类中的 完成节点设置
 2 private void finishCompletion() {
 3     // assert state > COMPLETING;
 4     // 遍历等待节点
 5     for (WaitNode q; (q = waiters) != null;) {
 6         // 修改将等待节点设为null,循环节点
 7         if (UNSAFE.compareAndSwapObject(this, waitersOffset, q, null)) {
 8             for (;;) {
 9                 Thread t = q.thread;
10                 // 节点线程不为空
11                 if (t != null) {
12                     // 将节点thread属性设为null
13                     q.thread = null;
14                     // 唤醒线程t
15                     LockSupport.unpark(t);
16                 }
17                 WaitNode next = q.next;
18                 if (next == null)
19                     break;
20                 q.next = null; // unlink to help gc
21                 // q指向下一个节点
22                 q = next;
23             }
24             break;
25         }
26     }
27
28     // 钩子方法
29     done();
30
31     callable = null;        // to reduce footprint
32 }
18、DelayedWorkQueue 类中的 take() 方法
 1 public RunnableScheduledFuture<?> take() throws InterruptedException {
 2     final ReentrantLock lock = this.lock;
 3     // 获取锁
 4     lock.lockInterruptibly();
 5     try {
 6         for (;;) {
 7             // 查看队列头的元素
 8             RunnableScheduledFuture<?> first = queue[0];
 9             if (first == null)
10                 // 队列无用元素,线程等待可用
11                 available.await();
12             else {
13                 // 第一个,也是最近一个可用元素的延迟时间
14                 long delay = first.getDelay(NANOSECONDS);
15                 // <= 0表示队头元素有过期或者已到期
16                 if (delay <= 0)
17                     // 完成拉取相关操作
18                     return finishPoll(first);
19                 // 不存在过期元素
20                 first = null; // don't retain ref while waiting
21                 // 前面是否还有消费线程等待消费
22                 if (leader != null)
23                     // 等待
24                     available.await();
25                 else {
26                     // 设置本线程为最先消费线程
27                     Thread thisThread = Thread.currentThread();
28                     leader = thisThread;
29                     try {
30                         // 本线程等待 delay 时长,后被唤醒
31                         // delay 时长 后,队列头第一个元素会过期
32                         available.awaitNanos(delay);
33                     } finally {
34                         if (leader == thisThread)
35                             leader = null;
36                     }
37                 }
38             }
39         }
40     } finally {
41         // 如果 leader 为空,且队列不为空,唤醒一个消费线程
42         if (leader == null && queue[0] != null)
43             // 通知消费线程,延迟队列可用
44             available.signal();
45         // 释放锁
46         lock.unlock();
47     }
48 }
19、DelayedWorkQueue 类中的 finishPoll() 方法
 1 // 完成拉取相关操作
 2 private RunnableScheduledFuture<?> finishPoll(RunnableScheduledFuture<?> f) {
 3     int s = --size;
 4     // 队列最后一个元素,由于数组第一位置空出来了,最后一个元素就需要上浮
 5     RunnableScheduledFuture<?> x = queue[s];
 6     // 数组位置空出来
 7     queue[s] = null;
 8     if (s != 0)
 9         // 二叉堆中的最小堆,下浮操作
10         siftDown(0, x);
11     // 设置数组下标,f是已取出来的元素,下标设为-1
12     setIndex(f, -1);
13     return f;
14 }
四、示例
 1 public class TestScheduledThreadPool {
 2
 3     public static void main(String[] args) throws InterruptedException, ExecutionException {
 4         ScheduledThreadPoolExecutor scheduledThreadPoolExecutor = new ScheduledThreadPoolExecutor(1);
 5
 6         ScheduledFuture<Integer> future1 = scheduledThreadPoolExecutor.schedule(() -> {
 7             System.out.println("我要延迟30s执行");
 8             return 1;
 9         }, 30_000, TimeUnit.MILLISECONDS);
10
11         ScheduledFuture<Integer> future2 = scheduledThreadPoolExecutor.schedule(() -> {
12             System.out.println("我要延迟20s执行");
13             return 2;
14         }, 20_000, TimeUnit.MILLISECONDS);
15
16         ScheduledFuture<Integer> future3 = scheduledThreadPoolExecutor.schedule(() -> {
17             System.out.println("我要延迟8s执行");
18             return 1;
19         }, 8_000, TimeUnit.MILLISECONDS);
20
21
22         scheduledThreadPoolExecutor.shutdown();
23
24         System.out.println(future1.get());
25         System.out.println(future2.get());
26         System.out.println(future3.get());
27
28 //        while (!scheduledThreadPoolExecutor.isTerminated()) {
29 //            Thread.sleep(1000);
30 //        }
31         System.out.println("Game Over~~~");
32
33
34     }
35 }