1--组件
可以理解为页面的一部分,其具有独立的逻辑及功能或界面,同时又能与其他部分进行相应地融合,变成完整的应用。页面可以由这样一个个的组件构成,如导航栏、列表项、弹窗、侧边栏、下拉框、多选框等。页面相当于一个大的框架,将这些组件组合成一个功能更为强大的模块,组件方便被替换或删除,而不影响整个应用程序的运行。
前端组件化的思想:
将大的东西拆成一个个的小东西,然后完成小东西的功能,最后再将这些小东西进行组合,得到最初想要的模样,即分而治之的思想。
使用组件的优势:
提高开发效率;可重用;简化调试步骤;便于协同开发;提升整个项目的可维护性。
2—vue中的组件
Vue中的组件是一个自定义标签,vue.js的编辑器为其添加特殊功能;vue也可以扩展原生的html元素,封装可重用的代码。
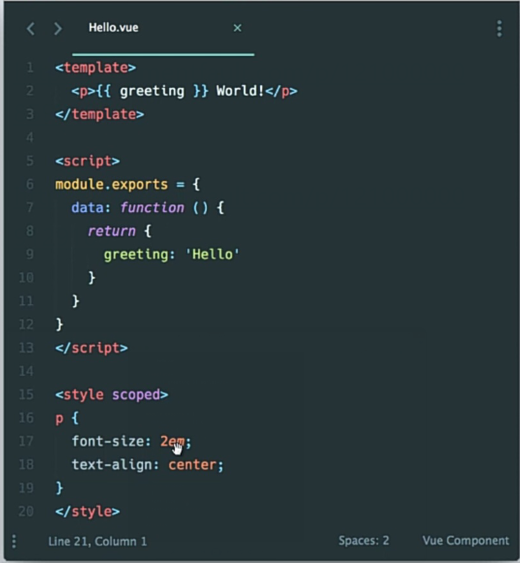
组件的基本组成:样式结构、行为逻辑、数据
如下为单文件组件,包含了样式结构、行为逻辑、数据。
3—注册组件
全局注册:
可以在任何模板中使用,使用前先注册。
语法:使用Vue.component(组件名,选项对象)
其中,Vue是构造函数,component是其下的方法
组件名命名规则:camelCase、kebab-case
在html中使用组件:使用kebab-case命名法
eg. 注册:Vue.component(’my-component’,{})
使用:<my-component></my-component>
局部注册:
在组件实例中通过选项对象注册,只在所注册的作用域中使用
{
components:{

    组件名:选项对象
 }
}
4--组件间通信:
父组件要给子组件传递数据,子组件需要将它内部发生的事情告知给父组件。
父组件->子组件:
组件实例的作用域是孤立的,不能在子组件直接用父组件的数据。
父组件向子组件传递数据时,可以在组件上使用自定义属性绑定数据,在组件中需要显示的用props声明自定义属性。
子组件->父组件:
子组件向父组件传递数据时,需要用到自定义事件,父组件用$on监听自定义事件,$emit触发父组件所关心的自定义事件。父组件用v-on用来监听子组件的事件是否触发了来作出相应的处理。
组件实例的作用域是孤立的。这意味着不能并且不应该在子组件的模板内直接引用父组件的数据。可以使用 props 把数据传给子组件。


<!DOCTYPE html>
<html lang="en">

<head>
    <meta charset="UTF-8">
    <meta name="viewport" content="width=device-width, initial-scale=1.0">
    <meta http-equiv="X-UA-Compatible" content="ie=edge">
    <title>Document</title>
    <script src="https://cdn.jsdelivr.net/npm/vue/dist/vue.js"></script>

    <script src="https://cdn.jsdelivr.net/npm/axios@0.12.0/dist/axios.min.js"></script>
    <script src="https://cdn.jsdelivr.net/npm/lodash@4.13.1/lodash.min.js"></script>
    <style>
    </style>
</head>

<body>
    <div id="app" class="common">
        <my-component :my-name="name" :my-age="age"></my-component>
    </div>
    <template id="myComponent">
        <div>
            子组件数据:
            <p>name:{{myName}}</p>
            <p>name:{{myAge}}</p>
        </div>
    </template>
    <script>
        new Vue({
            el:'#app',
            data:{
                name:'kkkk',
                age:20
            },
            components: {
                'my-component':{
                    template:'#myComponent',
                    props:['myName','myAge']
                }
            }
        })

    </script>
</body>

</html>

在子组件中定义prop时,使用了camelCase命名法。由于HTML特性不区分大小写,camelCase的prop用于特性时,需要转为 kebab-case(短横线隔开)。
例如,在prop中定义的myName,在用作特性时需要转换为my-name


父组件访问子组件:使用$children或$refs
子组件访问父组件:使用$parent
子组件访问根组件:使用$root

$children示例:

<!DOCTYPE html>
<html lang="en">
<head>
    <meta charset="UTF-8">
    <meta name="viewport" content="width=device-width, initial-scale=1.0">
    <meta http-equiv="X-UA-Compatible" content="ie=edge">
    <title>Document</title>
    <script src="https://cdn.jsdelivr.net/npm/vue/dist/vue.js"></script>
    <script src="https://cdn.jsdelivr.net/npm/axios@0.12.0/dist/axios.min.js"></script>
    <script src="https://cdn.jsdelivr.net/npm/lodash@4.13.1/lodash.min.js"></script>
    <style>
    </style>
</head>
<body>
    <div id="app">
        <parent-component></parent-component>
    </div>
    <template id="parent-component">
        <div>
           <child-component1></child-component1>
            <child-component2></child-component2>
            <button @click="showChildComponentData">显示子组件数据</button>
        </div>
    </template>
    <template id="child-component1">
        <h2>child-component1 data: {{msg}}</h2>
    </template>
    <template id="child-component2">
         <h2>child-component2 data: {{msg}}</h2>
    </template>
    <script>
        Vue.component('parent-component', {
            template:'#parent-component',
            components: {
                'child-component1':{
                    template:'#child-component1',
                    data:function(){
                        return {
                            msg: 'child-component1'
                        }
                    }
                },
                'child-component2':{
                    template:'#child-component2',
                    data:function(){
                        return {
                            msg: 'child-component2'
                        }
                    }
                }
            },
            methods: {
                // 在父组件中,通过this.$children可以访问子组件。
                // this.$children是一个数组,它包含所有子组件的实例。
                showChildComponentData: function(){
                    for(var i= 0; i < this.$children.length; i++) {
                        (this.$children[i].msg)
                    }
                }
            }
        })
        new Vue({
            el:'#app',
        })

    </script>
</body>

</html>


$refs示例:

组件个数较多时,在子组件上使用v-ref指令,可以给子组件指定一个索引ID
ref 被用来给元素或子组件注册引用信息。引用信息将会注册在父组件的 $refs 对象上。如果在普通的 DOM 元素上使用,引用指向的就是 DOM 元素;如果用在子组件上,引用就指向组件实例:
$refs 也不是响应式的,因此你不应该试图用它在模板中做数据绑定。
<!DOCTYPE html>
<html lang="en">

<head>
    <meta charset="UTF-8">
    <meta name="viewport" content="width=device-width, initial-scale=1.0">
    <meta http-equiv="X-UA-Compatible" content="ie=edge">
    <title>Document</title>
    <script src="https://cdn.jsdelivr.net/npm/vue/dist/vue.js"></script>

    <script src="https://cdn.jsdelivr.net/npm/axios@0.12.0/dist/axios.min.js"></script>
    <script src="https://cdn.jsdelivr.net/npm/lodash@4.13.1/lodash.min.js"></script>
    <style>
    </style>
</head>

<body>
    <div id="app" class="common">
        <parent-component></parent-component>
    </div>

    <template id="parent-component">
         <div>
            <child-component1 ref="comp1"></child-component1>
            <child-component2 ref="comp2"></child-component2>
            <button @click="showChildComponentDataRef">显示子组件数据ref</button>
         </div>
    </template>
    <template id="child-component1">
        <h2>child-component1 data {{msg}}</h2>
    </template>
    <template id="child-component2">
         <h2>child-component2 data {{msg}}</h2>
    </template>
    <script>
        Vue.component('parent-component', {
            template:'#parent-component',
            components: {
                'child-component1':{
                    template:'#child-component1',
                    data:function(){
                        return {
                            msg: 'child-component1'
                        }
                    }
                },
                'child-component2':{
                    template:'#child-component2',
                    data:function(){
                        return {
                            msg: 'child-component2'
                        }
                    }
                }
            },
            methods: {
                showChildComponentDataRef: function() {
                    console.log(this.$refs,'refs')
                    alert(this.$refs.comp1.msg);
                    alert(this.$refs.comp2.msg);
                }
            }
        })
        new Vue({
            el:'#app',
        })
    </script>
</body>

</html>


在子组件中,通过this.$parent可以访问到父组件的实例,推荐 -只有组件自己能修改它的状态
<!DOCTYPE html>
<html lang="en">

<head>
    <meta charset="UTF-8">
    <meta name="viewport" content="width=device-width, initial-scale=1.0">
    <meta http-equiv="X-UA-Compatible" content="ie=edge">
    <title>Document</title>
    <script src="https://cdn.jsdelivr.net/npm/vue/dist/vue.js"></script>

    <script src="https://cdn.jsdelivr.net/npm/axios@0.12.0/dist/axios.min.js"></script>
    <script src="https://cdn.jsdelivr.net/npm/lodash@4.13.1/lodash.min.js"></script>
    <style>
    </style>
</head>

<body>
    <div id="app">
        <parent-component></parent-component>
    </div>

    <template id="parent-component">
         <div>
            <child-component></child-component>
         </div>
    </template>
    <template id="child-component">
        <div>
            <h2>child-component</h2>
            <button @click="showChildComponentDataParent">显示父组件数据</button>
        </div>

    </template>

    <script>
        Vue.component('parent-component', {
            template:'#parent-component',
            components:{
                'child-component':{
                    template:'#child-component',
                    methods: {
                        showChildComponentDataParent() {
                            // 尽管可以访问父链上任意的实例,不过子组件应当避免直接依赖父组件的数据,尽量显式地使用 props 传递数据
                            // 推荐:只有组件自己能修改它的状态
                            console.log(this.$parent)
                            alert(this.$parent.msg)
                        }
                    }
                }
            },
            data:function(){
                return {
                    msg:'i am parent component data'
                }
            }
            })
        new Vue({
            el:'#app',
        })

    </script>
</body>

</html>


自定义事件:

有时候我们希望触发父组件的某个事件时,可以通知到子组件;触发子组件的某个事件时,可以通知到父组件。
Vue 实例实现了一个自定义事件接口,用于在组件树中通信。这个事件系统独立于原生 DOM 事件,用法也不同。
// 每个vue实例都是一个事件触发器:使用$on()监听事件;使用$emit()在它上面派发事件;使用$dispatch()派发事件,事件沿着父链冒泡;使用$broadcast()广播事件,事件向下传导给所有的后代

// ps $dispatch()  $broadcast()  已弃用


vue.js 组件的api来源于:prop slot  事件

prop允许外部环境传递数据给组件
事件允许组件触发外部环境的action
slot允许外部环境插入内容到组件的视图结构内
<!DOCTYPE html>
<html lang="en">

<head>
    <meta charset="UTF-8">
    <meta name="viewport" content="width=device-width, initial-scale=1.0">
    <meta http-equiv="X-UA-Compatible" content="ie=edge">
    <title>Document</title>
    <script src="https://cdn.jsdelivr.net/npm/vue/dist/vue.js"></script>

    <script src="https://cdn.jsdelivr.net/npm/axios@0.12.0/dist/axios.min.js"></script>
    <script src="https://cdn.jsdelivr.net/npm/lodash@4.13.1/lodash.min.js"></script>
    <style>
        .red{
            background: skyblue;
        }
    </style>
</head>

<body>
    <div id="app" class="common">
        <my-component></my-component>
    </div>
    // 二者等价
    <template id="myComponent">
        <div>This is a component1!</div>
    </template>
    <-- <script type="text/x-template" id="myComponent">
        <div>This is a component2!</div>
    </script> -->
    <script>
        // Vue.component()的第1个参数是标签名称,第2个参数是一个选项对象,使用选项对象的template属性定义组件模板
       Vue.component('my-component', {
        // 模板id
           template:`#myComponent`
       })

        new Vue({
            el:'#app'
        })

    </script>
</body>

</html>

template选项现在不再是HTML元素,而是一个id,Vue.js根据这个id查找对应的元素,然后将这个元素内的HTML作为模板进行编译。如果使用<template>标签,则不需要指定type属性。
使用<script>标签时,type指定为text/x-template,意在告诉浏览器这不是一段js脚本,浏览器在解析HTML文档时会忽略<script>标签内定义的内容。

ps:二者等价,选其一就可以了
    <template id="myComponent">
        <div>This is a component1!</div>
    </template>
    与
       <script type="text/x-template" id="myComponent">
        <div>This is a component2!</div>
    </script>
5—组件中的data必须是函数
每个组件是相互独立的,如果它们共用一个对象,在更改一个组件数据的时候,会影响其他组件。如果是函数的话,每个组件都会有自己独立的数据,相互之间不会影响。
6—受限制的元素
DOM模板解析:vue是在浏览器解析和标准化html后才获取模板内容,所以有些元素限制了能被它包裹的元素。如ul里只能放li
某些元素中放入了自定义属性,不符合W3C标准,会解析错误。变通的方式:使用特殊属性is来扩展HTML标签功能。

7-单向数据流
数据从父组件流向(传递)子组件,只能单向绑定。在子组件内部不应该修改父组件传递过来的数据。
改变prop的情况:
作为data中局部数据的初始值使用;作为子组件中的computed属性。
8-props验证
组件可以为props指定验证要求,如果未指定验证要求,vue会发出警告。
Props:{

  propA:Number,  //指定类型

  propB:[String,Number],//多种类型

  propC:[type:String,required:true], //必传,且为字符串

  propD:[type:Number,default:100],//数字类型,默认100

  propE:{type:Number,default:function(){

   return 1000

}},

//自定义验证规则

propF:{validator:function(value){return value>10}}

}
9-使用slot分发内容
使用一种方式混合父组件的的内容与子组件自己的模板,这个过程被称为内容分发。在子组件中使用特殊的<slot>元素作为内容的插槽。这样可使组件的可扩展性更强。
单个slot:
在子组件模板中有slot标签,被视为备用内容,在父组件不提供内容的情况下使用,如果父组件提供内容,则把整个内容片段插入到slot所在的dom位置,并替换掉slot标签本身。
子组件模板中没有slot标签,父组件提供的内容会被抛弃。
<div id="app">
    <h2>自定义组件</h2>
    <custom>
        <!--当写在自定义标签之间的内容,要混合子组件中的模板-->
        <div>我是html结构</div>
    </custom>
</div>
<script>
    //定制模板div
    Vue.component("custom",{
        template:`
         <div>
            <slot>//该标签内的内容将会被我是html结构覆盖掉
            <p>这是第1个提醒</p>
            <p>这是第2个提醒</p>
            <p>这是第3个提醒</p>
            </slot>
         </div>
        `
    })
    new Vue({
        el:"#app"
    });
</script>
<body>
<div id="app">
    <h2>自定义组件</h2>
    <custom>
        <!--当写在自定义标签之间的内容,要混合子组件中的模板-->
        <div>替换第1个提醒</div>
        <div>替换第2个提醒</div>
        <div>替换第3个提醒</div>
    </custom>
</div>
<script>
    //定制模板div
    Vue.component("custom",{
        template:`
         <div>
            <slot>
            <p>这是第1个提醒</p>
            <p>这是第2个提醒</p>
            <p>这是第3个提醒</p>
            </slot>
         </div>
        `
    })
    new Vue({
        el:"#app"
    });
</script>
</body>
具名slot:
<slot>元素可以用一个特殊的属性name来配置如何分发内容。
可以使用一个匿名的slot,处理那些没有对应slot的内容
<div id="app">
    <h2>自定义组件</h2>
    <custom>
        <!--当写在自定义标签之间的内容,要混合子组件中的模板-->
        <div slot="one">替换第1个提醒</div>
        <div slot="three">替换第3个提醒</div>
        <template slot="two">
            <div>替换第2个提醒</div>
            <span>替换第2个提醒</span>
            <div>替换第2个提醒</div>
        </template>
    </custom>
</div>
<script>
    //定制模板div
    Vue.component("custom",{
        template:`
         <div>
         <slot name="one"><p>这是第1个提醒</p></slot>
         <slot name="two"><p>这是第2个提醒</p></slot>
         <slot name="three"><p>这是第3个提醒</p></slot>
         </div>
        `
    })
    new Vue({
        el:"#app"
    });
</script>
编译作用域:
父组件模板的内容在父组件作用域内编译;子组件模板的内容在子组件作用域内编译。
<!DOCTYPE html>
<html>
<head lang="en">
    <meta charset="UTF-8">
    <title></title>
    <script src="vue.js"></script>
</head>
<body>
<div id="app">
    <custom>  <!--这里渲染的数据是父组件中的数据-->
        {{message}}
    </custom>
</div>
<script>
    Vue.component("custom",{  //子组件
        data(){
          return {
              message:"我是子组件的数据"
          }
    },
    template:`
       <div>
          {{message}}  <!--这里是渲染子组件里的数据-->
            <p>我是第1个提醒</p>
            <slot></slot>
       </div>
    `
    })
    new Vue({   //父组件
        el:"#app",
        data:{
            message:"我是父组件的数据"
        }
    });
</script>
</body>
</html>
10. 获取url中参数:
通过路由跳转的页面交互,可通过this.$route.query或this.$route.params获取url中地址参数
ps:看的东西有点杂,且是之前的word笔记后更新到博客,除了官网,想不起来具体参考哪些了各路大神了,如有雷同,欢迎指出。