引子
颜色渐变一般两种方式(好像是废话额,因为凡是涉及到特效或者动画,基本都是两种方式··)
一种是写XML配置,一种是写纯代码;下面分别就两个种方式给出demo;
方式1
在drawable/目录下创建一个文件gradient.xml,内容如下:
<shape xmlns:android="http://schemas.android.com/apk/res/android">
    <gradient
        android:angle="0"
        android:endColor="@android:color/holo_red_light"
        android:startColor="@android:color/holo_green_light" />
</shape>
然后给某个view指定background:
 <View
                 android:layout_width="@dimen/shape_width"
                 android:layout_height="@dimen/shape_width"
                 android:background="@drawable/gradient" />
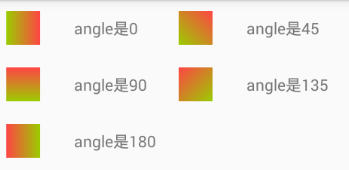
实际效果如下:

上面的gradient,我们用了3个属性:angle角度,startColor,endColor起始和结束的颜色;
起始结束颜色好理解,这里的这个angle,其实我们还可以指定为其他值,上面指定0 ,我们得到了一个从左到右的渐变;
此外还可以指定,
0 是从左到右渐变;45是从左下角向右上角渐变;90是从下到上,135是从右下角到左上角;180则是从右到左;(当然也可以是 -45,-90....)
优点:简单有效。足以应付大部分的渐变需求;
缺点: 不够灵活,不能满足高级需求。而且不支持任意角度(很诡异,只支持45的倍数);
方式二
利用LinearGradient + Paint + 自定义View;
由于是纯代码实现,我就直接帖代码了;重点看红色文字部分;
 1 package com.example.colorstudy;
 2
 3 import android.content.Context;
 4 import android.content.res.TypedArray;
 5 import android.graphics.Canvas;
 6 import android.graphics.Color;
 7 import android.graphics.LinearGradient;
 8 import android.graphics.Paint;
 9 import android.graphics.Shader;
10 import android.support.annotation.Nullable;
11 import android.util.AttributeSet;
12 import android.view.View;
13
14 public class GradientDemoView extends View {
15
16     public GradientDemoView(Context context) {
17         this(context, null);
18     }
19
20     public GradientDemoView(Context context, @Nullable AttributeSet attrs) {
21         this(context, attrs, 0);
22     }
23
24     public GradientDemoView(Context context, @Nullable AttributeSet attrs, int defStyleAttr) {
25         super(context, attrs, defStyleAttr);
26         initAttrs(context, attrs);
27     }
28
29     private int mode;
30
31     private void initAttrs(Context context, AttributeSet attrs) {
32         TypedArray ta = context.obtainStyledAttributes(attrs, R.styleable.GradientDemoView);
33         if (null != ta) {
34             mode = ta.getInteger(R.styleable.GradientDemoView_mode, 0);
35         }
36     }
37
38     @Override
39     protected void onDraw(Canvas canvas) {
40         super.onDraw(canvas);
41
42         int width = getWidth();
43         int height = getHeight();
44
45         int colorStart = Color.RED;
46         int color1 = Color.GREEN;
47         int colorEnd = Color.BLUE;
48
49         Paint paint = new Paint();
50
51         //重点解析这里的渐变配置
52 /**
53  * Create a shader that draws a linear gradient along a line.   创建一个沿着"一条线"绘制线性渐变的着色器?
54  *
55  * @param x0           "一条线"开始位置的X   - 这个坐标是以 左上角为原点,对哦,android里面所有的绘制都是以控件左上角为原点(0,0)
56  * @param y0           "一条线"开始位置的Y
57  * @param x1           "一条线"结束为止的X
58  * @param y1           "一条线"结束为止的Y
59  * @param colors       颜色数组,可以是3个以上
60  * @param positions    颜色分段权重:比如说,有3种颜色,红绿蓝渐变,这里的positions的值是new float[]{0, 0.75f, 1f};
61  *                     则,0到0.75这一段,是红色渐变为绿色,0.75到1这一段是 绿色渐变为蓝色;
62  * @param tile         填充模式?
63  *                     详解:
64  *                     CLAMP : 重复最后一种颜色直到View结束(当你的起始结束的坐标并没有覆盖整个View,那么这种模式将会用最后一种颜色填充剩余的部分)
65  *                     REPEAT: 当你的起始结束的坐标并没有覆盖整个View,这种模式将会进行颜色的重新渐变;
66  *                     MIRROR: 镜像模式绘制,当你的起始结束的坐标并没有覆盖整个View,剩余的部分将会尽量和已经绘制的部分颜色对称;
67  */
68         LinearGradient backGradient = null;
69         if (mode == 0) {
70             backGradient = new LinearGradient(0, 0, 0, height / 2,
71                     new int[]{colorStart, color1, colorEnd}, new float[]{0, 0.75f, 1f}, Shader.TileMode.CLAMP);
72         } else if (mode == 1) {
73             backGradient = new LinearGradient(0, 0, 0, height / 2,
74                     new int[]{colorStart, color1, colorEnd}, new float[]{0, 0.75f, 1f}, Shader.TileMode.REPEAT);
75         } else if (mode == 2) {
76             backGradient = new LinearGradient(0, 0, 0, height / 2,
77                     new int[]{colorStart, color1, colorEnd}, new float[]{0, 0.75f, 1f}, Shader.TileMode.MIRROR);
78         }
79
80
81         paint.setShader(backGradient);
82         canvas.drawRect(0, 0, width, height, paint);
83
84     }
85
86
87 }
其他文件:res/values/attr.xml
<resources>
    <declare-styleable name="GradientDemoView">
        <attr name="mode" format="integer" />
    </declare-styleable>
</resources>
res/values/dimens.xml
<?xml version="1.0" encoding="utf-8"?>
<resources>
    <dimen name="shape_width">30dp</dimen>
</resources>
使用此控件的xml:
<GridLayout
android:layout_width="match_parent"
android:layout_height="wrap_content"
android:columnCount="2"
android:rowCount="2">
<LinearLayout
android:layout_width="wrap_content"
android:layout_height="wrap_content"
android:layout_margin="10dp"
android:gravity="center"
android:orientation="horizontal">
<com.example.colorstudy.GradientDemoView
android:layout_width="@dimen/shape_width"
android:layout_height="@dimen/shape_width"
app:mode="0" />
<TextView
android:layout_width="wrap_content"
android:layout_height="wrap_content"
android:layout_marginLeft="30dp"
android:text="CLAMP模式" />
</LinearLayout>
<LinearLayout
android:layout_width="wrap_content"
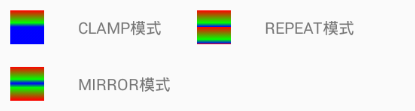
android:layout_height="wrap_content"
android:layout_margin="10dp"
android:gravity="center"
android:orientation="horizontal">
<com.example.colorstudy.GradientDemoView
android:layout_width="@dimen/shape_width"
android:layout_height="@dimen/shape_width"
app:mode="1" />
<TextView
android:layout_width="wrap_content"
android:layout_height="wrap_content"
android:layout_marginLeft="30dp"
android:text="REPEAT模式" />
</LinearLayout>
<LinearLayout
android:layout_width="wrap_content"
android:layout_height="wrap_content"
android:layout_margin="10dp"
android:gravity="center"
android:orientation="horizontal">
<com.example.colorstudy.GradientDemoView
android:layout_width="@dimen/shape_width"
android:layout_height="@dimen/shape_width"
app:mode="2" />
<TextView
android:layout_width="wrap_content"
android:layout_height="wrap_content"
android:layout_marginLeft="30dp"
android:text="MIRROR模式 " />
</LinearLayout>
</GridLayout>
实际效果:
优点:几乎能够满足你能想到的所有渐变需求,处理起来很灵活;渐变色可以是3个以上,每种颜色占比多少可以自己调节,渐变的模式自己指定;而且还可以顺带加上其他特效,就这一点,xml写配置就无法比拟;
缺点:如果是较为复杂的渐变,对开发人员要求就比较高了,而且还 可能涉及到什么数学算法之类的,数学渣一脸泪有木有·····
ok就酱紫咯。喜欢的大佬,欢迎复制;