本文记录使用Intellij创建Maven Web工程搭建Spring MVC + Mybatis 的一个非常简单的示例。关于Mybatis的入门使用可参考这篇文章,本文在该文的基础上,引入了Spring MVC功能。首先是创建项目:
打开Intellij,File-->new Project--->选中,Maven--->勾上"Create from archetype"--->选择 Maven web project。如下图:

一步步Next,等待工程Build成功,如果右下角有提示“Maven project need to be imported“则点击: import change...”
完了之后,整个项目Build Success,会生成如下初始目录:

在src.main下新建一个文件夹 java, 作为源代码目录。CTRL+ALT+SHIFT+S 打开“project structure配置窗口”,将 java 目录关联成 source目录。

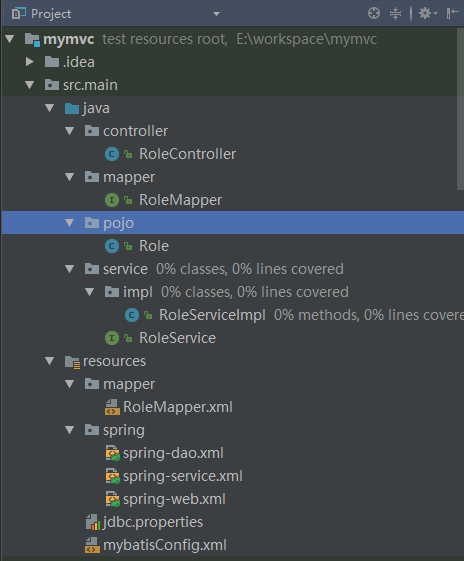
在 java 目录下创建四个子目录 controller、mapper、pojo、service
controller,控制器类。DispatcherServlet将拦截到的HTTP请求交给对应的Controller来处理,Controller调用 Service 完成相应的请求任务。
service,业务逻辑实现类。Service 一般都需要DAO类(或者说Mapper类)操作数据库,然后完成相应的业务逻辑处理。
mapper,数据库操作类。定义了一些如何操作数据库的方法。
pojo,实体类。对应数据库中的表,一般pojo类中的每个属性对应数据库中的一个字段。
此外,还有配置文件目录。在 src/main/resources目录下,新建mapper文件夹,与 src/main/java/mapper 对应:一个RoleMapper.java 对应着一个 RoleMapper.xml配置文件,再加上相应的Spring配置就可以实现数据库的操作。在 src/main/resources目录下,新建spring文件夹,里面有三个配置文件:spring-web.xml是web相关配置;spring-dao.xml是数据库相关的配置;spring-service.xml是Service类相关的配置。当然也可以将所有的配置放在一个文件里,比如常见的applicationContext.xml,分开配置的话,可能看起来更清晰。大致目录结构如下:
POJO类 Role.java代码和数据库表t_role字段,参考这篇文章前面部分。RoleMapper.java 定义了操作数据库的方法--根据 id字段 来查找 Role,getRole方法配合RoleMapper.xml中定义的数据库操作语句,就可以由Mybatis框架来负责所有的数据库操作事宜了。代码如下:
package mapper;
import org.springframework.stereotype.Repository;
import pojo.Role;
@Repository
public interface RoleMapper {
    public Role getRole(long id);
}
对应的RoleMapper.xml配置如下:
<?xml version="1.0" encoding="UTF-8"?>
<!DOCTYPE mapper PUBLIC "-//mybatis.org//DTD Mapper 3.0//EN"
        "http://mybatis.org/dtd/mybatis-3-mapper.dtd">

<mapper namespace="mapper.RoleMapper">
    <select id="getRole" parameterType="long" resultType="Role">
        select id,
        role_name as roleName, note from t_role where id = #{id}
    </select>
</mapper>
再来看业务逻辑,很简单:用户从浏览器中发一个查询请求 Role,请求的参数为 id,Service根据 id 去数据库找 Role 记录,返回给用户 id 对应的Role。
RoleService.java代码如下:
package service;
import pojo.Role;
/**
 * Created by Administrator on 2017/8/10.
 */
public interface RoleService {
    public Role getRole(long id);
}
具体的实现类如下:
 1 package service.impl;
 2
 3 import mapper.RoleMapper;
 4 import org.springframework.beans.factory.annotation.Autowired;
 5 import org.springframework.stereotype.Service;
 6 import pojo.Role;
 7 import service.RoleService;
 8
 9 /**
10  * Created by Administrator on 2017/8/10.
11  */
12 @Service
13 public class RoleServiceImpl implements RoleService {
14
15     @Autowired
16     private RoleMapper roleMapper;
17
18     public Role getRole(long id){
19         Role role = roleMapper.getRole(id);
20         return role;
21     }
22 }
第12行,@Service 以Spring注解的方式将RoleServiceImpl定义成Bean,在spring-service.xml中配置:component-scan,让Spring去扫描 service包下带有注解的类,告诉Spring容器 RoleService(Impl)类 是一个Bean对象。在其它类中就可以用 @Autowired 将RoleService注入。
    <!-- 扫描service包下所有使用注解的类型 -->
    <context:component-scan base-package="service" />
完整spring-sevice.xml配置文件:


<?xml version="1.0" encoding="UTF-8"?>
<beans xmlns="http://www.springframework.org/schema/beans"
       xmlns:xsi="http://www.w3.org/2001/XMLSchema-instance"
       xmlns:context="http://www.springframework.org/schema/context"
       xmlns:tx="http://www.springframework.org/schema/tx"
       xsi:schemaLocation="http://www.springframework.org/schema/beans
    http://www.springframework.org/schema/beans/spring-beans.xsd
    http://www.springframework.org/schema/context
    http://www.springframework.org/schema/context/spring-context.xsd
    http://www.springframework.org/schema/tx
    http://www.springframework.org/schema/tx/spring-tx.xsd">
    <!-- 扫描service包下所有使用注解的类型 -->
    <context:component-scan base-package="service" />
    <import resource="spring-dao.xml"/>
    <!-- 配置事务管理器 -->
    <bean id="transactionManager"
          class="org.springframework.jdbc.datasource.DataSourceTransactionManager">
        <!-- 注入数据库连接池 -->
        <property name="dataSource" ref="dataSource" />
    </bean>

    <!-- 配置基于注解的声明式事务 -->
    <tx:annotation-driven transaction-manager="transactionManager" />
</beans>
RoleController.java代码如下:
 1 package controller;
 2
 3 import org.springframework.beans.factory.annotation.Autowired;
 4 import org.springframework.stereotype.Controller;
 5 import org.springframework.web.bind.annotation.RequestMapping;
 6 import org.springframework.web.bind.annotation.RequestParam;
 7 import org.springframework.web.bind.annotation.ResponseBody;
 8 import pojo.Role;
 9 import service.RoleService;
10
11 /**
12  * Created by Administrator on 2017/8/10.
13  */
14 @Controller
15 public class RoleController {
16     @Autowired
17     private RoleService roleService;
18
19     @RequestMapping("/role/getRole")
20     @ResponseBody public Role getRole(@RequestParam("id") long id)
21     {
22         long start = System.currentTimeMillis();
23         Role role = roleService.getRole(id);
24         long end = System.currentTimeMillis();
25         System.out.println(end-start);
26         return role;
27     }
28 }
14行,@Controller 以Spring注解的方式将 RoleController类定义为Spring容器可管理的Bean。
19行,在web.xml中配置了 servlet-mapping,当浏览器请求的URL带有"role/getRole"时,就会拦截请求将给 RoleController来处理。
20行,@ResponseBody定义了 处理之后的返回值,将 Role 对象以 JSON格式封装起来,返回给浏览器。@RequestParam("id"),定义请求参数。
比如在浏览器中输入:http://localhost:8000/mvc/role/getRole?id=5

数据库中记录如下:

这一切到底是如何得到的呢?
①RoleController需要一个RoleService对象,然后在第23行调用 getRole方法,返回一个Role对象。首先第16-17行,使用 @Autowired将 RoleService注入到RoleController中,这样RoleController不需要显示地new RoleService对象,对应的创建过程由Spring容器自动完成----对象的创建 与 “对象的使用” 解耦。“对象的使用其实就是业务逻辑,让开发者不需要关注对象的创建了”
②为什么Spring容器知道 将 RoleService 作为一个Bean注入到 RoleController中去呢?
因为,RoleService类使用 了@Service 注解,并且在spring-service.xml中配置 了<component-scan....> 见上面RoleService源代码部分。
③为什么 roleSevice.getRole(id)就能从数据库中查找相应的记录并返回呢?前面的RoleMapper.java 和 RoleMapper.xml配置文件已经定义好了操作数据库的语句:
select id,role_name as roleName, note from t_role where id = #{id}
然后我们又在spring-dao.xml中配置了访问数据库:详细具体解释如下:
<context:component-scan base-package="mapper"/>
告诉Spring容器扫描mapper目录下的 带注解的类,这样RoleService就可以自动注入 RoleMapper对象了,有了RoleMapper对象,通过Mybatis框架,就可以访问数据库了。而Spring与Mybatis的整合依赖包,就需要在pom.xml中给出:
    <dependency>
      <groupId>org.mybatis</groupId>
      <artifactId>mybatis-spring</artifactId>
      <version>1.3.0</version>
    </dependency>
    <dependency>
      <groupId>org.mybatis</groupId>
      <artifactId>mybatis</artifactId>
      <version>3.4.0</version>
    </dependency>
<context:property-placeholder location="classpath:jdbc.properties"/>
配置数据库连接信息:访问哪个数据库?数据库地址在哪?访问数据库的端口是什么?用户名和密码是什么?这些信息都在jdbc.properties文件中定义好了,<context:property-placeholder>告诉Spring容器去哪里读取jdbc.properties配置文件。jdbc.properties文件如下:
jdbc.driver=com.mysql.jdbc.Driver
jdbc.url=jdbc:mysql://localhost:3306/test
jdbc.username=root
jdbc.password=xxxxx
知道了数据库在哪里了,以何种方式连接数据库呢?一般会配置各种连接池
    <!-- 2.数据库连接池 -->
    <bean id="dataSource" class="com.mchange.v2.c3p0.ComboPooledDataSource">
        <!-- 配置连接池属性 -->
        <property name="driverClass" value="${jdbc.driver}"/>
        <property name="jdbcUrl" value="${jdbc.url}"/>
        <property name="user" value="${jdbc.username}"/>
        <property name="password" value="${jdbc.password}"/>

        <!-- c3p0连接池的私有属性 -->
        <property name="maxPoolSize" value="30"/>
        <property name="minPoolSize" value="10"/>
        <!-- 关闭连接后不自动commit -->
        <property name="autoCommitOnClose" value="false"/>
        <!-- 获取连接超时时间 -->
        <property name="checkoutTimeout" value="10000"/>
        <!-- 当获取连接失败重试次数 -->
        <property name="acquireRetryAttempts" value="2"/>
    </bean>
连接池的依赖包,又在哪里呢?因为我们使用的是Maven POM管理依赖,在pom.xml文件中就需要配置:
    <dependency>
      <groupId>mysql</groupId>
      <artifactId>mysql-connector-java</artifactId>
      <version>5.1.37</version>
      <scope>runtime</scope>
    </dependency>
    <dependency>
      <groupId>c3p0</groupId>
      <artifactId>c3p0</artifactId>
      <version>0.9.1.2</version>
    </dependency>
配置好了访问数据库的环境,还需要访问数据库的具体实例,这就是SqlSession。于是继续在spring-dao.xml添加配置:
    <!-- 3.配置SqlSessionFactory对象 -->
    <bean id="sqlSessionFactory" class="org.mybatis.spring.SqlSessionFactoryBean">
        <!-- 注入数据库连接池 -->
        <property name="dataSource" ref="dataSource"/>
        <!-- 配置MyBaties全局配置文件:mybatisConfig.xml -->
        <property name="configLocation" value="classpath:mybatisConfig.xml"/>
        <!-- 扫描entity包 使用别名 -->
        <property name="typeAliasesPackage" value="pojo"/>
        <!-- 扫描sql配置文件:mapper需要的xml文件 -->
        <property name="mapperLocations" value="classpath:mapper/*.xml"/>
    </bean>
接下来再把SqlSession 告诉RoleMapper对象,让它拿着SqlSession去操作数据库。
    <!-- 4.配置扫描Dao接口包,动态实现Dao接口,注入到spring容器中 -->
    <bean class="org.mybatis.spring.mapper.MapperScannerConfigurer">
        <!-- 注入sqlSessionFactory -->
        <property name="sqlSessionFactoryBeanName" value="sqlSessionFactory"/>
        <!-- 给出需要扫描mapper接口包 -->
        <property name="basePackage" value="mapper"/>
    </bean>
因此,这也是为什么 我们只需要通过Spring将RoleMapper能够访问数据库的原因。而当 Service需要访问数据库时,只需要将RoleMapper注入进来,就可以执行getRole方法查询数据库了。
完整的spring-dao.xml配置文件:
<?xml version="1.0" encoding="UTF-8"?>
<beans xmlns="http://www.springframework.org/schema/beans"
       xmlns:xsi="http://www.w3.org/2001/XMLSchema-instance"
       xmlns:context="http://www.springframework.org/schema/context"
       xsi:schemaLocation="http://www.springframework.org/schema/beans
    http://www.springframework.org/schema/beans/spring-beans.xsd
    http://www.springframework.org/schema/context
    http://www.springframework.org/schema/context/spring-context.xsd">

    <context:component-scan base-package="mapper"/>
    <!-- 配置整合mybatis过程 -->
    <!-- 1.配置数据库相关参数properties的属性:${url} -->

    <context:property-placeholder location="classpath:jdbc.properties"/>

    <!-- 2.数据库连接池 -->
    <bean id="dataSource" class="com.mchange.v2.c3p0.ComboPooledDataSource">
        <!-- 配置连接池属性 -->
        <property name="driverClass" value="${jdbc.driver}"/>
        <property name="jdbcUrl" value="${jdbc.url}"/>
        <property name="user" value="${jdbc.username}"/>
        <property name="password" value="${jdbc.password}"/>

        <!-- c3p0连接池的私有属性 -->
        <property name="maxPoolSize" value="30"/>
        <property name="minPoolSize" value="10"/>
        <!-- 关闭连接后不自动commit -->
        <property name="autoCommitOnClose" value="false"/>
        <!-- 获取连接超时时间 -->
        <property name="checkoutTimeout" value="10000"/>
        <!-- 当获取连接失败重试次数 -->
        <property name="acquireRetryAttempts" value="2"/>
    </bean>

    <!-- 3.配置SqlSessionFactory对象 -->
    <bean id="sqlSessionFactory" class="org.mybatis.spring.SqlSessionFactoryBean">
        <!-- 注入数据库连接池 -->
        <property name="dataSource" ref="dataSource"/>
        <!-- 配置MyBaties全局配置文件:mybatisConfig.xml -->
        <property name="configLocation" value="classpath:mybatisConfig.xml"/>
        <!-- 扫描entity包 使用别名 -->
        <property name="typeAliasesPackage" value="pojo"/>
        <!-- 扫描sql配置文件:mapper需要的xml文件 -->
        <property name="mapperLocations" value="classpath:mapper/*.xml"/>
    </bean>

    <!-- 4.配置扫描Dao接口包,动态实现Dao接口,注入到spring容器中 -->
    <bean class="org.mybatis.spring.mapper.MapperScannerConfigurer">
        <!-- 注入sqlSessionFactory -->
        <property name="sqlSessionFactoryBeanName" value="sqlSessionFactory"/>
        <!-- 给出需要扫描Dao接口包 -->
        <property name="basePackage" value="mapper"/>
    </bean>
</beans>
前面介绍的都是Spring应用上下文,而这里的 HTTP请求牵涉到 web应用上下文,二者是如何结合的呢?在web.xml中进行配置:
 <servlet>
    <servlet-name>mvc</servlet-name>
    <servlet-class>org.springframework.web.servlet.DispatcherServlet</servlet-class>
    <!-- 配置springMVC需要加载的配置文件
        spring-dao.xml,spring-service.xml,spring-web.xml
        Mybatis - > spring -> springmvc
     -->
    <init-param>
      <param-name>contextConfigLocation</param-name>
      <param-value>classpath:spring/spring-*.xml</param-value>
    </init-param>
  </servlet>
通过contextConfigLocation将 spring上下文中的配置文件加载进来,实现二者的结合。
发起请求--->请求拦截--->返回请求 是如何实现的呢?在web.xml中配置了servlet-mapping,其中的<servlet-name>mvc</servlet-name>这也是请求URL中 有 mvc 前缀的原因。<url-pattern>将匹配的请求交给DispatcherServlet,由DispatcherServlet转发给相应的 Controller,在RoleController.java中使用 @RequestMapping配置了 请求的路径role/getRole,这样 http://localhost:8000/mvc/role/getRole?id=5 就会交给RoleController来处理了。
最后,还需要启动web应用程序,在 pom.xml中配置 jetty 容器,来运行web应用:
<!-- jetty插件 -->
      <plugin>
        <groupId>org.mortbay.jetty</groupId>
        <artifactId>maven-jetty-plugin</artifactId>
        <version>6.1.25</version>
        <configuration>
          <connectors>
            <connector implementation="org.mortbay.jetty.nio.SelectChannelConnector">
              <port>8000</port>
              <maxIdleTime>60000</maxIdleTime>
            </connector>
          </connectors>
          <contextPath>/mvc</contextPath>
          <scanIntervalSeconds>0</scanIntervalSeconds>
        </configuration>
      </plugin>
就可以在IDEA右侧,maven project中点击 jetty run 来运行了。

附完整的:mybatisConfig.xml
<?xml version="1.0" encoding="UTF-8" ?>
<!DOCTYPE configuration
        PUBLIC "-//mybatis.org//DTD Config 3.0//EN"
        "http://mybatis.org/dtd/mybatis-3-config.dtd">
<configuration>
    <!-- 配置全局属性 -->
    <settings>
        <!-- 使用jdbc的getGeneratedKeys获取数据库自增主键值 -->
        <setting name="useGeneratedKeys" value="true" />

        <!-- 使用列别名替换列名 默认:true -->
        <setting name="useColumnLabel" value="true" />

        <!-- 开启驼峰命名转换:Table{create_time} -> Entity{createTime} -->
        <setting name="mapUnderscoreToCamelCase" value="true" />
    </settings>
</configuration>
spring-web.xml
<?xml version="1.0" encoding="UTF-8"?>
<beans xmlns="http://www.springframework.org/schema/beans"
       xmlns:xsi="http://www.w3.org/2001/XMLSchema-instance"
       xmlns:context="http://www.springframework.org/schema/context"
       xmlns:mvc="http://www.springframework.org/schema/mvc"
       xsi:schemaLocation="http://www.springframework.org/schema/beans
    http://www.springframework.org/schema/beans/spring-beans.xsd
    http://www.springframework.org/schema/context
    http://www.springframework.org/schema/context/spring-context.xsd
    http://www.springframework.org/schema/mvc
    http://www.springframework.org/schema/mvc/spring-mvc-3.0.xsd">
    <mvc:annotation-driven />

    <mvc:default-servlet-handler/>

    <!-- 3.配置jsp 显示ViewResolver -->
    <!--<bean class="org.springframework.web.servlet.view.InternalResourceViewResolver">-->
        <!--<property name="viewClass" value="org.springframework.web.servlet.view.JstlView" />-->
        <!--<property name="prefix" value="/WEB-INF/jsp/" />-->
        <!--<property name="suffix" value=".jsp" />-->
    <!--</bean>-->

    <!-- 4.扫描web相关的bean -->
    <context:component-scan base-package="controller" />
</beans>
pom.xml配置文件
<project xmlns="http://maven.apache.org/POM/4.0.0" xmlns:xsi="http://www.w3.org/2001/XMLSchema-instance"
  xsi:schemaLocation="http://maven.apache.org/POM/4.0.0 http://maven.apache.org/maven-v4_0_0.xsd">
  <modelVersion>4.0.0</modelVersion>
  <groupId>mymvc</groupId>
  <artifactId>mymvc</artifactId>
  <packaging>war</packaging>
  <version>1.0-SNAPSHOT</version>
  <name>mymvc Maven Webapp</name>
  <url>http://maven.apache.org</url>
  <dependencies>
    <dependency>
      <groupId>junit</groupId>
      <artifactId>junit</artifactId>
      <version>3.8.1</version>
      <scope>test</scope>
    </dependency>
    <!-- 2.数据库 -->
    <dependency>
      <groupId>mysql</groupId>
      <artifactId>mysql-connector-java</artifactId>
      <version>5.1.37</version>
      <scope>runtime</scope>
    </dependency>
    <dependency>
      <groupId>c3p0</groupId>
      <artifactId>c3p0</artifactId>
      <version>0.9.1.2</version>
    </dependency>

    <dependency>
      <groupId>org.mybatis</groupId>
      <artifactId>mybatis-spring</artifactId>
      <version>1.3.0</version>
    </dependency>
    <dependency>
      <groupId>org.mybatis</groupId>
      <artifactId>mybatis</artifactId>
      <version>3.4.0</version>
    </dependency>

    <!-- 3.Servlet web -->
    <dependency>
      <groupId>taglibs</groupId>
      <artifactId>standard</artifactId>
      <version>1.1.2</version>
    </dependency>
    <dependency>
      <groupId>jstl</groupId>
      <artifactId>jstl</artifactId>
      <version>1.2</version>
    </dependency>
    <dependency>
      <groupId>com.fasterxml.jackson.core</groupId>
      <artifactId>jackson-databind</artifactId>
      <version>2.5.4</version>
    </dependency>
    <dependency>
      <groupId>javax.servlet</groupId>
      <artifactId>javax.servlet-api</artifactId>
      <version>3.1.0</version>
    </dependency>

    <!-- 4.Spring -->
    <!-- 1)Spring核心 -->
    <dependency>
      <groupId>org.springframework</groupId>
      <artifactId>spring-core</artifactId>
      <version>4.2.2.RELEASE</version>
    </dependency>
    <dependency>
      <groupId>org.springframework</groupId>
      <artifactId>spring-beans</artifactId>
      <version>4.2.2.RELEASE</version>
    </dependency>
    <dependency>
      <groupId>org.springframework</groupId>
      <artifactId>spring-context</artifactId>
      <version>4.2.2.RELEASE</version>
    </dependency>

    <!-- 2)Spring DAO层 -->
    <dependency>
      <groupId>org.springframework</groupId>
      <artifactId>spring-jdbc</artifactId>
      <version>4.2.2.RELEASE</version>
    </dependency>
    <dependency>
      <groupId>org.springframework</groupId>
      <artifactId>spring-tx</artifactId>
      <version>4.2.2.RELEASE</version>
    </dependency>

    <!-- 3)Spring web -->
    <dependency>
      <groupId>org.springframework</groupId>
      <artifactId>spring-web</artifactId>
      <version>4.2.2.RELEASE</version>
    </dependency>
    <dependency>
      <groupId>org.springframework</groupId>
      <artifactId>spring-webmvc</artifactId>
      <version>4.2.2.RELEASE</version>
    </dependency>

    <!-- 4)Spring test -->
    <dependency>
      <groupId>org.springframework</groupId>
      <artifactId>spring-test</artifactId>
      <version>4.2.2.RELEASE</version>
    </dependency>
    <dependency>
      <groupId>org.testng</groupId>
      <artifactId>testng</artifactId>
      <version>6.8.7</version>
      <scope>test</scope>
    </dependency>

    <dependency>
      <groupId>org.mortbay.jetty</groupId>
      <artifactId>jsp-2.1</artifactId>
      <version>6.0.0</version>
    </dependency>
  </dependencies>
  <build>

    <finalName>mymvc</finalName>
    <plugins>
      <!-- jetty插件 -->
      <plugin>
        <groupId>org.mortbay.jetty</groupId>
        <artifactId>maven-jetty-plugin</artifactId>
        <version>6.1.25</version>
        <configuration>
          <connectors>
            <connector implementation="org.mortbay.jetty.nio.SelectChannelConnector">
              <port>8000</port>
              <maxIdleTime>60000</maxIdleTime>
            </connector>
          </connectors>
          <contextPath>/mvc</contextPath>
          <scanIntervalSeconds>0</scanIntervalSeconds>
        </configuration>
      </plugin>
    </plugins>
  </build>
</project>
RoleService的调试:
在src目录下,新建 test 文件夹,用来作测试目录。然后在test目录下,建一个java目录,并将该目录关联为 “测试目录”。然后,在java目录下,src/main/java 一 一 对应的文件夹,作为mapper、controller、service类的测试类存放的文件夹。

比如,对RoleService进行测试如下:
package service;

import org.springframework.context.ApplicationContext;
import org.springframework.context.support.ClassPathXmlApplicationContext;
import pojo.Role;

/**
 * Created by Administrator on 2017/8/12.
 */
public class RoleServiceImplTest {
    public static void main(String[] args) {
        ApplicationContext applicationContext = new ClassPathXmlApplicationContext("classpath:spring/spring-service.xml");
        RoleService roleService = (RoleService) applicationContext.getBean(RoleService.class);
        Role role = roleService.getRole(5);
        System.out.println(role);
    }
}
或者使用 TestNg等测试工具进行测试。
参考文献:
IntelliJ IDEA 创建 hello world Java web Maven项目从头到尾都有图有真相2017版本