自定义控件时,最好抽象得彻底,并且编写需严谨,因为可能程序中多处都会引用到它,或者提供给团队中的其他人使用。
其一般步骤为:
1.创建控件的类文件,定义其功能逻辑。一般继承自现有控件或者View
2.在res/values目录下创建attrs.xml文件,用于定义该控件的xml标签属性,方便在使用xml声明该控件时设置参数
3.实现该控件的构造器,在构造器中把xml标签属性与后台代码中的变量相连接
4.完成以上步骤之后,便可使用该控件
需要注意的地方:
一.View的三个构造函数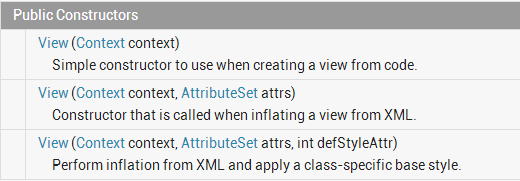
第一个构造函数:
当不需要使用xml声明或者不需要使用inflate动态加载时候,实现此构造函数即可
第二个构造函数:
当需要在xml中声明此控件,则需要实现此构造函数。并且在构造函数中把自定义的属性与控件的数据成员连接起来。
第三个构造函数:
接受一个style资源
二.View重要的回调
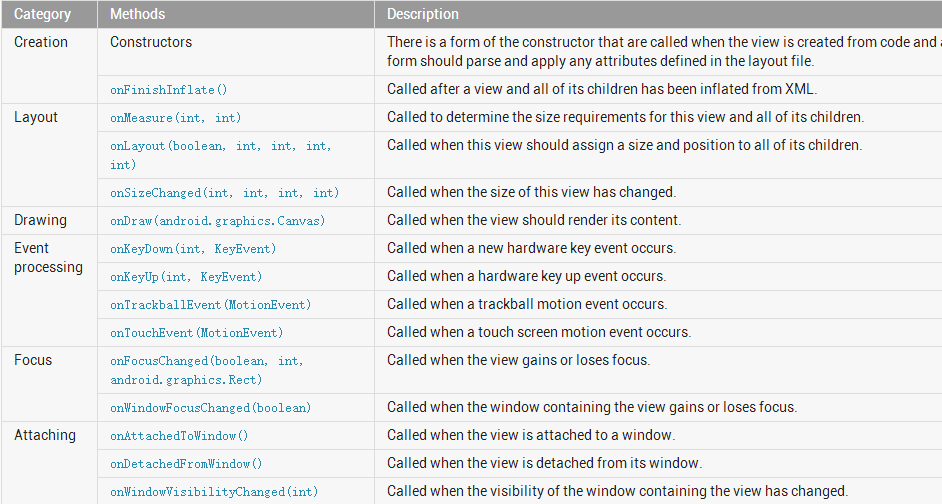
onFinishInflate()
在此控件被通过xml声明的方式创建之后调用
onMeasure(in,int)
计算本控件的宽高,如果继承自原有控件,则一般不需要重写此方法
onLayout()
用于布局控件,对于不是继承ViewGroup的控件,一般不需要重写此方法
onDraw()
在绘制控件时候调用,控件具体长什么样子就在此方法中实现
这些方法的调用顺序是:
一个控件从创建到显示到屏幕:
onLayout -> onMeasure -> onLayout -> onDraw
之后,(Button为例)点击Button,都会调用onDraw,因为有按下效果,控件发生了重绘
三.设置自定义属性
使用自定义控件时候,需要通过把xml中声明的属性与控件的数据成员连接起来
在res/values目录下创建attrs.xml文件
定义属性组
在构造函数中获取这些值
Example:
1.myButton.java


public class myButton extends Button
{
    private int step;

    public myButton(Context context, AttributeSet attrs, int defStyle)
    {
        super(context, attrs, defStyle);
        // TODO Auto-generated constructor stub
        init(attrs);
    }

    public myButton(Context context, AttributeSet attrs)
    {
        super(context, attrs);
        // TODO Auto-generated constructor stub
        init(attrs);
    }

    public myButton(Context context)
    {
        super(context);
        // TODO Auto-generated constructor stub
    }

    private void init(AttributeSet attrs)
    {
        if (attrs != null)
        {
            TypedArray a = getContext().obtainStyledAttributes(attrs,
                    R.styleable.myButton);

             step = a.getInt(R.styleable.myButton_step, 0);

             a.recycle();

             this.setText(step+"");
        }
    }
}
2.attrs.xml
<?xml version="1.0" encoding="utf-8"?>
<resources>
    <declare-styleable name="myButton">
        <attr name="step" format="integer"/>
    </declare-styleable>
</resources>
3.使用自定义控件
xmlns:views="http://schemas.android.com/apk/res/" + 子包名
<LinearLayout xmlns:android="http://schemas.android.com/apk/res/android"
    xmlns:tools="http://schemas.android.com/tools"
    android:layout_width="match_parent"
    android:layout_height="match_parent"
    android:paddingBottom="@dimen/activity_vertical_margin"
    android:paddingLeft="@dimen/activity_horizontal_margin"
    android:paddingRight="@dimen/activity_horizontal_margin"
    android:paddingTop="@dimen/activity_vertical_margin"
    android:orientation="vertical"
    tools:context=".MainActivity"

    xmlns:views="http://schemas.android.com/apk/res/com.example.createvewtest">

    <TextView
        android:layout_width="wrap_content"
        android:layout_height="wrap_content"
        android:text="@string/hello_world" />

    <com.example.views.myButton
        android:id="@+id/btn"
        android:text="button"
        views:step="10"
        android:layout_width="match_parent"
        android:layout_height="wrap_content"/>

</LinearLayout>