1、环境规划如下
centos7.4 三个节点一块 sdb 3G大小的测试硬盘
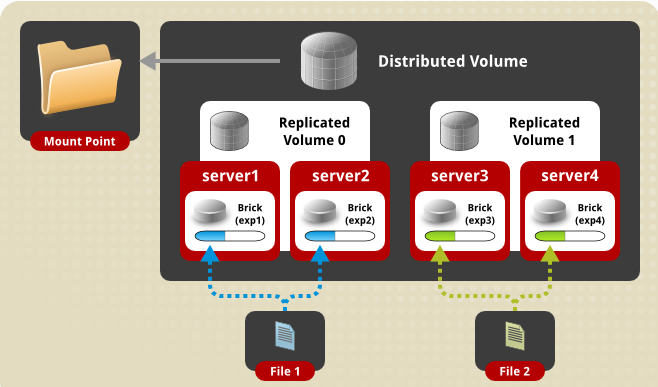
2、Glusterfs 卷的类型比较多,这里我们测试最常用的一种 Distributed Replicated Glusterfs Volume,架构如下
3、安装部署
1、准备yum源
yum install centos-release-gluster -y

2、Format and mount the bricks  三个节点操作
[root@glusterfs1 ~]# fdisk /dev/sdb
Welcome to fdisk (util-linux 2.23.2).

Changes will remain in memory only, until you decide to write them.
Be careful before using the write command.

Device does not contain a recognized partition table
Building a new DOS disklabel with disk identifier 0x56ea90c1.

Command (m for help): n
Partition type:
   p   primary (0 primary, 0 extended, 4 free)
   e   extended
Select (default p): p
Partition number (1-4, default 1):
First sector (2048-6291455, default 2048):
Using default value 2048
Last sector, +sectors or +size{K,M,G} (2048-6291455, default 6291455):
Using default value 6291455
Partition 1 of type Linux and of size 3 GiB is set

Command (m for help): p

Disk /dev/sdb: 3221 MB, 3221225472 bytes, 6291456 sectors
Units = sectors of 1 * 512 = 512 bytes
Sector size (logical/physical): 512 bytes / 512 bytes
I/O size (minimum/optimal): 512 bytes / 512 bytes
Disk label type: dos
Disk identifier: 0x56ea90c1

   Device Boot      Start         End      Blocks   Id  System
/dev/sdb1            2048     6291455     3144704   83  Linux

Command (m for help): w
The partition table has been altered!

Calling ioctl() to re-read partition table.
Syncing disks.
[root@glusterfs1 ~]# mkfs.xfs -f /dev/sdb
meta-data=/dev/sdb               isize=512    agcount=4, agsize=196608 blks
         =                       sectsz=512   attr=2, projid32bit=1
         =                       crc=1        finobt=0, sparse=0
data     =                       bsize=4096   blocks=786432, imaxpct=25
         =                       sunit=0      swidth=0 blks
naming   =version 2              bsize=4096   ascii-ci=0 ftype=1
log      =internal log           bsize=4096   blocks=2560, version=2
         =                       sectsz=512   sunit=0 blks, lazy-count=1
realtime =none                   extsz=4096   blocks=0, rtextents=0
[root@glusterfs1 ~]#
[root@glusterfs1 ~]# mkdir -p /storage/brick1    #建立挂载块设备的目录
yum -y install xfsprogs  安装xfs包
[root@glusterfs1 ~]# mount /dev/sdb /storage/brick1 [root@glusterfs1 ~]# echo "/dev/sdb /storage/brick1 xfs defaults 0 0" >> /etc/fstab
[root@glusterfs1 ~]# mount -a && mount
[root@glusterfs1 ~]# yum install glusterfs-server -y
节点加入信任存储池
[root@glusterfs1 ~]# iptables -I INPUT -s 192.168.10.0/24 -j ACCEPT
[root@glusterfs1 ~]#
[root@glusterfs1 ~]#
[root@glusterfs1 ~]# gluster peer probe glusterfs2
peer probe: success.
[root@glusterfs1 ~]# gluster peer probe glusterfs3
peer probe: success.
[root@glusterfs1 ~]# gluster peer status
Number of Peers: 2

Hostname: glusterfs2
Uuid: 6e7eb8e4-e4ec-4d60-8fa5-98f856759810
State: Peer in Cluster (Connected)

Hostname: glusterfs3
Uuid: 861d2297-8042-4f64-99e2-c16d46de60d9
State: Peer in Cluster (Connected)
[root@glusterfs1 ~]#

[root@glusterfs1 ~]# glusterfs -V
glusterfs 3.12.5
Repository revision: git://git.gluster.org/glusterfs.git
Copyright (c) 2006-2016 Red Hat, Inc. <https://www.gluster.org/>
GlusterFS comes with ABSOLUTELY NO WARRANTY.
It is licensed to you under your choice of the GNU Lesser
General Public License, version 3 or any later version (LGPLv3
or later), or the GNU General Public License, version 2 (GPLv2),
in all cases as published by the Free Software Foundation.

设置  GlusterFS volume
[root@glusterfs1 ~]# mkdir -p /storage/brick1 #每个节点都需要操作
[root@glusterfs1 ~]# gluster volume create gv0 replica 3 glusterfs1:/storage/brick1 glusterfs2:/storage/brick1 glusterfs3:/storage/brick1 force #创建分布式的复制卷
volume create: gv0: success: please start the volume to access data
[root@glusterfs1 ~]#
[root@glusterfs1 ~]# gluster volume start gv0
volume start: gv0: success
[root@glusterfs1 ~]# gluster volume info
Volume Name: gv0
Type: Replicate
Volume ID: 18bfd54d-43b0-4be8-85d6-2b385db61dc4
Status: Started
Snapshot Count: 0
Number of Bricks: 1 x 3 = 3
Transport-type: tcp
Bricks:
Brick1: glusterfs1:/storage/brick1
Brick2: glusterfs2:/storage/brick1
Brick3: glusterfs3:/storage/brick1
Options Reconfigured:
transport.address-family: inet
nfs.disable: on
performance.client-io-threads: off
Testing the GlusterFS volume
[root@glusterfs1 ~]# mount -t glusterfs glusterfs1:/gv0 /mnt
[root@glusterfs1 ~]# for i in `seq -w 1 100`; do cp -rp /var/log/messages /mnt/copy-test-$i; done
[root@glusterfs1 ~]# ls -lA /mnt/copy* | wc -l
100
在其他节点查看

