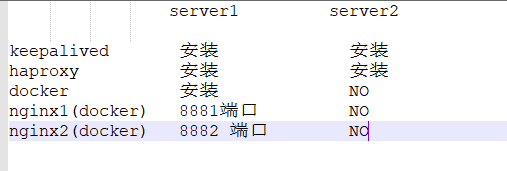
在server1 , server2安装并配置keepalived
[root@docker-server1 ~]# yum install keepalived –y
[root@docker-server1 ~]# cat /etc/keepalived/
主机一的keepalived.conf 的配置文件


 1 vrrp_instance MAKE_VIP_INT {
 2     state MASTER
 3     interface ens32
 4     virtual_router_id 1
 5     priority 100
 6     advert_int 1
 7     unicast_src_ip 192.168.153.139
 8     unicast_peer {
 9         192.168.153.141
10     }
11
12     authentication {
13         auth_type PASS
14         auth_pass 1111
15     }
16     virtual_ipaddress {
17         192.168.153.100/24 dev ens32 label ens32:1
18     }
19 }
[root@docker-server1~]# systemctl restart keepalived && systemctl enable keepalived
[root@docker-server2 ~]# yum install keepalived –y
[root@docker-server2 ~]# cat /etc/keepalived/
主机二的keepalived.conf 的配置文件
 1 vrrp_instance MAKE_VIP_INT {
 2     state BACKUP
 3     interface ens32
 4     virtual_router_id 1
 5     priority 50
 6     advert_int 1
 7     unicast_src_ip 192.168.153.141
 8     unicast_peer {
 9         192.168.153.139
10     }
11
12     authentication {
13         auth_type PASS
14         auth_pass 1111
15     }
16     virtual_ipaddress {
17         192.168.153.100/24 dev ens32 label ens32:1
18     }
19 }
20
[root@docker-server2~]# systemctl restart keepalived && systemctl enable keepalived

在server1,server2 两台主机上安装haproxy,并让keepalived的vip地址 作为前段地址,托管两台 nginx的web服务
通过访问keepalived 的vip的 高可用 访问后面的haproxy 托管的nginx服务,nginx服务托管后端的tomcate 服务
在server1和server2 上安装haproxy
[root@docker-server1 ~]# yum install haproxy –y
[root@docker-server1 ~]# cat /etc/haproxy/haproxy.cfg
[root@docker-server2 ~]# yum install haproxy –y
[root@docker-server2 ~]# cat /etc/haproxy/haproxy.cfg
server1 和server2的haproxy的配置文件相同
 1 global
 2 maxconn 100000
 3 uid 99
 4 gid 99
 5 daemon
 6 nbproc 1
 7 log 127.0.0.1 local0 info
 8
 9 defaults
10 option http-keep-alive
11 #option  forwardfor
12 maxconn 100000
13 mode tcp
14 timeout connect 500000ms
15 timeout client  500000ms
16 timeout server  500000ms
17
18 listen stats
19  mode http
20  bind 0.0.0.0:9999
21  stats enable
22  log global
23  stats uri     /haproxy-status
24  stats auth    haadmin:q1w2e3r4ys
25
26 #================================================================
27 frontend docker_nginx_web
28     bind 192.168.153.100:80
29     mode http
30     default_backend docker_nginx_hosts
31
32 backend docker_nginx_hosts
33     mode http
34     #balance source
35     balance roundrobin
36     server web1   192.168.153.139:8881 check inter 2000 fall 3 rise 5
37     server web2   192.168.153.139:8882 check inter 2000 fall 3 rise 5
在docker宿主机上即server1上启动两个nginx容器,分别映射 8881 和8882 两个端口
docker run -d -p 8881:80 niginx-web1:v2
docker run -d -p 8882:80 niginx-web2:v2
如haproxy.cfg中所看到的:

需要更改配置文件 让 haproxy 能够使用keepalived的 vip,并对vip生效。
[root@docker1 haproxy]# cat /etc/sysctl.conf
 1 # sysctl settings are defined through files in
 2 # /usr/lib/sysctl.d/, /run/sysctl.d/, and /etc/sysctl.d/.
 3 #
 4 # Vendors settings live in /usr/lib/sysctl.d/.
 5 # To override a whole file, create a new file with the same in
 6 # /etc/sysctl.d/ and put new settings there. To override
 7 # only specific settings, add a file with a lexically later
 8 # name in /etc/sysctl.d/ and put new settings there.
 9 #
10 # For more information, see sysctl.conf(5) and sysctl.d(5).
11 net.bridge.bridge-nf-call-ip6tables = 1
12 net.bridge.bridge-nf-call-iptables = 1
13 net.ipv4.ip_nonlocal_bind=1
[root@docker1 haproxy]# sysctl -p
nginx代理 tomcat的服务
生成nginx的docker镜像的配置文件

  1 user nginx nginx;
  2 worker_processes  auto;
  3
  4 #error_log  logs/error.log;
  5 #error_log  logs/error.log  notice;
  6 #error_log  logs/error.log  info;
  7
  8 #pid        logs/nginx.pid;
  9 daemon off;
 10
 11 events {
 12     worker_connections  1024;
 13 }
 14
 15
 16 http {
 17     include       mime.types;
 18     default_type  application/octet-stream;
 19
 20     #log_format  main  '$remote_addr - $remote_user [$time_local] "$request" '
 21     #                  '$status $body_bytes_sent "$http_referer" '
 22     #                  '"$http_user_agent" "$http_x_forwarded_for"';
 23
 24     #access_log  logs/access.log  main;
 25
 26     sendfile        on;
 27     #tcp_nopush     on;
 28
 29     #keepalive_timeout  0;
 30     keepalive_timeout  65;
 31
 32     #gzip  on;
 33 upstream  tomcat_webserver {
 34         server  web1:8080;
 35         server  web2:8080;
 36 }
 37     server {
 38         listen       80;
 39         server_name  localhost;
 40
 41         #charset koi8-r;
 42
 43         #access_log  logs/host.access.log  main;
 44
 45         location / {
 46             root   html;
 47             index  index.html index.htm;
 48         }
 49         location /web {
 50             root   html;
 51             index  index.html index.htm;
 52         }
 53         location /myapp {
 54              proxy_pass  http://tomcat_webserver;
 55              proxy_set_header   Host    $host;
 56              proxy_set_header   X-Forwarded-For $proxy_add_x_forwarded_for;
 57              proxy_set_header X-Real-IP $remote_addr;
 58         }
 59         #error_page  404              /404.html;
 60
 61         # redirect server error pages to the static page /50x.html
 62         #
 63         error_page   500 502 503 504  /50x.html;
 64         location = /50x.html {
 65             root   html;
 66         }
 67
 68         # proxy the PHP scripts to Apache listening on 127.0.0.1:80
 69         #
 70         #location ~ .php$ {
 71         #    proxy_pass   http://127.0.0.1;
 72         #}
 73
 74         # pass the PHP scripts to FastCGI server listening on 127.0.0.1:9000
 75         #
 76         #location ~ .php$ {
 77         #    root           html;
 78         #    fastcgi_pass   127.0.0.1:9000;
 79         #    fastcgi_index  index.php;
 80         #    fastcgi_param  SCRIPT_FILENAME  /scripts$fastcgi_script_name;
 81         #    include        fastcgi_params;
 82         #}
 83
 84         # deny access to .htaccess files, if Apache's document root
 85         # concurs with nginx's one
 86         #
 87         #location ~ /.ht {
 88         #    deny  all;
 89         #}
 90     }
 91
 92
 93     # another virtual host using mix of IP-, name-, and port-based configuration
 94     #
 95     #server {
 96     #    listen       8000;
 97     #    listen       somename:8080;
 98     #    server_name  somename  alias  another.alias;
 99
100     #    location / {
101     #        root   html;
102     #        index  index.html index.htm;
103     #    }
104     #}
105
106
107     # HTTPS server
108     #
109     #server {
110     #    listen       443 ssl;
111     #    server_name  localhost;
112
113     #    ssl_certificate      cert.pem;
114     #    ssl_certificate_key  cert.key;
115
116     #    ssl_session_cache    shared:SSL:1m;
117     #    ssl_session_timeout  5m;
118
119     #    ssl_ciphers  HIGH:!aNULL:!MD5;
120     #    ssl_prefer_server_ciphers  on;
121
122     #    location / {
123     #        root   html;
124     #        index  index.html index.htm;
125     #    }
126     #}
127
128 }
容器间的关联
docker run -d -p 8081:8080 --name tt1 tomcat-app1:v1
docker run -d -p 8881:80 --link tt1:web1 --link tt2:web2 niginx-web1:v2
启动第二个容器时,通过--link 参数 把第一个容器的 --name 参数后起的名字给加上 ,还可以通过 " : " 后面跟上第一个容器的别名,把第一个容器和第二个容器给关联起来。
容器网络
编辑 docker的启动脚本文件
vi /usr/lib/systemd/system/docker.service
 1 [Unit]
 2 Description=Docker Application Container Engine
 3 Documentation=https://docs.docker.com
 4 After=network-online.target firewalld.service
 5 Wants=network-online.target
 6
 7 [Service]
 8 Type=notify
 9 # the default is not to use systemd for cgroups because the delegate issues still
10 # exists and systemd currently does not support the cgroup feature set required
11 # for containers run by docker
12 ExecStart=/usr/bin/dockerd --bip=172.200.200.1/24
13 ExecReload=/bin/kill -s HUP $MAINPID
14 # Having non-zero Limit*s causes performance problems due to accounting overhead
15 # in the kernel. We recommend using cgroups to do container-local accounting.
16 LimitNOFILE=infinity
17 LimitNPROC=infinity
18 LimitCORE=infinity
19 # Uncomment TasksMax if your systemd version supports it.
20 # Only systemd 226 and above support this version.
21 #TasksMax=infinity
22 TimeoutStartSec=0
23 # set delegate yes so that systemd does not reset the cgroups of docker containers
24 Delegate=yes
25 # kill only the docker process, not all processes in the cgroup
26 KillMode=process
27 # restart the docker process if it exits prematurely
28 Restart=on-failure
29 StartLimitBurst=3
30 StartLimitInterval=60s
31
32 [Install]
33 WantedBy=multi-user.target
ExecStart=/usr/bin/dockerd --bip=172.200.200.1/24
重新启动docker的服务
创建新的docker容器 查看网络服务情况
docker容器跨主机互联的实现
夸主机互联是说A宿主机的容器可以访问B主机上的容器,但是前提是保证各宿主机之间的网络是可以相互通信的,然后各容器才可以通过宿主机访问到对方的容器,实现原理是在宿主机做一个网络路由就可以实现A宿主机的容器访问B主机的容器的目的,复杂的网络或者大型的网络可以使用google开源的k8s进行互联。
修改各个宿主机的docker的网段
添加静态路由
在各宿主机添加静态路由,网关指向对方的IP
在每个docker的宿主机上执行该命令,把宿主机上的docker网络 指向想要互通的docker宿主机的ip
[root@docker-server1 ~]# iptables -A FORWARD -s 192.168.10.0/24 -j ACCEPT
[root@docker-server1 ~]# route add -net 172.16.20.0/24 gw 192.168.10.206