数据集为:
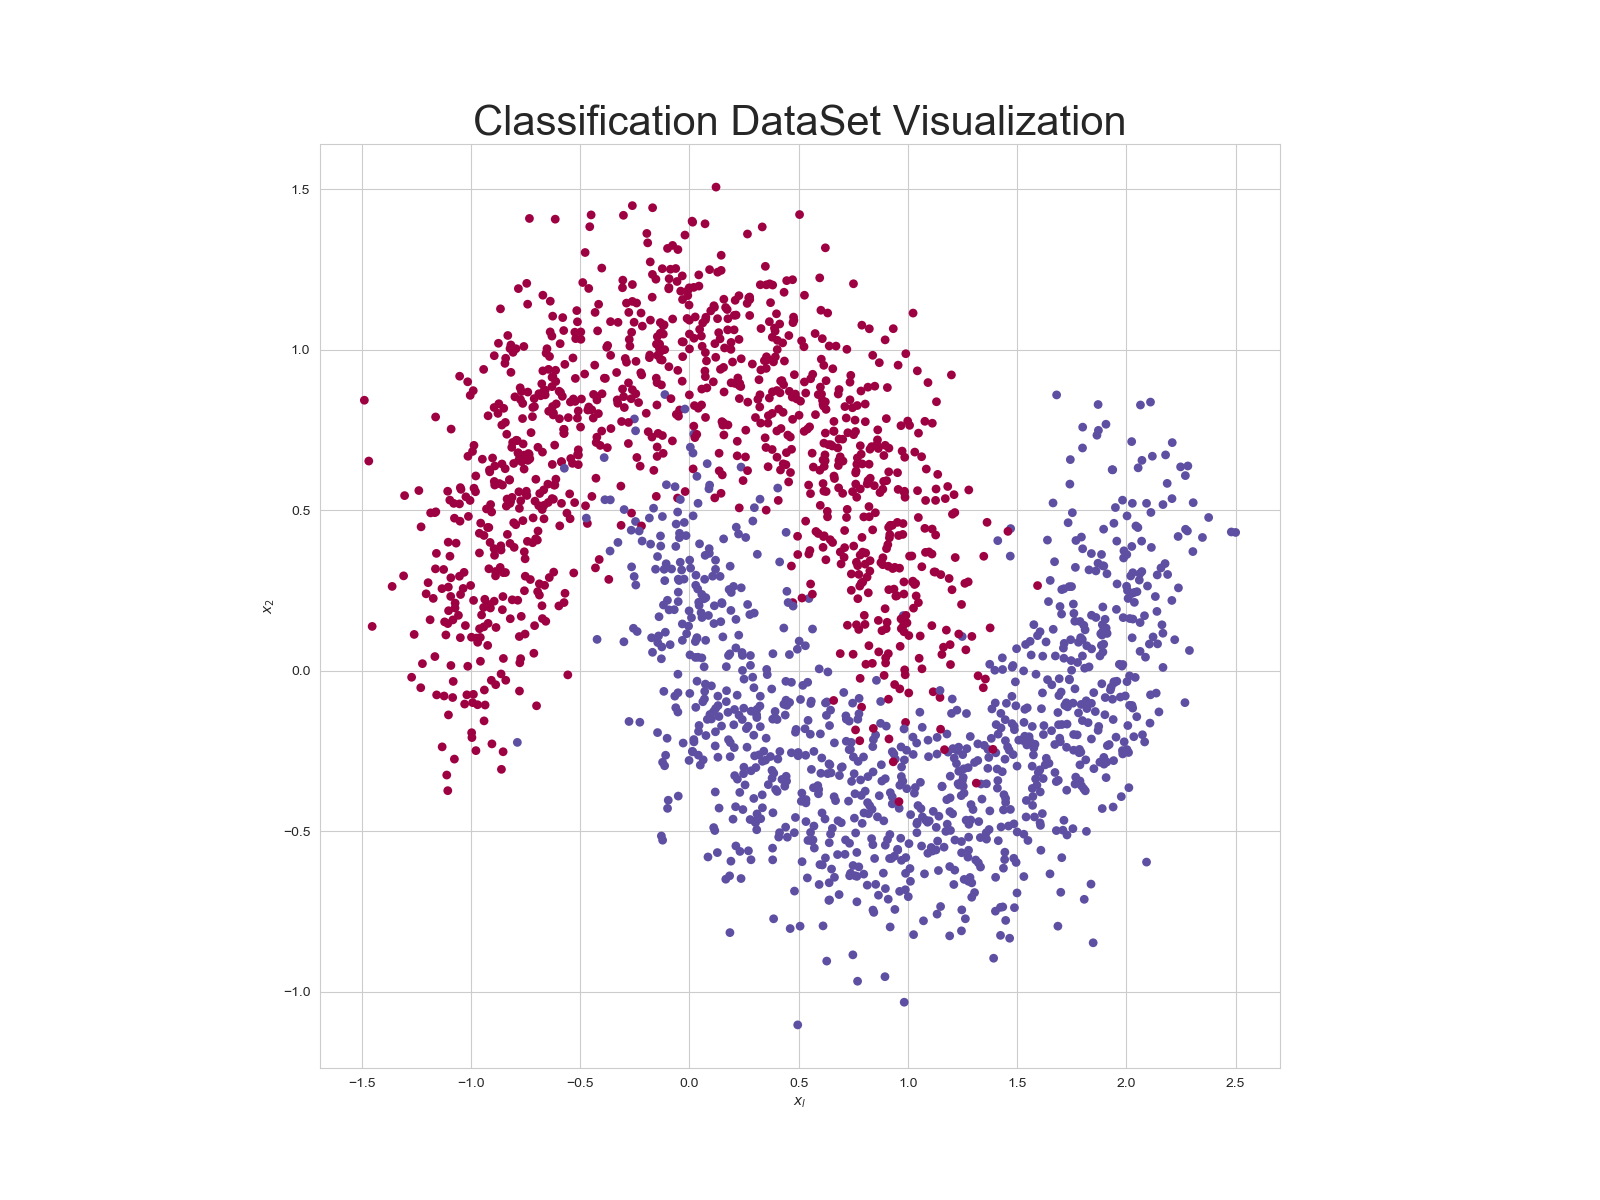
代码为:
  1 # encoding: utf-8
  2
  3 import tensorflow as tf
  4 import numpy as np
  5 import seaborn as sns
  6 import matplotlib.pyplot as plt
  7 from sklearn.datasets import make_moons
  8 # from sklearn.datasets import make_circles
  9 from sklearn.model_selection import train_test_split
 10
 11 N_SAMPLES = 2000  # 采样点数
 12 TEST_SIZE = 0.3  # 测试数量比率
 13
 14 # 产生一个简单的样本数据集,半环形图,类似的有make_circles,环形数据
 15 X, y = make_moons(n_samples=N_SAMPLES, noise=0.2, random_state=100)  # (2000, 2),(2000, 1)
 16 # X, y = make_circles(n_samples = N_SAMPLES, noise=0.2, random_state=100)
 17 # 将矩阵随机划分训练集和测试集 (1400,2),(600,2),(1400,1),(600,1)
 18 X_train, X_test, y_train, y_test = train_test_split(X, y, test_size=TEST_SIZE, random_state=42)
 19 print(X.shape, y.shape)
 20
 21 # 绘制数据集分布,X为2D坐标,y为数据点标签
 22
 23
 24 def make_plot(X, y, plot_name=None, XX=None, YY=None, preds=None, dark=False):
 25     if dark:
 26         plt.style.use('dark_background')
 27     else:
 28         sns.set_style('whitegrid')
 29     plt.figure(figsize=(16, 12))
 30     axes = plt.gca()
 31     axes.set(xlabel="$x_l$", ylabel="$x_2$")
 32     plt.title(plot_name, fontsize=30)
 33     plt.subplots_adjust(left=0.20)  # 调整边距和子图间距,子图的左侧
 34     plt.subplots_adjust(right=0.80)
 35     if XX is not None and YY is not None and preds is not None:
 36         plt.contourf(XX, YY, preds.shape(XX.shape), 25, alpha=1, cmap=plt.cm.Spectral)
 37         plt.contour(XX, YY, preds.reshape(XX.shape), levels=[1.5], cmap="Greys", vmin=0, vmax=.6)
 38     # 根据标签区分颜色
 39     plt.scatter(X[:, 0], X[:, 1], c=y.ravel(), s=40, cmap=plt.cm.Spectral, edgecolors='none')
 40
 41     plt.savefig('data_set.png')
 42     plt.close()
 43
 44
 45 make_plot(X, y, "Classification DataSet Visualization")
 46 plt.show()
 47
 48
 49 class Layer:
 50     # 全连接层网络
 51     def __init__(self, n_input, n_neurons, activation=None, weights=None, bias=None):
 52         """
 53         : int n_input: 输入节点数
 54         :int n_neurons: 输出节点数
 55         :str activation: 激活函数类型
 56         : weights: 权值张量,内部生成
 57         : bias: 偏置,内部生成
 58         """
 59         # 通过正态分布生成初始化的参数
 60         self.weights
 61             = weights if weights is not None else
 62             np.random.randn(n_input, n_neurons) * np.sqrt(1/n_neurons)
 63         self.bias
 64             = bias if bias is not None else
 65             np.random.randn(n_neurons) * 0.1
 66         self.activation = activation
 67         self.last_activation = None
 68         self.error = None
 69         self.delta = None
 70
 71     # 网络的前向传播
 72     def activate(self, x):
 73         r = np.dot(x, self.weights) + self.bias  # X@w + b
 74         self.last_activation = self._apply_activation(r)  # 激活函数
 75         return self.last_activation
 76
 77     # 不同类型的激活函数
 78     def _apply_activation(self, r):
 79         if self.activation is None:
 80             return r
 81         elif self.activation == 'relu':
 82             return np.maximum(r, 0)
 83         elif self.activation == 'tanh':
 84             return np.tanh(r)
 85         elif self.activation == 'sigmoid':
 86             return 1 / (1 + np.exp(-r))
 87         return r
 88
 89         # 不同类型激活函数的导数实现
 90     def apply_activation_derivation(self, r):
 91         if self.activation is None:
 92             return np.ones_like(r)
 93         elif self.activation == 'relu':
 94             grad = np.array(r, copy=True)
 95             grad[r > 0] = 1.
 96             grad[r <= 0] = 0.
 97             return grad
 98         elif self.activation == 'tanh':
 99             return 1 - r**2
100         elif self.activation == 'sigmoid':
101             return r * (1 - r)
102         return r
103
104
105 # 神经网络模型
106 class NeuralNetwork:
107     def __init__(self):  # 需要实例化后对属性赋值
108         self._layers = []  # 网络层对象列表
109
110     def add_layer(self, layer):  # 追加网络层
111         self._layers.append(layer)
112
113     # 前向传播只需要循环调用各网络层对象的前向计算函数
114     def feed_forward(self, X):
115         for layer in self._layers:
116             X = layer.activate(X)
117         return X
118
119     # 网络模型的反向传播
120     def backpropagation(self, X, y, learning_rate):
121         output = self.feed_forward(X)
122         # 反向循环
123         for i in reversed(range(len(self._layers))):
124             layer = self._layers[i]  # 得到当前层对象
125             if layer == self._layers[-1]:  #如果是输出层
126                 layer.error = y - output
127                 layer.delta = layer.error * layer.apply_activation_derivation(output)
128             else:  # 计算隐藏层
129                 next_layer = self._layers[i + 1]  # 得到下一层对象
130                 layer.error = np.dot(next_layer.weights, next_layer.delta)  # 矩阵乘法
131                 layer.delta = layer.error *
132                               layer.apply_activation_derivation(layer.last_activation)
133
134         for i in range(len(self._layers)):
135             layer = self._layers[i]
136             # o_i为上一层网络输出
137             o_i = np.atleast_2d(X if i == 0 else self._layers[i - 1].last_activation)  # 将数据视为2维数据
138             layer.weights += layer.delta * o_i.T * learning_rate  # .T是转置
139
140     # 网络的训练
141     def train(self, X_train, X_test, y_train, y_test, learning_rate, max_epochs):
142         temp1 = y_train.shape[0]
143         y_onehot = np.zeros((temp1, 2))
144         temp2 = np.arange(y_train.shape[0])  # 线性 0 - 1399
145         y_onehot[temp2, y_train] = 1
146         mses = []
147         accuracy = []
148         for i in range(max_epochs):
149             for j in range(len(X_train)):  # 一次训练一个样本
150                 self.backpropagation(X_train[j], y_onehot[j], learning_rate)
151             if i % 10 == 0:
152                 mse = np.mean(np.square(y_onehot - self.feed_forward(X_train)))
153                 mses.append(mse)
154                 print('Epoch: #%s, MSE: %f' % (i, float(mse)))
155                 acc = self.accuracy(self.predict(X_test), y_test.flatten())
156                 print('Accuracy: %.2f%%' % (acc * 100))
157                 accuracy.append(acc*100)
158         return mses, accuracy
159
160     def accuracy(self, y_output, y_test):
161         return np.mean((np.argmax(y_output, axis=1) == y_test))
162
163     def predict(self, X_test):
164         return self.feed_forward(X_test)
165
166
167 # 4层全连接网络 实例化训练和预测
168 nn = NeuralNetwork()  # 实列化网络
169 nn.add_layer(Layer(2, 25, 'sigmoid'))  # 2 --> 25
170 nn.add_layer(Layer(25, 50, 'sigmoid'))  # 25 --> 50
171 nn.add_layer(Layer(50, 25, 'sigmoid'))  # 50 --> 25
172 nn.add_layer(Layer(25, 2, 'sigmoid'))  # 25 --> 2
173 learning_rate = 0.01
174 max_epochs = 1000
175 mses, accuracy = nn.train(X_train, X_test, y_train, y_test, learning_rate, max_epochs)
176
177 plt.figure()
178 plt.plot(mses, 'b', label='MSE Loss')
179 plt.xlabel('Epoch')
180 plt.ylabel('MSE')
181 plt.legend()
182 plt.savefig('exam5.2 MSE Loss.png')
183 plt.show()
184
185 plt.figure()
186 plt.plot(accuracy, 'r', label='Accuracy rate')
187 plt.xlabel('Epoch')
188 plt.ylabel('Accuracy')
189 plt.legend()
190 plt.savefig('exam5.2 Accuracy.png')
191 plt.show()
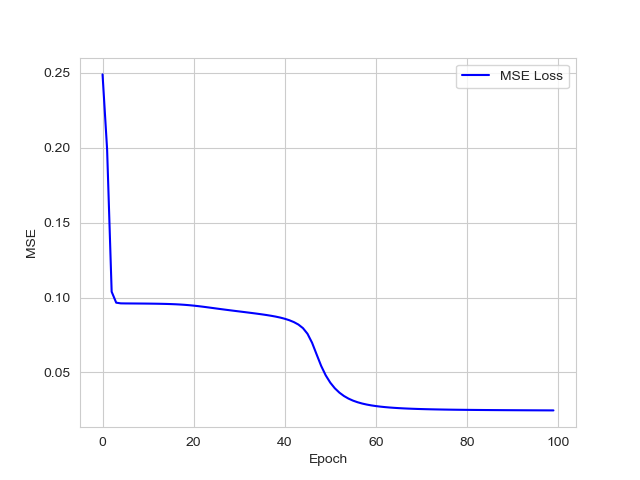
误差为:
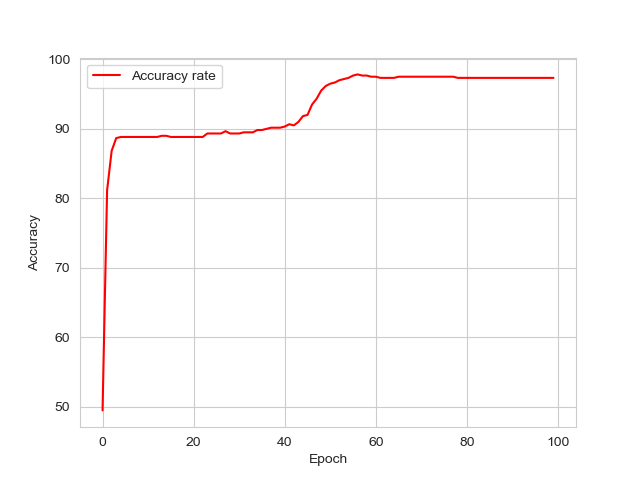
准确率为:
这个例子的目的是为让读者更进一步了解反向传播,包括数学上的理解和代码上的理解。
大体上还是能理解文中的含义,只是细节上要自己动手去算,故使用tensorflow封装好的函数,会简化很多代码,
会使学习者的成就感增加,否者的话,看到这么多数学公式以及代码的实现,早就放弃了!
下一次,我想更新关于tensorboard可视化的一些学习代码和感兴趣的东西。
但是下一次更新也不知道是好久,因为要做Geant4模拟,还有模拟内容相关的图像重建算法研究,
所以不知道什么时候可以继续学习tensorflow,但是也不能放弃,一定要把这本书过一遍!
最近solidorks的学习也遇到困难了,也不知道下一次更新是什么时候,可能2019年的更新就这些内容了!
不过对于我来说,也算开了个头!