一、Android基本布局
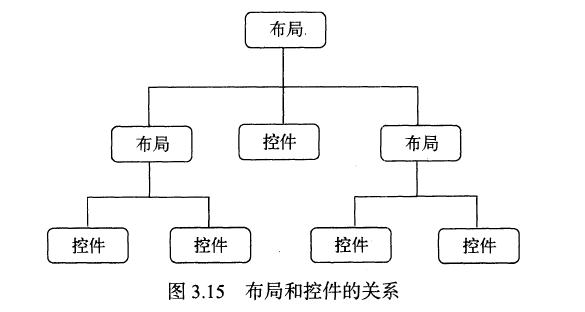
布局是一种可以放置多个控件的容器,它可以按照一定规律调整内部控件的位置,而且布局内部除了可以放置控件外,还可以放置布局,实现多层布局嵌套。布局和控件、布局和布局之间的关系如下图所示:
二、线性布局(LinearLayout)
1、LinearLayout布局是一种非常常用的布局文件,它内部所包含的控件在线性方向上依次排列。线性方向有水平和垂直两种,通过android:orientation属性来指定线性排列方向,可选值有两种:horizontal(控件在水平方向排列)、vertical(控件在垂直方向排列),默认排列方式是水平排列
接下来通过代码来直观感受一下:
第一步:创建三个按钮:
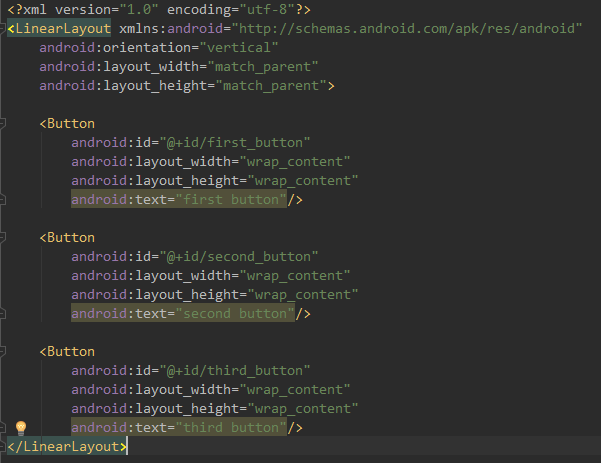
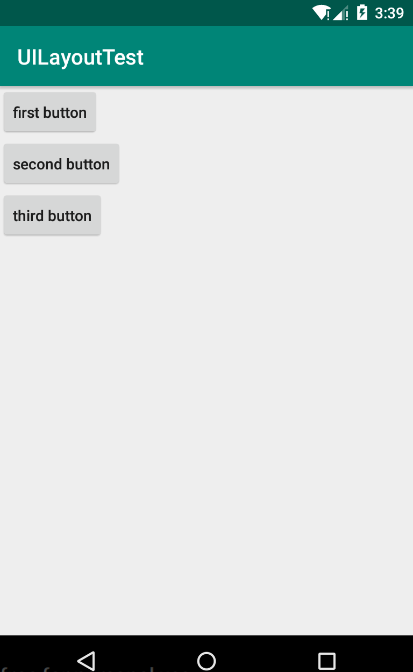
第二步:运行程序,效果如下(左),如果将android:orientation的值选为horizontal(水平),效果如下(右)
注意:
如果LinearLayout的排列方向是:horizontal(水平),那么其内部的控件就绝对不能将宽度指定为:match_parent(与父布局一样宽),因为这样的话,单独一个控件就会将整个水平方向占满,其他的控件就没有可以放置的位置了。同理,如果LinearLayout的排列方向是:vertical(垂直),那么内部控件的高度就绝对不能指定为:match_parent
2、android:layout_gravity属性与android:gravity属性:
android:layout_gravity属性:用于指定控件在布局中的对齐方式
android:gravity属性:用于指定文字在控件中的对齐方式
注意:
使用android:layout_gravity属性时,如果LinearLayout的排列方向是:horizontal(水平方向)时,只有垂直方向上的对齐方式才会生效,因为水平方向上的长度是不固定的,每添加一个控件,水平方向上的长度都会变,无法指定该方向上的对齐方式。同理,如果LinearLayout的排列方向是:vertical(垂直方向),那么只有水平方向的对齐方式有效。
下面通过代码来感受一下:
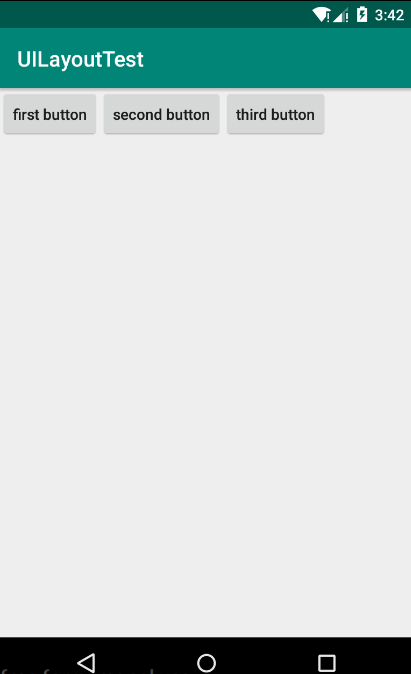
第一步:在activity_main.xml中指定:LinearLayout布局的排列方向为:horizontal(水平方向),first button对齐方式为:top,second button对齐方式为:center_vertical,third button对齐方式为:bottom
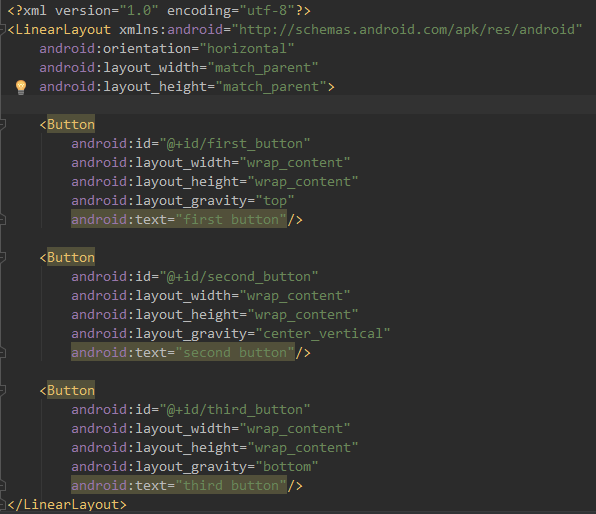
第二步:运行程序,效果如下:

3、android:layout_weight属性:这是一个很重要的属性,它允许我们使用比例的方式来指定控件的大小,在手机屏幕的适配性方面起到非常重要的作用。
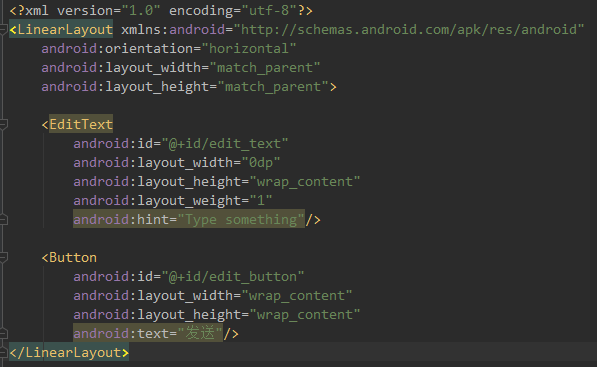
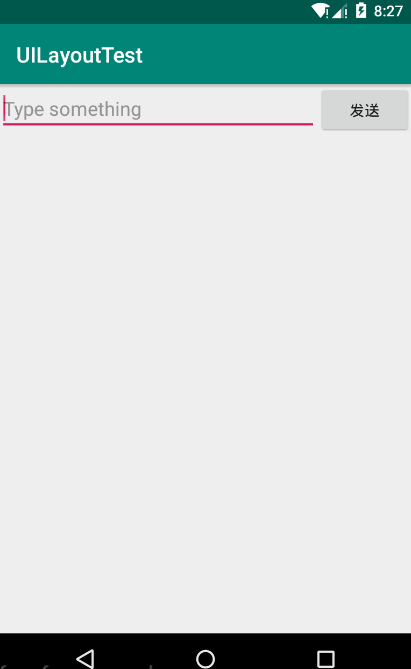
我们先来看一下代码和效果:编写一个消息发送界面(一个文本编辑框,一个发送按钮)
第一步:在布局中添加一个文本编辑框和发送按钮

第二步:效果展示:

代码分析:
1、代码中将EditText控件和Button控件的宽度都指定为0dp,然后使用了android:layout_weight属性,此时,控件的宽度就由android:layout_weight属性来控制了
2、系统是通过控件中android:layout_weight的值来分配屏幕宽度的,计算方法是:先把每个控件中layout_weight的值相加,得到一个总值,然后根据每个控件的值除以总值得到所占的比例。比如上面EditText控件所占的屏幕宽度为:4/(1+4)=4/5,同样,Button所占屏幕宽度即为:1/5.
拓展:
其实对于上面的代码我们还可以进行优化:将Button控件的宽度改回:wrap_content,这是,Button的宽度依然按:wrap_content来计算,而EditText控件就会占据屏幕剩下的所有空间,使用这种方式编辑界面,不仅在各种屏幕的适配方面会非常好,而且看起来也更加舒服。
三、相对布局(RelativeLayout)
RelativeLayout布局也是一种非常常用的布局。和LinearLayout的排列方式不同,RelativeLayout显得更加随意,它可以通过相对定位的方式让控件出现在布局的任何位置,也正因为如此,RelativeLayout中的属性非常的多,不过这些属性都是有规律可循的。
先看代码和效果:
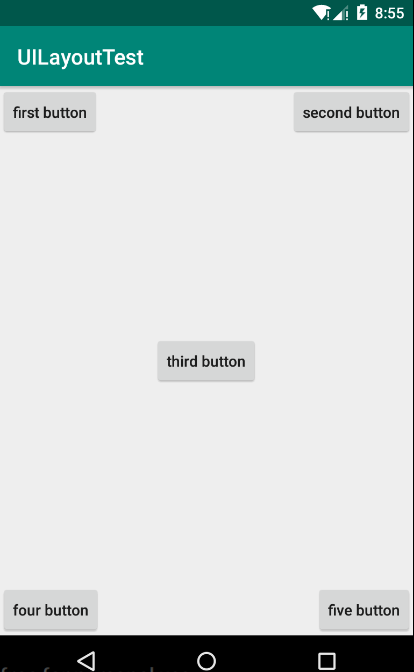
第一步:在RelativeLayout布局中加入五个Button,分别位于左上角、右上角、布局中间、左下角、右下角
 1 <?xml version="1.0" encoding="utf-8"?>
 2 <RelativeLayout xmlns:android="http://schemas.android.com/apk/res/android"
 3     android:layout_width="match_parent"
 4     android:layout_height="match_parent">
 5
 6     <Button
 7         android:id="@+id/first_button"
 8         android:layout_width="wrap_content"
 9         android:layout_height="wrap_content"
10         android:layout_alignParentLeft="true"
11         android:layout_alignParentTop="true"
12         android:text="first button"/>
13     <Button
14         android:id="@+id/second_button"
15         android:layout_width="wrap_content"
16         android:layout_height="wrap_content"
17         android:layout_alignParentRight="true"
18         android:layout_alignParentTop="true"
19         android:text="second button"/>
20     <Button
21         android:id="@+id/third_button"
22         android:layout_width="wrap_content"
23         android:layout_height="wrap_content"
24         android:layout_centerInParent="true"
25         android:text="third button"/>
26     <Button
27         android:id="@+id/four_button"
28         android:layout_width="wrap_content"
29         android:layout_height="wrap_content"
30         android:layout_alignParentLeft="true"
31         android:layout_alignParentBottom="true"
32         android:text="four button" />
33     <Button
34         android:id="@+id/five_button"
35         android:layout_width="wrap_content"
36         android:layout_height="wrap_content"
37         android:layout_alignParentRight="true"
38         android:layout_alignParentBottom="true"
39         android:text="five button"/>
40 </RelativeLayout>
第二步:效果展示:
代码分析:
layout_alignParentLeft、Layout_aligntParentTop:控件位于父布局的左上角
layout_alignParentRight、Layout_aligntParentTop:控件位于父布局的右上角
layout_alignParentLeft、Layout_aligntParentBottom:控件位于父布局的左下角
layout_alignParentRight、Layout_aligntParentBottom:控件位于父布局的右下角
Layout_centerInParent:控件位于父布局的中心
拓展:
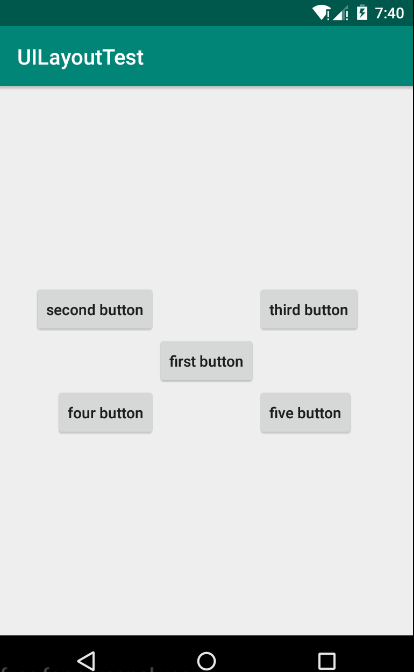
上面的控件都是相对于布局进行定位的,其实在RelativeLayout布局中,控件也可以相对于控件进行定位,下面是代码和效果:
 1 <?xml version="1.0" encoding="utf-8"?>
 2 <RelativeLayout xmlns:android="http://schemas.android.com/apk/res/android"
 3     android:layout_width="match_parent"
 4     android:layout_height="match_parent">
 5
 6     <Button
 7         android:id="@+id/first_button"
 8         android:layout_width="wrap_content"
 9         android:layout_height="wrap_content"
10         android:layout_centerInParent="true"
11         android:text="first button"/>
12     <Button
13         android:id="@+id/second_button"
14         android:layout_width="wrap_content"
15         android:layout_height="wrap_content"
16         android:layout_above="@id/first_button"
17         android:layout_toLeftOf="@id/first_button"
18         android:text="second button"/>
19     <Button
20         android:id="@+id/third_button"
21         android:layout_width="wrap_content"
22         android:layout_height="wrap_content"
23         android:layout_above="@id/first_button"
24         android:layout_toRightOf="@id/first_button"
25         android:text="third button"/>
26     <Button
27         android:id="@+id/four_button"
28         android:layout_width="wrap_content"
29         android:layout_height="wrap_content"
30         android:layout_below="@id/first_button"
31         android:layout_toLeftOf="@id/first_button"
32         android:text="four button" />
33     <Button
34         android:id="@+id/five_button"
35         android:layout_width="wrap_content"
36         android:layout_height="wrap_content"
37         android:layout_below="@id/first_button"
38         android:layout_toRightOf="@id/first_button"
39         android:text="five button"/>
40 </RelativeLayout>
效果展示:
代码分析:
android:layout_above属性:一个控件位于另一个控件的上方
android:layout_below属性:一个控件位于另一个控件的下方
android:layout_toLfetOf属性:一个控件位于另一个控件的左边
android:layout_toRightOf属性:一个控件位于另一个控件的右边
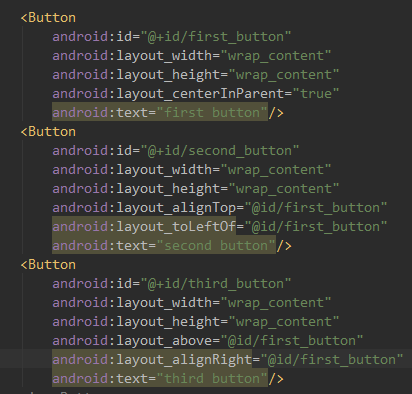
除此之外,还有另外一组相对于控件定位的属性:
android:layout_aligntLeft属性:一个控件的左边缘与另外一个控件的左边缘对齐
android:layout_aligntRight属性:一个控件的右边缘与另外一个控件的右边缘对齐
android:layout_aligntTop属性:一个控件的上边缘与另外一个控件的上边缘对齐
android:layout_aligntBottom属性:一个控件的下边缘与另外一个控件的下边缘对齐
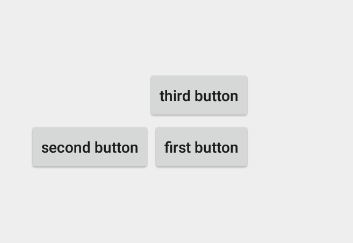
下面举一个简单的例子:
四、帧布局(FrameLayout)
FrameLayout布局因为其定位方式的欠缺,所以它的应用场景很少,下面我们就来简单的了解一下:
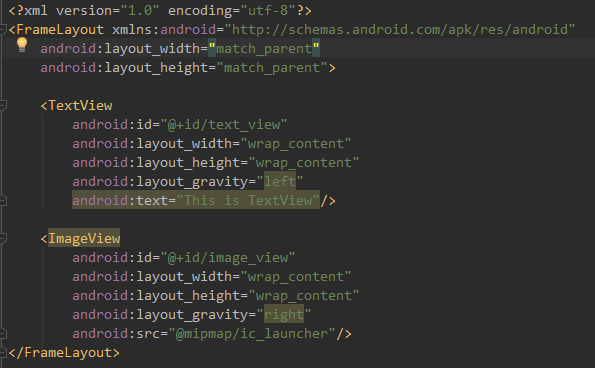
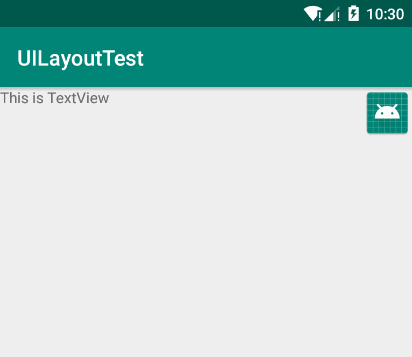
关于FrameLayout布局,在碎片中可以有所应用,后面我们会学到的。
五、百分比布局(PercentFrameLayout、PercentRelativeLayout)
1、 只有LinearLayout布局支持使用:layout_weight 来实现按比例指定控件大小的功能。
2、百分比布局允许直接指定控件在布局中所占的百分比,这样可以轻松实现平分布局或者按任意比例分割布局的效果了。
3、因为LinearLayout布局本身已经支持按比例来指定控件大小了,所以百分比布局只为FrameLayout布局和RelativeLayout布局进行了扩展,提供了PercentFrameLayout和PercentRelativeLayout两种全新的布局。
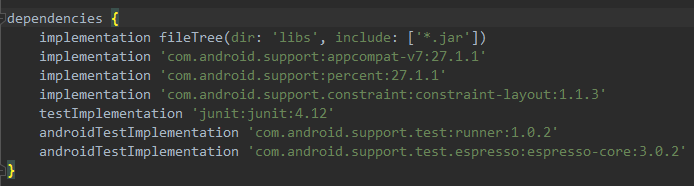
4、百分比布局是一种全新的布局,为了使其能在所有Android版本上使用,我们需要在app/build.gradle文件中添加百分比布局库的依赖:
implementation 'com.android.support:percent:27.1.1'
5、下面看代码和效果:
 1 <?xml version="1.0" encoding="utf-8"?>
 2 <android.support.percent.PercentFrameLayout
 3     xmlns:android="http://schemas.android.com/apk/res/android"
 4     xmlns:app="http://schemas.android.com/apk/res-auto"
 5     android:layout_width="match_parent"
 6     android:layout_height="match_parent">
 7     <Button
 8         android:id="@+id/first_button"
 9         android:text="first button"
10         android:layout_gravity="left|top"
11         app:layout_widthPercent="50%"
12         app:layout_heightPercent="50%"
13        />
14     <Button
15         android:id="@+id/second_button"
16         android:text="second button"
17         android:layout_gravity="right|top"
18         app:layout_widthPercent="50%"
19         app:layout_heightPercent="50%"/>
20     <Button
21         android:id="@+id/third_button"
22         android:text="third button"
23         android:layout_gravity="left|bottom"
24         app:layout_widthPercent="50%"
25         app:layout_heightPercent="50%"/>
26     <Button
27         android:id="@+id/four_button"
28         android:text="four button"
29         android:layout_gravity="right|bottom"
30         app:layout_widthPercent="50%"
31         app:layout_heightPercent="50%"/>
32 </android.support.percent.PercentFrameLayout>
代码分析:
1、在XML文件中需要定义一个app的命名空间,这样才能使用百分比布局的自定义属性(app属性)
app:layout_widthPercent属性:指定宽度百分比
app:layout_heightPercent属性:指定高度的百分比。
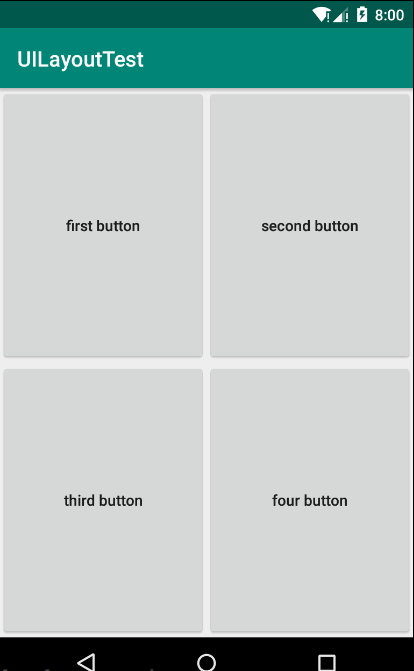
2、PercentFrameLayout还继承了FrameLayout的特性,及所有的控件默认都是摆放在布局的左上角。
使用layout_gravity来分别指定左上、右上、左下、右下
3、PercentRelativeLayout用法与PercentFrameLayout用法相似,它也继承了RelativeLayout布局的所有属性,并且可以使用app:layout_widthPercent和app:layout_heightPercent属性来指定控件所占的百分比。