微信小程序 Echarts 异步数据更新的练习,被坑了很多次,特作记录。
作者:罗兵
地址:https://www.cnblogs.com/hhh5460/p/9989805.html
0、效果图

1、视图
<!--index.wxml-->
<view class="container">
  <ec-canvas id="mychart-dom-bar" canvas-id="mychart-bar" ec="{{ ec }}"></ec-canvas>
</view>
2、设置
//index.json
{
  "usingComponents": {
    "ec-canvas": "../../components/ec-canvas/ec-canvas"
  }
}
3、样式
/**index.wxss**/
ec-canvas {
   100%;
  height: 100%;
}
/**app.wxss**/
.container {
  position: absolute;
  top: 0;
  bottom: 0;
  left: 0;
  right: 0;

  display: flex;
  flex-direction: column;
  align-items: center;
  justify-content: space-between;
  box-sizing: border-box;
}
4、逻辑
/**index.js**/

// 载入组件
import * as echarts from '../../components/ec-canvas/echarts';
// 载入工具
//const util = require('../../utils/util.js')

// 全局变量
let chart = null;
let month = ['月', '月', '月', '月', '月', '月']; //月份
let evaporation = [0, 0, 0, 0, 0, 0];           //蒸发量
let precipitation = [0, 0, 0, 0, 0, 0];         //降水量

function initChart(canvas, width, height) {
  chart = echarts.init(canvas, null, {
     width,
    height: height
  });
  canvas.setChart(chart);

  chart.showLoading(); // 首次显示加载动画

  var option = {
    legend: {
      data: ['蒸发量', '降水量']
    },
    xAxis: {
      data: month //全局变量
    },
    yAxis: {},
    series: [{
      name: '蒸发量',
      type: 'bar',
      data: evaporation //全局变量
    }, {
      name: '降水量',
      type: 'line',
      data: precipitation //全局变量
    }]
  };

  chart.setOption(option);
  chart.hideLoading(); // 隐藏加载动画
  return chart;
};

Page({
  data: {
    ec: {
      onInit: initChart
    },
    lastid: 0 // 哨兵
  },

  onReady() {
    this.data.timer = setInterval(this.getData, 2000);
  },

  getData() { //请求后台数据
    var that = this;
    wx.request({
      url: 'http://127.0.0.1:5000/api/weather',
      herder: {
        "content-type": "application/json"
      },
      method: "POST",
      data:{
        id: that.data.lastid + 1 // 哨兵,记录上次数据表中的最后id
      },
      success: function(res){
        that.setData({lastid: that.data.lastid + 1});

        // 下面这三个骚操作受python启发!!
        month = month.slice(1).concat(res.data.month); // 数组,先切片、再拼接
        evaporation = evaporation.slice(1).concat(res.data.evaporation.map(parseFloat)); //注意map方法
        precipitation = precipitation.slice(1).concat(res.data.precipitation.map(parseFloat));

        chart.setOption({
          xAxis: {
            data: month  //全局变量
          },
          series: [{
            name: '蒸发量',
            data: evaporation //全局变量
          }, {
            name: '降水量',
            data: precipitation //全局变量
          }]
        });

        if(that.data.lastid == 12){clearInterval(that.data.timer);}
      },
      fail: function (res) {},
      complete: function (res) {},
    });
  }

});
5、后端
# flask_restful_api.py

import sqlite3
from flask import Flask, request, render_template, jsonify

app = Flask(__name__)


def get_db():
    db = sqlite3.connect('mydb.db')
    db.row_factory = sqlite3.Row
    return db

def query_db(query, args=(), one=False):
    db = get_db()
    cur = db.execute(query, args)
    db.commit()
    rv = cur.fetchall()
    db.close()
    return (rv[0] if rv else None) if one else rv

@app.before_first_request
def create_db():
    # 建立连接
    conn = sqlite3.connect('mydb.db')
    c = conn.cursor()
    # 创建表格
    c.execute('''DROP TABLE IF EXISTS weather''')
    c.execute('''CREATE TABLE weather (id integer, month text, evaporation text, precipitation text)''')
    # 准备数据(格式:月份,蒸发量,降水量)
    purchases = [(1,'1月', 2, 2.6),
                 (2, '2月', 4.9, 5.9),
                 (3,'3月', 7, 9),
                 (4,'4月', 23.2, 26.4),
                 (5,'5月', 25.6, 28.7),
                 (6,'6月', 76.7, 70.7),
                 (7,'7月', 135.6, 175.6),
                 (8,'8月', 162.2, 182.2),
                 (9,'9月', 32.6, 48.7),
                 (10,'10月', 20, 18.8),
                 (11,'11月', 6.4, 6),
                 (12,'12月', 3.3, 2.3)
                ]
    # 插入数据
    c.executemany('INSERT INTO weather VALUES (?,?,?,?)', purchases)
    conn.commit()
    conn.close()


@app.route("/api/weather", methods=["GET","POST"])
def weather():
    if request.method == 'POST':
        res = query_db("SELECT * FROM weather WHERE id = (?)", args=(request.json['id'],)) #以后每次返回1个数据

    return jsonify(month = [x[1] for x in res],
                   evaporation = [x[2] for x in res],
                   precipitation = [x[3] for x in res]) # 返回json格式


if __name__ == "__main__":
    app.run(debug=True)
6、要点
a. 前端发送:herder: { "content-type": "application/json"};
前端接收:response.data(注意,微信将后台数据封装在res.data中, res.data是json格式)
b. 后端接收:request.json['id'] ;
后端发送:jsonify
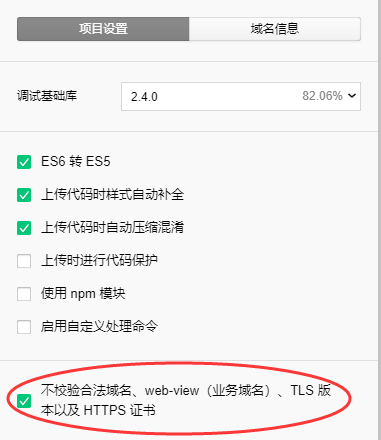
c. 本地测试设置:
7、参考
微信小程序Cannot read property 'setData' of null错误:https://blog.csdn.net/qq_42183184/article/details/82356208
微信小程序wx.request组件的那些坑:https://www.cnblogs.com/jhlqab/p/6900798.html
flask前端与后端之间传递的两种数据格式:json与FormData:https://www.cnblogs.com/hhh5460/p/8411978.html
flask+sqlite3+echarts3+ajax 异步更新数据:https://www.cnblogs.com/hhh5460/p/6010500.html
we3cschool微信小程序API发起请求:(地址略)