路由管理使用官方推荐的 React Navigation;
配置环境
-
安装相关依赖
yarn add react-navigation react-native-gesture-handler -
Link 原生依赖
react-native link react-native-gesture-handler -
修改 MainActivity.java
package com.reactnativedouban;

import com.facebook.react.ReactActivity;
+ import com.facebook.react.ReactActivityDelegate;
+ import com.facebook.react.ReactRootView;
+ import com.swmansion.gesturehandler.react.RNGestureHandlerEnabledRootView;

public class MainActivity extends ReactActivity {

@Override
protected String getMainComponentName() {
    return "ReactNativeDouban";
}

+  @Override
+  protected ReactActivityDelegate createReactActivityDelegate() {
+    return new ReactActivityDelegate(this, getMainComponentName()) {
+      @Override
+      protected ReactRootView createRootView() {
+        return new RNGestureHandlerEnabledRootView(MainActivity.this);
+      }
+    };
+  }
}
编辑路由相关页面
测试环境是否搭建成功
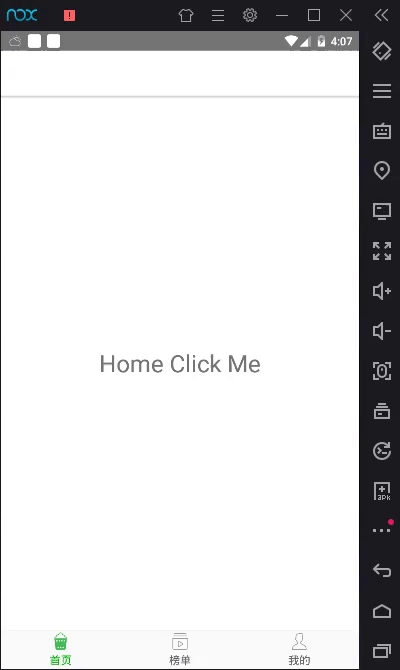
将如下 js 代码替换到 App.js 中,点击 Home Click Me 进行了页面跳转即表示环境搭建成功。
import React from "react";
import { View, Text } from "react-native";
import { createStackNavigator, createAppContainer } from "react-navigation";
class Home extends React.Component {
  render() {
    return (
      <View style={{ flex: 1, alignItems: "center", justifyContent: "center" }}>
        <Text onPress={() => this.props.navigation.push('Detail')}>Home Click Me</Text>
      </View>
    );
  }
}
class Detail extends React.Component {
  render() {
    return (
      <View style={{ flex: 1, alignItems: "center", justifyContent: "center" }}>
        <Text>Detail Screen</Text>
      </View>
    );
  }
}
const AppNavigator = createStackNavigator({Home,Detail});
export default createAppContainer(AppNavigator);
创建页面、配置路由
暂时创建主要的几个页面,后续有需求在进行创建,开发目录如下:
...
├─src                  主要开发目录
│ ├─router.js          管理路由
│ ├─App.js             入口页
│ └─pages              页面目录,暂时页面较少,不必对页面进行分类管理
│    ├─index.js        首页
│    ├─list.js         列表页
│    ├─detail.js       详情页
│    ├─center.js       个人中心
│    ├─rank.js         排行榜页面
│    └─rankDetail.js   排行榜详情页面
├─index.js
...
编辑 App.js
import React, { Component } from 'react';
import Router from './router';

export default class App extends Component {
  render() {
    return (
      <Router />
    );
  }
};
编辑 router.js
-
基本的结构如下:
import { createBottomTabNavigator, createAppContainer, createStackNavigator } from 'react-navigation'; import React from 'react'; import Index from './pages/index'; import Rank from './pages/rank'; import Center from './pages/center'; import List from './pages/list'; import Detail from './pages/detail'; import RankDetail from './pages/rankDetail'; const components = { List, Detail, RankDetail } const tabBarConfig = { tabBarOptions: { activeTintColor: '#fd0', inactiveTintColor: '#666', style: { backgroundColor: '#fafafa', } } } const TabNavigator = createBottomTabNavigator({ Index: { screen: Index, navigationOptions: { title: '首页' } }, Rank: { screen: Rank, navigationOptions: { title: '榜单' } }, Center: { screen: Center, navigationOptions: { title: '我的' } }, }, tabBarConfig); const AppNavigator = createStackNavigator({ Tab: TabNavigator, ...components }); export default createAppContainer(AppNavigator); -
页面内容如下:
import React from "react";
import { View, Text } from "react-native";

export default class Home extends React.Component {
render() {
    return (
    <View style={{ flex: 1, alignItems: "center", justifyContent: "center" }}>
        <Text onPress={() => this.props.navigation.push('Detail')}>Home Click Me</Text>
    </View>
    );
}
}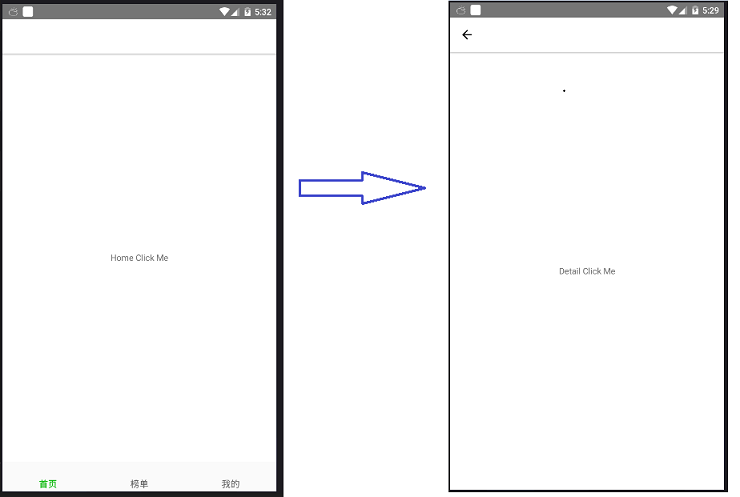
-
此时页面路由跳转是上下切换跳转,希望换成左右切换,修改createStackNavigator配置,如下,这样默认就是左右跳转,使用 this.props.navigation.push('Detail', { transition: 'bottom' }) 这样的带 transition 参数为 bottom 的跳转则为上下切换动画。
const AppNavigator = createStackNavigator({ Tab: TabNavigator, ...components }, { transitionConfig: () => ({ screenInterpolator: sceneProps => { const { layout, position, scene } = sceneProps; const { index, route } = scene; const { initWidth, initHeight } = layout; const params = route.params || {}; const transition = params.transition || 'left'; let transform = {}; if (transition === 'bottom') { transform.translateY = position.interpolate({ inputRange: [index - 1, index, index + 1], outputRange: [initHeight, 0, 0] }); } else { transform.translateX = position.interpolate({ inputRange: [index - 1, index, index + 1], outputRange: [initWidth, 0, 0] }); } const opacity = position.interpolate({ inputRange: [index - 1, index - 0.99, index], outputRange: [0, 1, 1], }); return { opacity, transform: [transform] }; } }) }); -
添加 Tabbar 图片,修改 tabBarConfig 配置:
const imgs = [
    require('./assets/index.png'),
    require('./assets/index-full.png'),
    require('./assets/rank.png'),
    require('./assets/rank-full.png'),
    require('./assets/center.png'),
    require('./assets/center-full.png')
];

const tabName = ['Index', 'Rank', 'Center'];

const tabBarConfig = {
    defaultNavigationOptions: ({ navigation }) => ({
        tabBarIcon: ({ focused }) => {
            const { routeName } = navigation.state;
            let imgIndex = focused ? tabName.indexOf(routeName) * 2 + 1 : tabName.indexOf(routeName) * 2;
            return <Image source={imgs[imgIndex]} style={{  25, height: 25 }} />;
        }
    }),
    tabBarOptions: {
        activeTintColor: '#00b600',
        inactiveTintColor: '#666',
        labelStyle: {
            fontSize: 15
        },
        style: {
            backgroundColor: '#fafafa',
        }
    }
}
效果如下:
至此,路由算是完成了,下节介绍项目中如何引入 redux。