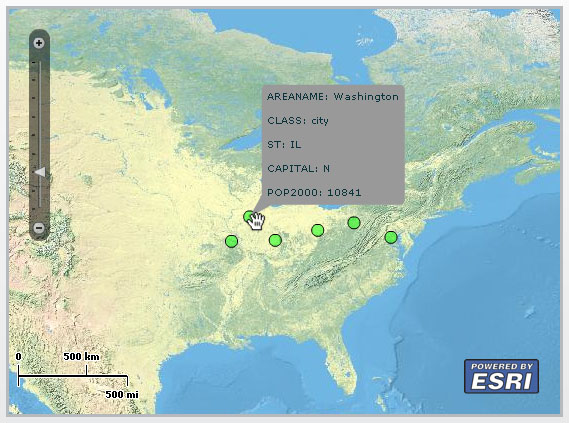
1.ArcGIS API for Flex实现MapTips功能,在USA的地图上添加城市点,鼠标移上去的时候显示MapTips可以查看城市的详细信息。
准备工作:
1.在ArcGIS.Server.9.3发布一个叫usa的Map Service,并且把这个Service启动起来。
2.采用Esri在线数据http://server.arcgisonline.com/ArcGIS/rest/services/NPS_Physical_World_2D/MapServer
3.去Esri下载新的ArcGIS API for Flex library开发包,昨天发布了1.0正式版,以后的文章都是基于正式版写。
完成后的效果图:
开始:
1.启动Flex Builder3新建工程以及引入1.0正式版的ArcGIS API for Flex library的开发包。
2.新建showInfoWindow.mxml页面, 整个功能主要分2部分,第一部分功能实现从我们上面发的动态地图USA的数据中读取Cities图层的城市点数据显示到ArcGISTiledMapServiceLayer的NPS_Physical_World_2D的地图上面。第二部分功能实现当鼠标移动到哪些数据点上时显示城市详细信息,鼠标移开时隐藏信息显示。
3.首先添加Map控件以及用来显示的NPS_Physical_World_2D的ArcGISTiledMapServiceLayer,用来显示Cities图层的城市点数据的GraphicsLayer,具体代码如下:
1 <esri:Extent id="usaExtent" xmin="-158.176464137356" ymin="19.702481852249" xmax="-68.7830120908013" ymax="64.8483018935526" />
2 <mx:Canvas width="557" height="411" borderStyle="solid" borderThickness="3" horizontalCenter="-58" verticalCenter="16">
3 <esri:Map id="myMap" extent="{usaExtent}">
4 <esri:ArcGISTiledMapServiceLayer url="http://server.arcgisonline.com/ArcGIS/rest/services/NPS_Physical_World_2D/MapServer" />
5 <esri:GraphicsLayer id="myGraphicsLayer"/>
6 </esri:Map>
7 </mx:Canvas>
4.上面的代码中添加了id为usaExtent的Extent用来设置当前地图的显示范围为USA。<esri:Extent id="usaExtent" xmin="-158.176464137356" ymin="19.702481852249" xmax="-68.7830120908013" ymax="64.8483018935526" />2
<mx:Canvas width="557" height="411" borderStyle="solid" borderThickness="3" horizontalCenter="-58" verticalCenter="16">3
<esri:Map id="myMap" extent="{usaExtent}">4
<esri:ArcGISTiledMapServiceLayer url="http://server.arcgisonline.com/ArcGIS/rest/services/NPS_Physical_World_2D/MapServer" />5
<esri:GraphicsLayer id="myGraphicsLayer"/>6
</esri:Map>7
</mx:Canvas>5.在添加一个点样式的定义用来设置地图上城市点的显示样式:
1<esri:SimpleMarkerSymbol id="defaultSymbol" color="0x00FF00" style="circle" size="12" alpha="0.5" >
2 <esri:SimpleLineSymbol/>
3 </esri:SimpleMarkerSymbol>
6.接下来需要在地图初始化的时候读取Cities图层的城市点数据显示到GraphicsLayer的功能。在mx:Application内添加mx:initialize标签实现:
<esri:SimpleMarkerSymbol id="defaultSymbol" color="0x00FF00" style="circle" size="12" alpha="0.5" >2
<esri:SimpleLineSymbol/>3
</esri:SimpleMarkerSymbol> 1<mx:initialize>
2 <![CDATA[
3 //实例化QueryTask并且把图层0作为参数,图层0就是Cities图层
4 var queryTask : QueryTask = new QueryTask("http://jh-53a435fbc0e8/ArcGIS/rest/services/USA/MapServer/0");
5 var query : Query = new Query();
6 //设置查询语句
7 query.where = "AREANAME = 'Washington'";
8 //设置是否返回Geometry
9 query.returnGeometry = true;
10 //设置查询需要返回的字段
11 query.outFields = ["AREANAME","POP2000","CLASS","ST","CAPITAL"];
12 //进行查询
13 queryTask.execute(query, new AsyncResponder( onResult, onFault ));
14
15 //查询完成后调用方法
16 function onResult( featureSet : FeatureSet, token : Object = null ) : void
17 {
{
18 for each ( var myGraphic : Graphic in featureSet.features )
19 {
20 //为城市点添加鼠标移动上去的事件监听
21 myGraphic.addEventListener(MouseEvent.ROLL_OVER,maouseOverHandler);
22 //为城市点添加鼠标移开的事件监听
23 myGraphic.addEventListener(MouseEvent.ROLL_OUT,maouseOutHandler);
24 //显示城市点的样式
25 myGraphic.symbol = defaultSymbol;
26 //添加到GraphicsLayer进行显示
27 myGraphicsLayer.add( myGraphic );
28 }
}
29 }
30 //查询错误后调用方法,显示错误信息
31 function onFault( info : Object, token : Object = null ) : void
32 {
33 Alert.show( info.toString() );
34 }
35
36 ]]>
37 </mx:initialize>
7.通过上面的代码实现了把城市点数据读取到地图上显示的功能并且为城市点数据添加了鼠标移动上去的事件监听和鼠标移开的事件监听的2个事件方法,显示城市相信信息和隐藏信息显示就在这个2个方法中实现的,显示信息用Map控件的infoWindow功能实现,这里要对infoWindow做一些我们自己的设置,首先添加cityInfo.mxml文件用来作为infoWindow的content内容用,实现非常的简单了不作具体解释了,代码如下:
<mx:initialize>2
<![CDATA[3
//实例化QueryTask并且把图层0作为参数,图层0就是Cities图层4
var queryTask : QueryTask = new QueryTask("http://jh-53a435fbc0e8/ArcGIS/rest/services/USA/MapServer/0");5
var query : Query = new Query();6
//设置查询语句7
query.where = "AREANAME = 'Washington'";8
//设置是否返回Geometry9
query.returnGeometry = true;10
//设置查询需要返回的字段11
query.outFields = ["AREANAME","POP2000","CLASS","ST","CAPITAL"];12
//进行查询13
queryTask.execute(query, new AsyncResponder( onResult, onFault ));14
15
//查询完成后调用方法16
function onResult( featureSet : FeatureSet, token : Object = null ) : void17
{
 }
}18
for each ( var myGraphic : Graphic in featureSet.features )19
{20
//为城市点添加鼠标移动上去的事件监听21
myGraphic.addEventListener(MouseEvent.ROLL_OVER,maouseOverHandler);22
//为城市点添加鼠标移开的事件监听23
myGraphic.addEventListener(MouseEvent.ROLL_OUT,maouseOutHandler);24
//显示城市点的样式25
myGraphic.symbol = defaultSymbol;26
//添加到GraphicsLayer进行显示27
myGraphicsLayer.add( myGraphic );28
}29
}30
//查询错误后调用方法,显示错误信息31
function onFault( info : Object, token : Object = null ) : void32
{33
Alert.show( info.toString() );34
}35
36
]]>37
</mx:initialize> 1<?xml version="1.0" encoding="utf-8"?>
2<mx:VBox xmlns:mx="http://www.adobe.com/2006/mxml">
3 <mx:String id="AREANAME"></mx:String>
4 <mx:String id="CLASS"></mx:String>
5 <mx:String id="ST"></mx:String>
6 <mx:String id="CAPITAL"></mx:String>
7 <mx:String id="POP2000"></mx:String>
8 <mx:Label text="AREANAME: {AREANAME}"/>
9 <mx:Label text="CLASS: {CLASS}"/>
10 <mx:Label text="ST: {ST}"/>
11 <mx:Label text="CAPITAL: {CAPITAL}"/>
12 <mx:Label text="POP2000: {POP2000}"/>
13</mx:VBox>
8.回到showInfoWindow.mxml页面添加mx:Script标签,然后在标签中首先添加对infowindow进行设置的代码:
<?xml version="1.0" encoding="utf-8"?>2
<mx:VBox xmlns:mx="http://www.adobe.com/2006/mxml">3
<mx:String id="AREANAME"></mx:String>4
<mx:String id="CLASS"></mx:String>5
<mx:String id="ST"></mx:String>6
<mx:String id="CAPITAL"></mx:String>7
<mx:String id="POP2000"></mx:String>8
<mx:Label text="AREANAME: {AREANAME}"/>9
<mx:Label text="CLASS: {CLASS}"/>10
<mx:Label text="ST: {ST}"/>11
<mx:Label text="CAPITAL: {CAPITAL}"/>12
<mx:Label text="POP2000: {POP2000}"/>13
</mx:VBox> 1//实例化cityInfo.mxml
2 private const m_content:cityInfo=new cityInfo();
3 //覆写createChildren方法,对infoWindow进行设置
4 override protected function createChildren():void
5 {
6 super.createChildren();
7 //不显示标题头
8 myMap.infoWindow.labelVisible = false;
9 //设置显示内容
10 myMap.infoWindow.content = m_content;
11 //不显示关闭按钮
12 myMap.infoWindow.closeButtonVisible = false;
13 }
9.最后就是编写鼠标移动上去的事件监听和鼠标移开的事件监听的2个事件方法:
//实例化cityInfo.mxml2
private const m_content:cityInfo=new cityInfo();3
//覆写createChildren方法,对infoWindow进行设置4
override protected function createChildren():void5
{6
super.createChildren();7
//不显示标题头8
myMap.infoWindow.labelVisible = false;9
//设置显示内容10
myMap.infoWindow.content = m_content;11
//不显示关闭按钮12
myMap.infoWindow.closeButtonVisible = false;13
} 1//鼠标移上去事件显示infoWindow
2 private function maouseOverHandler(event:MouseEvent):void
3 {
4 //获取当前鼠标移动上去的点对象
5 var graphic:Graphic=Graphic(event.target);
6 //转换成MapPoint
7 var mapPoint:MapPoint=MapPoint(graphic.geometry);
8 //设置cityInfo.mxml的AREANAME
9 m_content.AREANAME = graphic.attributes.AREANAME;
10 //设置cityInfo.mxml的CLASS
11 m_content.CLASS = graphic.attributes.CLASS;
12 //设置cityInfo.mxml的CAPITAL
13 m_content.CAPITAL = graphic.attributes.CAPITAL;
14 //设置cityInfo.mxml的ST
15 m_content.ST = graphic.attributes.ST;
16 //设置cityInfo.mxml的POP2000
17 m_content.POP2000 = graphic.attributes.POP2000;
18 //显示infoWindow
19 myMap.infoWindow.show(mapPoint);
20 }
21
22 //鼠标移开事件隐藏infoWindow
23 private function maouseOutHandler(event:MouseEvent):void
24 {
25 myMap.infoWindow.hide();
26 }
10.完成所有的功能运行测试效果。//鼠标移上去事件显示infoWindow2
private function maouseOverHandler(event:MouseEvent):void3
{4
//获取当前鼠标移动上去的点对象5
var graphic:Graphic=Graphic(event.target);6
//转换成MapPoint7
var mapPoint:MapPoint=MapPoint(graphic.geometry);8
//设置cityInfo.mxml的AREANAME9
m_content.AREANAME = graphic.attributes.AREANAME;10
//设置cityInfo.mxml的CLASS11
m_content.CLASS = graphic.attributes.CLASS;12
//设置cityInfo.mxml的CAPITAL13
m_content.CAPITAL = graphic.attributes.CAPITAL;14
//设置cityInfo.mxml的ST15
m_content.ST = graphic.attributes.ST;16
//设置cityInfo.mxml的POP200017
m_content.POP2000 = graphic.attributes.POP2000;18
//显示infoWindow19
myMap.infoWindow.show(mapPoint);20
}21
22
//鼠标移开事件隐藏infoWindow23
private function maouseOutHandler(event:MouseEvent):void24
{25
myMap.infoWindow.hide();26
}