@
一起学 mybatis
你想不想来学习 mybatis? 学习其使用和源码呢?那么, 在博客园关注我吧!!
我自己打算把这个源码系列更新完毕, 同时会更新相应的注释。快去 star 吧!!
在 mybatis 中, 对应 CRUD 的是四种节点: <select>, <insert>, <delete>, <update>。
在解析 Mapper.xml 文件中, 会调用 XMLStatementBuilder 来 进行这几个节点的解析。 解析完成后使用 MappedStatement 来表示一条条 SQL 语句。 完成的是这样这个过程
0 <sql> 节点解析
在此之前, 需要先了解一下 <sql>。
<sql> 节点不仅仅是代码生成器生成时, 代表一些字段而已, 其定义可重用的 SQL 语句的片段。 类似于我们在写代码时, 抽象出一个方法。
    /**
     * 解析 <sql> 节点
     *
     * @param list
     * @param requiredDatabaseId
     * @throws Exception
     */
    private void sqlElement(List<XNode> list, String requiredDatabaseId) throws Exception {
        // 遍历 <sql> 节点
        for (XNode context : list) {
            // 获取 databaseId 属性
            String databaseId = context.getStringAttribute("databaseId");
            // 获取 id 属性
            String id = context.getStringAttribute("id");
            // 为 id 添加命名空间
            id = builderAssistant.applyCurrentNamespace(id, false);
            // 检查 sql 节点的 databaseId 与当前 Configuration 中的是否一致
            if (databaseIdMatchesCurrent(id, databaseId, requiredDatabaseId)) {
                // 记录到 XMLMapperBuider.sqlFragments(Map<String, XNode>)中保存
                // 其最终是指向了 Configuration.sqlFragments(configuration.getSqlFragments) 集合
                sqlFragments.put(id, context);
            }
        }
    }
整体的过程就是获取所有节点, 然后逐个解析。 然后以 id-> context 键值对的方式存放在 XMLMapperBuilder.sqlFragments 对象中, 后续会用到。
注意, 此时的 context 还是 XNode 对象, 其最终的解析还是在解析 include 时进行解析。
注意, id 使用了 MapperBuilderAssistant.applyCurrentNamespace 进行了处理。 其是按照一定的规则在前面添加 namespace, 以便 id 在全局具有唯一性。
1 解析流程
其整体的代码是这样子的
  public void parseStatementNode() {
    // 获取 id 属性
    String id = context.getStringAttribute("id");
    // 获取 databaseid
    String databaseId = context.getStringAttribute("databaseId");
    //验证databaseId是否匹配
    if (!databaseIdMatchesCurrent(id, databaseId, this.requiredDatabaseId)) {
      return;
    }
    // 获取各个属性
    Integer fetchSize = context.getIntAttribute("fetchSize");
    Integer timeout = context.getIntAttribute("timeout");
    String parameterMap = context.getStringAttribute("parameterMap");
    String parameterType = context.getStringAttribute("parameterType");
    Class<?> parameterTypeClass = resolveClass(parameterType);
    String resultMap = context.getStringAttribute("resultMap");
    String resultType = context.getStringAttribute("resultType");
    String lang = context.getStringAttribute("lang");
    LanguageDriver langDriver = getLanguageDriver(lang);

    Class<?> resultTypeClass = resolveClass(resultType);
    String resultSetType = context.getStringAttribute("resultSetType");
    StatementType statementType = StatementType.valueOf(context.getStringAttribute("statementType", StatementType.PREPARED.toString()));
    ResultSetType resultSetTypeEnum = resolveResultSetType(resultSetType);

    // 获取节点的类型
    String nodeName = context.getNode().getNodeName();
    SqlCommandType sqlCommandType = SqlCommandType.valueOf(nodeName.toUpperCase(Locale.ENGLISH));
    boolean isSelect = sqlCommandType == SqlCommandType.SELECT;
    boolean flushCache = context.getBooleanAttribute("flushCache", !isSelect);
    boolean useCache = context.getBooleanAttribute("useCache", isSelect);
    boolean resultOrdered = context.getBooleanAttribute("resultOrdered", false);

    // Include Fragments before parsing
    // 引入include 解析出的 sql 节点内容
    XMLIncludeTransformer includeParser = new XMLIncludeTransformer(configuration, builderAssistant);
    includeParser.applyIncludes(context.getNode());

    // Parse selectKey after includes and remove them.
    // 处理 selectKey
    processSelectKeyNodes(id, parameterTypeClass, langDriver);

    // Parse the SQL (pre: <selectKey> and <include> were parsed and removed)
    SqlSource sqlSource = langDriver.createSqlSource(configuration, context, parameterTypeClass);
    String resultSets = context.getStringAttribute("resultSets");
    String keyProperty = context.getStringAttribute("keyProperty");
    String keyColumn = context.getStringAttribute("keyColumn");
    KeyGenerator keyGenerator;
    // 设置主键自增的方式
    String keyStatementId = id + SelectKeyGenerator.SELECT_KEY_SUFFIX;
    keyStatementId = builderAssistant.applyCurrentNamespace(keyStatementId, true);
    if (configuration.hasKeyGenerator(keyStatementId)) {
      keyGenerator = configuration.getKeyGenerator(keyStatementId);
    } else {
      keyGenerator = context.getBooleanAttribute("useGeneratedKeys",
          configuration.isUseGeneratedKeys() && SqlCommandType.INSERT.equals(sqlCommandType))
          ? Jdbc3KeyGenerator.INSTANCE : NoKeyGenerator.INSTANCE;
    }

    builderAssistant.addMappedStatement(id, sqlSource, statementType, sqlCommandType,
        fetchSize, timeout, parameterMap, parameterTypeClass, resultMap, resultTypeClass,
        resultSetTypeEnum, flushCache, useCache, resultOrdered,
        keyGenerator, keyProperty, keyColumn, databaseId, langDriver, resultSets);
  }
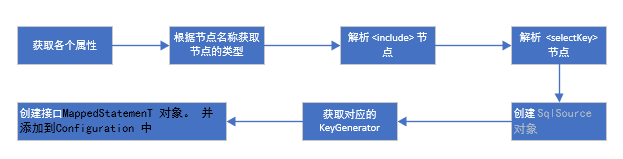
但去除一些获取节点属性的代码, 去除一些反射的代码。 其流程可以用下图表示
2 节点解析
在其他的内容解析之前, 会先解析 <incliude>节点, 用对应 id 的重用 SQL 语句将该节点替换掉。
先看看约束的定义
<!ELEMENT include (property+)?>
<!ATTLIST include
refid CDATA #REQUIRED
>
可以看出, <incliude> 节点中可以包含有 property 一个或多个, 必须包含有 refid。 refid 是对应 <sql> 节点的 id。
2.1 解析流程
解析时, 通过 XMLIncludeTransformer.applyIncludes 方法进行解析。
  /**
   * 从 parseStatementNode 方法进入时, Node 还是 (select|insert|update|delete) 节点
   */
  public void applyIncludes(Node source) {
    Properties variablesContext = new Properties();
    // 获取的是 mybatis-config.xml 所定义的属性
    Properties configurationVariables = configuration.getVariables();
    if (configurationVariables != null) {
      variablesContext.putAll(configurationVariables);
    }
    // 处理 <include> 子节点
    applyIncludes(source, variablesContext, false);
  }
获取 Coniguration.variables 中的所有属性, 这些属性后续在将 ${XXX} 替换成真实的参数时会用到。 然后递归解析所有的 include 节点。 具体的实现过程如下:
  /**
   * Recursively apply includes through all SQL fragments.
   * 递归的包含所有的 SQL 节点
   *
   * @param source           Include node in DOM tree
   * @param variablesContext Current context for static variables with values
   */
  private void applyIncludes(Node source, final Properties variablesContext, boolean included) {
    // 下面是处理 include 子节点
    if (source.getNodeName().equals("include")) {
      // 查找 refid 属性指向 <sql> 节点
      Node toInclude = findSqlFragment(getStringAttribute(source, "refid"), variablesContext);
      // 解析 <include> 节点下的 <property> 节点, 将得到的键值对添加到 variablesContext 中
      // 并形成 Properties 对象返回, 用于替换占位符
      Properties toIncludeContext = getVariablesContext(source, variablesContext);
      // 递归处理 <include> 节点, 在 <sql> 节点中可能会 <include> 其他 SQL 片段
      applyIncludes(toInclude, toIncludeContext, true);
      if (toInclude.getOwnerDocument() != source.getOwnerDocument()) {
        toInclude = source.getOwnerDocument().importNode(toInclude, true);
      }
      // 将 <include> 节点替换成 <sql>
      source.getParentNode().replaceChild(toInclude, source);
      while (toInclude.hasChildNodes()) {
        toInclude.getParentNode().insertBefore(toInclude.getFirstChild(), toInclude);
      }
      toInclude.getParentNode().removeChild(toInclude);
    } else if (source.getNodeType() == Node.ELEMENT_NODE) {
      if (included && !variablesContext.isEmpty()) {
        // replace variables in attribute values
        //  获取所有的属性值, 并使用 variablesContext 进行占位符的解析
        NamedNodeMap attributes = source.getAttributes();
        for (int i = 0; i < attributes.getLength(); i++) {
          Node attr = attributes.item(i);
          attr.setNodeValue(PropertyParser.parse(attr.getNodeValue(), variablesContext));
        }
      }
      // 获取所有的子类, 并递归解析
      NodeList children = source.getChildNodes();
      for (int i = 0; i < children.getLength(); i++) {
        applyIncludes(children.item(i), variablesContext, included);
      }
    } else if (included && source.getNodeType() == Node.TEXT_NODE
            && !variablesContext.isEmpty()) {
      // replace variables in text node
      // 使用 variablesContext 进行占位符的解析
      source.setNodeValue(PropertyParser.parse(source.getNodeValue(), variablesContext));
    }
  }
它分三种节点进行解析
- include
- Node.ELEMENT_NODE
- Node.TEXT_NODE
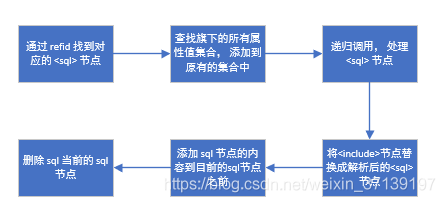
2.2 <include> 节点的解析
这个是节点为 <include> 时才进行解析的, 其解析的流程大体如下
2.3 Node.ELEMENT_NODE 类型解析
什么时候回出现这种情况呢? 节点是非 <include> 的 Node.ELEMENT_NODE 类型的节点时, 如 sql 节点, (select | insert | update | delete) 节点的时候。 这些节点的特点就是都有可能含有 <include> 节点。
这个的流程很简单, 就是递归调用解析所有的 <include> 子节点。
  // 获取所有的子类, 并递归解析
  NodeList children = source.getChildNodes();
  for (int i = 0; i < children.getLength(); i++) {
    applyIncludes(children.item(i), variablesContext, included);
  }
2.4 Node.TEXT_NODE
Node.TEXT_NODE 就是文本节点, 当时该类型的节点时, 就会使用 PropertyParser.parse 方法来进行解析。 其大体就是将 ${xxx} 替换成相应的值。
由于有 included 条件的现在, 其只有是在 include 所包含的子节点时才会如此。
举例
该过程中涉及到了多层递归, 同时还有多种节点类型, 还需要进行占位符的处理, 理解上还是比较费劲的, 举个栗子吧
<!--全部字段-->
<sql id="Base_Column_List">
    student_id, name, phone, email, sex, locked, gmt_created, gmt_modified
</sql>

<!--表名-->
<sql id="sometable">
  ${table}
</sql>

<!--refid可以使用${}-->
<sql id="someinclude">
    from
    <include refid="${include_target}"/>
</sql>

<!--SQL-->
<select id="selectById" resultMap="BaseResultMap">
    select
    <include refid="Base_Column_List" />
    <include refid="someinclude">
      <property name="table" value="student"/>
      <property name="include_target" value="sometable"/>
    </include>
    where student_id=#{studentId, jdbcType=INTEGER}
</select>
其流程大体如下
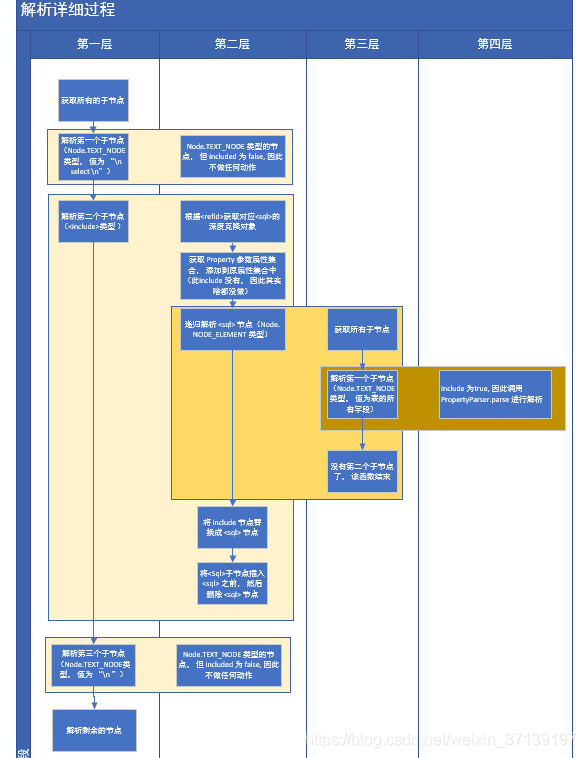
看的时候, 请对照代码来看, 详细讲解了前面三个节点的解析过程。 后面的类似, 可能有的递归层次加深了, 并大体的思路并没有改变。
3 节点
<insert>、<update>可以定义<selectKey>节点来获取主键。
/**
   * 真正解析 selectKey 的函数
   */
  private void parseSelectKeyNode(String id, XNode nodeToHandle, Class<?> parameterTypeClass, LanguageDriver langDriver, String databaseId) {
    // 开始时获取各个属性
    String resultType = nodeToHandle.getStringAttribute("resultType");
    Class<?> resultTypeClass = resolveClass(resultType);
    StatementType statementType = StatementType.valueOf(nodeToHandle.getStringAttribute("statementType", StatementType.PREPARED.toString()));
    String keyProperty = nodeToHandle.getStringAttribute("keyProperty");
    String keyColumn = nodeToHandle.getStringAttribute("keyColumn");
    boolean executeBefore = "BEFORE".equals(nodeToHandle.getStringAttribute("order", "AFTER"));

    //defaults
    boolean useCache = false;
    boolean resultOrdered = false;
    KeyGenerator keyGenerator = NoKeyGenerator.INSTANCE;
    Integer fetchSize = null;
    Integer timeout = null;
    boolean flushCache = false;
    String parameterMap = null;
    String resultMap = null;
    ResultSetType resultSetTypeEnum = null;

    // 生成对应的 SqlSource
    SqlSource sqlSource = langDriver.createSqlSource(configuration, nodeToHandle, parameterTypeClass);
    SqlCommandType sqlCommandType = SqlCommandType.SELECT;

    // 使用 SqlSource 创建 MappedStatement 对象
    builderAssistant.addMappedStatement(id, sqlSource, statementType, sqlCommandType,
            fetchSize, timeout, parameterMap, parameterTypeClass, resultMap, resultTypeClass,
            resultSetTypeEnum, flushCache, useCache, resultOrdered,
            keyGenerator, keyProperty, keyColumn, databaseId, langDriver, null);

    id = builderAssistant.applyCurrentNamespace(id, false);

    MappedStatement keyStatement = configuration.getMappedStatement(id, false);
    // 添加到 Configuration 中, 并通过 executeBefore 还觉得是在sql之前执行还是之后执行
    configuration.addKeyGenerator(id, new SelectKeyGenerator(keyStatement, executeBefore));
  }
其中涉及到
SqlSource sqlSource = langDriver.createSqlSource(configuration, nodeToHandle, parameterTypeClass);
这个过程。
LanguageDriver 类有两个实现类
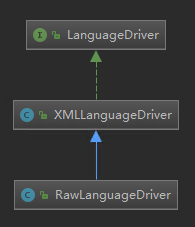
默认是 XMLLanguageDriver。 可以通过 Configuration 的构造函数得出。
languageRegistry.setDefaultDriverClass(XMLLanguageDriver.class);
在 langDriver.createSqlSource 函数中, 会调用 parseScriptNode 函数
  /**
   * 解析动态节点
   * @return
   */
  public SqlSource parseScriptNode() {
    // 首先判断是不是动态节点
    MixedSqlNode rootSqlNode = parseDynamicTags(context);
    SqlSource sqlSource = null;
    if (isDynamic) {
      sqlSource = new DynamicSqlSource(configuration, rootSqlNode);
    } else {
      sqlSource = new RawSqlSource(configuration, rootSqlNode, parameterType);
    }
    return sqlSource;
  }
而其中, 需要判定是否为动态SQL, 其中, 有 $ 和动态 sql 的节点, 都会认为是动态SQL。
  /**
   * 解析动态节点
   * @param node
   * @return
   */
  protected MixedSqlNode parseDynamicTags(XNode node) {
    List<SqlNode> contents = new ArrayList<>();
    // 获取节点下的所有子节点
    NodeList children = node.getNode().getChildNodes();
    for (int i = 0; i < children.getLength(); i++) {
      // 获取节点
      XNode child = node.newXNode(children.item(i));
      if (child.getNode().getNodeType() == Node.CDATA_SECTION_NODE || child.getNode().getNodeType() == Node.TEXT_NODE) {
        // 如果有 $ , 则为动态sql节点
        String data = child.getStringBody("");
        TextSqlNode textSqlNode = new TextSqlNode(data);
        if (textSqlNode.isDynamic()) {
          contents.add(textSqlNode);
          isDynamic = true;// 标记为动态节点
        } else {
          contents.add(new StaticTextSqlNode(data));
        }
      } else if (child.getNode().getNodeType() == Node.ELEMENT_NODE) { // issue #628
        // 子节点是标签, 则一定是动态sql节点。 根据nodeName, 生产不同的 NodeHandler
        String nodeName = child.getNode().getNodeName();
        NodeHandler handler = nodeHandlerMap.get(nodeName);
        if (handler == null) {
          throw new BuilderException("Unknown element <" + nodeName + "> in SQL statement.");
        }
        handler.handleNode(child, contents);
        isDynamic = true;
      }
    }
    return new MixedSqlNode(contents);
  }
NodeHandler 有以下几个实现类
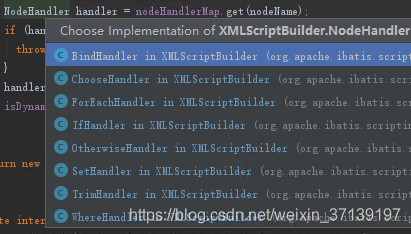
是不是似曾相识? 就是动态 SQL 的几个节点所对应的。
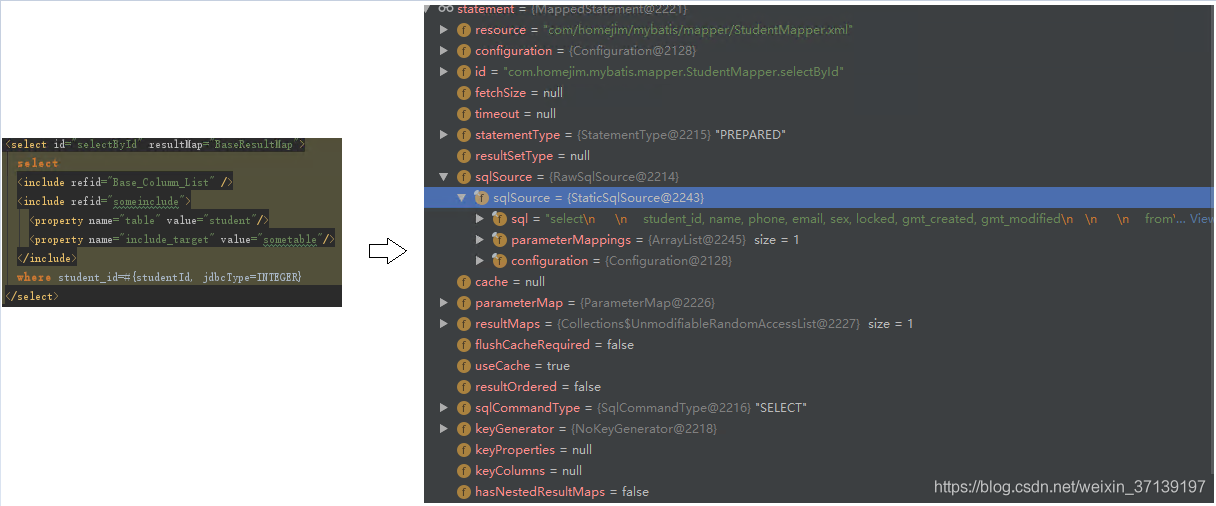
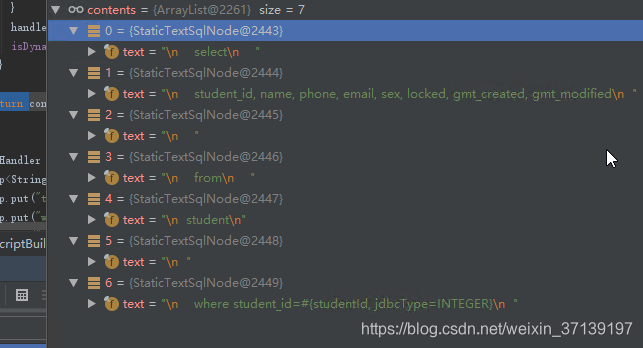
在该过程之后, selectById 就变成了:
4 创建 SqlSource
该过程与上面的过程相似, 经过 include 节点的解析之后, 会创建对应的 SqlSourceNode 对象。
关于 SqlSource, 会在后续的文章中详细展开讲解。
在该过程之后, selectById 变成了
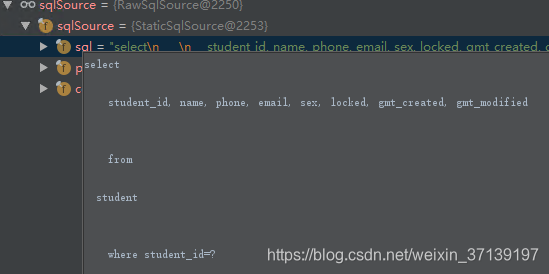
对应参数及其类型被保存起来, 同时参数的占位符 #{xxx, JdbcType=yyy} 变成了问号。 在调用 RawSqlSource 构造函数时, 会完成该过程
  public RawSqlSource(Configuration configuration, String sql, Class<?> parameterType) {
    SqlSourceBuilder sqlSourceParser = new SqlSourceBuilder(configuration);
    Class<?> clazz = parameterType == null ? Object.class : parameterType;
    sqlSource = sqlSourceParser.parse(sql, clazz, new HashMap<String, Object>());
  }


  public SqlSource parse(String originalSql, Class<?> parameterType, Map<String, Object> additionalParameters) {
    // 占位符处理器
    ParameterMappingTokenHandler handler = new ParameterMappingTokenHandler(configuration, parameterType, additionalParameters);
    GenericTokenParser parser = new GenericTokenParser("#{", "}", handler);
    String sql = parser.parse(originalSql);
    return new StaticSqlSource(configuration, sql, handler.getParameterMappings());
  }

    // SQL 中的占位符处理。
    @Override
    public String handleToken(String content) {
      parameterMappings.add(buildParameterMapping(content));
      return "?";
    }
5 获取对应的 KeyGenerator
KeyGenerator为键生成器。 在我们使用主键自动生成时, 会生成一个对应的主键生成器实例。
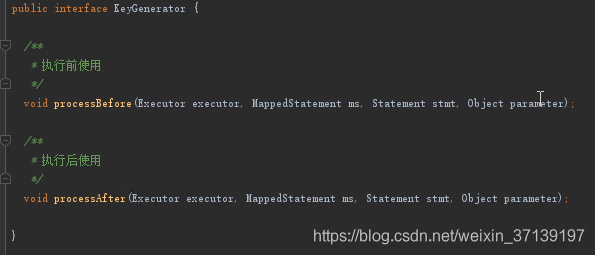
该接口主要定义了生成器的在 SQL 在查询前执行还是之后执行。 其有如下的实现类
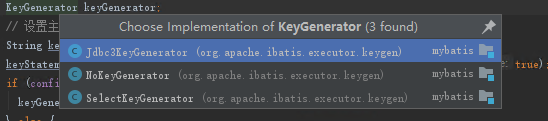
- Jdbc3KeyGenerator:用于处理数据库支持自增主键的情况,如MySQL的auto_increment。
- NoKeyGenerator:空实现,不需要处理主键。没有主键生成器, 如不是 INSERT, 也没有使用主键生成器的时候, 就是该类型。
- SelectKeyGenerator:配置了 <selectKey> 之后, 就是该类型。 用于处理数据库不支持自增主键的情况,比如Oracle,postgres的sequence序列。
6 创建并添加 MappedStatement
在完成以上步骤的处理之后, 通过
  builderAssistant.addMappedStatement(id, sqlSource, statementType, sqlCommandType,
        fetchSize, timeout, parameterMap, parameterTypeClass, resultMap, resultTypeClass,
        resultSetTypeEnum, flushCache, useCache, resultOrdered,
        keyGenerator, keyProperty, keyColumn, databaseId, langDriver, resultSets);
进行 MappedStatement 对象的生成, 并添加到 Configuration 中。
以上的 selectById 最后再存在 Configuration中:
