一、开启开发者模式
步骤: -> 系统设置 -> 更新和安全 -> 针对开发人员 -> 选择开发者模式
点击后会自动安装环境
二、启用WSL
步骤: -> 系统设置 -> 应用 -> 右侧的程序和功能 -> 启动或关闭windows功能 -> 勾选适用于 Linux 的 Windows 子系统
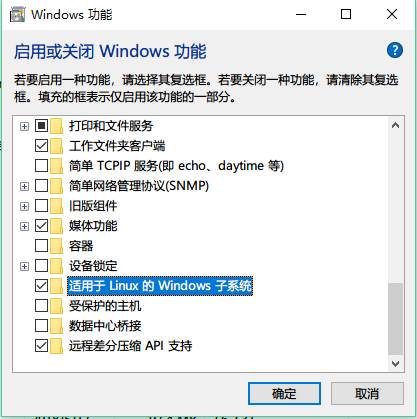
确定后,重启电脑,系统更新配置
三、安装 Linux 子系统
打开 Windows 商店,输入 Ubuntu 搜索,选择你自己想要的系统版本,我选择的是 Ubuntu 18.04。然后点击安装,第一次启动会进行初始化安装。

管理员控制台,属性,关闭使用旧版控制台
使用bash命令进入linux子系统
默认的子系统的路径:
C:UsersqhongAppDataLocalPackagesCanonicalGroupLimited.Ubuntu18.04onWindows_79rhkp1fndgscLocalState
ootfs
查看系统版本:
root@hongda:/# cat etc/os-release
NAME="Ubuntu"
VERSION="18.04 LTS (Bionic Beaver)"
ID=ubuntu
ID_LIKE=debian
PRETTY_NAME="Ubuntu 18.04 LTS"
VERSION_ID="18.04"
HOME_URL="https://www.ubuntu.com/"
SUPPORT_URL="https://help.ubuntu.com/"
BUG_REPORT_URL="https://bugs.launchpad.net/ubuntu/"
PRIVACY_POLICY_URL="https://www.ubuntu.com/legal/terms-and-policies/privacy-policy"
VERSION_CODENAME=bionic
UBUNTU_CODENAME=bionic
通过passwd设置密码:
root@hongda:/# passwd
Enter new UNIX password:
Retype new UNIX password:
passwd: password updated successfully
如果su进入root账户,密码错误,需要设置root账户的密码:
$ sudo passwd root
Enter new UNIX password:
//此时输入你的密码
Retype new UNIX password:
//再次输入,相同密码。
passwd: password updated successfully
更换ubuntu的数据源:
# 1.备份原来的数据源配置文件
cp /etc/apt/sources.list /etc/apt/sources.list_backup
# 2.编辑数据源配置文件
vi /etc/apt/sources.list
替换:
deb http://mirrors.aliyun.com/ubuntu/ trusty main restricted universe multiverse
deb http://mirrors.aliyun.com/ubuntu/ trusty-security main restricted universe multiverse
deb http://mirrors.aliyun.com/ubuntu/ trusty-updates main restricted universe multiverse
deb http://mirrors.aliyun.com/ubuntu/ trusty-proposed main restricted universe multiverse
deb http://mirrors.aliyun.com/ubuntu/ trusty-backports main restricted universe multiverse

deb https://mirrors.ustc.edu.cn/ubuntu/ xenial main restricted universe multiverse
deb https://mirrors.ustc.edu.cn/ubuntu/ xenial-updates main restricted universe multiverse
deb https://mirrors.ustc.edu.cn/ubuntu/ xenial-backports main restricted universe multiverse
deb https://mirrors.ustc.edu.cn/ubuntu/ xenial-security main restricted universe multiverse

deb-src http://mirrors.aliyun.com/ubuntu/ trusty main restricted universe multiverse
deb-src http://mirrors.aliyun.com/ubuntu/ trusty-security main restricted universe multiverse
deb-src http://mirrors.aliyun.com/ubuntu/ trusty-updates main restricted universe multiverse
deb-src http://mirrors.aliyun.com/ubuntu/ trusty-proposed main restricted universe multiverse
deb-src http://mirrors.aliyun.com/ubuntu/ trusty-backports main restricted universe multiverse
更新配置:
# 3.更新配置
apt-get update
参考:
https://www.jianshu.com/p/bc38ed12da1d