更新。。。
首先采用的是XML配置方式,请先查看 初识Spring security-添加security 在之前的示例中进行代码修改
项目结构如下:

一、修改spring-security.xml文件,添加配置如下
<security:http auto-config="true">
        <security:intercept-url pattern="/admin**" access="hasRole('ROLE_USER')"/>
        <security:form-login
                login-page="/login"
                default-target-url="/welcome"
                authentication-failure-url="/login?error"
                username-parameter="user-name"
                password-parameter="pwd"/>
        <security:logout
                logout-success-url="/login?logout"/>
        <!-- XML 配置中默认csrf是关闭的,此处设置为打开
            如果这里打开csrf,则在form表单中需要添加
            <input type="hidden" th:name="${_csrf.parameterName}" th:value="${_csrf.token}" />
        -->
        <security:csrf />
    </security:http>
其中:
login-page指定的用户自定义的登录页面
default-target-url登录成功以后默认跳转到的页面
authentication-failure-url登录失败以后跳转到的页面
username-parameter指定登录表单中用户名的input中name,如果这里不配置,则默认为username
password-parameter指定登录表单中密码的input中name,如果这里不配置,则默认为password
logout-success-url成功退出以后跳转到的地址
其他见注释
二、添加login.html
<!DOCTYPE html>
<html xmlns:th="http://www.thymeleaf.org">
<head>
    <meta charset="UTF-8" />
    <title>login</title>
    <style>
        .error {
            padding: 15px;
            margin-bottom: 20px;
            border-radius: 4px;
            color: #a94442;
            background-color: #f2dede;
            border: 1px solid #ebccd1;
        }
        .msg {
            padding: 15px;
            margin-bottom: 20px;
            border-radius: 4px;
            color: #31708f;
            background-color: #d9edf7;
            border: 1px solid #bce8f1;
        }
        #login-box {
            width: 300px;
            padding: 20px;
            margin: 100px auto;
            background: #fff;
            -webkit-border-radius: 2px;
            -moz-border-radius: 2px;
            border: 1px solid #000;
        }
        .hide {
            display: none;
        }
        .show {
            display: block;
        }
    </style>
</head>
<body>
    <div id="login-box">
        <h1>Spring Security 自定义登录页面</h1>
        <div class="error" th:class="${error}? 'show error' : 'hide'" th:text="${error}"></div>
        <div class="msg" th:class="${msg}? 'show msg' : 'hide'" th:text="${msg}"></div>
        <form name='loginForm' action="/login" method='POST'>
            <table>
                <tr>
                    <td>用户名:</td>
                    <td><input type='text' name='user-name' /></td>
                </tr>
                <tr>
                    <td>密码:</td>
                    <td><input type='password' name='pwd' /></td>
                </tr>
                <tr>
                    <td colspan='2'>
                        <input type="submit" value="提交" />
                    </td>
                </tr>
            </table>
            <input type="hidden" th:name="${_csrf.parameterName}" th:value="${_csrf.token}" />
        </form>
    </div>
</body>
</html>
<form name='loginForm' th:action="@{/login}" method='POST'>
    <table>
        <tr>
            <td>用户名:</td>
            <td><input type='text' name='user-name' autofocus/></td>
        </tr>
        <tr>
            <td>密码:</td>
            <td><input type='password' name='pwd' /></td>
        </tr>
        <tr>
            <td colspan='2'>
                <input type="submit" value="提交" />
            </td>
        </tr>
    </table>
</form>
使用这个表单也可以进行登录,提交时候自动添加_csrf属性
三、修改admin.html
<!DOCTYPE html>
<html xmlns="http://www.w3.org/1999/xhtml"
      xmlns:th="http://www.thymeleaf.org">
<head>
    <meta charset="UTF-8"/>
    <title>admin</title>
</head>
<body>
    <h1 th:text="|标题: ${title}|">Title : XXX</h1>
    <h1 th:text="|信息: ${message}|">Message : XXX</h1>
    <h2><a href="javascript:formSubmit()">Logout</a></h2>
    <!-- csrf for logout-->
    <form action="/logout" method="post" id="logoutForm">
        <input type="hidden" th:name="${_csrf.parameterName}" th:value="${_csrf.token}" />
    </form>
    <script>
        function formSubmit() {
            document.getElementById("logoutForm").submit();
        }
    </script>
</body>
</html>
<!-- 同样可以进行正常退出,自动加入了_csrf的属性值 -->
<form th:action="@{/logout}" method="post" id="logoutForm"></form>
如果使用这种表单也可以实现退出,提交时候自动添加_csrf属性
四、修改HelloController文件,添加代码:
@RequestMapping(value = "/login", method = RequestMethod.GET)
    public ModelAndView login(
            @RequestParam(value = "error", required = false) String error,
            @RequestParam(value = "logout", required = false) String logout) {
        ModelAndView model = new ModelAndView();
        if (error != null) {
            model.addObject("error", "不正确的用户名和密码");
        }
        if (logout != null) {
            model.addObject("msg", "你已经成功退出");
        }
        model.setViewName("login");
        return model;
    }
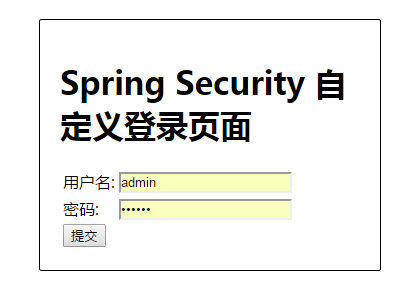
启动程序:访问http://localhost:8010/login 跳转到自定义的登录页面
可以自行测试登录成功和失败的提示
下面采用注解方式,在前面的采用注解方式实现security和自定义登录页基础之上,把配置spring-security.xml的过程改成注解方式即可
项目结构如下:

修改SecurityConfig文件
package com.petter.config;
import org.springframework.beans.factory.annotation.Autowired;
import org.springframework.context.annotation.Configuration;
import org.springframework.security.config.annotation.authentication.builders.AuthenticationManagerBuilder;
import org.springframework.security.config.annotation.web.builders.HttpSecurity;
import org.springframework.security.config.annotation.web.configuration.EnableWebSecurity;
import org.springframework.security.config.annotation.web.configuration.WebSecurityConfigurerAdapter;
/**
 * 相当于spring-security.xml中的配置
 * @author hongxf
 * @since 2017-03-08 9:30
 */
@Configuration
@EnableWebSecurity
public class SecurityConfig extends WebSecurityConfigurerAdapter {
    /**
     * 在内存中设置三个用户
     * @param auth
     * @throws Exception
     */
    @Autowired
    public void configureGlobal(AuthenticationManagerBuilder auth) throws Exception {
        auth.inMemoryAuthentication().withUser("hongxf").password("123456").roles("USER");
        auth.inMemoryAuthentication().withUser("admin").password("123456").roles("ADMIN");
        auth.inMemoryAuthentication().withUser("dba").password("123456").roles("DBA");
    }
    /**
     * 配置权限要求
     * 采用注解方式,默认开启csrf
     * @param http
     * @throws Exception
     */
    @Override
    protected void configure(HttpSecurity http) throws Exception {
        http.authorizeRequests()
                .antMatchers("/admin/**").access("hasRole('ROLE_ADMIN')")
                .antMatchers("/dba/**").access("hasRole('ROLE_ADMIN') or hasRole('ROLE_DBA')")
             .and()
                .formLogin().loginPage("/login")
                .defaultSuccessUrl("/welcome").failureUrl("/login?error")
                .usernameParameter("user-name").passwordParameter("pwd")
            .and()
                .logout().logoutSuccessUrl("/login?logout")
            .and()
                .csrf();
    }
}
修改HelloController文件,添加
@RequestMapping(value = "/login", method = RequestMethod.GET)
    public ModelAndView login(
            @RequestParam(value = "error", required = false) String error,
            @RequestParam(value = "logout", required = false) String logout) {
        ModelAndView model = new ModelAndView();
        if (error != null) {
            model.addObject("error", "不正确的用户名和密码");
        }
        if (logout != null) {
            model.addObject("msg", "你已经成功退出");
        }
        model.setViewName("login");
        return model;
    }
启动程序测试成功