一、 传统任务调度
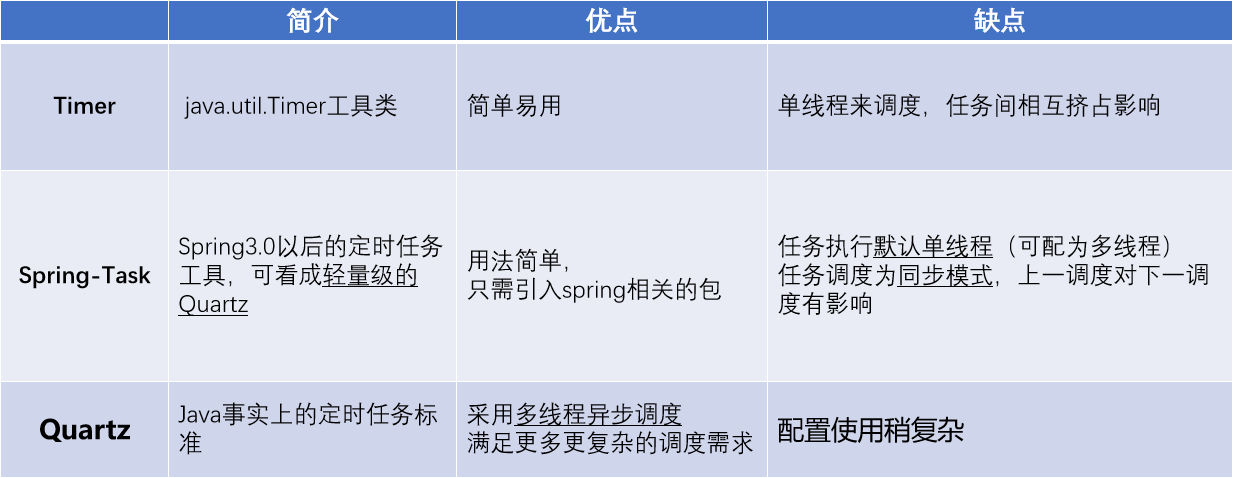
cron表达式

* 表示匹配该域的任意值。
? 只能用在DayofMonth和DayofWeek两个域,表示匹配域的任意值。
- 表示范围
/ 表示起始时间开始触发,然后每隔固定时间触发一次
, 表示列出枚举值值。
L 表示最后,只能出现在DayofWeek和DayofMonth域
W 表示有效工作日(周一到周五),只能出现在DayofMonth域
LW 这两个字符可以连用,表示在某个月最后一个工作日,即最后一个星期五。
# 用于确定每个月第几个星期几,只能出现在DayofMonth域。例如在4#2,表示某月的第二个星期三
1 Quartz 框架
1.1 Quartz Scheduler 开源框架
Quartz是开源任务调度框架中的翘首,是 java 业务界事实上的任务调度标准。
        <dependency>
            <groupId>org.quartz-scheduler</groupId>
            <artifactId>quartz</artifactId>
        </dependency>

1.4.2 配置触发器
简单触发器,将实现Job接口的任务bean交给SimpleTriggerFactoryBea

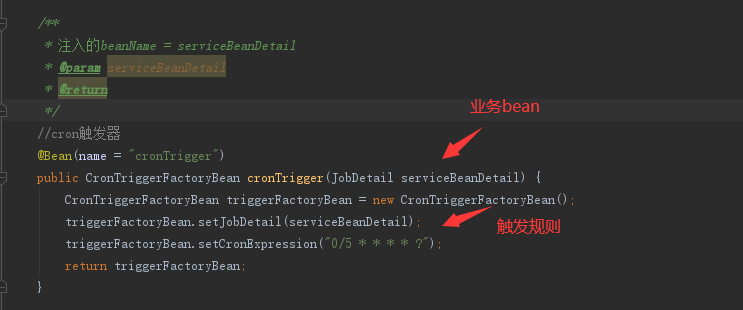
cron触发器
1.4.3 配置调度工厂
Quartz侧重于触发的管理,对于具体的任务管理相对较弱;一个trigger只能绑定一个任务,一个任务可以被多个trigger绑定
Quartz配置类

package com.quartz.config;

import com.quartz.job.BusinessJob;
import com.quartz.job.XXXService;
import org.quartz.JobDataMap;
import org.quartz.JobDetail;
import org.quartz.Trigger;
import org.springframework.context.annotation.Bean;
import org.springframework.context.annotation.Configuration;
import org.springframework.scheduling.quartz.CronTriggerFactoryBean;
import org.springframework.scheduling.quartz.JobDetailFactoryBean;
import org.springframework.scheduling.quartz.MethodInvokingJobDetailFactoryBean;
import org.springframework.scheduling.quartz.SchedulerFactoryBean;
import org.springframework.scheduling.quartz.SimpleTriggerFactoryBean;

/**
 * Created by Peter on 11/15 015.
 */
@Configuration
public class QuartzConfig {

    /**
     * 耦合业务---①创建job
     * 将调度环境信息传递给业务方法,如:调度时间,批次等
     * @return
     */
    @Bean(name = "businessJobDetail")
    public JobDetailFactoryBean businessJobDetail() {
        JobDetailFactoryBean jobDetailFactoryBean = new JobDetailFactoryBean();
        //业务bean是多例的还是单例的?--传的是class,每次调度都会实例一个bean,所以是多例,不会有并发问题
        jobDetailFactoryBean.setJobClass(BusinessJob.class);

        //将参数封装传递给job
        JobDataMap jobDataMap =new JobDataMap();
        jobDataMap.put("time",System.currentTimeMillis());//每次调度这个参数不会变,如固定业务参数值
        jobDetailFactoryBean.setJobDataAsMap(jobDataMap);
        return  jobDetailFactoryBean;
    }

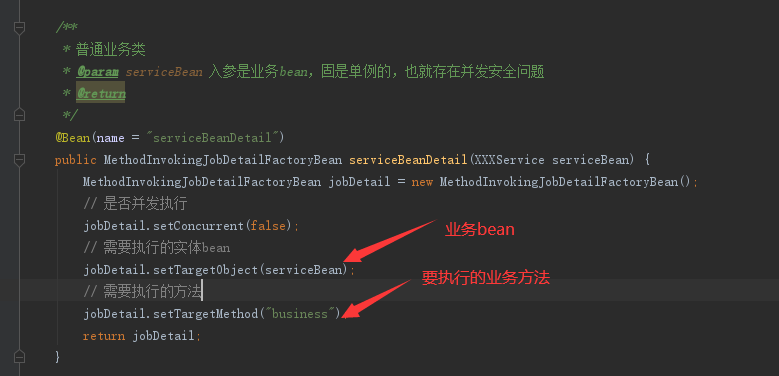
    /**
     * 普通业务类
     * @param serviceBean 入参是业务bean,固是单例的,也就存在并发安全问题
     * @return
     */
    @Bean(name = "serviceBeanDetail")
    public MethodInvokingJobDetailFactoryBean serviceBeanDetail(XXXService serviceBean) {
        MethodInvokingJobDetailFactoryBean jobDetail = new MethodInvokingJobDetailFactoryBean();
        // 是否并发执行
        jobDetail.setConcurrent(false);
        // 需要执行的实体bean
        jobDetail.setTargetObject(serviceBean);
        // 需要执行的方法
        jobDetail.setTargetMethod("business");
        return jobDetail;
    }

    /**
     * 注入的 beanName = businessJobDetail-----②trigger绑定job
     * @param businessJobDetail
     * @return
     */
    // 简单触发器
    @Bean(name = "simpleTrigger")
    public SimpleTriggerFactoryBean simpleTrigger(JobDetail businessJobDetail) {
        SimpleTriggerFactoryBean trigger = new SimpleTriggerFactoryBean();
        trigger.setJobDetail(businessJobDetail);
        // 设置任务启动延迟
        trigger.setStartDelay(0);
        // 每10秒执行一次
        trigger.setRepeatInterval(10000);
        return trigger;
    }

    /**
     * 注入的beanName = serviceBeanDetail
     * @param serviceBeanDetail
     * @return
     */
    //cron触发器
    @Bean(name = "cronTrigger")
    public CronTriggerFactoryBean cronTrigger(JobDetail serviceBeanDetail) {
        CronTriggerFactoryBean triggerFactoryBean = new CronTriggerFactoryBean();
        triggerFactoryBean.setJobDetail(serviceBeanDetail);
        triggerFactoryBean.setCronExpression("0/5 * * * * ?");
        return triggerFactoryBean;
    }

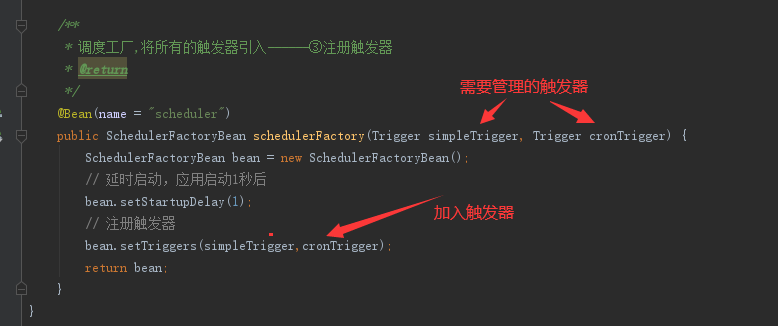
    /**
     * 调度工厂,将所有的触发器引入------③注册触发器
     * @return
     */
    @Bean(name = "scheduler")
    public SchedulerFactoryBean schedulerFactory(Trigger simpleTrigger, Trigger cronTrigger) {
        SchedulerFactoryBean bean = new SchedulerFactoryBean();
        // 延时启动,应用启动1秒后
        bean.setStartupDelay(1);
        // 注册触发器
        bean.setTriggers(simpleTrigger,cronTrigger);
        return bean;
    }
}
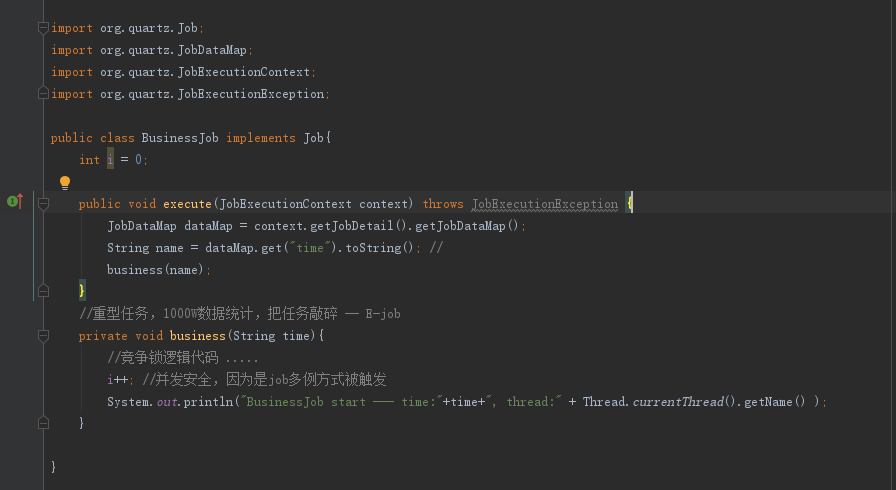
实现Job接口任务bean

package com.quartz.job;

import org.quartz.Job;
import org.quartz.JobDataMap;
import org.quartz.JobExecutionContext;
import org.quartz.JobExecutionException;

public class BusinessJob implements Job{
    int i = 0;

    public void execute(JobExecutionContext context) throws JobExecutionException {
        JobDataMap dataMap = context.getJobDetail().getJobDataMap();
        String name = dataMap.get("time").toString(); //参数
        business(name);
    }
    //重型任务,1000W数据统计,把任务敲碎 -- E-job
    private void business(String time){
        //竞争锁逻辑代码 .....
        i++; //并发安全,因为是job多例方式被触发
        System.out.println("实现Job接口 --- 参数time:"+time+", thread:" + Thread.currentThread().getName() );
    }

}
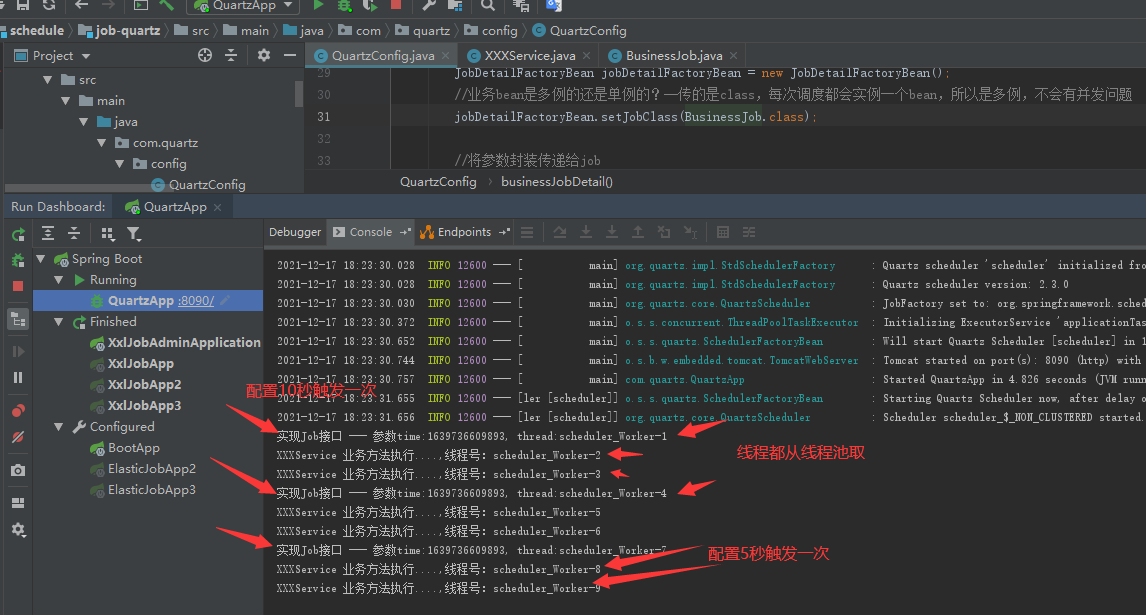
到此配置完成
启动应用,即可启动定时任务
2 spring task 调度器用法

package com.enjoy.schedule;

import org.springframework.scheduling.annotation.EnableScheduling;
import org.springframework.scheduling.annotation.Scheduled;
import org.springframework.stereotype.Component;

import java.text.SimpleDateFormat;
import java.util.Date;

/**
 * 2021-12-17
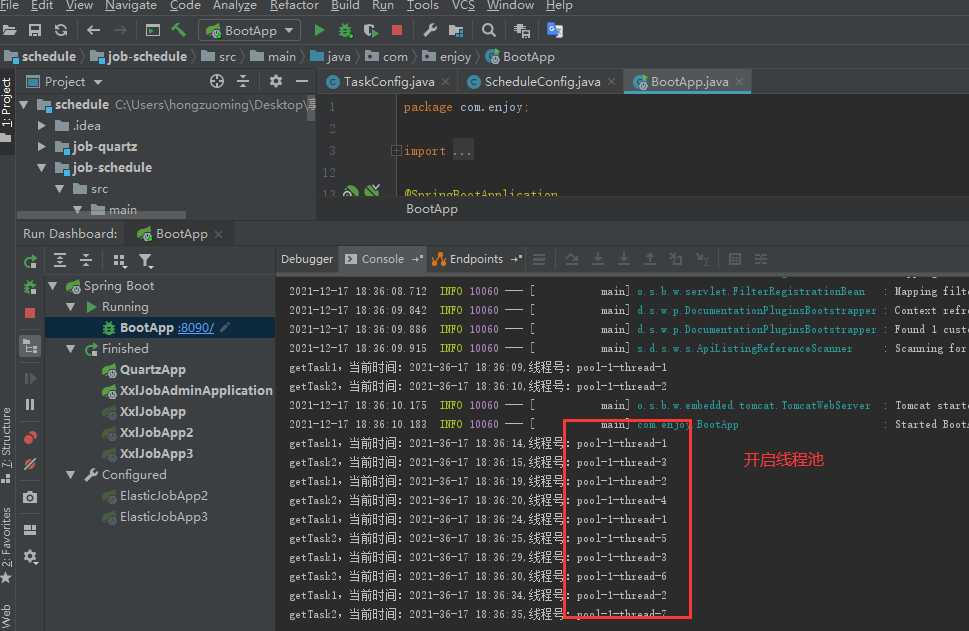
 * 单线程调度时(没有开启 ScheduleConfig 配置),getTask1和getTask2是同一线程调度,也就是同步执行
 *
 */
@Component
@EnableScheduling
public class TaskConfig {

    private static final SimpleDateFormat dateFormat = new SimpleDateFormat("yyyy-mm-dd HH:mm:ss");

    @Scheduled(fixedDelayString = "5000") //单机
    public void getTask1() {
        //竞争锁逻辑代码 .....
        System.out.println("getTask1,当前时间:" + dateFormat.format(new Date())+",线程号:"+Thread.currentThread().getName());
        // throw new RuntimeException("xxxxx");
    }

    @Scheduled(cron = "0/5 * *  * * ?")
    public void getTask2() {
        System.out.println("getTask2,当前时间:" + dateFormat.format(new Date())+",线程号:"+Thread.currentThread().getName());
    }

}

不推荐单线程模式:
任务执行默认单线程且 任务调度为同步模式,上一调度对下一调度有影响;
开启线程池支持配置类

package com.enjoy.schedule;

import org.springframework.context.annotation.Bean;
import org.springframework.context.annotation.Configuration;
import org.springframework.scheduling.annotation.EnableScheduling;
import org.springframework.scheduling.annotation.SchedulingConfigurer;
import org.springframework.scheduling.config.ScheduledTaskRegistrar;

import java.util.concurrent.Executor;
import java.util.concurrent.Executors;

/**
 * 2021-12-17
 * 没有此配置,则schedule为单线程串行执行
 */
@Configuration
@EnableScheduling
public class ScheduleConfig implements SchedulingConfigurer {

    public void configureTasks(ScheduledTaskRegistrar taskRegistrar) {
        taskRegistrar.setScheduler(taskExecutor());
    }

    /**
     * 配置线程池---触发器和任务共用的线程池
     * @return
     */
    @Bean(destroyMethod="shutdown")
    public Executor taskExecutor() {
        return Executors.newScheduledThreadPool(10);
    }
}
二、分布式任务调度
分布式任务调度方案大全

1 Elastic-job 去中心化
Elastic-Job 是一个分布式调度解决方案,由两个相互独立的子项目 Elastic-Job-Lite 和Elastic-Job-Cloud 组成。Elastic-Job-Lite为轻量级无中心化解决方案,使用 jar 包的形式提供分布式任务的协调服务。
1.2 添加依赖:
pom.xml引入依赖
<dependencies>
<!-- 引入当当网 e-job 包 maven中央仓库没有这个源-->
        <dependency>
            <groupId>com.github.yinjihuan</groupId>
            <artifactId>elastic-job-spring-boot-starter</artifactId>
            <version>1.0.2</version>
        </dependency>
</dependencies>

<!-- e-job 中央仓库没有,需手动添加到自己仓库或者上传到公司私有仓库 -->
    <repositories>
        <repository>
            <id>jitpack.io</id>
            <url>https://jitpack.io</url>
        </repository>
    </repositories>
1.3 配置:依赖zookeeper
application.properties 配置zk注册中心
# zk注册中心 主要是选举(以哪个触发器为准trigger)、分布式锁(分段任务)
elastic.job.zk.serverLists=192.168.78.130:2181
elastic.job.zk.namespace=hong_elastic

spring.main.allow-bean-definition-overriding=true
server.port=8281
1.4 定时任务编写
Elastic-job常用的两种类型定时任务:Simple类型都是任务,Dataflow类型定时任务;
Simple类型需要实现SimpleJob接口,没有经过任何封装的简单任务实现,和Quartz原生相似
Dataflow类型主要用于处理数据流,需实现DataflowJob接口,可以根据需要进行覆盖抓取(fetchData)和处理(processData)数据
1.4.1 使用e-job注解,实现SimpleJob接口
@ElasticJobConf(
    name = "自定义EjoySimpleJob",//自定义
    cron = "0/5 * * * * ?",
    shardingItemParameters = "0=aaa,1=bbb|ccc", //数据分片参数,固定格式 0=param0,1=param1,2=param21|param22
    shardingTotalCount = 2,//上面数据切片的数量
    listener = "com.enjoy.handle.MessageElasticJobListener",//任务监听
    jobExceptionHandler = "com.enjoy.handle.CustomJobExceptionHandler"//自定义异常处理
)
| cron | cron表达式,用于配置作业触发时间 |
| sharding-total-count | 作业分片总数 |
| sharding-item-parameters | 分片序列和参数用等号分隔,多个键值对用逗号分隔,分片序号从0开始,不可大于或等于作业分片总数,如:0=a,1=b,2=c|d|e |
| job-parameter | 作业自定义参数,可以配置多个相同作业,但是用不同的参数作为不同的调度实例 |
| misfire | 是否开启错过任务重新执行 |
| listener | 任务开始和结束时,自定义的处理功能 |
| jobExceptionHandler | 任务异常时,自定义处理 |
1.5 任务启动
springboot在启动类上加上@EnableElasticJob注解启动ElasticJob即可

package com.hong.job;

import com.cxytiandi.elasticjob.annotation.ElasticJobConf;
import com.dangdang.ddframe.job.api.ShardingContext;
import com.dangdang.ddframe.job.api.simple.SimpleJob;
import com.hong.business.EnjoyBusiness;
import org.springframework.beans.factory.annotation.Autowired;

@ElasticJobConf(
    name = "自定义EjoySimpleJob",//自定义
    cron = "0/5 * * * * ?",
    shardingItemParameters = "0=beijing|shenzhen,1=shanghai", //数据分片参数,固定格式 0=param0,1=param1,2=param21|param22
    shardingTotalCount = 2,//上面数据切片的数量
    listener = "com.hong.handle.MessageElasticJobListener",//任务监听
    jobExceptionHandler = "com.hong.handle.CustomJobExceptionHandler"//自定义异常处理
)
public class EnjoySimpleJob implements SimpleJob {
    @Autowired
    private EnjoyBusiness enjoyBusiness;

    /**
     * 启动后根据设定的cron定时去调用这个方法
     * @param context
     */
    public void execute(ShardingContext context) {
        System.out.println("EnjoySimpleJob,当前分片:"+context.getShardingParameter());

        //当前起始
        //context.getShardingParameter(),回返切片信息beijing
        String sql = enjoyBusiness.getSql(context.getShardingParameter());
        enjoyBusiness.process(sql);
    }

}
任务监听 MessageElasticJobListener

package com.hong.handle;

import com.dangdang.ddframe.job.executor.ShardingContexts;
import com.dangdang.ddframe.job.lite.api.listener.ElasticJobListener;

import java.text.SimpleDateFormat;
import java.util.Date;

/**
 * 作业监听器
 */
public class MessageElasticJobListener implements ElasticJobListener {

    @Override
    public void beforeJobExecuted(ShardingContexts shardingContexts) {
        String date = new SimpleDateFormat("yyyy-MM-dd HH:mm:ss").format(new Date());
        String msg = date + " 【任务开始执行-" + shardingContexts.getJobName() + "】";
        System.out.println("beforeJobExecuted执行前给管理发邮件:"+msg);

    }

    @Override
    public void afterJobExecuted(ShardingContexts shardingContexts) {
        String date = new SimpleDateFormat("yyyy-MM-dd HH:mm:ss").format(new Date());
        String msg = date + " 【任务执行结束-" + shardingContexts.getJobName() + "】" ;
        System.out.println("afterJobExecuted执行后给管理发邮件:"+msg);
        System.out.println();
    }

}
自定义异常处理

package com.hong.handle;

import com.dangdang.ddframe.job.executor.handler.JobExceptionHandler;
import org.slf4j.Logger;
import org.slf4j.LoggerFactory;

/**
 * 自定义异常处理
 */
public class CustomJobExceptionHandler implements JobExceptionHandler {

    private Logger logger = LoggerFactory.getLogger(CustomJobExceptionHandler.class);

    @Override
    public void handleException(String jobName, Throwable cause) {
        logger.error(String.format("Job '%s' exception occur in job processing", jobName), cause);
        System.out.println("自定义作业异常处理=========》给管理发邮件:【"+jobName+"】任务异常。" + cause.getMessage());
    }

}
①单台服务
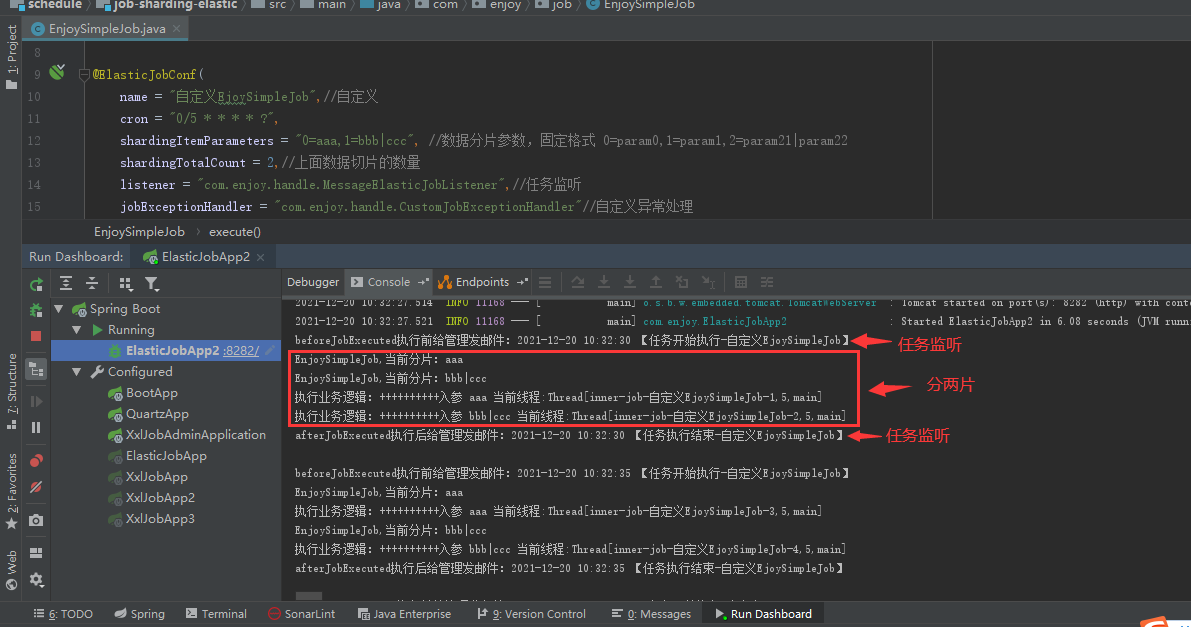
②集群部署时
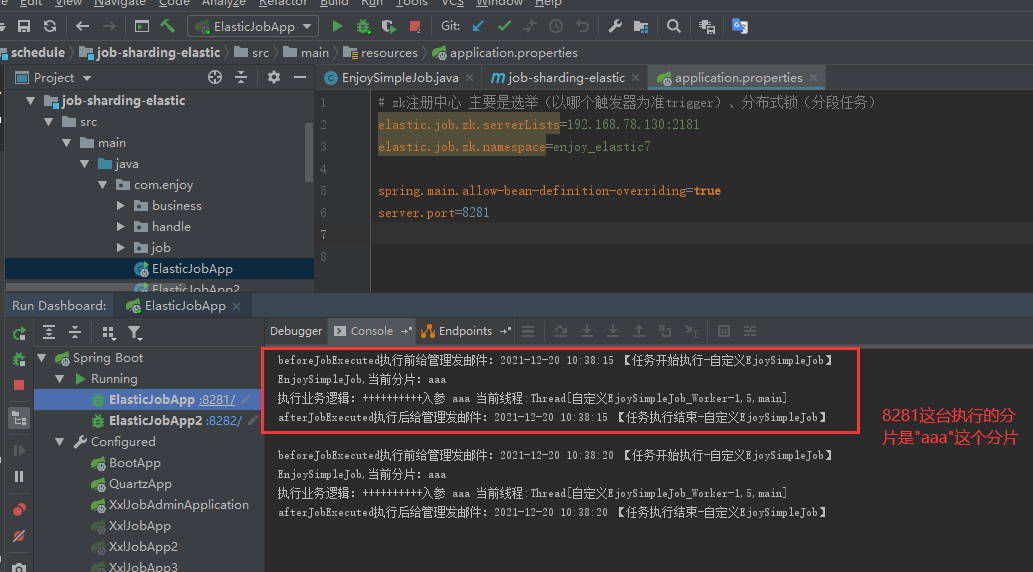
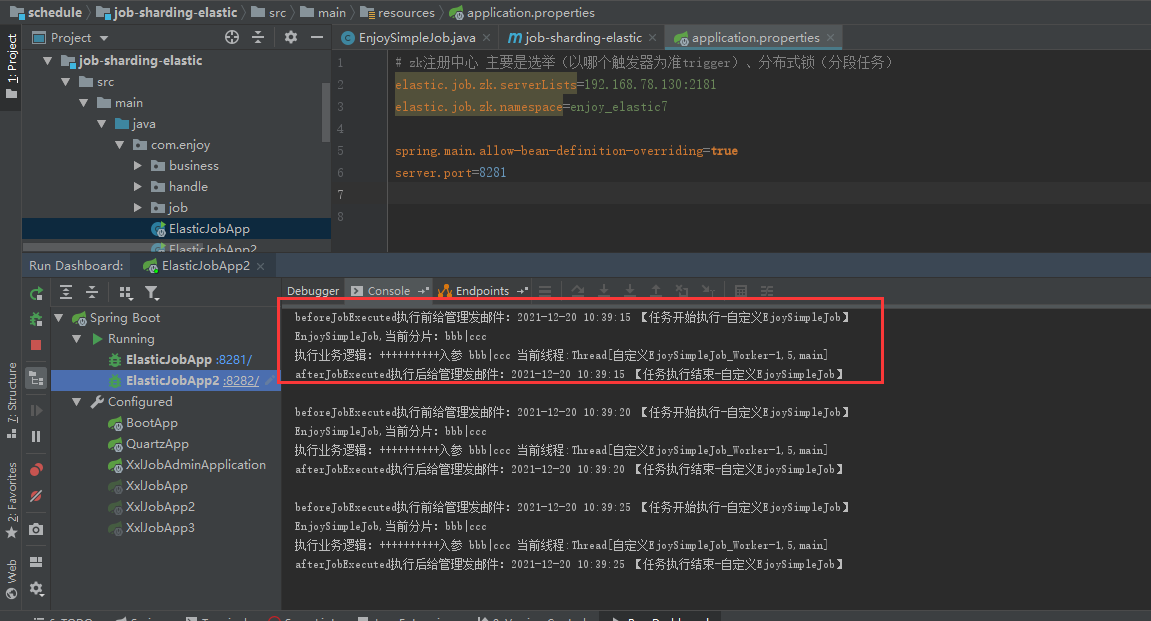
可以看到,集群时,会动态扩容;
同样,如果某台服务宕掉,那么对应的任务会转移到其它服务执行;

2 xxl-job 集权中心化
如果项目里面有一堆job,不但会影响启动速度,而且不好管理,那么x-job就是由job配置中心管理通过quartz控制客户端的job触发时机,然后通过nettry rpc调用执行客户端具体实现。
详见官方文档:https://www.xuxueli.com/xxl-job/#《分布式任务调度平台XXL-JOB》
2.1 x-job需要一个部署调度中心
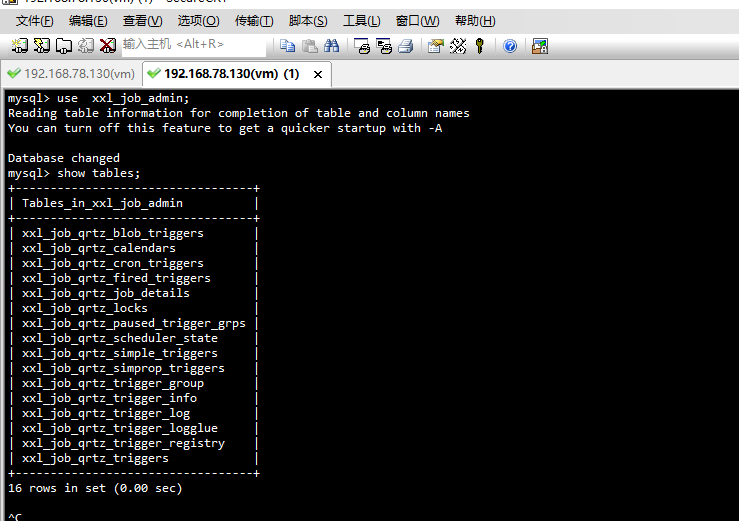
更改调度中心配置文件:xxl-job-admin\src\main\resources\application.properties


启动管理中心 XxlJobAdminApplication 即可
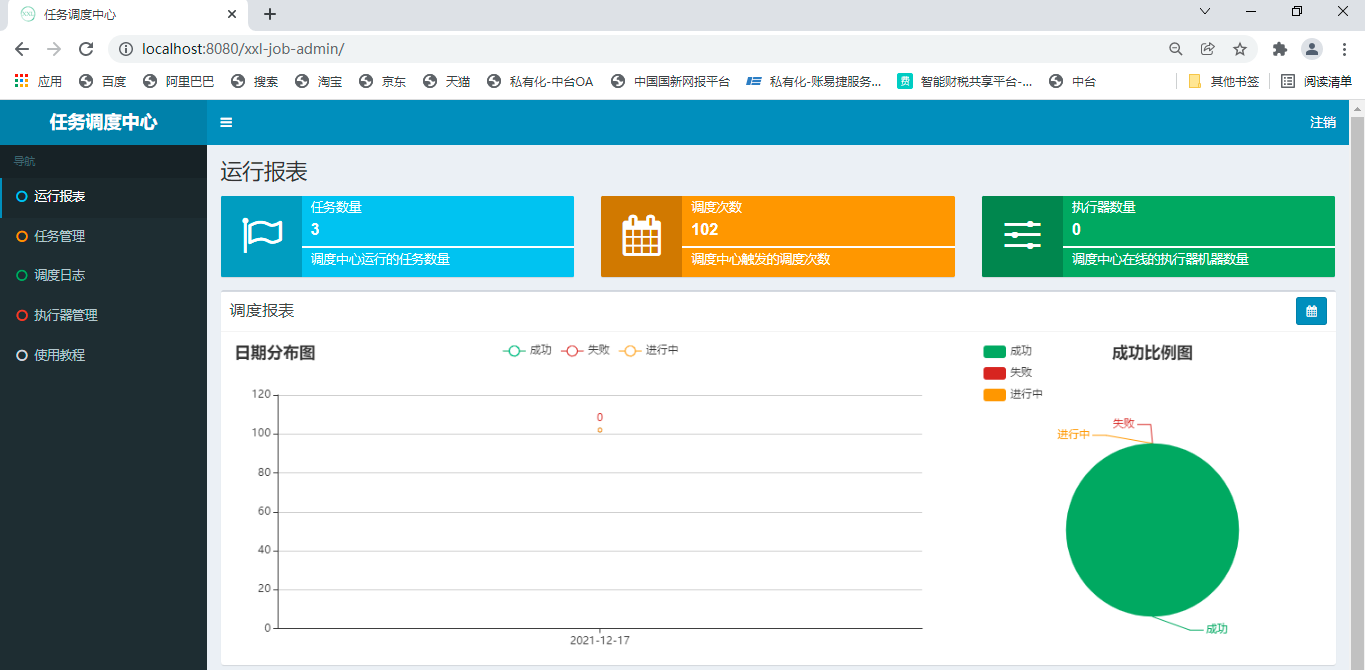
2.2 调度中心集群
<dependency>
    <groupId>com.xuxueli</groupId>
    <artifactId>xxl-job-core</artifactId>
    <version>2.0.2</version>
</dependency>
2.3.2 执行器配置
### 调度器的地址----- 发消息
xxl.job.admin.addresses=http://localhost:8080/xxl-job-admin
### 当前执行器的标识名称,同一个名字的执行器构成集群
xxl.job.executor.appname=xxl-enjoy
# 执行器与调度器通信的 ip / port
xxl.job.executor.ip=
xxl.job.executor.port=9991
### job-job, access token
xxl.job.accessToken=
### job-job log path
xxl.job.executor.logpath=/logs/xxl/job
### job-job log retention days
xxl.job.executor.logretentiondays=-1
### 调度中心部署跟地址 [选填]:如调度中心集群部署存在多个地址则用逗号分隔。执行器将会使用该地址进行"执行器心跳注 册"和"任务结果回调";为空则关闭自动注册;
xxl.job.admin.addresses=http://127.0.0.1:8080/xxl-job-admin
### 执行器 AppName [选填]:执行器心跳注册分组依据;为空则关闭自动注册
xxl.job.executor.appname= xxl-enjoy
### 执行器 IP [选填]:默认为空表示自动获取 IP,多网卡时可手动设置指定 IP,该 IP 不会绑定 Host 仅作为通讯实用;地址信息 用于 "执行器注册" 和 "调度中心请求并触发任务";
xxl.job.executor.ip=
### 执行器端口号 [选填]:小于等于 0 则自动获取;默认端口为 9999,单机部署多个执行器时,注意要配置不同执行器端口;
xxl.job.executor.port=9999 ### 执行器通讯 TOKEN [选填]:非空时启用;
xxl.job.accessToken=
### 执行器运行日志文件存储磁盘路径 [选填] :需要对该路径拥有读写权限;为空则使用默认路径;
xxl.job.executor.logpath=/data/applogs/xxl-job/jobhandler
### 执行器日志保存天数 [选填] :值大于 3 时生效,启用执行器 Log 文件定期清理功能,否则不生效;
xxl.job.executor.logretentiondays=-1

2.3.3 执行器组件配置
@Bean(initMethod = "start", destroyMethod = "destroy")
    public XxlJobSpringExecutor xxlJobExecutor() {
        logger.info(">>>>>>>>>>> job-job config init.");
        XxlJobSpringExecutor xxlJobSpringExecutor = new XxlJobSpringExecutor();
        xxlJobSpringExecutor.setAdminAddresses(adminAddresses);
        xxlJobSpringExecutor.setAppName(appName);
        xxlJobSpringExecutor.setIp(ip);
        xxlJobSpringExecutor.setPort(port);
        xxlJobSpringExecutor.setAccessToken(accessToken);
        xxlJobSpringExecutor.setLogPath(logPath);
        xxlJobSpringExecutor.setLogRetentionDays(logRetentionDays);

        return xxlJobSpringExecutor;
    }
2.3.4 任务编写

package com.enjoy.job;

import com.enjoy.business.EnjoyBusiness;
import com.xxl.job.core.biz.model.ReturnT;
import com.xxl.job.core.handler.IJobHandler;
import com.xxl.job.core.handler.annotation.JobHandler;
import org.springframework.beans.factory.annotation.Autowired;
import org.springframework.stereotype.Component;

/**
 * 普通任务
 */
@JobHandler(value="enjoySimple") //value值对应的是调度中心新建任务的JobHandler
@Component
public class EnjoySimple extends IJobHandler {

    @Autowired
    private EnjoyBusiness enjoyBusiness;

    @Override
    public ReturnT<String> execute(String param) throws Exception {
        enjoyBusiness.process(1,1,param);
        // int i = 1/0;
        return SUCCESS;
    }

}
2.3.5 调度中心新建任务
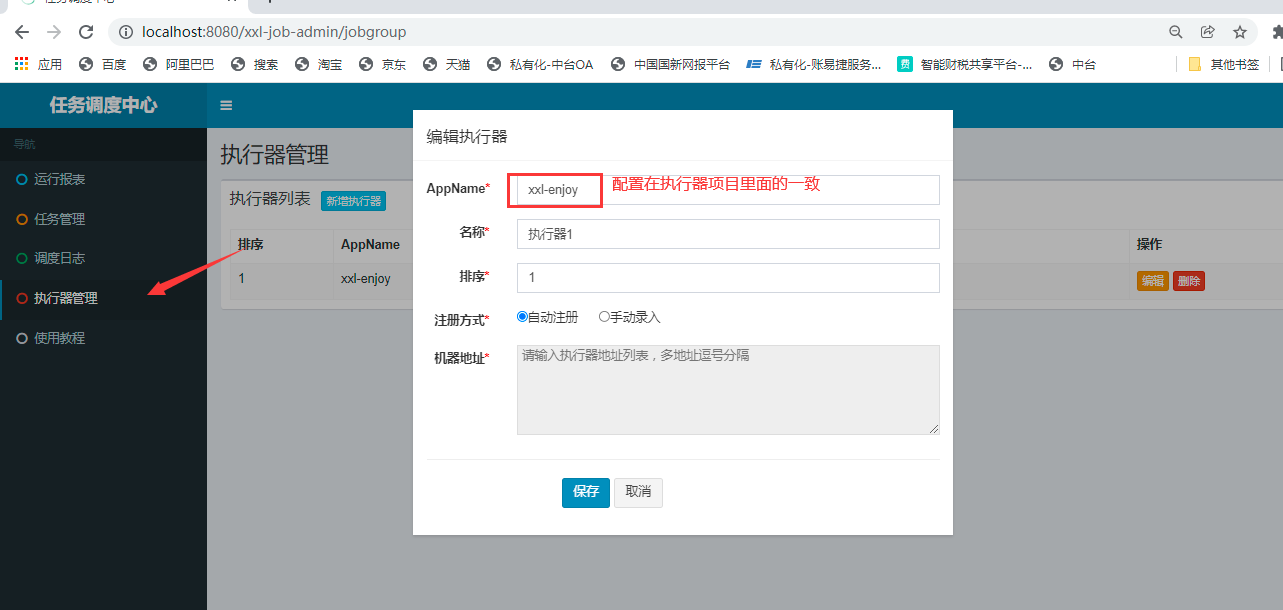

启动执行器(项目),调度中心启动任务

任务异常,会发送邮件到设定的邮箱

