如果用普通用户安装就需要创建用户 属组例
groupadd configer //创建用户组
useradd -g configer configer //创建用户并指定用户组
passwd configer //为用户分配密码
cd /opt
mkdir maven #创建maven目录
chown -R configer:configer /opt/maven #属组属主改为普通用户
chmod 755 /opt/maven #修改为755 的 权限
su -l configer #切换到普通用户下 进行操作
我这里是用root用户操作的就不需要以上的操作了
创建存放macen的目录
mkdir -p /newtouch/maven
将软件上传

将软件移到新建的目录里

解压maver的软件

配置maven的环境变量 可以配置/etc/profile 全局的 我配置的是root用户的
vim /root/.bash_profile 在最后加以下几条
export PATH
M2_HOME=/newtouch/maven/apache-maven-3.5.2
export M2_HOME
PATH=$PATH:$M2_HOME/bin
export PATH
申明生效
source /root/.bash_profile
查看一下信息 也可以mvn -v

修改maven的配置文件制定maven的仓库
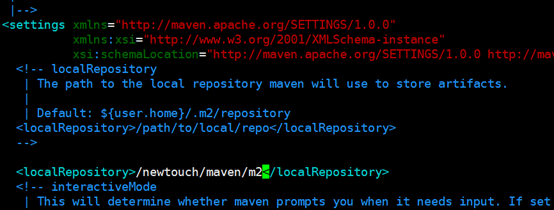
然后创建指定的目录
mkdir /newtouch/maven/m2
搭建nexus私服
在newtouch目录下创建nexus的目录并将之前移到maven目录先的nexus软件移过来

解压软件

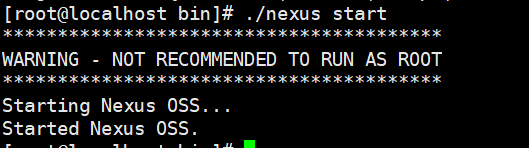
启动nexus 报一下错误是没有指定用户

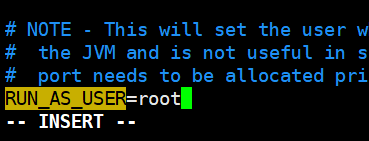
修改配置文件指定root用户
Vim /newtouch/nexus/nexus-2.12.0-01/bin/nexus(最好不要设为root)
就可以启动
在maven的配置文件中配置
Vim /newtouch/maven/apache-maven-3.5.2/conf/settings.xml
<settings>
<profiles>
<profile>
<id>nexus</id>
<repositories>
<repository>
<id>central-snapshots</id>
<url>http://localhost:8081/nexus/content/groups/public-snapshots</url>
<releases><enabled>false</enabled></releases>
<snapshots><enabled>true</enabled></snapshots>
</repository>
<repository>
<id>central-releases</id>
<!-- url原为http://central,指向http://repos.d.xxx.com/nexus/content/groups/public 其中xxx一般为公司名--->
<url>http://localhost:8081/nexus/content/groups/public</url>
<!-- 表示可以从此仓库下载release版本 -->
<releases><enabled>true</enabled></releases>
<!-- 表示不可以从此仓库下载snapshot版本 -->
<snapshots><enabled>false</enabled></snapshots>
</repository>
</repositories>
<!-- 插件仓库 -->
<pluginRepositories>
<pluginRepository>
<id>central-snapshots</id>
<url>http://localhost:8081/nexus/content/groups/public-snapshots</url>
<releases><enabled>false</enabled></releases>
<snapshots><enabled>true</enabled></snapshots>
</pluginRepository>
<pluginRepository>
<id>central-releases</id>
<url>http://localhost:8081/nexus/content/groups/public</url>
<releases><enabled>true</enabled></releases>
<snapshots><enabled>false</enabled></snapshots>
</pluginRepository>
</pluginRepositories>
<servers>
<server>
<!--配置所有的releases版本构件部署Nexus的releases仓库中-->
<id>nexus-releases</id>
<username>admin</username>
<password>admin123</password>
</server>
<server>
<!--配置所有的snapshot版本构件部署到Nexus的Snapshots仓库中-->
<id>nexus-snapshots</id>
<username>admin</username>
<password>admin123</password>
</server>
</servers>
</profile>
<!-- 配置activeProfiles后,此处添加snapshots,可以使snapshots被搜索到。-->
</profiles>
<!--添加id,激活profile。-->
<activeProfiles>
<activeProfile>nexus</activeProfile>
</activeProfiles>
</settings>
也可以安装好maven后不修改配置文件在要启动的用户下~/.m2/settings.xml(初始状态下该文件不存在),编辑上面内容就OK
浏览器属ip:8081/nexus 就可以默认用户:admin 密码:admin123