一、python模块
1、urllib.request常规使用


import urllib.request

#1、指定URL
url = 'http://www.baidu.com'
#2、发起请求:urlopen可以根据指定的url发起请求,且返回一个响应对象
response = urllib.request.urlopen(url=url)
#3、获取页面数据:read函数返回的就是响应对象中存储的页面数据(byte)
response_text = response.read()
#4、持久化存储
with open('./baidu.html','wb') as f:
    f.write(response_text)
    print('写入成功')
urllib.request处理url中文
import urllib.request
import urllib.parse

#1、指定URL
# url = 'https://tieba.baidu.com/f?ie=utf-8&kw=你好&fr=search'
url = 'https://tieba.baidu.com/f?ie=utf-8&kw=%s&fr=search'
#url不可以存在非ascii编码的字符数据
wd = urllib.parse.quote("你好")
new_url = format(url % wd)
print(new_url)
#2、发起请求:urlopen可以根据指定的url发起请求,且返回一个响应对象
response = urllib.request.urlopen(url=new_url)
#3、获取页面数据:read函数返回的就是响应对象中存储的页面数据(byte)
response_text = response.read()
#4、持久化存储
with open('./baidu1.html','wb') as f:
    f.write(response_text)
    print('写入成功')
urllib.request伪装请求头User-Agent
import urllib.request

#1、指定URL
url = 'http://www.baidu.com'

#自制定一个请求对象
headers = {
    "User-Agent": "Mozilla/5.0 (Windows NT 10.0; Win64; x64) AppleWebKit/537.36 (KHTML, like Gecko) Chrome/71.0.3578.98 Safari/537.36",
}
#该请求对象的UA进行了伪装
request = urllib.request.Request(url=url,headers=headers)

#2、发起请求:urlopen根据自制定的request发起请求,且返回一个响应对象
response = urllib.request.urlopen(request)
#3、获取页面数据:read函数返回的就是响应对象中存储的页面数据(byte)
response_text = response.read()
#4、持久化存储
with open('./baidu.html','wb') as f:
    f.write(response_text)
    print('写入成功')
urllib.request发送post请求
import urllib.request
import urllib.parse

#1、指定URL
url = 'https://fanyi.baidu.com/sug'

#请求头
headers = {
    "User-Agent": "Mozilla/5.0 (Windows NT 10.0; Win64; x64) AppleWebKit/537.36 (KHTML, like Gecko) Chrome/71.0.3578.98 Safari/537.36",
}

#该请求对象的UA进行了伪装
request = urllib.request.Request(url=url,headers=headers)

#将post请求参数封装到字典
data = {
    'kw':'你好',
}
#使用parse模块对字典进行编码处理
data = urllib.parse.urlencode(data)
#将data转换成byte类型
data = data.encode()

#2、发起请求:urlopen根据自制定的request发起请求,且返回一个响应对象
response = urllib.request.urlopen(request,data=data)
#3、获取页面数据:read函数返回的就是响应对象中存储的页面数据(byte)
response_text = response.read()
#4、持久化存储
with open('./baidu.html','wb') as f:
    f.write(response_text)
    print('写入成功')
urllib.request使用代理
import urllib.request

#创建处理器对象,在其内部封装代理ip和端口
handler = urllib.request.ProxyHandler(proxies={"http":"118.172.211.3:58535"})
#创建opener对象,然后使用该对象发起一个请求
opener = urllib.request.build_opener(handler)

#1、指定URL
url = 'http://www.baidu.com/s?ie=utf-8&wd=ip'


#该请求对象的UA进行了伪装
request = urllib.request.Request(url=url)


#2、发起请求:urlopen根据自制定的request发起请求,且返回一个响应对象
response = opener.open(request)
#3、获取页面数据:read函数返回的就是响应对象中存储的页面数据(byte)
response = response.read()
#4、持久化存储
with open('./baiduip.html','wb') as f:
    f.write(response)
    print('写入成功')
urllib.request请求携带cookie(未经验证)
#使用cookiejar实现人人网的登录
import urllib.request
import urllib.parse
import http.cookiejar
#请求中的cookie会自动存储到cj对象中
cj = http.cookiejar.CookieJar()
#创建携带cookiejar对象的处理器对象
handler = urllib.request.HTTPCookieProcessor(cj)
#创建opener对象,(携带handler对象)
opener = urllib.request.build_opener(handler)

#要让cookiejar获取请求中的cookie数据值
url = 'http://www.renren.com/ajaxLogin/login?1=1&uniqueTimestamp=2018110912156'
#自定义一个请求对象,让该对象作为opener的open函数中的参数
data={
    "email": "aaa",
    "icode": "",
    "origURL": "http://www.renren.com/home",
    "domain": "renren.com",
    "key_id": 1,
    "captcha_type": "web_login",
    "password": "1ae3b707652ccb767340abb542af0616c42fc942beb275069939d6c4cc461e5c",
    "rkey": "948db2d8639bcd2664994c49454256d1",
    "f":"" ,
}
data = urllib.parse.urlencode(data).encode()
request = urllib.request.Request(url,data=data)
opener.open(request)

#获取当前用户的二级子页面
s_url = 'http://www.renren-inc.com/zh/product/renren.html'

#该次请求中就携带了cookie
response = opener.open(s_url)
with open('./renren.html','wb') as f:
    f.write(response.read())
2、requests (pip install requests)
requests发送get请求
import requests

#1、指定url
url = 'https://www.baidu.com'

#2、发起get请求,返回响应对象
response = requests.get(url=url)

#人为指定编码格式为utf-8
# response.encoding = 'utf-8'

#3、获取响应对象值 ,.text为str,content为byte
response_content = response.content

with open('./re3.html',"wb") as f:
    f.write(response_content)
response常用属性
import requests

#1、指定url
url = 'https://www.baidu.com'

#2、发起get请求,返回响应对象
response = requests.get(url=url)

#获取str类型值
# print(response.text)

#获取bytes值
# print(response.content)

#返回一个响应状态码
print(response.status_code)

#返回一个响应头信息
print(response.headers)

#返回请求的url
print(response.url)
requests发送带参数和自定制headers的get请求
方式一:url中直接带参,如url = 'https://www.baidu.com/s?ie=utf-8&wd=你好'
方式二:使用params
import requests

#1、指定url
url = 'https://tieba.baidu.com/f'

#定义get参数
params = {
    "ie": "utf-8",
    "kw": "你好",
    "fr": "search",
}

#自定制头
headers = {
    "User-Agent": "Mozilla/5.0 (Windows NT 10.0; Win64; x64) AppleWebKit/537.36 (KHTML, like Gecko) Chrome/71.0.3578.98 Safari/537.36"
}

#2、发起get请求,传params参,指定headers头,返回响应对象
response = requests.get(url=url,params=params,headers=headers)


#3、获取响应对象值 ,.text为str,content为byte
response_content = response.content

#打印请求url
print(response.url)

with open('./re3.html',"wb") as f:
    f.write(response_content)
requests发送post请求
import requests

#1、指定url
url = 'https://accounts.douban.com/login'

#定义post参数
data = {
    "source": "movie",
    "redir": "https://movie.douban.com/",
    "from_email": "xxx",
    "from_password":"xxx",
    "login":"登录",
}

#自定制头
headers = {
    "User-Agent": "Mozilla/5.0 (Windows NT 10.0; Win64; x64) AppleWebKit/537.36 (KHTML, like Gecko) Chrome/71.0.3578.98 Safari/537.36"
}

#2、发起post请求
response = requests.post(url=url,data=data,headers=headers)


#3、获取响应对象值 ,.text为str,content为byte
response_content = response.content

#打印请求url
print(response.url)

with open('./re3.html',"wb") as f:
    f.write(response_content)
requests的cookie操作
import requests

session = requests.session()

#1、指定url
url = 'https://accounts.douban.com/login'

#定义post参数
data = {
    "source": "movie",
    "redir": "https://movie.douban.com/",
    "from_email": "xxx",
    "from_password":"xxx",
    "login":"登录",
}

#自定制头
headers = {
    "User-Agent": "Mozilla/5.0 (Windows NT 10.0; Win64; x64) AppleWebKit/537.36 (KHTML, like Gecko) Chrome/71.0.3578.98 Safari/537.36"
}

#2、使用session发起post请求,将cookie获取并存储到session对象中
login_response = session.post(url=url,data=data,headers=headers)

#对个人主页发起请求(session(cookie)),获取响应页面数据
url = 'https://www.douban.com/people/xxxx/'
response = session.get(url=url,headers=headers)

#3、获取响应对象值 ,.text为str,content为byte
response_content = response.content

#打印请求url
print(response.url)

with open('./re3.html',"wb") as f:
    f.write(response_content)
requests的代理操作
免费代理ip的网站提供商:www.goubanjia.com、快代理、西祠代理
import requests

#1、指定url  ****注意,url的协议要和代理协议保持一致,如都使用http或https
url = 'http://www.baidu.com/s?ie=utf-8&wd=ip'
#自定制头
headers = {
    "User-Agent": "Mozilla/5.0 (Windows NT 10.0; Win64; x64) AppleWebKit/537.36 (KHTML, like Gecko) Chrome/71.0.3578.98 Safari/537.36"
}
#自定制代理ip
proxy={
    "http":"118.172.211.3:58535"
}
#发送请求
response = requests.get(url=url,proxies=proxy,headers=headers)

#3、获取响应对象值 ,.text为str,content为byte
response_content = response.content

#4、数据持久化
with open('./re3.html',"wb") as f:
    f.write(response_content)
    print("写入成功")
3、selenium
安装:pip install selenium
下载浏览器对应驱动:
谷歌浏览器:http://chromedriver.storage.googleapis.com/index.html
版本对应表:https://blog.csdn.net/huilan_same/article/details/51896672
编码流程:
from selenium import webdriver
from time import sleep
#创建一个浏览器对象
bro = webdriver.Chrome('./chromedriver.exe')
#get方法可以指定一个url,让浏览器进行请求
bro.get('https://www.baidu.com')
sleep(1)
#让百度进行指定词条的一个搜索
text = bro.find_element_by_id('kw')#定位到text文本框
text.send_keys('人民币')#send_keys表示向文本框中录入指定内容
sleep(1)
button = bro.find_element_by_id('su')
button.click()#click表示的是点击操作
sleep(3)
bro.quit()#关闭浏览器
使用PhantomJS无界面浏览器
下载PhantomJS:http://phantomjs.org/download.html
编码流程:
from selenium import webdriver
import time
#创建一个浏览器对象
bro = webdriver.PhantomJS('./phantomjs-2.1.1-windows/bin/phantomjs.exe')
#get方法可以指定一个url,让浏览器进行请求
bro.get('https://www.baidu.com')

#截屏
bro.save_screenshot('./1.png')

#让百度进行指定词条的一个搜索
text = bro.find_element_by_id('kw')#定位到text文本框
text.send_keys('人民币')#send_keys表示向文本框中录入指定内容

#截屏
bro.save_screenshot('./2.png')

button = bro.find_element_by_id('su')
button.click()#click表示的是点击操作

#等待两秒,待页面加载完成
time.sleep(2)

#截屏
bro.save_screenshot('./3.png')

bro.quit()#关闭浏览器
补充:让页面中的滚轮向下滑动(底部)
js = 'window.scrollTo(0,document.body.scrollHeight)'
#浏览器对象执行js代码
bro.execute_script(js)
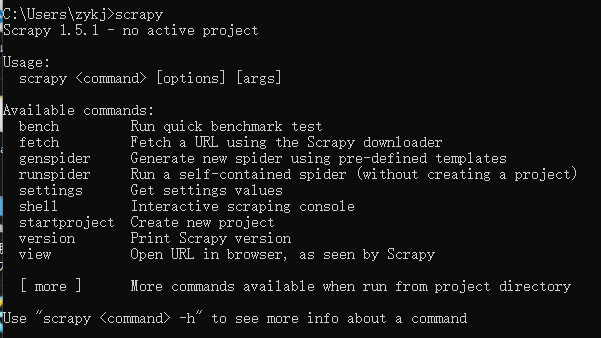
二、框架(scrapy)
1、安装
If you’re using Anaconda or Miniconda, you can install the package from the conda-forge channel, which has up-to-date packages for Linux, Windows and OS X.
conda install -c conda-forge scrapy
安装成功界面如下:
windowns安装方式二:
1、pip install wheel
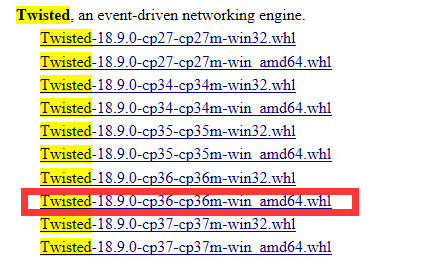
2、下载twisted:
https://www.lfd.uci.edu/~gohlke/pythonlibs/#twisted
如下:按自己对应的版本下载
安装:
pip install **.whl
3、pip install pywin32
4、pip install scrapy
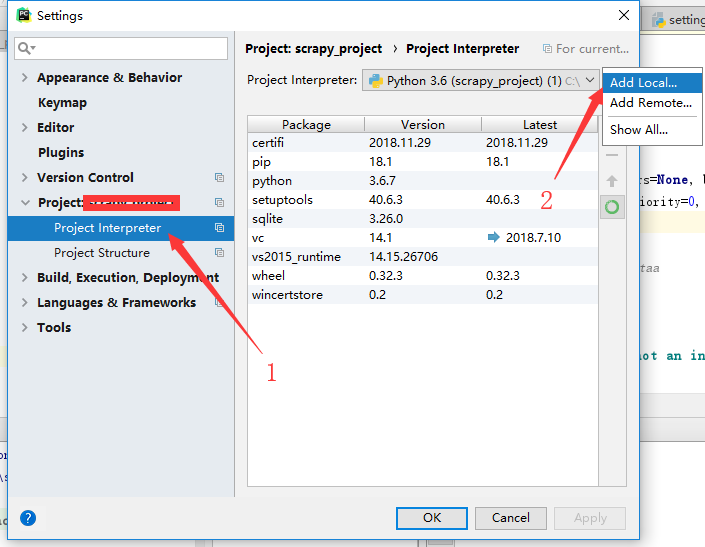
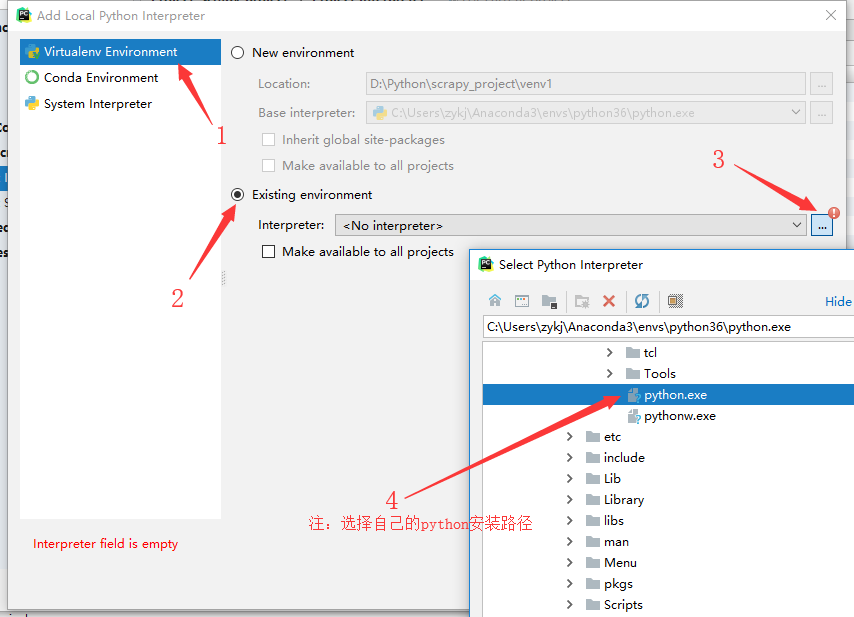
pycharm修改python环境,使pycharm支持scrapy:
file-->settings->如下图:
1、
2、
2、创建项目
cmd进入到想要创建项目的目录下,执行:scrapy startproject projectname
创建成功界面如下:

3、创建爬虫程序
a、创建basic爬虫,cmd进入到项目目录

b、创建crawl爬虫,cmd进入到项目目录

4、前戏
a、注释爬虫文件中的allowed_domains
b、settings.py第22行,ROBOTSTXT_OBEY = True改为ROBOTSTXT_OBEY = False
c、settings.py第19行,改为USER_AGENT = 'Mozilla/5.0 (Windows NT 10.0; Win64; x64) AppleWebKit/537.36 (KHTML, like Gecko) Chrome/71.0.3578.98 Safari/537.36'
d、开启管道:67-69行,
ITEM_PIPELINES = {
   'mytestscrapy.pipelines.MytestscrapyPipeline': 300,
}
持久化存储操作:
一、磁盘文件
1、基于终端指令
保证parse方法返回一个可迭代类型的对象(存储解析到的页面内容)
使用终端指令完成数据存储到指定磁盘文件中的操作
scrapy crawl 爬虫文件名称 -o 磁盘文件.后缀(xxoo.csv)
2、基于管道
将解析到的页面数据存储到items对象
使用yield关键字将items提交给管道文件进行处理
def parse(self, response):
    item = MytestscrapyItem()
    item.author = 'hg'
    item['content'] = 'hg_content'
    yield item
在管道文件中编写代码完成数据存储的操作
class MytestscrapyPipeline(object):
    def open_spider(self,spider):
        self.f = open('t.txt','w')
    def process_item(self, item, spider):
        author = item['author']
        content = item['content']
        str = "author:"+author+" "+"content:"+content
        self.f.write(str)

        return item
    def close_spider(self,spider):
        self.f.close()
在配置文件中开启管道操作(settings.py 67-69行)
ITEM_PIPELINES = {
   'mytestscrapy.pipelines.MytestscrapyPipeline': 300,
}
二、数据库
1、mysql
import pymysql

class MytestscrapyPipeline(object):
    def open_spider(self,spider):
        self.db = pymysql.connect("localhost","root","123456","scrapy_test" )
    def process_item(self, item, spider):
        author = item['author']
        content = item['content']
        sql = 'insert into ac(author,content) VALUES ("hg","hg_content")'
        cursor = self.db.cursor()
        try:
            cursor.execute(sql)
            self.db.commit()
        except:
            self.db.rollback()
2、redis
三、实战
1、发送post请求
class PostspiderdemoSpider(scrapy.Spider):
    name = 'postSpiderDemo'
    # allowed_domains = ['www.baidu.com']
    start_urls = ['https://fanyi.baidu.com/sug']

    def start_requests(self):
        for url in self.start_urls:
            #post请求方式一:
            # scrapy.Request(url=url,callback=self.parse,method='post')
            #post请求方式二:(推荐)
            data = {
                "kw": "dog"
            }
            yield scrapy.FormRequest(url=url,callback=self.parse,formdata=data)
    def parse(self, response):
        print(response.text)
2、cookie操作
发送post请求时会自动保存cookie,之后再发get请求会自动携带。
3、代理
(1)、middlewares.py文件新建类,如:
class MyProxy(object):
    def process_request(self, request, spider):
        request.meta['proxy'] = "http://198.1.122.29:80"
(2)、settings.py(56-58行)文件取消中间件注释:如:
DOWNLOADER_MIDDLEWARES = {
   'postDemo.middlewares.MyProxy': 543,
}
4、日志等级和写入日志到文件,编辑settings.py文件,增加如下两行:
LOG_LEVEL = 'ERROR'
LOG_FILE = 'log.txt'
5、请求传参
class RequestArgsSpider(scrapy.Spider):
    name = 'request_args'
    # allowed_domains = ['www.baidu.com']
    start_urls = ['http://www.hao6v.com/gvod/zx.html']

    def movie_details(self,response):
        item = response.meta['item']
        print(item['name'])
        print(item['i'])
    i=0
    def parse(self, response):
        li_list = response.xpath('//*[@id="main"]/div[1]/div/ul/li')
        print(len(li_list))
        for li in li_list:
            name = li.xpath('./a//text()').extract_first()
            url = li.xpath('./a/@href').extract_first()
            item = PostdemoItem()
            self.i += 1
            item['name'] = name
            item['i'] = self.i
            #请求传参
            yield scrapy.Request(url=url,callback=self.movie_details,meta={'item':item})
6、CrawlSpider
class TestcrawlSpider(CrawlSpider):
    name = 'testcrawl'
    # allowed_domains = ['https://www.baidu.com']
    start_urls = ['https://dig.chouti.com/']

    rules = (
        Rule(LinkExtractor(allow=r'/all/hot/recent/d+'), callback='parse_item', follow=True),
    )

    def parse_item(self, response):
        print(response)
import scrapy
from scrapy.linkextractors import LinkExtractor
from scrapy.spiders import CrawlSpider, Rule
import time,random
from mytestscrapy.items import MytestscrapyItem

class TestcrawlSpider(CrawlSpider):
    name = 'testcrawl'
    # allowed_domains = ['https://www.baidu.com']
    start_urls = ['https://cc.yyss.icu/thread0806.php?fid=2&search=&page=1']

    rules = (
        Rule(LinkExtractor(allow=r'thread0806.php?fid=2&search=&page=[0-9]{1,2}$'), callback='parse_item', follow=True),
    )

    def parse_item(self, response):
        print(response.url)
        time.sleep(random.randint(2,4))
        if response.url == 'https://cc.yyss.icu/thread0806.php?fid=2&search=&page=1':
            tr_ele = response.xpath('//table[@id="ajaxtable"]/tbody[@style="table-layout:fixed;"]/tr[@class="tr3 t_one tac"]')[2:]
        else:
            tr_ele=response.xpath('//table[@id="ajaxtable"]/tbody[@style="table-layout:fixed;"]/tr[@class="tr3 t_one tac"]')

        for tr in tr_ele:
            count = tr.xpath('./td[4]/text()').extract_first()
            if int(count) < 5:
                continue
            text = tr.xpath('./td[2]//a/text()').extract_first()
            url = 'https://cc.yyss.icu/'+tr.xpath('./td[2]//a/@href').extract_first()
            item = MytestscrapyItem()
            item['urlname'] = text
            item['urladdr'] = url
            item['commentsNum'] = count
            yield item
7、RedisCrawlSpider分布式爬虫
(1)概念:多台机器上可以执行同一个爬虫程序,实现网站数据的分布爬取。
(2)原生的scrapy是不可以实现分布式爬虫的
a:调度器无法共享
b:管道无法共享
(3)scrapy-redis组件:专门为scrapy开发的一套组件,该组件可以让scrapy实现分布式
a:下载,pip install scrapy-redis
(4) 分布式爬取的流程
a:redis配置文件的配置
注释bind 127.0.0.1
将protected-mode yes改为 no
b:redis服务器的开启:基于配置文件
c:创建scrapy工程后,创建基于crawlSpider的爬虫文件
d:导入RedisCrawlSpider类,然后将爬虫文件修改成基于该类的源文件
e:将start_url修改成redis_key = 'xxx'
f:将项目的管道和调度器配置基于成基于scrapy-redis组件
g:执行爬虫文件:scrapy runspider xxx.py
h:将起始url放置到调度器的队列中:redis-cli:lpush 队列的名称(redis-key)起始url
步骤:
a、创建项目:
1、scrapy startproject RedisCrawlSpider
2、scrapy genspider -t crawl redis_crawl_spider www.baidu.com
b、安装scrapy-redis
1、pip install scrapy-redis
c、启动redis服务
1、 ./src/redis-server redis.conf
d、redis_crawl_spider.py
# -*- coding: utf-8 -*-
import scrapy
from scrapy.linkextractors import LinkExtractor
from scrapy.spiders import CrawlSpider, Rule
from scrapy_redis.spiders import RedisCrawlSpider
from RedisCrawlSpider.items import RediscrawlspiderItem

#继承RedisCrawlSpider
class RedisCrawlSpiderSpider(RedisCrawlSpider):
    name = 'redis_crawl_spider'
    # allowed_domains = ['www.baidu.com']
    # start_urls = ['http://www.baidu.com/']
    redis_key = 'qiubaispider'
    rules = (
        Rule(LinkExtractor(allow=r'/pic/page/d+'), callback='parse_item', follow=True),
    )

    def parse_item(self, response):
        div_list = response.xpath('//div[@id="content-left"]/div')
        for div in div_list:
            img_url = "https:"+div.xpath('.//div[@class = "thumb"]/a/img/@src').extract_first()
            item = RediscrawlspiderItem()
            item['img_url'] = img_url
            yield item
e、settings.py
USER_AGENT = 'Mozilla/5.0 (Windows NT 10.0; Win64; x64) AppleWebKit/537.36 (KHTML, like Gecko) Chrome/71.0.3578.98 Safari/537.36'# 指定数据库密码:REDIS_PARAMS = {"password":"123456"}
ROBOTSTXT_OBEY = False
ITEM_PIPELINES = { # 'RedisCrawlSpider.pipelines.RediscrawlspiderPipeline': 300, 'scrapy_redis.pipelines.RedisPipeline': 400, } # 使用scrapy-redis里的去重组件,不使用scrapy默认的去重方式 DUPEFILTER_CLASS = "scrapy_redis.dupefilter.RFPDupeFilter" # 使用scrapy-redis里的调度器组件,不使用默认的调度器 SCHEDULER = "scrapy_redis.scheduler.Scheduler" # 允许暂停,redis请求记录不丢失 SCHEDULER_PERSIST = True # 指定数据库的主机IP REDIS_HOST = "192.168.9.4" # 指定数据库的端口号 REDIS_PORT = 6379
8、RedisSpider分布式爬虫
a、代码修改(爬虫类):
导包:from scrapy_redis.spiders import RedisSpider
将爬虫类的父类修改成RedisSpider
将起始url列表注释,添加一个redis_key(调度器队列的名称)的属性
# -*- coding: utf-8 -*-
import scrapy
import time
from selenium import webdriver
from wangyipro.items import WangyiproItem
from scrapy_redis.spiders import RedisSpider

class WangyispiderSpider(RedisSpider):
    name = 'wangyispider'
    # allowed_domains = ['https://news.163.com/']
    # start_urls = ['https://news.163.com/']
    redis_key = "wangyi"
    def __init__(self):
        #实例化一个浏览器对象(实例化一次)
        options = webdriver.ChromeOptions()
        options.add_argument('--ignore-certificate-errors')
        self.bro = webdriver.Chrome('./chromedriver.exe',chrome_options=options)

    def closed(self,spider):
        print("爬虫结束")
        self.bro.quit()

    def parse(self, response):
        menu_list = ["menu_guonei","menu_guoji","menu_war","menu_hangkong"]
        li_list = []
        for menu in menu_list:
            li = response.xpath("//div[@class='ns_area list']/ul/li[@class=$val]",val=menu)
            li_list.append(li)
        for li in li_list:
            title = li.xpath('./a/text()').extract_first()
            url = li.xpath('./a/@href').extract_first()
            yield scrapy.Request(url=url,callback=self.secondPage,meta={"title":title})

    def secondPage(self,response):
        title = response.meta['title']
        div_list = response.xpath('//div[@class="data_row news_article clearfix "]')
        for div in div_list:
            head = div.xpath('.//h3/a/text()').extract_first()
            url = div.xpath('.//h3/a/@href').extract_first()
            imgUrl = div.xpath('./a[@class="na_pic"]/img/@src').extract_first()
            tag_list = div.xpath('.//div[@class="news_tag"]/div/a/text()').extract()
            for tag in tag_list:
                tag = tag.strip()
            tag = ",".join(tag_list)
            item = WangyiproItem()
            item['title'] = title
            item['head'] = head
            item['url'] = url
            item['imgUrl'] = imgUrl
            item['tag'] = tag
            yield scrapy.Request(url=url,callback=self.getContent,meta={"item":item})

    def getContent(self,response):
        item = response.meta['item']
        content_list = response.xpath('//div[@id="endText"]/p//text()').extract()
        for content in content_list:
            content.strip()
        content = "
	".join(content_list)
        item['content'] = content
        yield item
# -*- coding: utf-8 -*-

# Define here the models for your spider middleware
#
# See documentation in:
# https://doc.scrapy.org/en/latest/topics/spider-middleware.html

from scrapy import signals
from scrapy.http import HtmlResponse
import time
from scrapy.contrib.downloadermiddleware.useragent import UserAgentMiddleware
import random
#UA池
user_agent_list = [
    "Mozilla/5.0 (Macintosh; U; Intel Mac OS X 10_6_8; en-us) AppleWebKit/534.50 (KHTML, like Gecko) Version/5.1 Safari/534.50",
    #safari 5.1 – Windows
    "Mozilla/5.0 (Windows; U; Windows NT 6.1; en-us) AppleWebKit/534.50 (KHTML, like Gecko) Version/5.1 Safari/534.50",
    #IE 9.0
    "Mozilla/5.0 (compatible; MSIE 9.0; Windows NT 6.1; Trident/5.0;",
    #IE 8.0
    "Mozilla/4.0 (compatible; MSIE 8.0; Windows NT 6.0; Trident/4.0)",
    #IE 7.0
    "Mozilla/4.0 (compatible; MSIE 7.0; Windows NT 6.0)",
    #IE 6.0
    " Mozilla/4.0 (compatible; MSIE 6.0; Windows NT 5.1)",
    # Firefox 4.0.1 – MAC
    " Mozilla/5.0 (Macintosh; Intel Mac OS X 10.6; rv:2.0.1) Gecko/20100101 Firefox/4.0.1",
    # Firefox 4.0.1 – Windows
    "Mozilla/5.0 (Windows NT 6.1; rv:2.0.1) Gecko/20100101 Firefox/4.0.1",
    # Opera 11.11 – MAC
    "Opera/9.80 (Macintosh; Intel Mac OS X 10.6.8; U; en) Presto/2.8.131 Version/11.11",
    # Opera 11.11 – Windows
    "Opera/9.80 (Windows NT 6.1; U; en) Presto/2.8.131 Version/11.11",
    # Chrome 17.0 – MAC
    " Mozilla/5.0 (Macintosh; Intel Mac OS X 10_7_0) AppleWebKit/535.11 (KHTML, like Gecko) Chrome/17.0.963.56 Safari/535.11",
    # 傲游(Maxthon)
    " Mozilla/4.0 (compatible; MSIE 7.0; Windows NT 5.1; Maxthon 2.0)",
    # 腾讯TT
    " Mozilla/4.0 (compatible; MSIE 7.0; Windows NT 5.1; TencentTraveler 4.0)",
    # 世界之窗(The World) 2.x
    " Mozilla/4.0 (compatible; MSIE 7.0; Windows NT 5.1)",
    # 世界之窗(The World) 3.x
    " Mozilla/4.0 (compatible; MSIE 7.0; Windows NT 5.1; The World)",
    # 搜狗浏览器 1.x
    " Mozilla/4.0 (compatible; MSIE 7.0; Windows NT 5.1; Trident/4.0; SE 2.X MetaSr 1.0; SE 2.X MetaSr 1.0; .NET CLR 2.0.50727; SE 2.X MetaSr 1.0)",
    # 360浏览器
    " Mozilla/4.0 (compatible; MSIE 7.0; Windows NT 5.1; 360SE)",
    # Avant
    " Mozilla/4.0 (compatible; MSIE 7.0; Windows NT 5.1; Avant Browser)",
    # Green Browser
    " Mozilla/4.0 (compatible; MSIE 7.0; Windows NT 5.1)",
    # 移动设备端:
    # safari iOS 4.33 – iPhone
    "Mozilla/5.0 (iPhone; U; CPU iPhone OS 4_3_3 like Mac OS X; en-us) AppleWebKit/533.17.9 (KHTML, like Gecko) Version/5.0.2 Mobile/8J2 Safari/6533.18.5",
    # safari iOS 4.33 – iPod Touch
    "Mozilla/5.0 (iPod; U; CPU iPhone OS 4_3_3 like Mac OS X; en-us) AppleWebKit/533.17.9 (KHTML, like Gecko) Version/5.0.2 Mobile/8J2 Safari/6533.18.5",
    # safari iOS 4.33 – iPad
    "Mozilla/5.0 (iPad; U; CPU OS 4_3_3 like Mac OS X; en-us) AppleWebKit/533.17.9 (KHTML, like Gecko) Version/5.0.2 Mobile/8J2 Safari/6533.18.5",
    # Android N1
    " Mozilla/5.0 (Linux; U; Android 2.3.7; en-us; Nexus One Build/FRF91) AppleWebKit/533.1 (KHTML, like Gecko) Version/4.0 Mobile Safari/533.1",
    # Android QQ浏览器 For android
    " MQQBrowser/26 Mozilla/5.0 (Linux; U; Android 2.3.7; zh-cn; MB200 Build/GRJ22; CyanogenMod-7) AppleWebKit/533.1 (KHTML, like Gecko) Version/4.0 Mobile Safari/533.1",
    # Android Opera Mobile
    " Opera/9.80 (Android 2.3.4; Linux; Opera Mobi/build-1107180945; U; en-GB) Presto/2.8.149 Version/11.10",
    # Android Pad Moto Xoom
    " Mozilla/5.0 (Linux; U; Android 3.0; en-us; Xoom Build/HRI39) AppleWebKit/534.13 (KHTML, like Gecko) Version/4.0 Safari/534.13",
    # BlackBerry
    " Mozilla/5.0 (BlackBerry; U; BlackBerry 9800; en) AppleWebKit/534.1+ (KHTML, like Gecko) Version/6.0.0.337 Mobile Safari/534.1+",
    # WebOS HP Touchpad
    " Mozilla/5.0 (hp-tablet; Linux; hpwOS/3.0.0; U; en-US) AppleWebKit/534.6 (KHTML, like Gecko) wOSBrowser/233.70 Safari/534.6 TouchPad/1.0",
    # Nokia N97
    " Mozilla/5.0 (SymbianOS/9.4; Series60/5.0 NokiaN97-1/20.0.019; Profile/MIDP-2.1 Configuration/CLDC-1.1) AppleWebKit/525 (KHTML, like Gecko) BrowserNG/7.1.18124",
    # Windows Phone Mango
    " Mozilla/5.0 (compatible; MSIE 9.0; Windows Phone OS 7.5; Trident/5.0; IEMobile/9.0; HTC; Titan)",
    # UC无
    " UCWEB7.0.2.37/28/999",
    # UC标准
    " NOKIA5700/ UCWEB7.0.2.37/28/999",
    # UCOpenwave
    " Openwave/ UCWEB7.0.2.37/28/999",
    # UC Opera
    " Mozilla/4.0 (compatible; MSIE 6.0; ) Opera/UCWEB7.0.2.37/28/999",
]

class RandomUserAgent(UserAgentMiddleware):
    def process_request(self, request, spider):
        ua = random.choice(user_agent_list)
        request.headers.setdefault('User-Agent',ua)

#代理池
proxies_http = [
    "182.53.197.24:56383",
    "78.58.136.55:39232",
    "188.17.156.26:30773",
]
proxies_https = [
    "103.19.110.177:8080",
    "193.33.101.152:34611",
    "119.176.80.220:9999",
]

class Proxy(object):
    def process_request(self, request, spider):
        ph = request.url.split(":")[0]
        if ph == "http":
            proxy = random.choice(proxies_http)
            request.meta['proxy'] = 'http://'+proxy
        else:
            proxy = random.choice(proxies_https)
            request.meta['proxy'] = 'https://' + proxy


class WangyiproSpiderMiddleware(object):
    # Not all methods need to be defined. If a method is not defined,
    # scrapy acts as if the spider middleware does not modify the
    # passed objects.

    @classmethod
    def from_crawler(cls, crawler):
        # This method is used by Scrapy to create your spiders.
        s = cls()
        crawler.signals.connect(s.spider_opened, signal=signals.spider_opened)
        return s

    def process_spider_input(self, response, spider):
        # Called for each response that goes through the spider
        # middleware and into the spider.

        # Should return None or raise an exception.
        return None

    def process_spider_output(self, response, result, spider):
        # Called with the results returned from the Spider, after
        # it has processed the response.

        # Must return an iterable of Request, dict or Item objects.
        for i in result:
            yield i

    def process_spider_exception(self, response, exception, spider):
        # Called when a spider or process_spider_input() method
        # (from other spider middleware) raises an exception.

        # Should return either None or an iterable of Response, dict
        # or Item objects.
        pass

    def process_start_requests(self, start_requests, spider):
        # Called with the start requests of the spider, and works
        # similarly to the process_spider_output() method, except
        # that it doesn’t have a response associated.

        # Must return only requests (not items).
        for r in start_requests:
            yield r

    def spider_opened(self, spider):
        spider.logger.info('Spider opened: %s' % spider.name)


class WangyiproDownloaderMiddleware(object):
    # Not all methods need to be defined. If a method is not defined,
    # scrapy acts as if the downloader middleware does not modify the
    # passed objects.

    @classmethod
    def from_crawler(cls, crawler):
        # This method is used by Scrapy to create your spiders.
        s = cls()
        crawler.signals.connect(s.spider_opened, signal=signals.spider_opened)
        return s

    def process_request(self, request, spider):
        # Called for each request that goes through the downloader
        # middleware.

        # Must either:
        # - return None: continue processing this request
        # - or return a Response object
        # - or return a Request object
        # - or raise IgnoreRequest: process_exception() methods of
        #   installed downloader middleware will be called
        return None
    #拦截到响应对象(下载器传递给Spider的响应对象)
    #request:响应对象对应的请求对象
    #response:拦截到的响应对象
    #spider:爬虫文件中对应的爬虫类的实例
    def process_response(self, request, response, spider):
        if request.url in ["http://news.163.com/domestic/","http://news.163.com/world/","http://war.163.com/","http://news.163.com/air/"]:
            spider.bro.get(url = request.url)
            #将浏览器拖到最底部
            # js = 'window.scrollTo(0,document.body.scrollHeight)'
            # 浏览器对象执行js代码
            # spider.bro.execute_script(js)
            # time.sleep(3)
            page_text = spider.bro.page_source
            print(page_text)
            return HtmlResponse(url=spider.bro.current_url,body=page_text,encoding='utf-8',request=request)
        else:
            return response

    def process_exception(self, request, exception, spider):
        # Called when a download handler or a process_request()
        # (from other downloader middleware) raises an exception.

        # Must either:
        # - return None: continue processing this exception
        # - return a Response object: stops process_exception() chain
        # - return a Request object: stops process_exception() chain
        pass

    def spider_opened(self, spider):
        spider.logger.info('Spider opened: %s' % spider.name)
b、修改redis.conf配置文件,并指定配置文件启动redis服务
注释bind 127.0.0.1
protected-mode yes改为 no
c、修改settings.py文件
ITEM_PIPELINES = {
   # 'RedisCrawlSpider.pipelines.RediscrawlspiderPipeline': 300,
    'scrapy_redis.pipelines.RedisPipeline': 400,

}

# 使用scrapy-redis里的去重组件,不使用scrapy默认的去重方式
DUPEFILTER_CLASS = "scrapy_redis.dupefilter.RFPDupeFilter"
# 使用scrapy-redis里的调度器组件,不使用默认的调度器
SCHEDULER = "scrapy_redis.scheduler.Scheduler"
# 允许暂停,redis请求记录不丢失
SCHEDULER_PERSIST = True

# 指定数据库的主机IP
REDIS_HOST = "192.168.9.4"
# 指定数据库的端口号
REDIS_PORT = 6379
# 指定数据库密码
REDIS_PARAMS = {"password":"123456"}
d:执行爬虫文件:scrapy runspider xxx.py
e:将起始url放置到调度器的队列中:redis-cli:lpush 队列的名称(redis-key)起始url