概述
在软件开发中,我们重点关注的是业务逻辑代码,但在实际开发中,需要写的代码却不仅仅是业务逻辑,还需要处理记录日志,异常处理,事务控制等一些与业务无关的事情。而且这些代码也是服务端必须的,类似这样的代码分散在系统中的各个地方,如:几乎所有的重要操作方法前面都会加上日志记录代码,这样的代码写起来繁琐,又占用开发时间和精力,而且不容易维护。我们统一把这类代码成为【切面代码】,如何让我们从这些繁琐的工作中抽身而退,更加专注于业务逻辑,这就需要用到Spring的AOP技术。
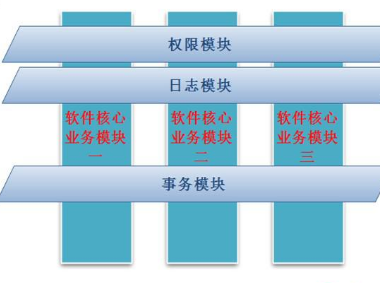
AOP原理:将复杂的需求分解成不同的方面,将散落在系统中的公共功能集中解决,如下图所示:
通知(Advice)的分类
分类如下:
- 前置通知:在某个切入点之前执行的通知
- 后置通知:在某个切入点之后执行的通知
- 异常通知:在某个切入点出现异常时候的通知
- 环绕通知:包围某个切入点的通知,功能最强大
准备工作
AOP需要的jar包
除Spring必备的五个jar包外,还需要以下三个来支撑AOP:
- aopalliance-1.0.jar
- aspectjweaver-1.5.3.jar
- spring-aop-4.0.6.RELEASE.jar
定义一个接口和实现类
如下所示:
IStudentService接口 代码如下:


 1 package com.hex.second;
 2
 3 /**
 4  * 学生服务接口
 5  * @author Administrator
 6  *
 7  */
 8 public interface IStudentService {
 9
10     /**
11      * 新增学生
12      * @param student
13      */
14     void addStudent(Student student);
15     /**
16      * 删除学生
17      * @param id
18      */
19     void deleteStudent(int id);
20
21     /**
22      * 修改学生
23      * @param id
24      */
25     void updateStudent(int id);
26 }
StudentServiceImpl类 代码如下:
 1 package com.hex.second;
 2
 3 /**
 4  * 学生服务事项类
 5  * @author Administrator
 6  *
 7  */
 8 public class StudentServiceImpl implements IStudentService {
 9
10     /**
11      * 新增学生
12      */
13     public void addStudent(Student student) {
14         // TODO Auto-generated method stub
15         System.out.println("新增加学生。。。");
16     }
17
18     /**
19      * 删除学生
20      */
21     @Override
22     public void deleteStudent(int id) {
23         // TODO Auto-generated method stub
24         System.out.println("删除学生。。。");
25     }
26
27     /**
28      * 修改学生
29      */
30     public void updateStudent(int id) {
31         // TODO Auto-generated method stub
32         System.out.println("修改学生");
33         int i=1/0;
34     }
35 }
前置通知
1. 实现接口
前置通知类,需要实现【MethodBeforeAdvice】接口中的before方法,如下所示:
Method method 表示执行的目标方法
Object[] args 表示传入的参数数组
Object target 表示目标对象,即切入点所示的对象
 1 package com.hex.second;
 2
 3 import java.lang.reflect.Method;
 4
 5 import org.springframework.aop.MethodBeforeAdvice;
 6
 7 public class LogBefore implements MethodBeforeAdvice {
 8
 9     /***
10      * 前置通知
11      * method:表示调用的方法,即切入点
12      * args:表示调用方法的参数
13      * target:表示方法所在的目标对象
14      */
15     @Override
16     public void before(Method method, Object[] args, Object target) throws Throwable {
17         // TODO Auto-generated method stub
18         System.out.println("前置通知。。。");
19         System.out.println("method="+method+",args数量="+args.length+",target="+target);
20     }
21 }
2. 配置applicationContext.xml文件
如果要支持AOP,需要引入命名空间,如下所示:
1 <?xml version="1.0" encoding="UTF-8"?>
2 <beans xmlns="http://www.springframework.org/schema/beans"
3 xmlns:xsi="http://www.w3.org/2001/XMLSchema-instance"
4 xmlns:p="http://www.springframework.org/schema/p"
5 xmlns:aop="http://www.springframework.org/schema/aop"
6 xsi:schemaLocation="http://www.springframework.org/schema/beans
7  http://www.springframework.org/schema/beans/spring-beans.xsd
8  http://www.springframework.org/schema/aop
9  http://www.springframework.org/schema/aop/spring-aop.xsd">
3. 配置两个类对应的bean
1 <!-- 服务类 -->
2 <bean id="studentService" class="com.hex.second.StudentServiceImpl"></bean>
3 <!-- 前置通知类 -->
4 <bean id="logBefore" class="com.hex.second.LogBefore"></bean>
4. 配置AOP
通过AOP配置,将通知类和业务逻辑类进行关联,说明如下:
一个配置文件中,可以有多个<aop:config>配置,每一个aop:config中只能有一个aop:pointcut配置,如果有多个切入点需要配置expression,且切入点必须是全路径配置。如下所示:
<!-- 将addStudent和通知进行关联 -->
<aop:config>
     <!-- 每一个config只有一个poingcut,如果有多个,则需要配置多个config -->
     <!-- 配置切入点  id自定义,expression表示切入点的函数名-->
     <aop:pointcut expression="execution(public void com.hex.second.StudentServiceImpl.addStudent(com.hex.second.Student))" id="pc"/>
     <!-- 配置通知 -->
     <aop:advisor advice-ref="logBefore" pointcut-ref="pc"/>
</aop:config>
后置通知
1. 实现接口
需要实现【AfterReturningAdvice】接口【afterReturning】方法中的 如下所示:
 1 package com.hex.second;
 2
 3 import java.lang.reflect.Method;
 4
 5 import org.springframework.aop.AfterReturningAdvice;
 6
 7 /**
 8  * 通过实现接口将普通类变成后置通知
 9  * @author Administrator
10  *
11  */
12 public class LogAfter implements AfterReturningAdvice {
13
14     /**
15      * 后置通知实现类
16      * returnValue:返回值
17      * method:表示调用的方法,即切入点
18      * args:表示调用方法的参数
19      * target:表示方法所在的目标对象
20      */
21     @Override
22     public void afterReturning(Object returnValue, Method method, Object[] args, Object target) throws Throwable {
23         // TODO Auto-generated method stub
24         System.out.println("后置通知。。。");
25         System.out.println("returnValue="+returnValue+",method="+method+",args数量="+args.length+",target="+target);
26     }
27
28 }
2. 配置切入点和通知的Bean
1 <bean id="studentService" class="com.hex.second.StudentServiceImpl"></bean>
2 <bean id="logAfter" class="com.hex.second.LogAfter"></bean>
3. AOP配置
如果前置通知和后置通知为同一个切入点,则可以配置在一个aop:config节点中,如下所示:
多个切入点用or连接,多个通知就配置多个aop:advisor
 1 <!-- 将addStudent和通知进行关联 -->
 2 <aop:config>
 3      <!-- 每一个config只有一个poingcut,如果有多个,则需要配置多个config -->
 4      <!-- 配置切入点  id自定义,expression表示切入点的函数名-->
 5      <aop:pointcut expression="execution(public void com.hex.second.StudentServiceImpl.deleteStudent(int)) or execution(public void com.hex.second.StudentServiceImpl.addStudent(com.hex.second.Student))" id="pc"/>
 6      <!-- 配置通知 -->
 7      <aop:advisor advice-ref="logBefore" pointcut-ref="pc"/>
 8
 9      <aop:advisor advice-ref="logAfter" pointcut-ref="pc"/>
10 </aop:config>
异常通知
1. 实现接口
异常通知是有异常发生时,才会触发的通知,需要实现【ThrowsAdvice】接口,且此接口没有需要实现的方法,但同时给出了约定:
必须以固定格式实现方法:public void afterThrowing([Method, args, target], ThrowableSubclass);
 1 package com.hex.second;
 2
 3 import java.lang.reflect.Method;
 4
 5 import org.springframework.aop.ThrowsAdvice;
 6
 7 /**
 8  * 异常通知
 9  * @author Administrator
10  *
11  */
12 public class LogException implements ThrowsAdvice {
13
14     /**
15      * 异常通知执行
16      * @param method 切入点
17      * @param args 参数个数
18      * @param target 调用目标对象
19      * @param ex 异常
20      */
21     public void afterThrowing(Method method, Object[] args, Object target, Exception ex){
22         System.out.println("异常通知。。。");
23         System.out.println("method="+method+",args数量="+args.length+",target="+target+",ex="+ex);
24     }
25 }
2. 配置Bean类
1 <!-- 服务类 -->
2 <bean id="studentService" class="com.hex.second.StudentServiceImpl"></bean>
3 <bean id="logException" class="com.hex.second.LogException"></bean>
3. 配置AOP
如下所示:参数只需要写参数类型即可,不需要写参数名称
1 <!-- 可以配置aop:config -->
2 <aop:config>
3         <aop:pointcut expression="execution(public void com.hex.second.StudentServiceImpl.updateStudent(int))" id="pc1"/>
4      <!-- 配置通知 -->
5      <aop:advisor advice-ref="logException" pointcut-ref="pc1"/>
6 </aop:config>
环绕通知
1. 实现接口
环绕通知,需要实现【MethodInterceptor】接口并实现【invoke】方法,其中obj = invocation.proceed();表示调用目标方法,如果不写此句,则目标方法不会被调用。如下所示:
 1 package com.hex.second;
 2
 3 import org.aopalliance.intercept.MethodInterceptor;
 4 import org.aopalliance.intercept.MethodInvocation;
 5
 6 /**
 7  * 环绕通知
 8  * 环绕通知的本质上是一个拦截器
 9  * @author Administrator
10  *
11  */
12 public class LogAround implements MethodInterceptor {
13
14     /**
15      *
16      */
17     @Override
18     public Object invoke(MethodInvocation invocation) throws Throwable {
19         Object obj = null;
20         try {
21
22             // 前置通知
23             System.out.println("环绕实现前置通知。。。");
24             System.out.println("环绕通知:target="+invocation.getThis()+",method="+invocation.getMethod().getName()+",args="+invocation.getArguments().length);
25             // 控制目标方法的执行 obj表示目标方法的返回值,表示执行addStudent(student)方法
26             //此方法控制目标方法的执行,如果不写此方法,则目标方法不会执行,此方法前的是前置通知,此方法后的是后置通知
27             obj = invocation.proceed();
28             // 后置通知
29             System.out.println("环绕实现后置通知。。。");
30         } catch (Exception e) {
31             // 异常通知
32             System.out.println("环绕实现异常通知。。。");
33             throw e;
34         }
35         // TODO Auto-generated method stub
36         return obj;
37     }
38
39 }
2. 配置Bean
1 <!-- 服务类 -->
2 <bean id="studentService" class="com.hex.second.StudentServiceImpl"></bean>
3 <bean id="logAround" class="com.hex.second.LogAround"</bean>
3. 配置AOP
所有配置切入点通知的方式都是一样的。如下所示:
1 <aop:config>
2      <aop:pointcut expression="execution(public void com.hex.second.StudentServiceImpl.addStudent(com.hex.second.Student))" id="pc2"/>
3      <aop:advisor advice-ref="logAround" pointcut-ref="pc2"/>
4 </aop:config>
所有的调用方式是一致的,不需要调用通知类,系统会自动调用,如下所示:
 1 package com.hex.second;
 2
 3 import org.springframework.context.ApplicationContext;
 4 import org.springframework.context.support.ClassPathXmlApplicationContext;
 5
 6 public class TestMain {
 7
 8     public static void main(String[] args) {
 9         // TODO Auto-generated method stub
10         //通过Spring进行注入,Spring上下文对象
11         ApplicationContext context=new ClassPathXmlApplicationContext("applicationContext.xml");
12         IStudentService studentService=(IStudentService)context.getBean("studentService");
13         Student student =new Student();
14         studentService.addStudent(student);
15         //studentService.deleteStudent(1);
16         //studentService.updateStudent(0);
17     }
18
19 }
备注
合抱之木,生于毫末;九层之台,起于累土;千里之行,始于足下。