2.1 确定被测接口
首先一个现实的问题,我们要有一个待测接口来验证我们自动化方案的可行性。
我们可以选择在自己的本地去部署一套待测接口,当然也可以选择公网上的接口去进行测试,这里我们选择后者。
我选定的是apishop这个站点:https://www.apishop.net/
这个站点提供非常多,种类齐全的对外开放的接口,其实主要是给其他网站提供各种接口服务的,比如我们接下来要用到的手机号归属地查询接口。当然用他来实现我们的测试也完全没问题。
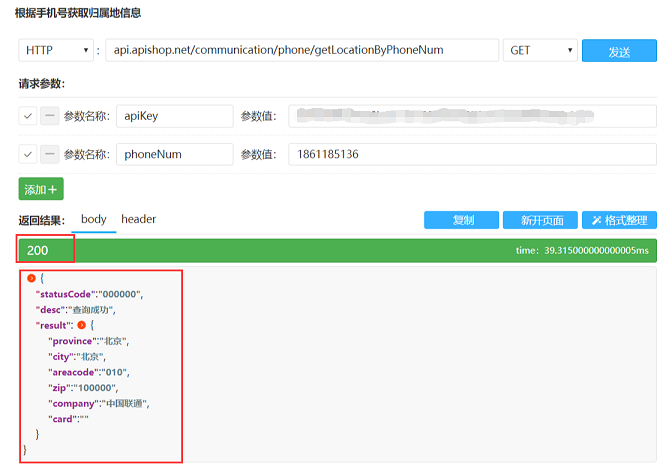

从上图可以看到,我们可以对这个接口进行符合标准格式的请求,红框中给出的就是我们要去用自动化验证的反馈信息。
反馈信息可以划分为三个部分:
- 状态返回码
- 反馈信息主体
- 反馈头部信息
2.2 创建发送接口的测试类
首先我们来考虑,在我们的项目中写这么个类,让他能够实现发送请求,接收反馈,验证反馈的功能。暂时我们只考虑发送GET方法的请求。
2.2.1 创建所有变量
在我们的第一个测试类中,我们需要使用httpClient来发送请求,接收反馈,然后对反馈信息做一个存储处理和验证。
在我们的项目src/main/java目录下新建一个包名为:com.test.client,在包下新建一个testGetAPI.java类,
首先我们考虑需要如下变量:

        String url;
        CloseableHttpClient httpClient;
        HttpGet httpGet;
        CloseableHttpResponse httpResponse;
        String responseBody;
        int responseCode;
        Header[] responseHeader;
- url是我们去进行get请求的地址;
- httpClient是用来发送http请求的HttpClient实例;
- httpGet是get请求的一个实例;
- httpResponse用来存储我们接收到的反馈;
- responseBody用来存储反馈的主体信息;
- responseCode用来存储反馈的状态码;
- responseHeader用来存储反馈的头部信息;
将以上变量创建。
2.2.2 实现请求发送和反馈接收
接下来实现请求的发送和反馈接收。
首先URL配置如下(部分apikey出于安全原因隐去):
String url = "https://api.apishop.net/communication/phone/getLocationByPhoneNum?apiKey=nMke6NK29c40*********3eec8aa0808389b16c4&phoneNum=1861195236";
接下来用三行代码来发送请求,接收反馈:
  //创建一个httpClient的实例
  httpClient = HttpClients.createDefault();
  //创建一个httpGet请求实例
  httpGet = new HttpGet(url);
  //使用httpClient实例发送刚创建的get请求,并用httpResponse将反馈接收
  httpResponse = httpClient.execute(httpGet);
其实到这一步我们的主体工作已经做完了,接下来要对接收到的反馈进行一个处理、分析和验证。
我们可以想到,要从httpResponse中提取出上文提到的header,body,code三部分信息。处理代码如下:
  //从反馈中提取出状态码
  responseCode = httpResponse.getStatusLine().getStatusCode();
  //从反馈中提取出反馈主体
  responseBody = httpResponse.getEntity();
  //从反馈中提取出所有头部信息
  responseHeader = httpResponse.getAllHeaders();
2.2.3 结果验证和处理
接下来用systemOut的方式,将我们提取到这三部分信息一一打印出来,得出的结果如下:
This is the response code:200
This is the response body:ResponseEntityProxy{[Content-Type: text/plain; charset=utf-8,Content-Length: 159,Chunked: false]}
This is the response header:[Lorg.apache.http.Header;@4a9789ee
这里的问题在于,我们发现反馈信息主体和头部格式都不是我们想要的,可验证的格式,所以我们需要以下代码做一些处理:
  //用EntityUtils工具类将反馈主体处理为字符串形式
  String resnponseBodyString = EntityUtils.toString(responseBody,"utf-8");

  //用哈希图将反馈头信息以键值对形式保存
  HashMap<String,String> hashMap = new HashMap<String,String>();
  for(Header header:responseHeader){
    hashMap.put(header.getName(), header.getValue());
  }
然后再将处理后的变量打印,得到:
This is the response code:200
This is the response body:{"statusCode":"000000","desc":"查询成功","result":{"province":"北京","city":"北京","areacode":"010","zip":"100000","company":"中国联通","card":""}}
This is the response header in hash{Access-Control-Allow-Origin=*, Date=Tue, 20 Nov 2018 03:40:43 GMT, Content-Length=159, Connection=keep-alive, Content-Type=text/plain; charset=utf-8}
可以看到,到这个程度,我们已经可以去验证反馈的正确性了。当然要注意到response body也就是反馈主体还不是以json格式呈现的,我们可以进一步对他做json格式处理,这个放到后续内容。
暂时我们还没有自动验证和断言,但是通过肉眼比对,我们已经能够验证整个请求过程的正确性。
最终我们的整体代码如下:
import java.io.IOException;
import java.util.HashMap;

import org.apache.http.Header;
import org.apache.http.HttpEntity;
import org.apache.http.client.ClientProtocolException;
import org.apache.http.client.methods.CloseableHttpResponse;
import org.apache.http.client.methods.HttpGet;
import org.apache.http.impl.client.CloseableHttpClient;
import org.apache.http.impl.client.HttpClients;
import org.apache.http.util.EntityUtils;

import com.alibaba.fastjson.JSON;
import com.alibaba.fastjson.JSONObject;

public class TestGet {

    public static void main(String[] args) throws ClientProtocolException, IOException {
        String url = "https://api.apishop.net/communication/phone/getLocationByPhoneNum?apiKey=nMke6NK29c40********c8aa0808389b16c4&phoneNum=1861195236";
        CloseableHttpClient httpClient;
        HttpGet httpGet;
        CloseableHttpResponse httpResponse;
        HttpEntity responseBody;
        int responseCode;
        Header[] responseHeader;

        httpClient = HttpClients.createDefault();
        httpGet = new HttpGet(url);
        httpResponse = httpClient.execute(httpGet);

        responseCode = httpResponse.getStatusLine().getStatusCode();
        responseBody = httpResponse.getEntity();
        responseHeader = httpResponse.getAllHeaders();

        String responseBodyString = EntityUtils.toString(responseBody,"utf-8");

        HashMap<String,String> hashMap = new HashMap<String,String>();
        for(Header header:responseHeader){
            hashMap.put(header.getName(), header.getValue());
        }


        System.out.println("This is the response code:" + responseCode);
        System.out.println("This is the response body:" + responseBodyString);
        System.out.println("This is the response header in hash" + hashMap);

    }

}
下一篇我们对当前的测试做一个优化调整和基础封装。