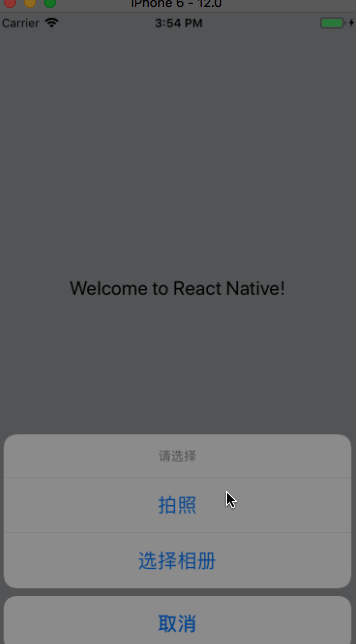
效果图,因为我用的是模拟器,所以拍照功能没有效果,不过可从相册选择,下面是具体的效果图
把react-native-image-picker添加到项目
yarn add react-native-image-picker
plist文件设置
<key>NSPhotoLibraryUsageDescription</key>
    <string>$(PRODUCT_NAME) would like access to your photo gallery</string>
    <key>NSCameraUsageDescription</key>
    <string>$(PRODUCT_NAME) would like to use your camera</string>
    <key>NSPhotoLibraryAddUsageDescription</key>
    <string>$(PRODUCT_NAME) would like to save photos to your photo gallery</string>
    <key>NSMicrophoneUsageDescription</key>
    <string>$(PRODUCT_NAME) would like to your microphone (for videos)</string>
xcode设置:
1.In the XCode's "Project navigator", right click on your project's Libraries folder ➜ Add Files to <...>.
2.Go to node_modules ➜ react-native-image-picker ➜ ios ➜ select RNImagePicker.xcodeproj.
Add RNImagePicker.a to Build Phases -> Link Binary With Libraries.
代码集成步骤:
/**
 * Sample React Native App
 * https://github.com/facebook/react-native
 * @flow
 */

import React, {Component} from 'react';
import {
    AppRegistry,
    StyleSheet,
    Text,
    View, TouchableOpacity,Image
} from 'react-native';
import ImagePicker from 'react-native-image-picker';
export default class MyApp extends Component {

    constructor(props){
        super(props)
        this.state={
            avatarSource:null
        }
    }

    render() {
        const photoOptions = {
            title: '请选择',
            quality: 0.8,
            cancelButtonTitle: '取消',
            takePhotoButtonTitle: '拍照',
            chooseFromLibraryButtonTitle: '选择相册',
            allowsEditing: true,
            noData: false,
            storageOptions: {
                skipBackup: true,
                path: 'images'
            }
        };


        return (
            <View style={styles.container}>
                <TouchableOpacity onPress = {()=>{
                    ImagePicker.showImagePicker(photoOptions, (response) => {
                        console.log('Response = ', response);
                        if (response.didCancel) {
                            console.log('User cancelled image picker');
                        }
                        else if (response.error) {
                            console.log('ImagePicker Error: ', response.error);
                        }
                        else if (response.customButton) {
                            console.log('User tapped custom button: ', response.customButton);
                        }
                        else {
                            let source = { uri: response.uri };
                            // You can also display the image using data:
                            // let source = { uri: 'data:image/jpeg;base64,' + response.data };
                            this.setState({
                                avatarSource: source
                            });
                        }
                    });
                }}>
                    <Text style={styles.welcome}>
                        Welcome to React Native!
                    </Text>
                </TouchableOpacity>
                <Image source={this.state.avatarSource} style={{100,height:100}}/>
            </View>
        );
    }
}

const styles = StyleSheet.create({
    container: {
        flex: 1,
        justifyContent: 'center',
        alignItems: 'center',
        backgroundColor: '#F5FCFF',
    },
    welcome: {
        fontSize: 20,
        textAlign: 'center',
        margin: 10,
    },
    instructions: {
        textAlign: 'center',
        color: '#333333',
        marginBottom: 5,
    },
});

AppRegistry.registerComponent('MyApp', () => MyApp);