zoukankan      html  css  js  c++  java
  • Gradle与Gatling脚本集成

    Gatling作为次时代的性能测试工具,由于其API简洁明了、性能出众,越来越受欢迎。但是运行Gatling脚本却有诸多不便,其提供的默认方式不是很方便。考虑到Gatling脚本本质上是Scala类,运行的时候还是使用的是java虚拟机,我们可以将其脚本的运行与Gradle结合起来。这样子就可以通过Gradle来运行Gatling脚本了。

    废话少说,接下来就讲述下如何来进行配置。

    创建一个标准的maven结构的工程目录,如下图所示。

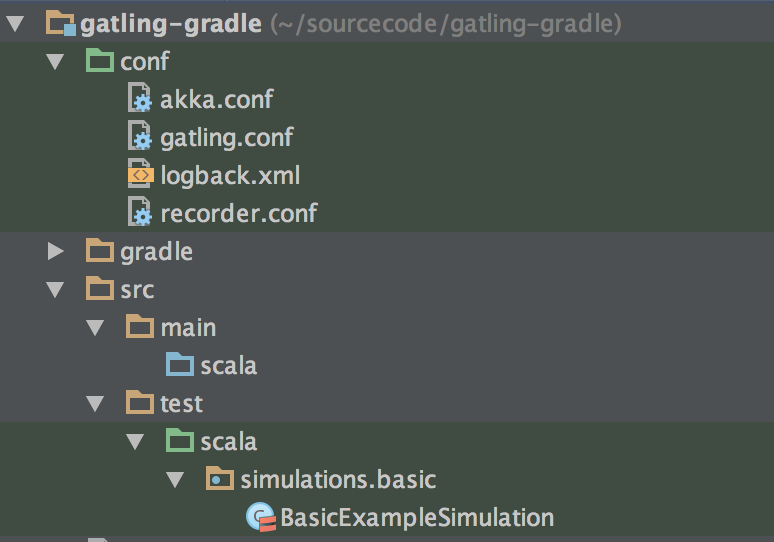
    conf目录存放Gatling的基本配置文件。 Gatling的脚本文件存放在src/test/scala/simulations包里面。可以自行在此包下对脚本文件再分类。

    在build.gradle文件中引入scala插件。

    1
    
    apply plugin: 'scala'
    

    然后引入有gatling库的maven repo。

    1
    2
    3
    4
    5
    6
    
    repositories {
        mavenCentral ()
        maven {
            url 'http://repository.excilys.com/content/groups/public'
        }
    }
    

    再加入scala和gatling的依赖项。

    1
    2
    3
    4
    
    dependencies {
        compile 'org.scala-lang:scala-library:2.10.1'
        testCompile 'io.gatling.highcharts:gatling-charts-highcharts:2.0.0-M3a'
    }
    

    把conf文件夹作为test的source文件。

    1
    2
    3
    4
    5
    6
    7
    
    sourceSets {
        test {
            resources {
                srcDir 'conf'
            }
        }
    }
    

    创建一个名为gatling的task,目的是运行所有的gatling脚本。

    1
    2
    3
    4
    5
    6
    7
    8
    9
    10
    11
    12
    13
    14
    15
    16
    17
    18
    19
    20
    21
    22
    23
    24
    25
    26
    
    task gatling (dependsOn: 'compileTestScala') << {
    
        logger.lifecycle (" ---- Executing all Gatling scenarios from: ${sourceSets.test.output.classesDir} ----")
    
        sourceSets.test.output.classesDir.eachFileRecurse { file ->
            if (file.isFile ()) {
    
                def gatlingScenarioClass = (file.getPath () - (sourceSets.test.output.classesDir.getPath () + File.separator) - '.class')
                        .replace (File.separator, '.')
    
                javaexec {
                    main = 'io.gatling.app.Gatling'
                    classpath = sourceSets.test.output + sourceSets.test.runtimeClasspath
                    args '-sbf',
                            sourceSets.test.output.classesDir,
                            '-s',
                            gatlingScenarioClass,
                            '-rf',
                            'build/reports/gatling'
                }
            }
    
        }
    
        logger.lifecycle (" ---- Done executing all Gatling scenarios ----")
    }
    

    这是借助于Gatling的command line运行功能来实现的。具体参数指定官网上有,这里贴出原文。

    Command Line Options # Gatling can be started with several options listed below:

    • -nr (–no-reports): Runs simulation but does not generate reports
    • -ro (–reports-only ): Generates the reports for the simulation log file located in /results/
    • -df (–data-folder ): Uses as the folder where feeders are stored
    • -rf (–results-folder ): Uses as the folder where results are stored
    • -bf (–request-bodies-folder ): Uses as the folder where request bodies are stored
    • -sf (–simulations-folder ): Uses as the folder where simulations are stored
    • -sbf (–simulations-binaries-folder ): Uses as the folder where simulation binaries are stored
    • -s (–simulation ): Uses as the name of the simulation to be run
    • -sd (–simulation-description ): Uses as simulation description

    我在github上创建了一个示例项目,请参见https://github.com/huangbowen521/gatling-gradle

  • 相关阅读:
    python day05
    python day04
    python day03
    python day02
    计算机基本了解
    流程控制
    MFC程序中创建文件夹(文件路径)
    svn移动目录并且保存历史日志
    C++单例模式的问题
    PtInRect 的详细范围
  • 原文地址:https://www.cnblogs.com/huang0925/p/3862935.html
Copyright © 2011-2022 走看看