服务端开发
1,创建一个 webapp maven 项目,pom.xml 导入依赖
<dependency>
    <groupId>com.tencent.tars</groupId>
    <artifactId>tars-server</artifactId>
    <version>1.6.0</version>
    <type>jar</type>
</dependency>
2,添加插件
在生成代码的时候会根据此插件来生成
<plugin>
     <groupId>com.tencent.tars</groupId>
     <artifactId>tars-maven-plugin</artifactId>
     <version>1.6.0</version>
     <configuration>
          <tars2JavaConfig>
              <!-- 项目中 tars 文件位置 -->
              <tarsFiles>
                    <tarsFile>${basedir}/src/main/resources/hello.tars</tarsFile>
              </tarsFiles>
              <!-- 源文件编码 -->
              <tarsFileCharset>UTF-8</tarsFileCharset>
              <!-- 生成服务端代码 -->
              <servant>true</servant>
              <!-- 生成源代码编码 -->
              <charset>UTF-8</charset>
              <!-- 生成的源代码目录 -->
              <srcPath>${basedir}/src/main/java</srcPath>
              <!-- 生成源代码包前缀 -->
              <packagePrefixName>com.qq.tars.quickstart.server.</packagePrefixName>
           </tars2JavaConfig>
       </configuration>
</plugin>
3,在 src/main/resources 中新建 hello.tars 文件
module TestApp {
	interface Hello{
	    string hello(int no, string name);
	};
};
4,在工程目录下运行 mvn tars:tars2java 命令来生成接口文件
tars 文件决定了生成的接口,命名上追加 Servant ;内容也基本类似。具体如下:
@Servant
public interface HelloServant {

    public String hello(int no, String name);
}
5,继承接口,实现方法
public class HelloServantImpl implements HelloServant {

    public String hello(int no, String name) {
        // TODO Auto-generated method stub
        return String.format("hello no=%s, name=%s, time=%s", no, name, System.currentTimeMillis());
    }

}
6,在 src/main/resources 中新建 servants.xml 文件,目的是暴露服务
<?xml version="1.0" encoding="UTF-8"?>
<servants>
    <!-- 这是 OBJ 名 -->
    <servant name="HelloObj">
        <!-- tars 生成的接口路径 -->
        <home-api>com.qq.tars.quickstart.server.testapp.HelloServant</home-api>
        <!-- 我们自己的实现类路径 -->
        <home-class>com.qq.tars.quickstart.server.testapp.impl.HelloServantImpl</home-class>
    </servant>
</servants>
一定要正确配置接口和实现类的路径,我之前就是路径问题,花了好长时间才解决的~
7,打成 war 包,这就是一个服务,准备上传
在这里需要上传到管理平台,如果没有搭建好 tars 服务管理平台,请参照上一篇博文
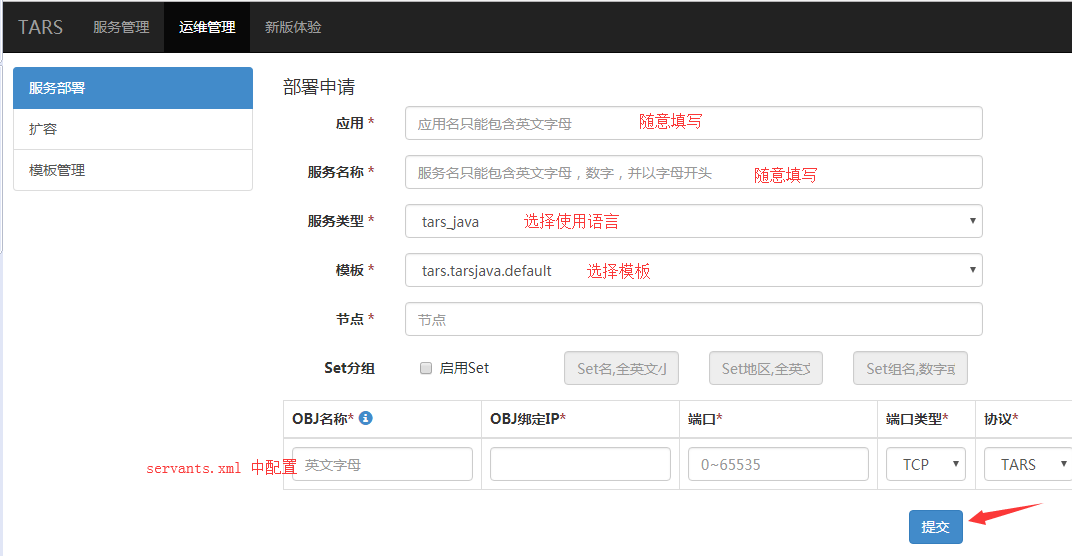
点击提交后到导航菜单“发布管理”,选中服务,上传 war 包,点击发布
客户端开发
1,新建 maven webapp 项目,导入依赖
和服务端基本一致,区别是<artifactId>标签里是tars-client
<dependency>
            <groupId>com.tencent.tars</groupId>
            <artifactId>tars-client</artifactId>
            <version>1.6.0</version>
            <type>jar</type>
        </dependency>
2,添加插件
和服务端基本一致,区别是 <servant> 标签里是 false ,和生成源代码包前缀
<plugin>
                <groupId>com.tencent.tars</groupId>
                <artifactId>tars-maven-plugin</artifactId>
                <version>1.6.0</version>
                <configuration>
                    <tars2JavaConfig>
                        <!-- tars文件位置 -->
                        <tarsFiles>
                            <tarsFile>${basedir}/src/main/resources/hello.tars</tarsFile>
                        </tarsFiles>
                        <!-- 源文件编码 -->
                        <tarsFileCharset>UTF-8</tarsFileCharset>
                        <!-- 生成代码,PS:客户端调用,这里需要设置为false -->
                        <servant>false</servant>
                        <!-- 生成源代码编码 -->
                        <charset>UTF-8</charset>
                        <!-- 生成的源代码目录 -->
                        <srcPath>${basedir}/src/main/java</srcPath>
                        <!-- 生成源代码包前缀 -->
                        <packagePrefixName>com.qq.tars.quickstart.client.</packagePrefixName>
                    </tars2JavaConfig>
                </configuration>
            </plugin>
3,在 src/main/resources 中新建 hello.tars 文件
文件和服务端的 tars 文件一致,拷贝即可
4,工程目录下运行 mvn tars:tars2java 命令生成接口
和服务端一致
5,测试,直接运行该文件即可
同步调用
public class Test {

    public static void main(String[] args) {
        // TODO Auto-generated method stub
        CommunicatorConfig cfg = new CommunicatorConfig();
        //构建通信器
        Communicator communicator = CommunicatorFactory.getInstance().getCommunicator(cfg);
        //通过通信器,生成代理对象
        HelloPrx proxy = communicator.stringToProxy(HelloPrx.class, "TestAppToTwo.HelloServer.HelloObj@tcp -h 111.231.63.166 -p 8202");
        String ret = proxy.hello(1000, "HelloWorld");
        System.out.println(ret);
    }

}
异步调用
public class TestAsync {

    public static void main(String[] args) {
        // TODO Auto-generated method stub
        CommunicatorConfig cfg = new CommunicatorConfig();
        //构建通信器
        Communicator communicator = CommunicatorFactory.getInstance().getCommunicator(cfg);
        //通过通信器,生成代理对象
        HelloPrx proxy = communicator.stringToProxy(HelloPrx.class, "TestAppToTwo.HelloServer.HelloObj@tcp -h 111.231.63.166 -p 8202");
        proxy.async_hello(new HelloPrxCallback() {

            @Override
            public void callback_expired() {
            }

            @Override
            public void callback_exception(Throwable ex) {
            }

            @Override
            public void callback_hello(String ret) {
                System.out.println(ret);
            }
        }, 1000, "Hello World!");
    }

}