IOC概念
控制反转(Inversion of Control,IOC),是面向对象编程中的一种设计原则,它建议将不需要的职责移出类,让类专注于核心职责,从而提供松散耦合,提高优化软件程序设计。它把传统上由程序代码直接操控的对象的调用权(new、get等操作对象)交给容器,通过容器来实现对象组件的装配和管理,也就是对组件对象控制权的转移,从程序代码本身转移到了外部容器。
IOC的实现方式
IOC有多种实现方式,其中最常见的叫做“依赖注入”(Dependency Injection,简称DI),另外还有“依赖查找”(Dependency Lookup),其中“依赖查找”可分为“依赖拖拽”(Dependency Pull)和“上下文依赖查找”(Contextualized Dependency Lookup)。
依赖的理解
什么是依赖呢?Java开发是面向对象编程,面向抽象编程容易产生类与类的依赖。看下面的代码中,UserManagerImpl 类中有个对象属性 UserDao ,也就是说 UserManagerImpl 依赖 UserDao。也就是说,一个类A中有了类B的对象属性或类A的构造方法需要传递类B对象来进行构造,那表示类A依赖类B。
public class UserManagerImpl implements UserManagerServie{
    private UserDao userDao;
}
为什么需要依赖呢?下面的代码中 UserDao 直接 new 写死了,如果此时新需求需要代理对象来处理业务就不行了,所以为了程序的灵活,需要改成上面的依赖代码,由程序控制对象的创建(IOC);
public class UserManagerImpl implements UserManagerServie{
    public void addUser(){
     UserDao userDao = new UserDao();
    }
}
依赖注入(Dependency Injection)
依赖注入是一个过程,对象通过构造方法参数、工厂方法参数、构造或工厂方法返回后在对象实例上设置的属性来定义它们的依赖项,从类外部注入依赖(容器在创建bean时注入这些依赖项),类不关心细节。这个过程从根本上说是bean自身的反向(因此得名控制反转),通过使用直接构造类或服务定位器模式来控制依赖项的实例化或位置。
依赖注入的基本原则是:应用组件不应该负责查找资源或者其他依赖对象,配置对象的工作由IOC容器负责,即组件不做定位查询,只提供常规的Java方法让容器去决定依赖关系。
使用 DI 原则,代码会更清晰,并且当向对象提供它们的依赖时,解耦会更有效。对象不查找其依赖项,也不知道依赖项的位置或类。因此,类变得更容易测试,特别是当依赖关系在接口或抽象类上时,它们允许在单元测试中使用 stub 或 mock 实现。
Spring中依赖注入有四种方式:构造方法注入(Constructor Injection),set注入(Setter Injection)、接口注入(Interface Injection)和字段注入(Field Injection),其中接口注入由于在灵活性和易用性比较差,现在从Spring4开始已被废弃。
(1) 构造方法注入(Constructor Injection):Spring Framework 更倾向并推荐使用构造方法注入


public class ExampleBean {

    private AnotherBean beanOne;

    private YetAnotherBean beanTwo;

    private int i;

    public ExampleBean(
        AnotherBean anotherBean, YetAnotherBean yetAnotherBean, int i) {
        this.beanOne = anotherBean;
        this.beanTwo = yetAnotherBean;
        this.i = i;
    }
}
xml配置文件对应bean的定义信息:
bean id="exampleBean" class="examples.ExampleBean" factory-method="createInstance">
    <constructor-arg ref="anotherExampleBean"/>
    <constructor-arg ref="yetAnotherBean"/>
    <constructor-arg value="1"/>
</bean>

<bean id="anotherExampleBean" class="examples.AnotherBean"/>
<bean id="yetAnotherBean" class="examples.YetAnotherBean"/>
也可以配置成下面的模式:
<bean id="exampleBean" class="examples.ExampleBean">
    <!-- constructor injection using the nested ref element -->
    <constructor-arg>
        <ref bean="anotherExampleBean"/>
    </constructor-arg>

    <!-- constructor injection using the neater ref attribute -->
    <constructor-arg ref="yetAnotherBean"/>
    <!-- 指定类型 -->
    <constructor-arg type="int" value="1"/>
</bean>

<bean id="anotherExampleBean" class="examples.AnotherBean"/>
<bean id="yetAnotherBean" class="examples.YetAnotherBean"/>
1)构造函数参数解析:构造函数参数解析匹配通过使用参数类型实现。如果 bean definition 在构造函数参数中不存在潜在的歧义,那么构造函数参数的bean definition定义的顺序就是实例化bean时将这些参数提供给对应构造函数的顺序。
package x.y;

public class ThingOne {

    public ThingOne(ThingTwo thingTwo, ThingThree thingThree) {
        // ...
    }
}
假设 ThingTwo 和 ThingThree 类与继承无关,那么就不存在潜在的歧义。因此,以下配置可以很好地工作,不需要在 <constructor-arg/> 标签中显式地指定构造函数参数索引或类型;
<beans>
    <bean id="beanOne" class="x.y.ThingOne">
        <constructor-arg ref="beanTwo"/>
        <constructor-arg ref="beanThree"/>
    </bean>

    <bean id="beanTwo" class="x.y.ThingTwo"/>

    <bean id="beanThree" class="x.y.ThingThree"/>
</beans>
2)构造函数参数类型匹配
当引用另一个 bean 时,类型是已知的,可以进行匹配(就像前面的例子一样)。当使用简单类型时,例如<value>true</value>, Spring 无法确定值的类型,因此如果没有帮助,就无法按类型进行匹配。如下面的例子:
package examples;

public class ExampleBean {

    // Number of years to calculate the Ultimate Answer
    private int years;

    // The Answer to Life, the Universe, and Everything
    private String ultimateAnswer;

    public ExampleBean(int years, String ultimateAnswer) {
        this.years = years;
        this.ultimateAnswer = ultimateAnswer;
    }
}
如果使用 type 属性显式地指定构造函数参数的类型,则容器可以使用简单类型的类型匹配。
<bean id="exampleBean" class="examples.ExampleBean">
    <constructor-arg type="int" value="7500000"/>
    <constructor-arg type="java.lang.String" value="42"/>
</bean>
3)构造函数参数索引匹配:可以使用 index 属性显式地指定构造函数参数的索引,从0开始;
<bean id="exampleBean" class="examples.ExampleBean">
    <constructor-arg index="0" value="7500000"/>
    <constructor-arg index="1" value="42"/>
</bean>
index 除了解决多个简单值的模糊性之外,还可以解决构造函数有两个相同类型的参数时的模糊性。
4)构造函数参数的名字匹配:除了上面的类型、索引匹配,还可以使用名字进行匹配;
<bean id="exampleBean" class="examples.ExampleBean">
    <constructor-arg name="years" value="7500000"/>
    <constructor-arg name="ultimateAnswer" value="42"/>
</bean>
请记住,要使它开箱即用,代码编译时必须启用debug标志,以便 Spring 可以从构造函数中查找参数名进行实例化创建。如果不能或不想使用 debug 标志编译代码,可以使用 JDK注解 @ConstructorProperties 显式地命名构造函数参数。
public class Point {
       @ConstructorProperties({"x", "y"})
       public Point(int x, int y) {
           this.x = x;
           this.y = y;
       }

       public int getX() {
           return x;
       }

       public int getY() {
           return y;
       }

       private final int x, y;
   }
关于 @ConstructorProperties 的作用:
一些序列化框架使用 @ConstructorProperties 将构造函数参数与相应的字段及其 getter 和 setter 方法关联起来,比如上面参数 x 和 y 对应的是 getX() 和 getY();
为此,它依赖于为字段命名 getter 和 setter 方法时使用相同的常见命名约定: getter 和 setter 方法名称通常是通过大写字段名称并在前缀加get或set创建的(或者对于布尔类型的 getter 是 is)。但是,使用单字母字段名的示例并不能很好地展示这一点。
一个最好的案例是:someValue 变成 getSomeValue 和 setSomeValue;
因此在构造函数属性的上下文中,@ConstructorProperties({"someValue"})表示第一个参数与 getter方法 getSomeValue和setter方法 setSomeValue相关联;
请记住,方法参数名在运行时是不可见的。重要的是参数的顺序。构造函数参数的名称或构造函数实际设置的字段并不重要。下面仍然引用名为getSomeValue()的方法,然后对方法里面的值进行序列化:
import com.fasterxml.jackson.databind.ObjectMapper;

import java.beans.ConstructorProperties;
import java.beans.XMLEncoder;
import java.io.ByteArrayOutputStream;

public class Point {

    private final int x;
    private final int y=10;

    @ConstructorProperties({"someValue"})
    public Point(int a) {
        this.x = a;
    }

    public int getX() {
        return x;
    }

    public int getY() {
        return y;
    }

    public int getSomeValue() {
        return y;
    }

    public static void main(String[] args) throws Exception {
        //将bean信息进行xml格式输出:进行序列化
        ByteArrayOutputStream stream = new ByteArrayOutputStream();

        XMLEncoder encoder = new XMLEncoder(stream);
        encoder.writeObject(new Point(1));
        encoder.close();

        System.out.println(stream);
    }
}
======结果======
<?xml version="1.0" encoding="UTF-8"?>
<java version="1.8.0_191" class="java.beans.XMLDecoder">
 <object class="test.Point">
  <int>10</int>
 </object>
</java>
什么情况下使用@ConstructorProperties注解呢?
一般的POJO bean 都有set 和 get 方法,所以是可变的。在默认情况下,Jackson 将使用Java bean模式进行反序列化:首先通过使用默认(或零args)构造函数创建bean类的实例,然后使用一系列对setter的调用来设置每个属性值。但如果是一个不可变bean(没有set方法),比如上面的Point案例呢?现在没有了set方法,或者构造函数也是无参的,这时你就使用 @JsonProperty and @JsonCreator注解来进行序列号和反序列化了,如下面的案例:
import com.fasterxml.jackson.annotation.JsonCreator;
import com.fasterxml.jackson.annotation.JsonProperty;

public class JacksonBean {
  private final int value;
  private final String another;

  @JsonCreator
  public JacksonBean(@JsonProperty("value") int value, @JsonProperty("another") String another) {
    this.value = value;
    this.another = another;
  }

  public int getValue() {
    return value;
  }

  public String getAnother() {
    return another;
  }
}
但这里存在一个问题,比如我在程序的多模块下使用了这个bean,在其中一个模块中我将它序列化成 JSON,但在另外一个模块中,我可能选择不同的序列号机制(比如YAML、XML),但由于Jackson不支持 YAML,我们将不得不使用不同的框架来序列号这些bean,而这些库可能需要它们自己的注解集,所以我们需要在这个 bean中添加大量的注解以支持对应的序列号框架,这样很不友好。这时就可以使用 @ConstructorProperties 注解来解决这个问题了,序列号框架比如 Jackson 框架从2.7版本就支持这个注解了;
import com.fasterxml.jackson.core.JsonProcessingException;
import com.fasterxml.jackson.databind.ObjectMapper;

import java.beans.ConstructorProperties;

public class JacksonBean {
    private final int value;
    private final String another;

    @ConstructorProperties({"value", "another"})
    public JacksonBean(int value, String another) {
        this.value = value;
        this.another = another;
    }

    public int getValue() {
        return value;
    }

    public String getAnother() {
        return another;
    }

    public static void main(String[] args) {
        try {
            ObjectMapper mapper = new ObjectMapper();
            JacksonBean jacksonBean = new JacksonBean(1, "hrh");
            String jsonString = mapper.writerWithDefaultPrettyPrinter().writeValueAsString(jacksonBean);
            System.out.println(jsonString);
        } catch (JsonProcessingException e) {
            e.printStackTrace();
        }
    }

}
======结果======
{
  "value" : 1,
  "another" : "hrh"
}
只要对应的序列化框架支持该注解,就可以使用更少的注解来被这些支持的框架进行序列化和反序列化了。
参考:https://liviutudor.com/2017/09/15/little-known-yet-useful-java-annotation-constructorproperties/
对于序列化,框架使用对象getter获取所有值,然后使用这些值序列化对象。当需要反序列化对象时,框架必须创建一个新实例。如果对象是不可变的,它没有任何可以用来设置其值的setter。构造函数是设置这些值的唯一方法。@ConstructorProperties注解用于告诉框架如何调用构造函数来正确地初始化对象。
Spring还可以使用@ConstructorProperties注解按名称查找构造函数参数:
    <bean id="point" class="testPackage.Point">
        <constructor-arg name="xx" value="10"/>
        <constructor-arg name="yy" value="20"/>
    </bean>
public class Point {

    private final int x;
    private final int y;

    @ConstructorProperties({"xx", "yy"})
    public Point(int x, int y) {
        this.x = x;
        this.y = y;
    }

    public int getX() {
        return x;
    }

    public int getY() {
        return y;
    }


    public static void main(String[] args) throws Exception {
        ClassPathXmlApplicationContext context = new ClassPathXmlApplicationContext("applicationContext.xml");
        Point point = (Point) context.getBean("point");
        System.out.println(point.getX());
        System.out.println(point.getY());
    }
}
参考:https://stackoverflow.com/questions/26703645/dont-understand-constructorproperties
5)当构造方法是私有时,可以提供一个静态工厂方法供外部使用:
public class ExampleBean {

    // 一个私有构造方法
    private ExampleBean(...) {
        ...
    }

    //一个静态工厂方法:参数是这个ExampleBean实例化后bean的依赖项,不需要管这些参数实际上是如何被使用的;
    public static ExampleBean createInstance (
        AnotherBean anotherBean, YetAnotherBean yetAnotherBean, int i) {

        ExampleBean eb = new ExampleBean (...);
        // 一些其他的操作
        ...
        return eb;
    }
}
静态工厂方法的参数是由xml配置文件的<constructor-arg/>标签提供的,与实际使用构造函数时完全相同。工厂方法返回的类的类型不必与包含静态工厂方法的类的类型相同(上面的案例中是相同的)。
(2) set注入(Setter Injection):由容器在调用无参数构造函数或无参数静态工厂方法来实例化bean之后调用bean上的setter方法来完成的;
public class ExampleBean {

    private AnotherBean beanOne;

    private YetAnotherBean beanTwo;

    private int i;

    public void setBeanOne(AnotherBean beanOne) {
        this.beanOne = beanOne;
    }

    public void setBeanTwo(YetAnotherBean beanTwo) {
        this.beanTwo = beanTwo;
    }

    public void setIntegerProperty(int i) {
        this.i = i;
    }
}
xml配置文件对应bean的定义信息:
<bean id="exampleBean" class="examples.ExampleBean">
    <!-- setter injection using the nested ref element -->
    <property name="beanOne">
        <ref bean="anotherExampleBean"/>
    </property>

    <!-- setter injection using the neater ref attribute -->
    <property name="beanTwo" ref="yetAnotherBean"/>
    <property name="integerProperty" value="1"/>
</bean>

<bean id="anotherExampleBean" class="examples.AnotherBean"/>
<bean id="yetAnotherBean" class="examples.YetAnotherBean"/>
(3) 接口注入(Interface Injection):
-
- 若根据 wikipedia 的定义,接口注入只是客户端向客户端依赖项的setter方法发布一个角色接口,它可以用来建立注入器在注入依赖时应该如何与客户端通信
View Code
// Service setter interface.
public interface ServiceSetter {
    public void setService(Service service);
}

// Client class
public class Client implements ServiceSetter {
    // Internal reference to the service used by this client.
    private Service service;

    // Set the service that this client is to use.
    @Override
    public void setService(Service service) {
        this.service = service;
    }
}
Spring为 ResourceLoaders, ApplicationContexts, MessageSource和其他资源提供了开箱即用的资源插件接口:ResourceLoaderAware, ApplicationContextAware, MessageSourceAware等等,这里就使用到了接口注入;
我们以ApplicationContextAware接口为例,它的作用是Spring容器在创建bean时会扫描实现了这个接口的类,然后将这个容器注入给这个实现类,这样这个实现类就可以通过容器去获取bean等其他操作了。
public interface ApplicationContextAware extends Aware {

    void setApplicationContext(ApplicationContext applicationContext) throws BeansException;

}
那我们什么时候会需要用到 ApplicationContextAware这个接口呢?如果你需要查找一些bean或访问一些应用程序文件资源,甚至发布一些应用程序范围的事件,这时你就需要用到这个接口了。
@Component
public class MyClass implements ApplicationContextAware {

    private ApplicationContext context;

    @Override
    public void setApplicationContext(ApplicationContext applicationContext)
            throws BeansException {
        context = applicationContext;
    }

    public void work() {
        MyOtherClass otherClass = context.getBean(MyOtherClass.class);
        Resource image = context.getResource("logo.img");
    }
}
- 若根据 wikipedia 的定义,接口注入只是客户端向客户端依赖项的setter方法发布一个角色接口,它可以用来建立注入器在注入依赖时应该如何与客户端通信
当然了,现在我们也可以通过注解方式来获取到程序的上下文环境:@Inject ApplicationContext context 或者 @Autowired ApplicationContext context
-
- 根据Martin Fowler的定义: 为接口的定义和使用提供的一种注入技术,通过实现依赖bean的关联接口将bean依赖项注入到实际对象中。因此容器调用该接口的注入器,该接口是在实际对象被实例化时实现的。
I.电影:
public class Movie {
    private String director;
    private String title;

    public Movie(String director, String title) {
        this.director = director;
        this.title = title;
    }

    public String getDirector() {
        return director;
    }

    public void setDirector(String director) {
        this.director = director;
    }

    public String getTitle() {
        return title;
    }

    public void setTitle(String title) {
        this.title = title;
    }
}
II.电影查找器注入接口实现:
//电影查找器
public interface MovieFinder {
    List findAll();
}
public interface Injector {
    public void inject(Object  target);
}

//注入接口,将影片查找器注入到对象的一个接口
public interface InjectFinder {
    void injectFinder(MovieFinder finder);
}
//实现注入接口
public class MovieLister implements InjectFinder {
    private MovieFinder finder;

    public void injectFinder(MovieFinder finder) {
        this.finder = finder;
    }


    public Movie[] moviesDirectedBy(String arg) {
        List allMovies = finder.findAll();
        for (Iterator it = allMovies.iterator(); it.hasNext(); ) {
            Movie movie = (Movie) it.next();
            if (!movie.getDirector().equals(arg)) it.remove();
        }
        return (Movie[]) allMovies.toArray(new Movie[allMovies.size()]);
    }

}
III.文件名注入接口实现:
//文件名注入
public interface InjectFinderFilename {
    void injectFilename (String filename);
}

public interface Injector {
    public void inject(Object  target);
}

public class ColonMovieFinder implements MovieFinder, InjectFinderFilename, Injector {
    private String filename;

    //注入文件名
    @Override
    public void injectFilename(String filename) {
        this.filename = filename;
    }

    //找到所有的电影
    @Override
    public List findAll() {
        List<Movie> list = new ArrayList(10);
        list.add(new Movie("Sergio Leone","Once Upon a Time in the West"));
        list.add(new Movie("See","hrh"));
        list.add(new Movie("Sere","hrh"));
        list.add(new Movie("Serge","hrh"));
        list.add(new Movie("Sergie","hrh"));
        list.add(new Movie("Sergioe","hrh"));
        return list;
    }

    @Override
    public void inject(Object target) {
        ((InjectFinder) target).injectFinder(this);
    }

}
IV.测试:
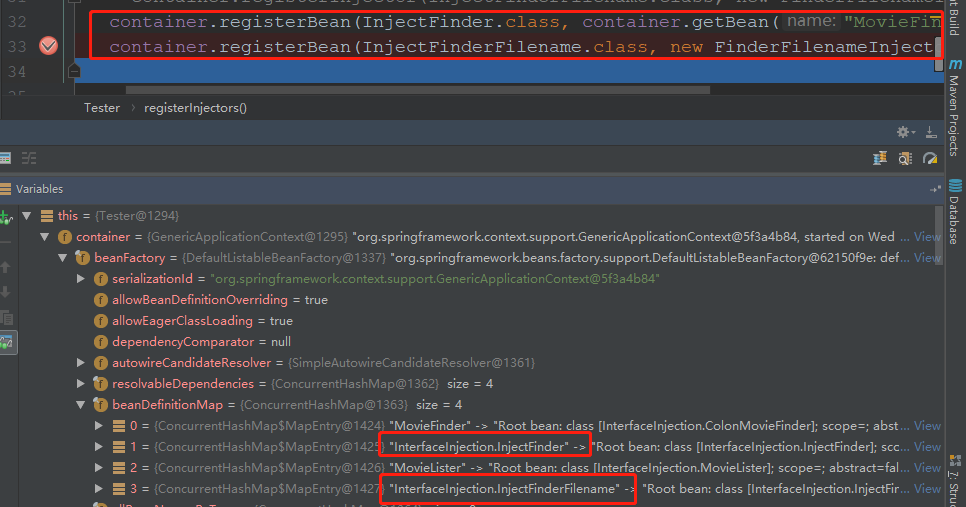
public class Tester {
    //容器
    GenericApplicationContext container;
    //private Container container;

    private void configureContainer() {
        //创建容器
        container = new GenericApplicationContext();
        registerComponents();
        container.refresh();
        registerInjectors();
        container.start();
    }

    private void registerComponents() {
//        container.registerComponent("MovieLister", MovieLister.class);
//        container.registerComponent("MovieFinder", ColonMovieFinder.class);
        container.registerBean("MovieLister", MovieLister.class);
        container.registerBean("MovieFinder", ColonMovieFinder.class);
    }

    private void registerInjectors() {
//        container.registerInjector(InjectFinder.class, container.lookup("MovieFinder"));
//        container.registerInjector(InjectFinderFilename.class, new FinderFilenameInjector());
        container.registerBean(InjectFinder.class, container.getBean("MovieFinder"));
        container.registerBean(InjectFinderFilename.class, new FinderFilenameInjector());
    }

    public static class FinderFilenameInjector implements Injector {
        @Override
        public void inject(Object target) {
            ((InjectFinderFilename) target).injectFilename("movies1.txt");
        }
    }
    @Test
    public void testIface() {
        configureContainer();
        MovieLister lister = (MovieLister) container.getBean("MovieLister");
        lister.injectFinder((MovieFinder) container.getBean("MovieFinder"));
        Movie[] movies = lister.moviesDirectedBy("Sergio Leone");
        assertEquals("Once Upon a Time in the West", movies[0].getTitle());
    }

}
V.测试通过,查看容器的bean效果图:
参考:https://stackoverflow.com/questions/2827147/doesnt-spring-really-support-interface-injection-at-all
(4)字段注入(Field Injection):它实际上不是一种新的注入类型,它是基于注解(@Autowired、@Resource等)实现的,在依赖项属性上直接使用注解进行注入,在底层中,Spring使用反射来设置这些值;
下面以@Autowired注解为例:
public class ExampleBean {
    @Autowired
    private AnotherBean beanOne;

}
字段注入可以与构造方法注入和setter注入相结合,在Spring 4.3之前,使用构造方法注入我们必须在构造方法上添加@Autowired注解,在4.3之后,如果只有一个构造方法,该注解是可选项,但如果是多个构造方法,需要在其中一个添加@Autowired注解指定使用哪个构造方法来注入依赖项。
public class ExampleBean {

    private AnotherBean beanOne;

    @Autowired
    public void setBeanOne(AnotherBean beanOne) {
        this.beanOne = beanOne;
    }

}
public class ExampleBean {

    private AnotherBean beanOne;

    private YetAnotherBean beanTwo;


    public ExampleBean(AnotherBean beanOne) {
        this.beanOne = beanOne;
    }

    @Autowired
    public ExampleBean(AnotherBean beanOne,YetAnotherBean beanTwo) {
        this.beanOne = beanOne;
        this.beanTwo = beanTwo;
    }

}
当字段注入同时应用在属性和setter注入方法时,Spring会优先使用setter注入方法注入依赖项:
public class ExampleBean {

    @Autowired
    private AnotherBean beanOne;

    @Autowired
    public void setBeanOne(AnotherBean beanOne) {
        this.beanOne = beanOne;
    }

}
当然了,在上面这个例子中,单个类中混合注入类型是不太友好的,因为它降低了代码的可读性。
依赖注入几种方式的探讨
(1)构造方法注入(Constructor Injection):
-
-
-
明显、可靠、不可变的:类的依赖关系在构造方法中很明显,所有的依赖项在构造方法中,所以所有的依赖项都第一时间被注入到类中,且无法更改,即构造的对象是不可变的;
- 可以与setter注入或字段注入相结合,构造方法参数指示所必需的依赖,其他-可选,即构造方法指定强依赖项(final属性),其他灵活可选依赖项选择setter注入或字段注入;
-
使代码更加健壮,可以防止空指针异常;
-
缺乏灵活性:以后不可能更改对象的依赖关系,导致重构比较麻烦;
-
依赖项数量增多的问题:依赖越多,构造函数越大,是一种糟糕的代码质量,可能需要进行重构;
- 产生循环依赖的可能性增大;
- 关于构造方法注入的更多探讨可参考:https://reflectoring.io/constructor-injection/
-
-
(2)setter注入(Setter Injection):
-
-
- 灵活、可变对象:使用setter注入可以在bean创建后选择注入依赖项,而从产生可变对象,但这些对象在多线程环境中可能不是线程安全的;
-
可控性:可以在任何时候进行依赖注入,这种自由度解决了构造方法注入导致的循环依赖问题;
- 可以在setter方法上使用@Required注解使属性成为必需依赖项,当然,这个需求使用构造方法注入是更可取的做法;
-
需要进行Null检查,因为可能会忘记设置依赖项导致获取依赖项为空报错;
-
由于会存在重写依赖项的可能性,比构造方法注入更容易出错,安全性更低;
- 关于setter注入的更多探讨可参考:https://spring.io/blog/2007/07/11/setter-injection-versus-constructor-injection-and-the-use-of-required
-
(3)接口注入(Interface Injection):扩展可参考https://blogs.oracle.com/jrose/interface-injection-in-the-vm
(4)字段注入(Field Injection):
-
-
- 快速方便,与IOC容器相耦合;
-
易于使用 ,不需要构造方法或setter方法;
-
可以和构造方法、setter相结合使用;
-
Spring允许我们通过在setter方法中添加@Autowired(required = false)来指定可选的依赖,Spring会跳过不满足的依赖项,不会将这些不满足的依赖项进行注入;
- 在构造方法注入中,无法使用@Autowired(required = false)来指定可选依赖项,构造方法注入是强依赖项,是必需的,没有依赖项进行注入无法进行对象实例化;
-
对对象实例化的控制较少,为了测试实例化后的对象,你需要额外对Sring容器进行一些配置,比如使用SpringBoot对@Autowired依赖项进行测试时,需要在测试类上加上@RunWith(SpringJUnit4ClassRunner.class)和@SpringBootTest注解;
-
兼容问题:使用字段注入意味着缩小类对依赖注入环境的兼容性,前面说了字段注入是依赖注解的,使用反射来设置值的,而这些注解依赖于特定的环境和平台,如果是一些Java平台但不支持反射的(比如GWT),会导致不兼容问题;
-
性能问题:构造方法注入比一堆反射字段赋值快。依赖注入框架来反射分析来构造依赖树并创建反射构造函数,会导致额外的性能开销;
-
从哲学的角度来看,字段注入打破了封装,而封装是面向对象编程的特性之一,而面向对象编程是Java的主要范式;
-
关于字段注入的更多讨论可参考:
-
https://softwareengineering.stackexchange.com/questions/300706/dependency-injection-field-injection-vs-constructor-injection
-
https://www.vojtechruzicka.com/field-dependency-injection-considered-harmful/
-
-
依赖查找(Dependency Lookup)
依赖查找也叫服务定位器(Service Locator), 对象工厂(Object Factory), 组件代理(Component Broker), 组件注册表(Component Registry)
依赖注入和依赖查找的主要区别是:谁负责检索依赖项;
依赖项查找是一种模式,调用者向容器对象请求具有特定名称或特定类型的对象;依赖项注入是一种模式,容器通过构造方法、setter方法、属性或工厂方法按名称将对象传递给其他对象;
通常,在DI(依赖注入)中,你的组件不知道DI容器,依赖“自动”出现(通过声明setter/构造方法参数,DI容器为你填充它们);
但在DL(依赖查找)中,你必须明确地询问你需要什么(显示查找资源),这意味着你必须依赖于上下文(在Spring中是Application context),并从它检索你需要的东西,这种方式其实叫做“上下文依赖查找”(Contextualized Dependency Lookup):

ApplicationContext applicationContext = new ClassPathXmlApplicationContext("/application-context.xml");
MyBean bean = applicationContext.getBean("myBean")
我们从JNDI注册表获取JDBC数据源对象引用的方法称为“依赖拖拽”(Dependency Pull):

public class PigServiceImpl {
    private DataSource dataSource;
    private PigDao pigDao;

    public PigServiceImpl(){
        Context context = null;
        try{
            context = new InitialContext();
            dataSource = (DataSource)context.lookup(“java:comp/env/dataSourceName”);
            pigDao = (PigDao) context.lookup(“java:comp/env/PigDaoName”);
        } catch (Exception e) {

        }
    }
}
DL(依赖查找)存在两个问题:
-
-
- 紧密耦合:依赖查找使代码紧密耦合,如果资源发生了改变,我们需要在代码中执行大量修改;
- 测试难:在测试应用程序时会产生一些问题,尤其是在黑盒测试中;
-
那什么时候需要应用到DL(依赖查找)呢?
我们都知道,默认情况下,Spring中所有的bean创建都是单例模式,这意味着它们将在容器中只被创建一次,而同一个对象将被注入到请求它的任何地方。然而,有时需要不同的策略,比如每个方法调用都应该从一个新对象执行。现在想象一下,如果一个短生命周期的对象被注入到单例对象中,Spring会在每次调用时自动刷新这个依赖吗?答案当然是不会,除非我们指出这种特殊依赖类型的存在。
假设我们有3个服务(类),其中一个依赖于其他服务,Service2是常见对象,可以使用前面讲到的任何DI(依赖注入)技术注入到DependentService中,比如setter注入。Service1的对象将是不同的,它不能一次注入,每次调用都应该访问一个新的实例 ---- 我们创建一个方法来提供这个对象,并让Spring 知道它。
abstract class DependentService {
    private Service2 service2;

    public void setService2(Service2 service2) {
        this.service2 = service2;
    }

    void doSmth() {
        createService1().doSmth();
        service2.doSmth();
    }

    protected abstract Service1 createService1();
}
在上面的代码中,我们没有将Service1的对象声明为通常的依赖项,相反,我们指定了将被 Spring Framework覆盖的方法,以便返回 Service1类的最新实例。
接下来我们进行xml文件的配置,我们必须声明Service1是一个生命周期较短的对象,在Spring中我们可以使用prototype作用域,因为它比单例对象小,通过look-method标签,我们可以指定方法的名称,它将注入依赖项:
<?xml version="1.0" encoding="UTF-8"?>
<beans xmlns="http://www.springframework.org/schema/beans"
       xmlns:xsi="http://www.w3.org/2001/XMLSchema-instance"
       xsi:schemaLocation="
http://www.springframework.org/schema/beans http://www.springframework.org/schema/beans/spring-beans.xsd">

    <bean id="service1" class="example.Service1" scope="prototype"/>
    <bean id="service2" class="example.Service2"/>

    <bean id="dependentService" class="example.DependentService">
        <lookup-method name="createService1" bean="service1"/>
        <property name="service2" ref="service2"/>
    </bean>

</beans>
当然,我们也可以使用注解方式来实现上面功能和配置:
@Service
@Scope(value = "prototype")
class Service1 {
    void doSmth() {
        System.out.println("Service1");
    }
}

@Service
abstract class DependentService {
    private Service2 service2;

    @Autowired
    public void setService2(Service2 service2) {
        this.service2 = service2;
    }

    void doSmth() {
        createService1().doSmth();
        service2.doSmth();
    }

    @Lookup
    protected abstract Service1 createService1();
}
综上所述,依赖查找不同于其他注入类型,它适用于较小范围的注入依赖,即生命周期更短的依赖注入。